Page 190 of 246

CONNECT Nav+
189
– emergency call in progress warning
– credit available in case of a prepaid
SIM card (if the Network Provider
makes these data available).
During an incoming or outgoing call,
the lower part of the display provides
the following information:
– interlocutor’s name (if present in
the telephone directory) or telephone
number (for calls received, if available)
– interlocutor telephone number (if
made available by the network
provider)
– time from beginning of the call (mm
: ss - minutes and seconds).
Information provided in the display
lower part are replaced, at the end of
the call, by the telephone number di-
alling sector.ACCEPTING CALLS
Any incoming call while a conversa-
tion is in progress is shown on the dis-
play by the name (if present in the di-
rectory) and by the number (if avail-
able) of the caller and by the options
“Accept” or “Refuse”. To choose and
confirm the options use the knob 22-
fig. 1.
If the new call is accepted, the pre-
vious one will wait till the end of the
new call or till the interlocutor decides
to hang up.
If the incoming call is refused, the dis-
played message disappears and the
first telephone call continues with no
disturbance.
Incoming calls are signalled, regard-
less of the active mode of the inte-
grated system (radio, CD player etc.),
by a screen that shows the caller’s
name (if present in the directory) and
number (if available) and the prompt
to accept or refuse the call.
To accept the call, briefly press key
ò13-fig. 1, to refuse the call keep the
key pressed longer.
To interrupt a telephone call, press
key
ò13-fig. 1at length.TELEPHONE CALL
To make a telephone call, select the
“telephone” function using key 19-
fig. 1, then press key
ò13-fig. 1af-
ter dialling the telephone number us-
ing the keypad located on the control
panel left-hand side or after retriev-
ing it using one of the dedicated menu
functions (directory, frequent num-
bers, last received or called numbers).
When calling, the display left-hand
side shows information associated
with the call in progress, the vehicle
radio is switched off, connection is
made and, if the called person an-
swers, the call duration counter is
started.
To interrupt the forwarding of a
call, keep key
ò13-fig. 1pressed.
Page 220 of 246

CONNECT Nav+
219
GENERAL
INFORMATION
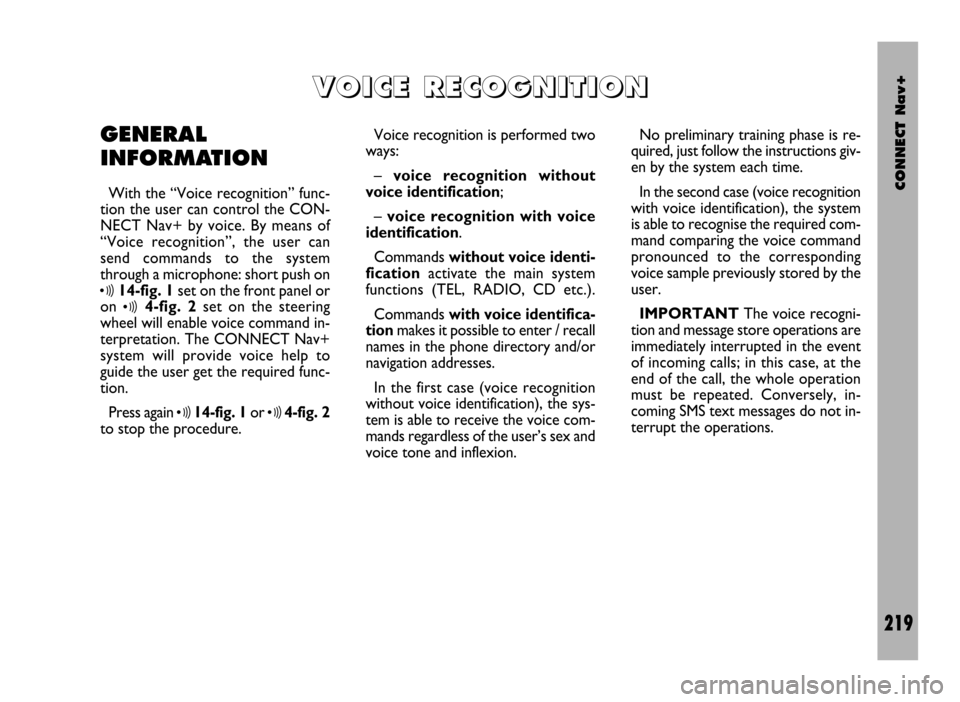
With the “Voice recognition” func-
tion the user can control the CON-
NECT Nav+ by voice. By means of
“Voice recognition”, the user can
send commands to the system
through a microphone: short push on
ô14-fig. 1set on the front panel or
on
ô4-fig. 2set on the steering
wheel will enable voice command in-
terpretation. The CONNECT Nav+
system will provide voice help to
guide the user get the required func-
tion.
Press again
ô14-fig. 1or ô4-fig. 2
to stop the procedure.Voice recognition is performed two
ways:
– voice recognition without
voice identification;
– voice recognition with voice
identification.
Commands without voice identi-
ficationactivate the main system
functions (TEL, RADIO, CD etc.).
Commands with voice identifica-
tion makes it possible to enter / recall
names in the phone directory and/or
navigation addresses.
In the first case (voice recognition
without voice identification), the sys-
tem is able to receive the voice com-
mands regardless of the user’s sex and
voice tone and inflexion.No preliminary training phase is re-
quired, just follow the instructions giv-
en by the system each time.
In the second case (voice recognition
with voice identification), the system
is able to recognise the required com-
mand comparing the voice command
pronounced to the corresponding
voice sample previously stored by the
user.
IMPORTANTThe voice recogni-
tion and message store operations are
immediately interrupted in the event
of incoming calls; in this case, at the
end of the call, the whole operation
must be repeated. Conversely, in-
coming SMS text messages do not in-
terrupt the operations.
V V
O O
I I
C C
E E
R R
E E
C C
O O
G G
N N
I I
T T
I I
O O
N N
Page 221 of 246

CONNECT Nav+
220
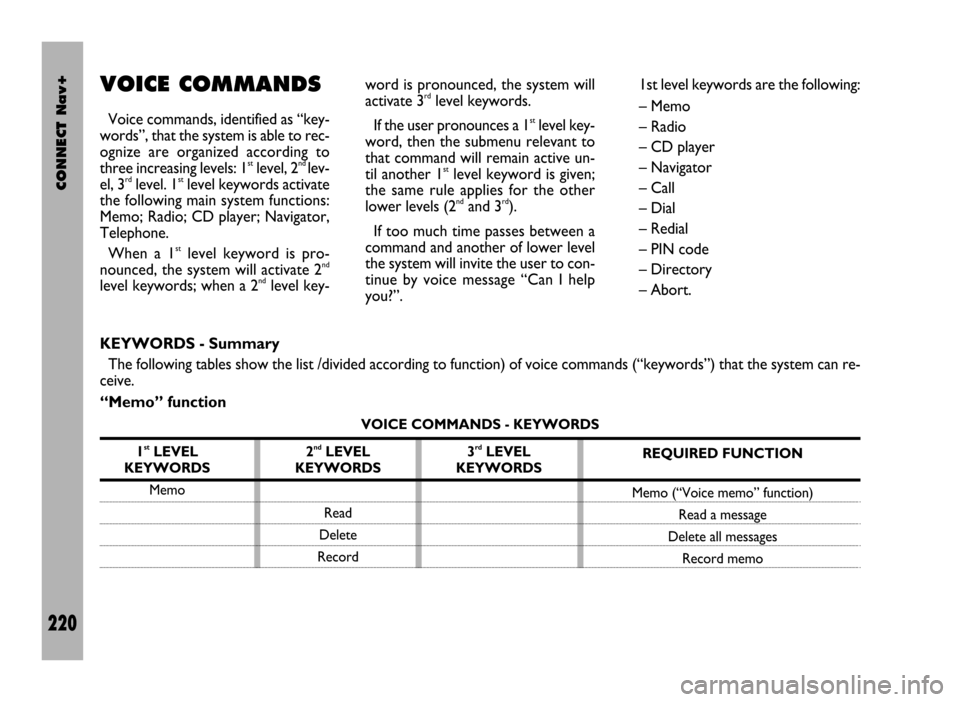
VOICE COMMANDS
Voice commands, identified as “key-
words”, that the system is able to rec-
ognize are organized according to
three increasing levels: 1
stlevel, 2nd lev-
el, 3rdlevel. 1stlevel keywords activate
the following main system functions:
Memo; Radio; CD player; Navigator,
Telephone.
When a 1
stlevel keyword is pro-
nounced, the system will activate 2nd
level keywords; when a 2ndlevel key-word is pronounced, the system will
activate 3
rdlevel keywords.
If the user pronounces a 1
stlevel key-
word, then the submenu relevant to
that command will remain active un-
til another 1
stlevel keyword is given;
the same rule applies for the other
lower levels (2
ndand 3rd).
If too much time passes between a
command and another of lower level
the system will invite the user to con-
tinue by voice message “Can I help
you?”.1st level keywords are the following:
– Memo
– Radio
– CD player
– Navigator
– Call
– Dial
– Redial
– PIN code
– Directory
– Abort.
KEYWORDS - Summary
The following tables show the list /divided according to function) of voice commands (“keywords”) that the system can re-
ceive.
“Memo” function
VOICE COMMANDS - KEYWORDS
1
stLEVEL
KEYWORDS
Memo
REQUIRED FUNCTION
Memo (“Voice memo” function)
Read a message
Delete all messages
Record memo 2ndLEVEL
KEYWORDS
Read
Delete
Record3rdLEVEL
KEYWORDS
Page 222 of 246
CONNECT Nav+
221
“Radio” function
VOICE COMMANDS - KEYWORDS
1
stLEVEL
KEYWORDS
Radio
Once a command has been pronounced and executed, second level “keywords” and all first level keywords will remain available for further
commands. (*) After this command the system will ask: “The frequency, please”.
2ndLEVEL
KEYWORDS
Next
Previous
FM
MW
LW
Memory
Autostore
Tune
Frequency (*)
3rdLEVEL
KEYWORDS
(1 …. 3)
(1 …. 6)
(0 …. 9)
“Point”
Cancel
Delete
Abort
Repeat
Send
REQUIRED FUNCTION
Tuner
Tune next radio station
Tune previous radio station
Select FM band
Select MW band
Select LW band
Select one station in the band
If FM station is tuned: FMAST band
is selected. If LW or MW station
is tuned: AMAST band is selected.
Valid only if selected band is FMAST
or AMAST: autostore function activation.
Tuning on special frequency
Page 227 of 246
CONNECT Nav+
226
VOICE COMMAND
EXAMPLES
Tuning a radio frequency
Pronouncing 1st level keyword “Ra-
dio” and then the 2nd level one “Fre-
quency”, opens a dialogue enabling the
following keywords:
– [0..9]
– Point
– Cancel
– Delete
– Abort
– Repeat
– Send.First example:
User: Radio - Frequency
CONNECT: The frequency,
please
User: 1-0-5-Point-5
CONNECT: 1-0-5-Point-5
User: Send
CONNECT: The frequency
is being tuned.
Second example:
User: Radio - Frequency
CONNECT: The frequency,
please
User: 9-6
CONNECT: 9-6
User: Point-5-0
CONNECT: Point-5-0
User: Send
CONNECT: The frequency
is being tuned.Third example:
User: Radio - Frequency
CONNECT: The frequency,
please
User: 1-0-6
CONNECT: 1-0-6
User: Point-7
CONNECT: Point-7
User: Delete
CONNECT: 1-0-6
User: Point-6
CONNECT: Point-6
User: Repeat
CONNECT: 1-0-6-Point-6
User: Send
CONNECT: The frequency
is being tuned.
Page 241 of 246

CONNECT Nav+
240
AUDIO mode
When the telecamera image is dis-
played, the AUDIO mode is enabled:
– “AUDIO” key 18-fig. 1disabled;
– the active source (RADIO, CD)
stays on;
– audio volume setting, knob 16-fig.
1enabled;
– “SRC” key 15-fig. 1enabled;
– station tuning disabled.
TEL mode
When the telecamera image is dis-
played, the TEL mode is enabled:
– “TEL” key 19-fig. 1disabled;
– key ò13-fig. 1enabled.INCOMING CALL WITH DISPLAYED
TELECAMERA IMAGE
When the above condition occurs,
the following takes place:
– automatic display switching to TEL
mode display;
– incoming call number display (if
available);
– briefly press the òkey 13-fig. 1to
accept the incoming call or press it at
length to refuse the call. Just after
pressing the key (with reverse en-
gaged) the display returns to display
the telecamera image and if the in-
coming call is accepted the system will
enable the communication. If during
this phase there is another incoming
call, the display will show the TEL
mode again.
FORWARDING CALL WITH DISPLAYED
TELECAMERA IMAGE
Briefly press the òkey 13-fig. 1to
obtain the following:
– disable the telecamera image;
– display the last dialled number (see
“Cellular telephone” chapter); press
again the òkey 13-fig. 1to forward
a call within 10 seconds. Pressing
“ESC” 23-fig. 1will delete the last di-
alled number and activate the window
to be used for dialling (through the key-
pad) the required telephone number;
pressing the òkey 13-fig. 1again will
forward the call;
– press ESC 23-fig. 1at length to
return to the telecamera image (with
reverse gear engaged).