2002 DODGE RAM drain bolt
[x] Cancel search: drain boltPage 1264 of 2255
(8) Install and tighten the gear housing bolts to 24
N´m (18 ft. lbs.) torque.
(9) Install and tighten the oil pan bolts to 24 N´m
(18 ft. lbs.) torque.
(10) Install the camshaft (Refer to 9 - ENGINE/
ENGINE BLOCK/CAMSHAFT & BEARINGS (IN
BLOCK) - INSTALLATION). Align the crankshaft,
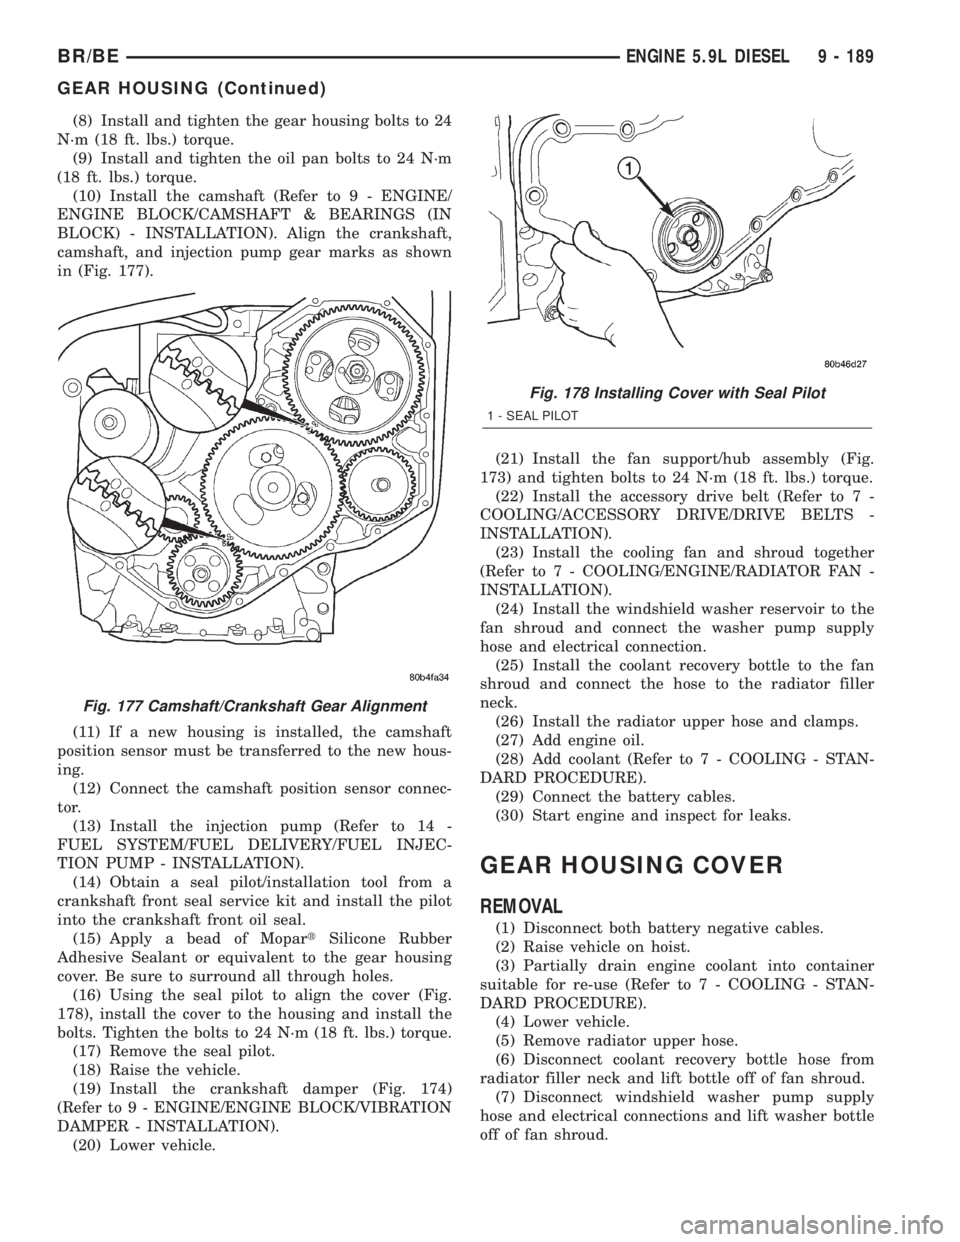
camshaft, and injection pump gear marks as shown
in (Fig. 177).
(11) If a new housing is installed, the camshaft
position sensor must be transferred to the new hous-
ing.
(12) Connect the camshaft position sensor connec-
tor.
(13) Install the injection pump (Refer to 14 -
FUEL SYSTEM/FUEL DELIVERY/FUEL INJEC-
TION PUMP - INSTALLATION).
(14) Obtain a seal pilot/installation tool from a
crankshaft front seal service kit and install the pilot
into the crankshaft front oil seal.
(15) Apply a bead of MopartSilicone Rubber
Adhesive Sealant or equivalent to the gear housing
cover. Be sure to surround all through holes.
(16) Using the seal pilot to align the cover (Fig.
178), install the cover to the housing and install the
bolts. Tighten the bolts to 24 N´m (18 ft. lbs.) torque.
(17) Remove the seal pilot.
(18) Raise the vehicle.
(19) Install the crankshaft damper (Fig. 174)
(Refer to 9 - ENGINE/ENGINE BLOCK/VIBRATION
DAMPER - INSTALLATION).
(20) Lower vehicle.(21) Install the fan support/hub assembly (Fig.
173) and tighten bolts to 24 N´m (18 ft. lbs.) torque.
(22) Install the accessory drive belt (Refer to 7 -
COOLING/ACCESSORY DRIVE/DRIVE BELTS -
INSTALLATION).
(23) Install the cooling fan and shroud together
(Refer to 7 - COOLING/ENGINE/RADIATOR FAN -
INSTALLATION).
(24) Install the windshield washer reservoir to the
fan shroud and connect the washer pump supply
hose and electrical connection.
(25) Install the coolant recovery bottle to the fan
shroud and connect the hose to the radiator filler
neck.
(26) Install the radiator upper hose and clamps.
(27) Add engine oil.
(28) Add coolant (Refer to 7 - COOLING - STAN-
DARD PROCEDURE).
(29) Connect the battery cables.
(30) Start engine and inspect for leaks.
GEAR HOUSING COVER
REMOVAL
(1) Disconnect both battery negative cables.
(2) Raise vehicle on hoist.
(3) Partially drain engine coolant into container
suitable for re-use (Refer to 7 - COOLING - STAN-
DARD PROCEDURE).
(4) Lower vehicle.
(5) Remove radiator upper hose.
(6) Disconnect coolant recovery bottle hose from
radiator filler neck and lift bottle off of fan shroud.
(7) Disconnect windshield washer pump supply
hose and electrical connections and lift washer bottle
off of fan shroud.
Fig. 177 Camshaft/Crankshaft Gear Alignment
Fig. 178 Installing Cover with Seal Pilot
1 - SEAL PILOT
BR/BEENGINE 5.9L DIESEL 9 - 189
GEAR HOUSING (Continued)
Page 1272 of 2255
SPECIFICATIONS
TORQUE
DESCRIPTION N´m Ft. In.
Lbs. Lbs.
Adjusting StrapÐBolt 23 Ð 200
Air Heater Power SupplyÐ
Nuts14 Ð 124
Air Inlet HousingÐBolts 24 18 Ð
Cab Heater Supply/Return
LineÐNuts24 18 Ð
Exhaust ClampÐNuts 48 35 Ð
Exhaust Manifold to Cylinder
HeadÐBolts
(Diesel Engine) 43 32 Ð
Exhaust Manifold to Cylinder
HeadÐBolts
(5.9L) 31 23 Ð
Exhaust Manifold to Cylinder
HeadÐBolts
(8.0L) 22 Ð 195
Exhaust Pipe to ManifoldÐ
Bolts31 23 Ð
Generator MountingÐBolts 41 30 Ð
Charge Air Cooler
MountingÐBolts2Ð17
Charge Air Cooler DuctÐ
Nuts8Ð72
Heat ShieldÐNuts and Bolts 11 Ð 100
Turbocharger MountingÐ
Nuts32 24 Ð
Turbocharger Oil Drain
TubeÐBolts24 18 Ð
Turbocharger Oil Supply
LineÐFitting15 Ð 133
Turbocharger V-Band
ClampÐNut9Ð75
CATALYTIC CONVERTER -
3.9L/5.2L/5.9L
DESCRIPTION
The stainless steel catalytic converter is located
under the vehicle, integral to the exhaust pipe(s).
OPERATION
The catalytic converter captures and burns any
unburned fuel mixture exiting the combustion cham-
bers during the exhaust stroke of the engine. This
process aids in reducing emissions output.
REMOVAL
(1) Raise and support vehicle.
(2) Saturate the bolts and nuts with heat valve
lubricant. Allow 5 minutes for penetration.
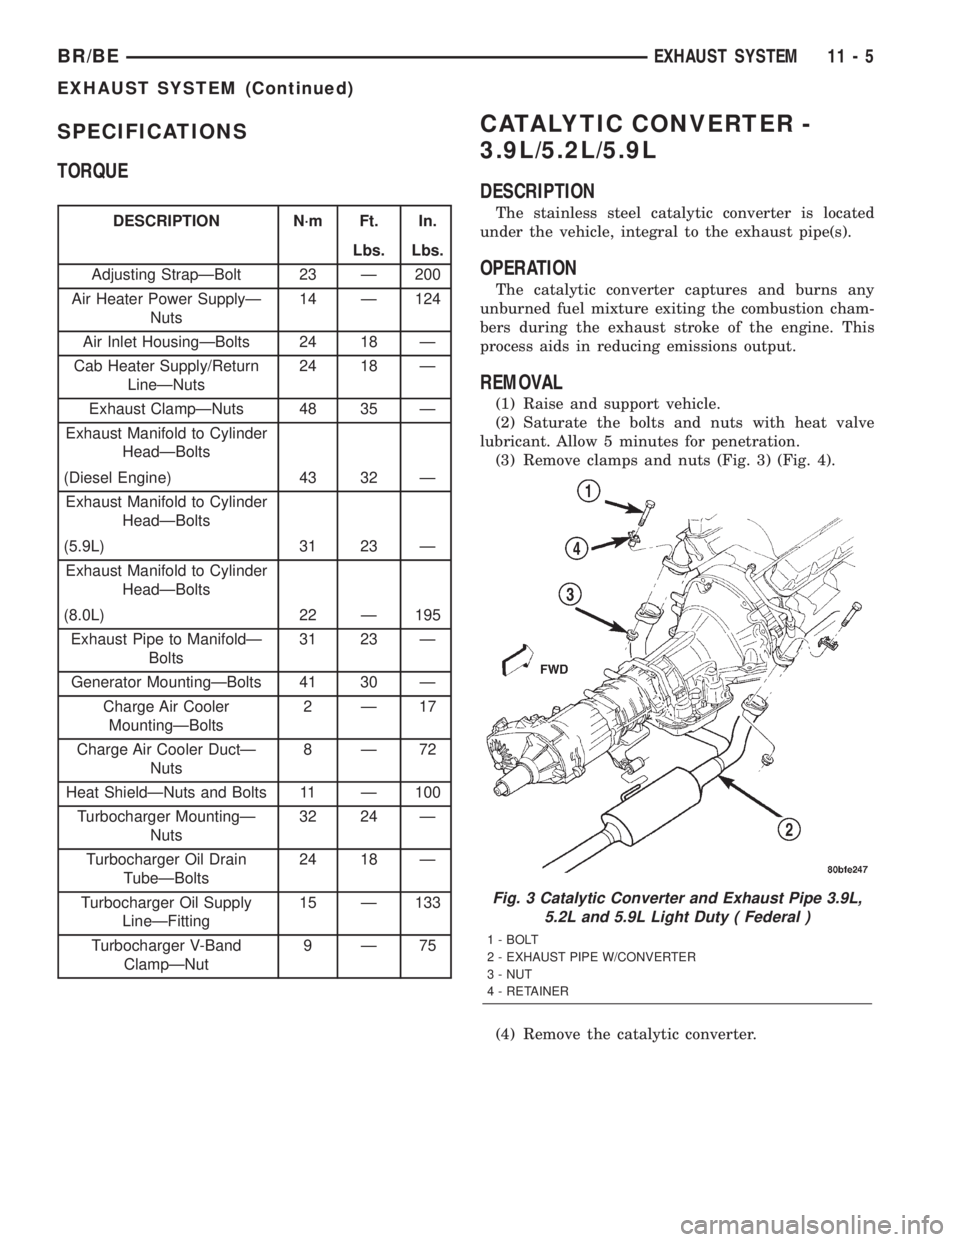
(3) Remove clamps and nuts (Fig. 3) (Fig. 4).
(4) Remove the catalytic converter.
Fig. 3 Catalytic Converter and Exhaust Pipe 3.9L,
5.2L and 5.9L Light Duty ( Federal )
1 - BOLT
2 - EXHAUST PIPE W/CONVERTER
3 - NUT
4 - RETAINER
BR/BEEXHAUST SYSTEM 11 - 5
EXHAUST SYSTEM (Continued)
Page 1284 of 2255
(b) Move the impeller shaft fore and aft and
record the measurement. Allowable end play is
0.038 mm (0.0015 in.) MIN. and 0.089 mm (0.0035
in.) MAX. If the recorded measurement falls out-
side these parameters, replace the turbocharger
assembly.
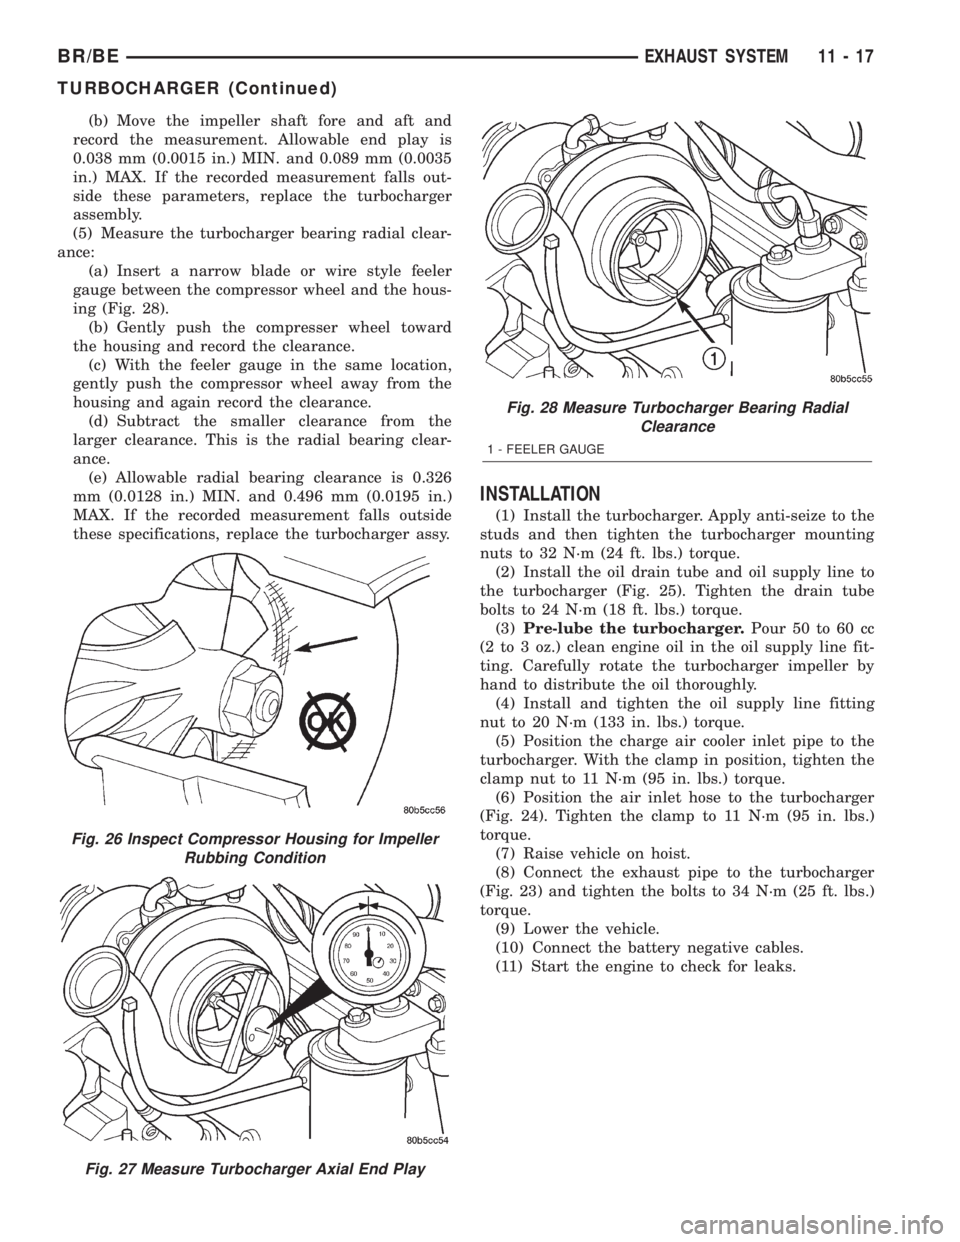
(5) Measure the turbocharger bearing radial clear-
ance:
(a) Insert a narrow blade or wire style feeler
gauge between the compressor wheel and the hous-
ing (Fig. 28).
(b) Gently push the compresser wheel toward
the housing and record the clearance.
(c) With the feeler gauge in the same location,
gently push the compressor wheel away from the
housing and again record the clearance.
(d) Subtract the smaller clearance from the
larger clearance. This is the radial bearing clear-
ance.
(e) Allowable radial bearing clearance is 0.326
mm (0.0128 in.) MIN. and 0.496 mm (0.0195 in.)
MAX. If the recorded measurement falls outside
these specifications, replace the turbocharger assy.
INSTALLATION
(1) Install the turbocharger. Apply anti-seize to the
studs and then tighten the turbocharger mounting
nuts to 32 N´m (24 ft. lbs.) torque.
(2) Install the oil drain tube and oil supply line to
the turbocharger (Fig. 25). Tighten the drain tube
bolts to 24 N´m (18 ft. lbs.) torque.
(3)Pre-lube the turbocharger.Pour 50 to 60 cc
(2 to 3 oz.) clean engine oil in the oil supply line fit-
ting. Carefully rotate the turbocharger impeller by
hand to distribute the oil thoroughly.
(4) Install and tighten the oil supply line fitting
nut to 20 N´m (133 in. lbs.) torque.
(5) Position the charge air cooler inlet pipe to the
turbocharger. With the clamp in position, tighten the
clamp nut to 11 N´m (95 in. lbs.) torque.
(6) Position the air inlet hose to the turbocharger
(Fig. 24). Tighten the clamp to 11 N´m (95 in. lbs.)
torque.
(7) Raise vehicle on hoist.
(8) Connect the exhaust pipe to the turbocharger
(Fig. 23) and tighten the bolts to 34 N´m (25 ft. lbs.)
torque.
(9) Lower the vehicle.
(10) Connect the battery negative cables.
(11) Start the engine to check for leaks.
Fig. 26 Inspect Compressor Housing for Impeller
Rubbing Condition
Fig. 27 Measure Turbocharger Axial End Play
Fig. 28 Measure Turbocharger Bearing Radial
Clearance
1 - FEELER GAUGE
BR/BEEXHAUST SYSTEM 11 - 17
TURBOCHARGER (Continued)
Page 1317 of 2255
(5) Push therightfuel rail down until fuel injec-
tors have bottomed on injector shoulder. Push the
leftfuel rail down until fuel injectors have bottomed
on injector shoulder.
(6) Install fuel rail mounting bolts.
(7) Connect electrical connector to intake manifold
air temperature sensor.
(8) Connect electrical connectors at all fuel injec-
tors. To install connector, refer to (Fig. 26). Push con-
nector onto injector (1) and then push and lock red
colored slider (2). Verify connector is locked to injec-
tor by lightly tugging on connector.
(9) Install the A/C support bracket (if equipped).
(10) Install throttle body to intake manifold. Refer
to Throttle Body installation in this section of the
group.
(11) Install fuel tube (line) at side of fuel rail.
Refer to Quick-Connect Fittings for procedures.
(12) Install air cleaner.
(13) Connect battery cable to battery.
(14) Start engine and check for leaks.
INSTALLATION - 8.0L
(1) Apply a small amount of engine oil to each fuel
injector o-ring. This will help in fuel rail installation.
(2) Install injector(s) and injector clip(s) to fuel
rail.
NOTE: The fuel injector electrical connectors on all
10 injectors should be facing to the right (passen-
ger) side of the vehicle (Fig. 31).
(3) Position the fuel rail/fuel injector assembly to
the injector openings on the intake manifold.
(4) Guide each injector into the intake manifold.
Be careful not to tear the injector o-ring.
(5) Push therightfuel rail down until fuel injec-
tors have bottomed on injector shoulder. Push the
leftfuel rail down until fuel injectors have bottomed
on injector shoulder.
(6) Install the six fuel rail mounting bolts into the
lower half of intake manifold. Tighten bolts to 15
N´m (136 in. lbs.) torque.
(7) Connect electrical connectors at all fuel injec-
tors. To install connector, refer to (Fig. 30). Push con-
nector onto injector (1) and then push and lock red
colored slider (2). Verify connector is locked to injec-
tor by lightly tugging on connector. The injector wir-
ing harness is numerically tagged.
(8) Install upper half of intake manifold. Refer to
Engines for procedures.
(9) Connect main fuel line at fuel rail. Refer to
Quick-Connect Fittings for procedures.
(10) Install ignition coil pack and bracket assem-
bly at intake manifold and right engine valve cover
(four bolts).(11) Install throttle body to intake manifold. Refer
to Throttle Body removal in this group.
(12) Install throttle body linkage to throttle body.
(13) Install air cleaner tube and housing.
(14) Install negative battery cable at battery.
(15) Start engine and check for leaks.
FUEL TANK
DESCRIPTION
The fuel tank is constructed of a plastic material.
Its main functions are for fuel storage and for place-
ment of the fuel pump module.
OPERATION
All models pass a full 360 degree rollover test
without fuel leakage. To accomplish this, fuel and
vapor flow controls are required for all fuel tank con-
nections.
A fuel tank check valve(s) is mounted into the top
of the fuel tank (or pump module). Refer to Emission
Control System for fuel tank check valve information.
An evaporation control system is connected to the
rollover valve(s) to reduce emissions of fuel vapors
into the atmosphere. When fuel evaporates from the
fuel tank, vapors pass through vent hoses or tubes to
a charcoal canister where they are temporarily held.
When the engine is running, the vapors are drawn
into the intake manifold. Certain models are also
equipped with a self-diagnosing system using a Leak
Detection Pump (LDP). Refer to Emission Control
System for additional information.
REMOVAL
WARNING: GASOLINE POWERED ENGINES: THE
FUEL SYSTEM IS UNDER A CONSTANT PRESSURE
EVEN WITH THE ENGINE OFF. BEFORE SERVICING
THE FUEL TANK, FUEL SYSTEM PRESSURE MUST
BE RELEASED. REFER TO THE FUEL SYSTEM
PRESSURE RELEASE PROCEDURE BEFORE SER-
VICING THE FUEL TANK.
Two different procedures may be used to drain fuel
tank (lowering tank or using DRB scan tool). When
equipped with a diesel engine, the DRB scan tool
cannot be used (no electric fuel pump).
The quickest draining procedure involves lowering
the fuel tank.
Gasoline Powered Engines:As an alternative
procedure, the electric fuel pump may be activated
allowing tank to be drained at fuel rail connection.
Refer to DRB scan tool for fuel pump activation pro-
cedures. Before disconnecting fuel line at fuel rail,
release fuel pressure. Refer to the Fuel System Pres-
sure Release Procedure in this group for procedures.
14 - 18 FUEL DELIVERY - GASOLINEBR/BE
FUEL RAIL (Continued)
Page 1318 of 2255
Attach end of special test hose tool number 6541,
6539, 6631 or 6923 at fuel rail disconnection (tool
number will depend on model and/or engine applica-
tion). Position opposite end of this hose tool to an
approved gasoline draining station. Activate fuel
pump and drain tank until empty.
If electric fuel pump is not operating, tank must be
lowered for fuel draining. Refer to following proce-
dures.
(1) Remove fuel tank filler tube cap.
(2) Perform Fuel System Pressure Release proce-
dure as described in this group.
(3) Gasoline Engines: Disconnect negative battery
cable at battery. Diesel Engines: Disconnect both neg-
ative battery cables at both batteries.
(4) Raise vehicle on hoist.
(5) Certain models are equipped with a separate
grounding wire (strap) connecting the fuel fill tube
assembly to the body. Disconnect wire by removing
screw.
(6) Open fuel fill door and remove screws mount-
ing fuel filler tube assembly to body. Do not discon-
nect rubber fuel fill or vent hoses from tank at this
time.
(7) Place a transmission jack under center of fuel
tank. Apply a slight amount of pressure to fuel tank
with transmission jack.
(8) Remove fuel tank mounting strap nuts from
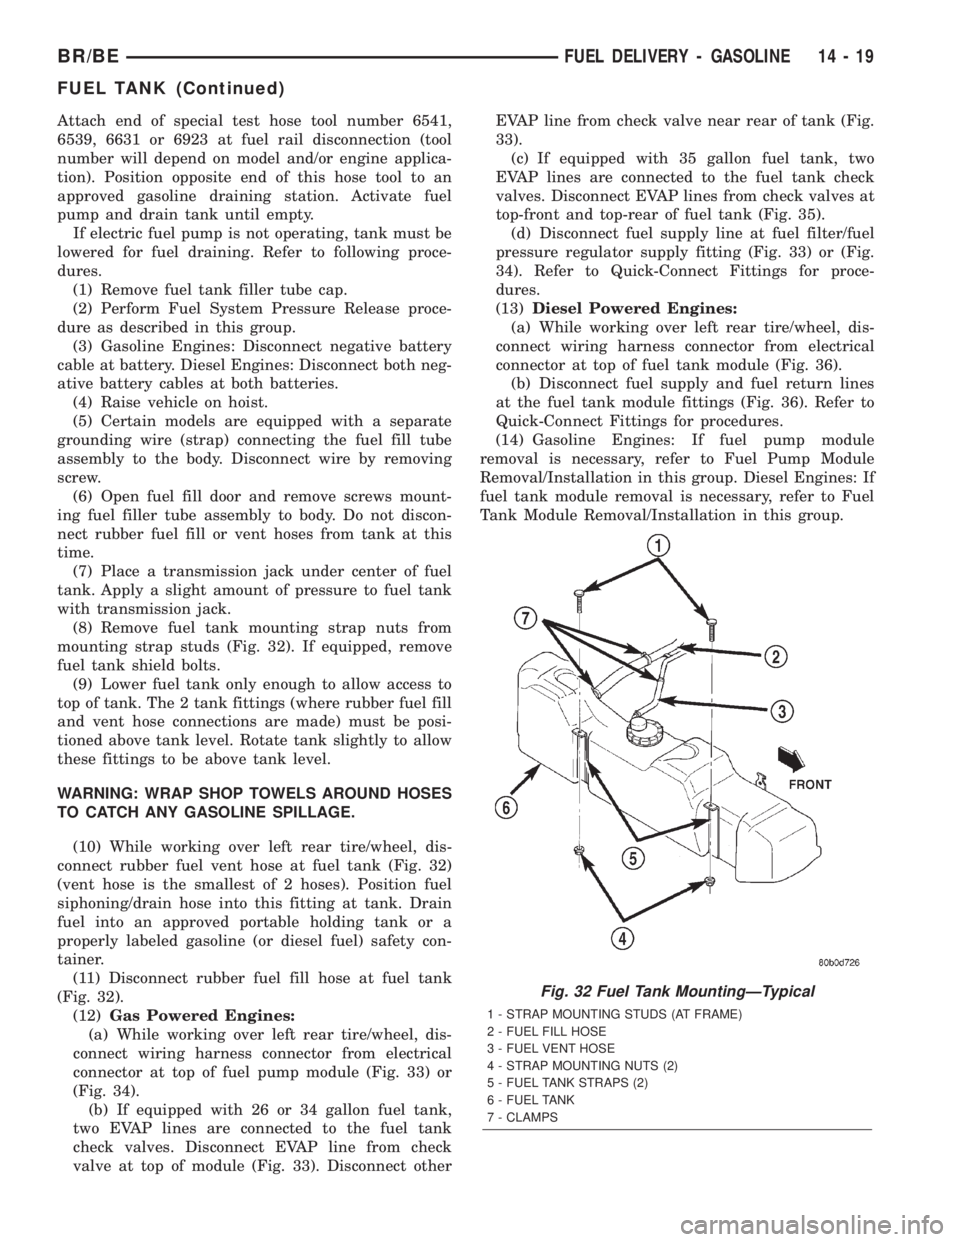
mounting strap studs (Fig. 32). If equipped, remove
fuel tank shield bolts.
(9) Lower fuel tank only enough to allow access to
top of tank. The 2 tank fittings (where rubber fuel fill
and vent hose connections are made) must be posi-
tioned above tank level. Rotate tank slightly to allow
these fittings to be above tank level.
WARNING: WRAP SHOP TOWELS AROUND HOSES
TO CATCH ANY GASOLINE SPILLAGE.
(10) While working over left rear tire/wheel, dis-
connect rubber fuel vent hose at fuel tank (Fig. 32)
(vent hose is the smallest of 2 hoses). Position fuel
siphoning/drain hose into this fitting at tank. Drain
fuel into an approved portable holding tank or a
properly labeled gasoline (or diesel fuel) safety con-
tainer.
(11) Disconnect rubber fuel fill hose at fuel tank
(Fig. 32).
(12)Gas Powered Engines:
(a) While working over left rear tire/wheel, dis-
connect wiring harness connector from electrical
connector at top of fuel pump module (Fig. 33) or
(Fig. 34).
(b) If equipped with 26 or 34 gallon fuel tank,
two EVAP lines are connected to the fuel tank
check valves. Disconnect EVAP line from check
valve at top of module (Fig. 33). Disconnect otherEVAP line from check valve near rear of tank (Fig.
33).
(c) If equipped with 35 gallon fuel tank, two
EVAP lines are connected to the fuel tank check
valves. Disconnect EVAP lines from check valves at
top-front and top-rear of fuel tank (Fig. 35).
(d) Disconnect fuel supply line at fuel filter/fuel
pressure regulator supply fitting (Fig. 33) or (Fig.
34). Refer to Quick-Connect Fittings for proce-
dures.
(13)Diesel Powered Engines:
(a) While working over left rear tire/wheel, dis-
connect wiring harness connector from electrical
connector at top of fuel tank module (Fig. 36).
(b) Disconnect fuel supply and fuel return lines
at the fuel tank module fittings (Fig. 36). Refer to
Quick-Connect Fittings for procedures.
(14) Gasoline Engines: If fuel pump module
removal is necessary, refer to Fuel Pump Module
Removal/Installation in this group. Diesel Engines: If
fuel tank module removal is necessary, refer to Fuel
Tank Module Removal/Installation in this group.
Fig. 32 Fuel Tank MountingÐTypical
1 - STRAP MOUNTING STUDS (AT FRAME)
2 - FUEL FILL HOSE
3 - FUEL VENT HOSE
4 - STRAP MOUNTING NUTS (2)
5 - FUEL TANK STRAPS (2)
6 - FUEL TANK
7 - CLAMPS
BR/BEFUEL DELIVERY - GASOLINE 14 - 19
FUEL TANK (Continued)
Page 1356 of 2255
DIAGNOSIS AND TESTING
DIAGNOSIS AND TESTING - FUEL SYSTEM AIR
LEAK VACUUM TEST
The proceeding test will determine if a fuel system
air leak exists at the engine. Air leaks will cause
hard starting and/or poor performance.
A hand-operated vacuum pump/gauge equipped
with a remote or built-on fluid container will be used.
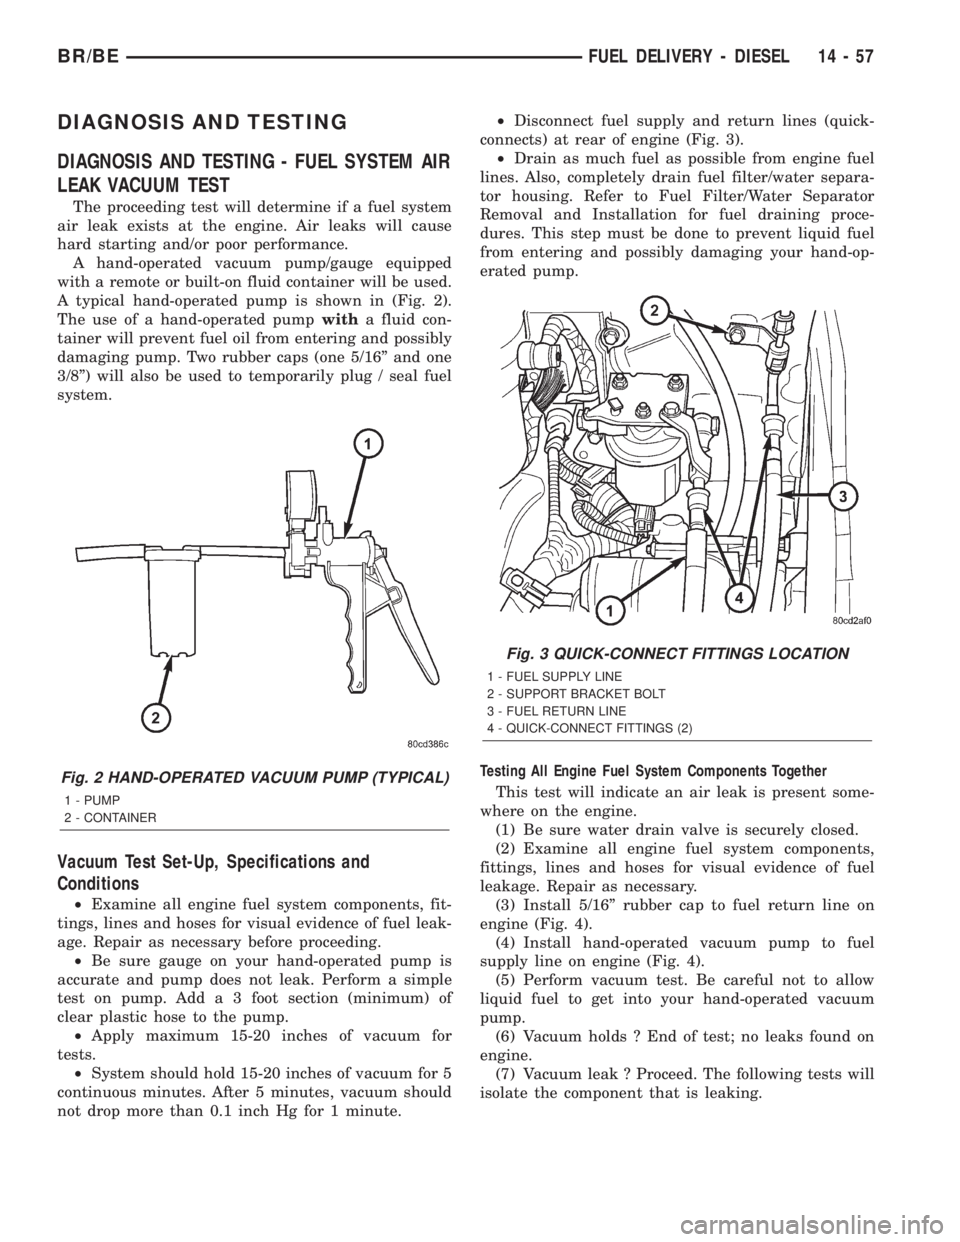
A typical hand-operated pump is shown in (Fig. 2).
The use of a hand-operated pumpwitha fluid con-
tainer will prevent fuel oil from entering and possibly
damaging pump. Two rubber caps (one 5/16º and one
3/8º) will also be used to temporarily plug / seal fuel
system.
Vacuum Test Set-Up, Specifications and
Conditions
²Examine all engine fuel system components, fit-
tings, lines and hoses for visual evidence of fuel leak-
age. Repair as necessary before proceeding.
²Be sure gauge on your hand-operated pump is
accurate and pump does not leak. Perform a simple
test on pump. Add a 3 foot section (minimum) of
clear plastic hose to the pump.
²Apply maximum 15-20 inches of vacuum for
tests.
²System should hold 15-20 inches of vacuum for 5
continuous minutes. After 5 minutes, vacuum should
not drop more than 0.1 inch Hg for 1 minute.²Disconnect fuel supply and return lines (quick-
connects) at rear of engine (Fig. 3).
²Drain as much fuel as possible from engine fuel
lines. Also, completely drain fuel filter/water separa-
tor housing. Refer to Fuel Filter/Water Separator
Removal and Installation for fuel draining proce-
dures. This step must be done to prevent liquid fuel
from entering and possibly damaging your hand-op-
erated pump.
Testing All Engine Fuel System Components Together
This test will indicate an air leak is present some-
where on the engine.
(1) Be sure water drain valve is securely closed.
(2) Examine all engine fuel system components,
fittings, lines and hoses for visual evidence of fuel
leakage. Repair as necessary.
(3) Install 5/16º rubber cap to fuel return line on
engine (Fig. 4).
(4) Install hand-operated vacuum pump to fuel
supply line on engine (Fig. 4).
(5) Perform vacuum test. Be careful not to allow
liquid fuel to get into your hand-operated vacuum
pump.
(6) Vacuum holds ? End of test; no leaks found on
engine.
(7) Vacuum leak ? Proceed. The following tests will
isolate the component that is leaking.
Fig. 2 HAND-OPERATED VACUUM PUMP (TYPICAL)
1 - PUMP
2 - CONTAINER
Fig. 3 QUICK-CONNECT FITTINGS LOCATION
1 - FUEL SUPPLY LINE
2 - SUPPORT BRACKET BOLT
3 - FUEL RETURN LINE
4 - QUICK-CONNECT FITTINGS (2)
BR/BEFUEL DELIVERY - DIESEL 14 - 57
Page 1357 of 2255
Testing Fuel Transfer Pump
(1) Leave vacuum pump attached to fuel supply
line (Fig. 5).
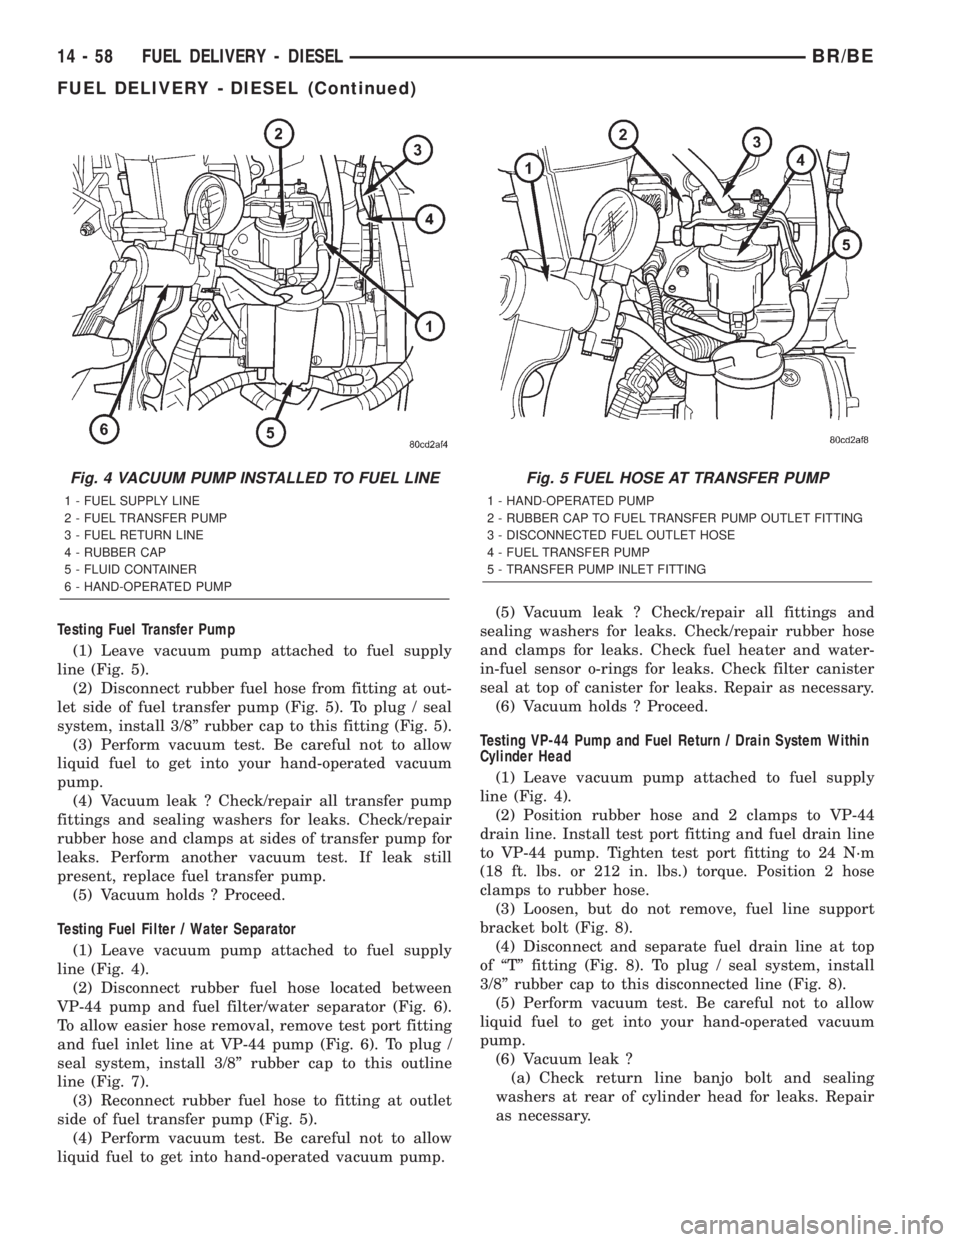
(2) Disconnect rubber fuel hose from fitting at out-
let side of fuel transfer pump (Fig. 5). To plug / seal
system, install 3/8º rubber cap to this fitting (Fig. 5).
(3) Perform vacuum test. Be careful not to allow
liquid fuel to get into your hand-operated vacuum
pump.
(4) Vacuum leak ? Check/repair all transfer pump
fittings and sealing washers for leaks. Check/repair
rubber hose and clamps at sides of transfer pump for
leaks. Perform another vacuum test. If leak still
present, replace fuel transfer pump.
(5) Vacuum holds ? Proceed.
Testing Fuel Filter / Water Separator
(1) Leave vacuum pump attached to fuel supply
line (Fig. 4).
(2) Disconnect rubber fuel hose located between
VP-44 pump and fuel filter/water separator (Fig. 6).
To allow easier hose removal, remove test port fitting
and fuel inlet line at VP-44 pump (Fig. 6). To plug /
seal system, install 3/8º rubber cap to this outline
line (Fig. 7).
(3) Reconnect rubber fuel hose to fitting at outlet
side of fuel transfer pump (Fig. 5).
(4) Perform vacuum test. Be careful not to allow
liquid fuel to get into hand-operated vacuum pump.(5) Vacuum leak ? Check/repair all fittings and
sealing washers for leaks. Check/repair rubber hose
and clamps for leaks. Check fuel heater and water-
in-fuel sensor o-rings for leaks. Check filter canister
seal at top of canister for leaks. Repair as necessary.
(6) Vacuum holds ? Proceed.
Testing VP-44 Pump and Fuel Return / Drain System Within
Cylinder Head
(1) Leave vacuum pump attached to fuel supply
line (Fig. 4).
(2) Position rubber hose and 2 clamps to VP-44
drain line. Install test port fitting and fuel drain line
to VP-44 pump. Tighten test port fitting to 24 N´m
(18 ft. lbs. or 212 in. lbs.) torque. Position 2 hose
clamps to rubber hose.
(3) Loosen, but do not remove, fuel line support
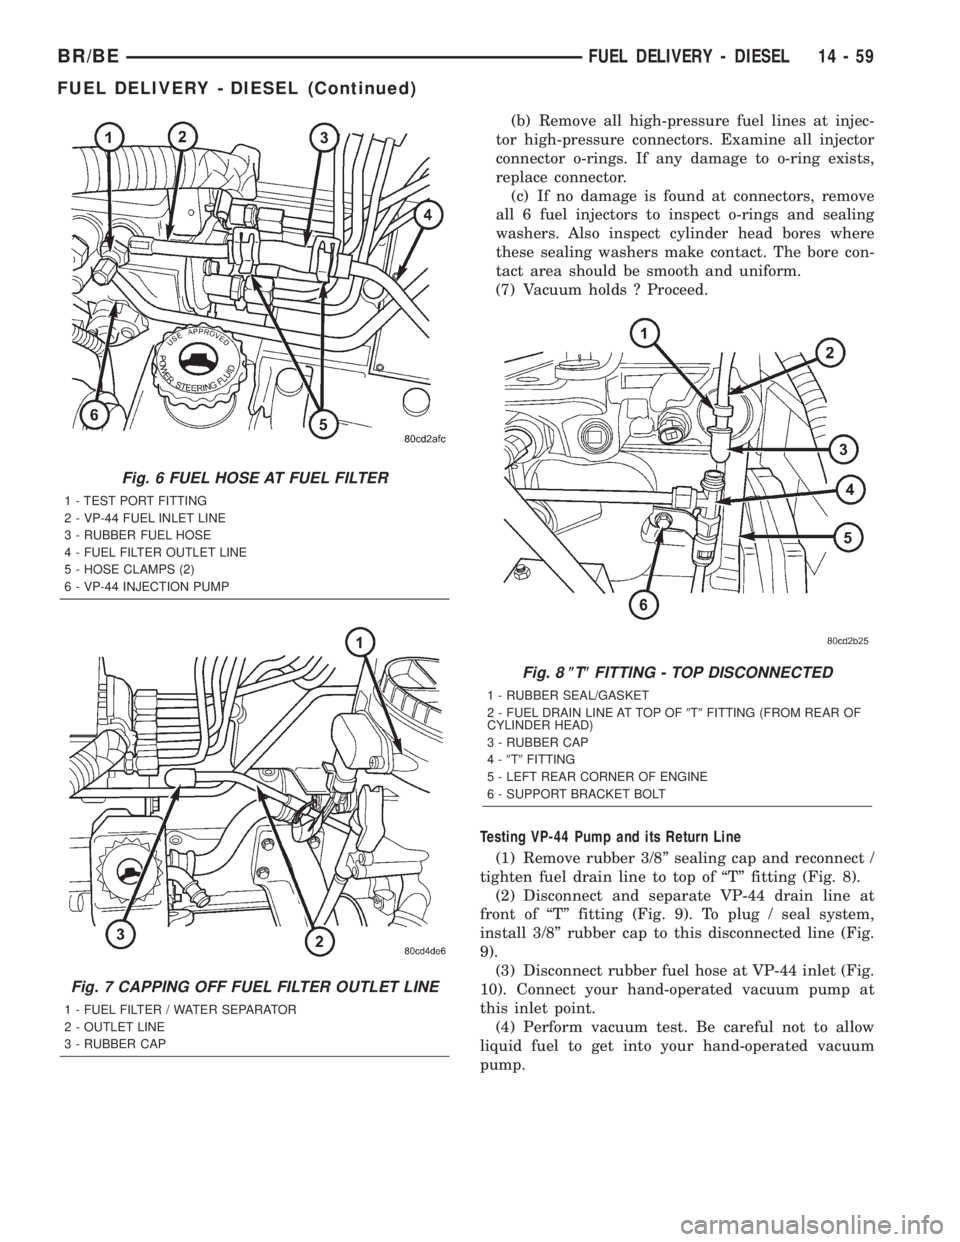
bracket bolt (Fig. 8).
(4) Disconnect and separate fuel drain line at top
of ªTº fitting (Fig. 8). To plug / seal system, install
3/8º rubber cap to this disconnected line (Fig. 8).
(5) Perform vacuum test. Be careful not to allow
liquid fuel to get into your hand-operated vacuum
pump.
(6) Vacuum leak ?
(a) Check return line banjo bolt and sealing
washers at rear of cylinder head for leaks. Repair
as necessary.
Fig. 4 VACUUM PUMP INSTALLED TO FUEL LINE
1 - FUEL SUPPLY LINE
2 - FUEL TRANSFER PUMP
3 - FUEL RETURN LINE
4 - RUBBER CAP
5 - FLUID CONTAINER
6 - HAND-OPERATED PUMP
Fig. 5 FUEL HOSE AT TRANSFER PUMP
1 - HAND-OPERATED PUMP
2 - RUBBER CAP TO FUEL TRANSFER PUMP OUTLET FITTING
3 - DISCONNECTED FUEL OUTLET HOSE
4 - FUEL TRANSFER PUMP
5 - TRANSFER PUMP INLET FITTING
14 - 58 FUEL DELIVERY - DIESELBR/BE
FUEL DELIVERY - DIESEL (Continued)
Page 1358 of 2255
(b) Remove all high-pressure fuel lines at injec-
tor high-pressure connectors. Examine all injector
connector o-rings. If any damage to o-ring exists,
replace connector.
(c) If no damage is found at connectors, remove
all 6 fuel injectors to inspect o-rings and sealing
washers. Also inspect cylinder head bores where
these sealing washers make contact. The bore con-
tact area should be smooth and uniform.
(7) Vacuum holds ? Proceed.
Testing VP-44 Pump and its Return Line
(1) Remove rubber 3/8º sealing cap and reconnect /
tighten fuel drain line to top of ªTº fitting (Fig. 8).
(2) Disconnect and separate VP-44 drain line at
front of ªTº fitting (Fig. 9). To plug / seal system,
install 3/8º rubber cap to this disconnected line (Fig.
9).
(3) Disconnect rubber fuel hose at VP-44 inlet (Fig.
10). Connect your hand-operated vacuum pump at
this inlet point.
(4) Perform vacuum test. Be careful not to allow
liquid fuel to get into your hand-operated vacuum
pump.
Fig. 6 FUEL HOSE AT FUEL FILTER
1 - TEST PORT FITTING
2 - VP-44 FUEL INLET LINE
3 - RUBBER FUEL HOSE
4 - FUEL FILTER OUTLET LINE
5 - HOSE CLAMPS (2)
6 - VP-44 INJECTION PUMP
Fig. 7 CAPPING OFF FUEL FILTER OUTLET LINE
1 - FUEL FILTER / WATER SEPARATOR
2 - OUTLET LINE
3 - RUBBER CAP
Fig. 8(T(FITTING - TOP DISCONNECTED
1 - RUBBER SEAL/GASKET
2 - FUEL DRAIN LINE AT TOP OF9T9FITTING (FROM REAR OF
CYLINDER HEAD)
3 - RUBBER CAP
4-9T9FITTING
5 - LEFT REAR CORNER OF ENGINE
6 - SUPPORT BRACKET BOLT
BR/BEFUEL DELIVERY - DIESEL 14 - 59
FUEL DELIVERY - DIESEL (Continued)