2002 DODGE RAM torque
[x] Cancel search: torquePage 150 of 2255
(8) Hold yoke with Yoke Holder 6719A and remove
the pinion shaft nut and washer.
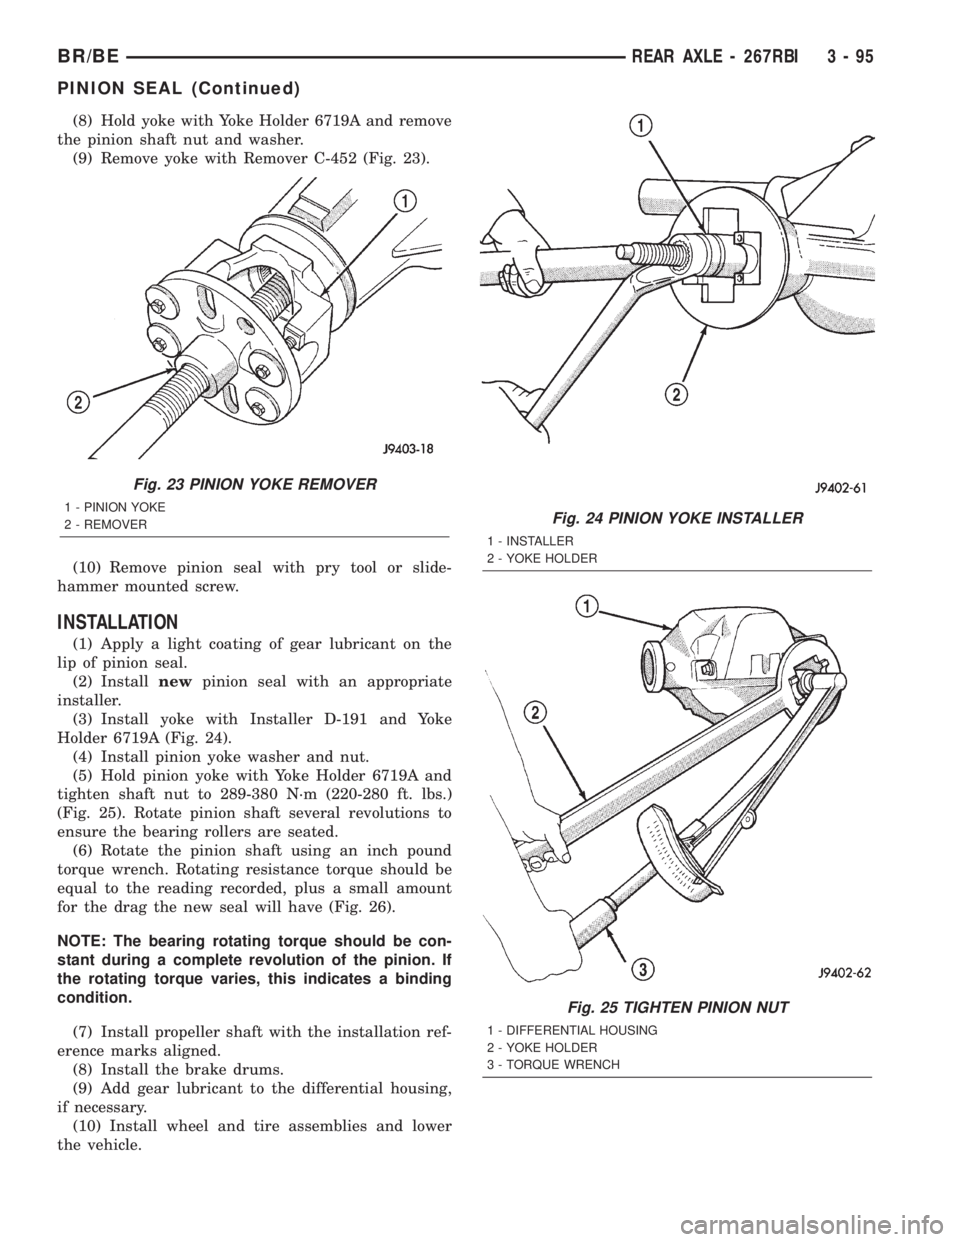
(9) Remove yoke with Remover C-452 (Fig. 23).
(10) Remove pinion seal with pry tool or slide-
hammer mounted screw.
INSTALLATION
(1) Apply a light coating of gear lubricant on the
lip of pinion seal.
(2) Installnewpinion seal with an appropriate
installer.
(3) Install yoke with Installer D-191 and Yoke
Holder 6719A (Fig. 24).
(4) Install pinion yoke washer and nut.
(5) Hold pinion yoke with Yoke Holder 6719A and
tighten shaft nut to 289-380 N´m (220-280 ft. lbs.)
(Fig. 25). Rotate pinion shaft several revolutions to
ensure the bearing rollers are seated.
(6) Rotate the pinion shaft using an inch pound
torque wrench. Rotating resistance torque should be
equal to the reading recorded, plus a small amount
for the drag the new seal will have (Fig. 26).
NOTE: The bearing rotating torque should be con-
stant during a complete revolution of the pinion. If
the rotating torque varies, this indicates a binding
condition.
(7) Install propeller shaft with the installation ref-
erence marks aligned.
(8) Install the brake drums.
(9) Add gear lubricant to the differential housing,
if necessary.
(10) Install wheel and tire assemblies and lower
the vehicle.
Fig. 23 PINION YOKE REMOVER
1 - PINION YOKE
2 - REMOVERFig. 24 PINION YOKE INSTALLER
1 - INSTALLER
2 - YOKE HOLDER
Fig. 25 TIGHTEN PINION NUT
1 - DIFFERENTIAL HOUSING
2 - YOKE HOLDER
3 - TORQUE WRENCH
BR/BEREAR AXLE - 267RBI 3 - 95
PINION SEAL (Continued)
Page 151 of 2255
DIFFERENTIAL
REMOVAL
(1) Raise and support the vehicle.
(2) Remove fill hole plug from the differential
housing cover.
(3) Remove differential housing cover and drain
lubricant from the housing.
(4) Clean the housing cavity with a flushing oil,
light engine oil or lint free cloth.Do not use water,
steam, kerosene or gasoline for cleaning.
(5) Remove axle shafts.
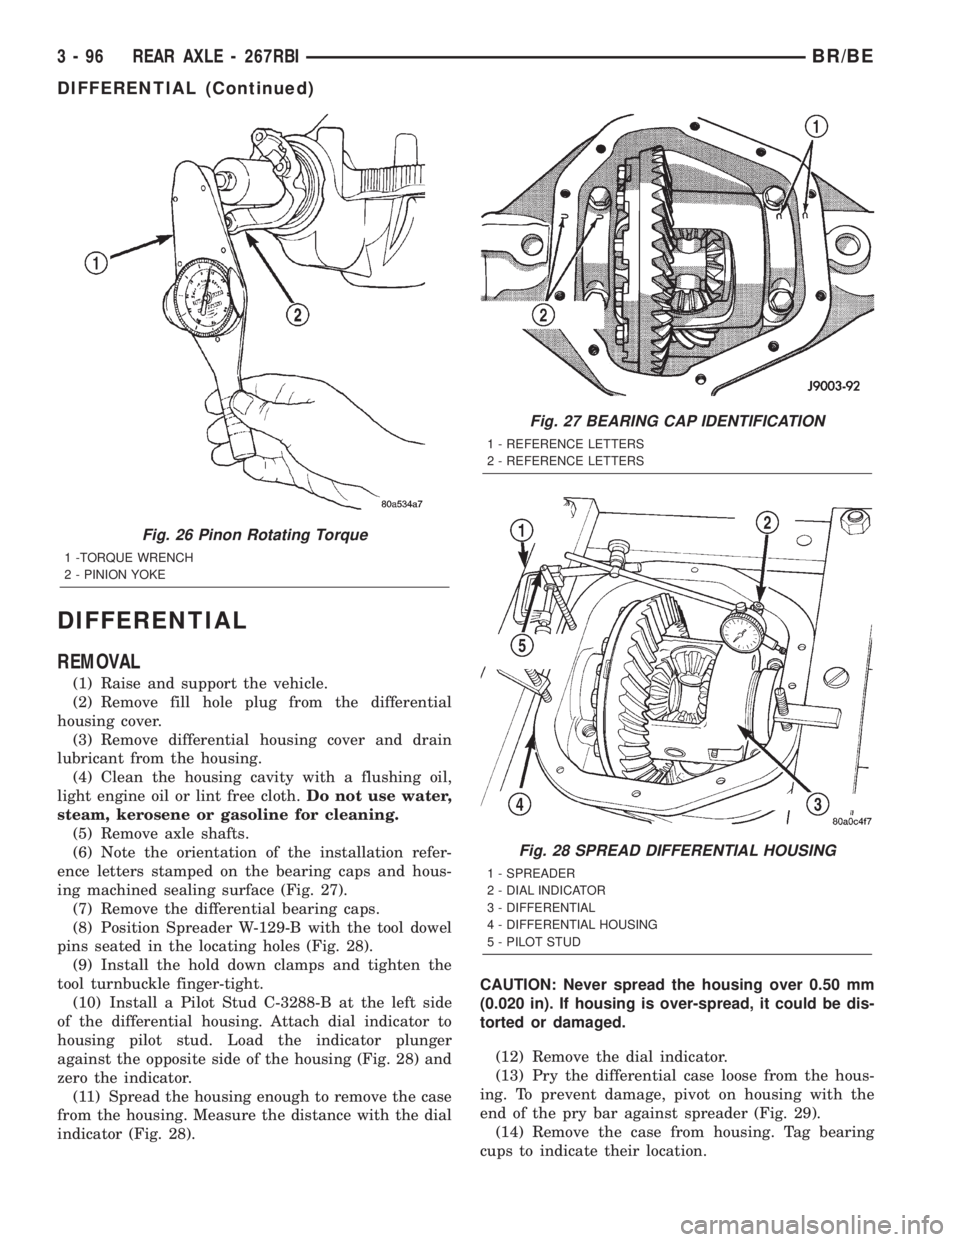
(6) Note the orientation of the installation refer-
ence letters stamped on the bearing caps and hous-
ing machined sealing surface (Fig. 27).
(7) Remove the differential bearing caps.
(8) Position Spreader W-129-B with the tool dowel
pins seated in the locating holes (Fig. 28).
(9) Install the hold down clamps and tighten the
tool turnbuckle finger-tight.
(10) Install a Pilot Stud C-3288-B at the left side
of the differential housing. Attach dial indicator to
housing pilot stud. Load the indicator plunger
against the opposite side of the housing (Fig. 28) and
zero the indicator.
(11) Spread the housing enough to remove the case
from the housing. Measure the distance with the dial
indicator (Fig. 28).CAUTION: Never spread the housing over 0.50 mm
(0.020 in). If housing is over-spread, it could be dis-
torted or damaged.
(12) Remove the dial indicator.
(13) Pry the differential case loose from the hous-
ing. To prevent damage, pivot on housing with the
end of the pry bar against spreader (Fig. 29).
(14) Remove the case from housing. Tag bearing
cups to indicate their location.
Fig. 26 Pinon Rotating Torque
1 -TORQUE WRENCH
2 - PINION YOKE
Fig. 27 BEARING CAP IDENTIFICATION
1 - REFERENCE LETTERS
2 - REFERENCE LETTERS
Fig. 28 SPREAD DIFFERENTIAL HOUSING
1 - SPREADER
2 - DIAL INDICATOR
3 - DIFFERENTIAL
4 - DIFFERENTIAL HOUSING
5 - PILOT STUD
3 - 96 REAR AXLE - 267RBIBR/BE
DIFFERENTIAL (Continued)
Page 154 of 2255
(13) Install the fill hole plug and tighten to 34 N´m
(25 ft. lbs.).
(14) Remove support and lower vehicle.
DIFFERENTIAL - POWR-LOK
DIAGNOSIS AND TESTING - POWR-LOKT
WARNING: WHEN SERVICING VEHICLES WITH A
POWR-LOKTDIFFERENTIAL DO NOT USE THE
ENGINE TO TURN THE AXLE AND WHEELS. BOTH
REAR WHEELS MUST BE RAISED AND THE VEHI-
CLE SUPPORTED. THE AXLE CAN EXERT ENOUGH
FORCE IF ONE WHEEL IS IN CONTACT WITH A
SURFACE TO CAUSE THE VEHICLE TO MOVE.
The differential can be tested without removing the
differential case by measuring rotating torque. Make
sure brakes are not dragging during this measure-
ment.
(1) Place blocks in front and rear of both front
wheels.
(2) Raise one rear wheel until it is completely off
the ground.
(3) Engine off, transmission in neutral, and park-
ing brake off.
(4) Remove wheel and bolt Special Tool 6790 or
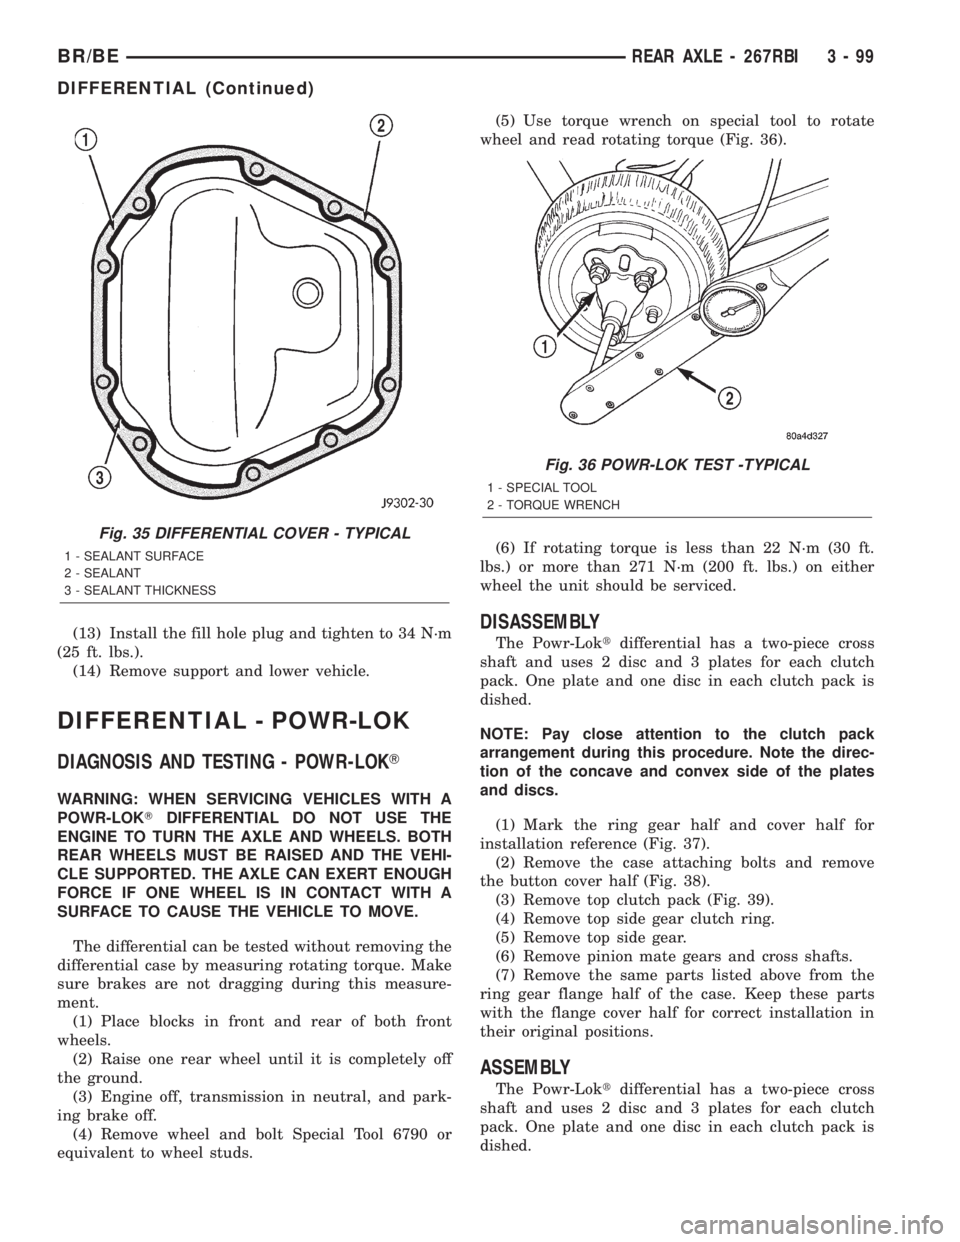
equivalent to wheel studs.(5) Use torque wrench on special tool to rotate
wheel and read rotating torque (Fig. 36).
(6) If rotating torque is less than 22 N´m (30 ft.
lbs.) or more than 271 N´m (200 ft. lbs.) on either
wheel the unit should be serviced.
DISASSEMBLY
The Powr-Loktdifferential has a two-piece cross
shaft and uses 2 disc and 3 plates for each clutch
pack. One plate and one disc in each clutch pack is
dished.
NOTE: Pay close attention to the clutch pack
arrangement during this procedure. Note the direc-
tion of the concave and convex side of the plates
and discs.
(1) Mark the ring gear half and cover half for
installation reference (Fig. 37).
(2) Remove the case attaching bolts and remove
the button cover half (Fig. 38).
(3) Remove top clutch pack (Fig. 39).
(4) Remove top side gear clutch ring.
(5) Remove top side gear.
(6) Remove pinion mate gears and cross shafts.
(7) Remove the same parts listed above from the
ring gear flange half of the case. Keep these parts
with the flange cover half for correct installation in
their original positions.
ASSEMBLY
The Powr-Loktdifferential has a two-piece cross
shaft and uses 2 disc and 3 plates for each clutch
pack. One plate and one disc in each clutch pack is
dished.
Fig. 35 DIFFERENTIAL COVER - TYPICAL
1 - SEALANT SURFACE
2 - SEALANT
3 - SEALANT THICKNESS
Fig. 36 POWR-LOK TEST -TYPICAL
1 - SPECIAL TOOL
2 - TORQUE WRENCH
BR/BEREAR AXLE - 267RBI 3 - 99
DIFFERENTIAL (Continued)
Page 157 of 2255
DIFFERENTIAL CASE
BEARINGS
REMOVAL
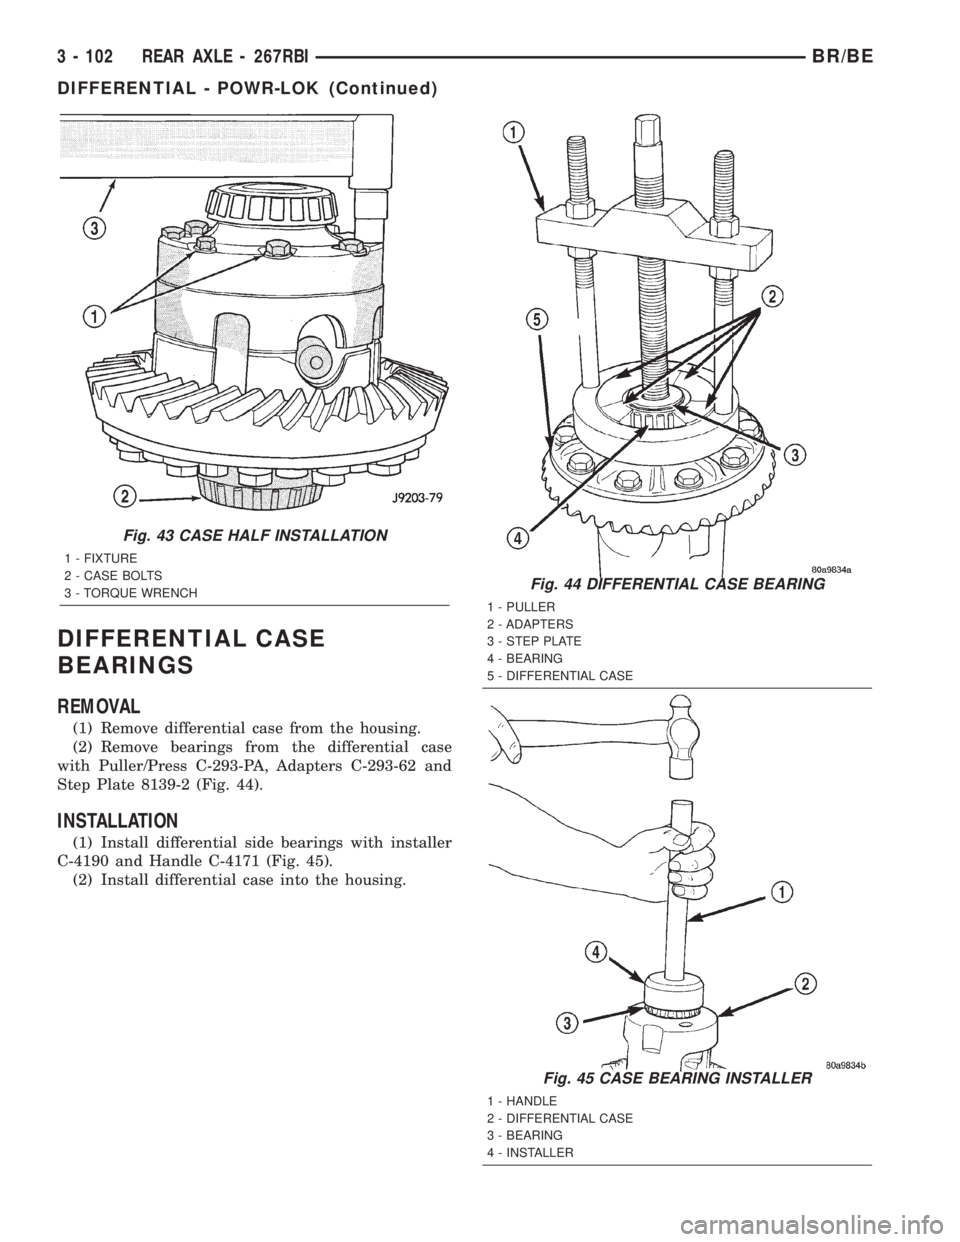
(1) Remove differential case from the housing.
(2) Remove bearings from the differential case
with Puller/Press C-293-PA, Adapters C-293-62 and
Step Plate 8139-2 (Fig. 44).
INSTALLATION
(1) Install differential side bearings with installer
C-4190 and Handle C-4171 (Fig. 45).
(2) Install differential case into the housing.
Fig. 44 DIFFERENTIAL CASE BEARING
1 - PULLER
2 - ADAPTERS
3 - STEP PLATE
4 - BEARING
5 - DIFFERENTIAL CASE
Fig. 45 CASE BEARING INSTALLER
1 - HANDLE
2 - DIFFERENTIAL CASE
3 - BEARING
4 - INSTALLER
Fig. 43 CASE HALF INSTALLATION
1 - FIXTURE
2 - CASE BOLTS
3 - TORQUE WRENCH
3 - 102 REAR AXLE - 267RBIBR/BE
DIFFERENTIAL - POWR-LOK (Continued)
Page 160 of 2255
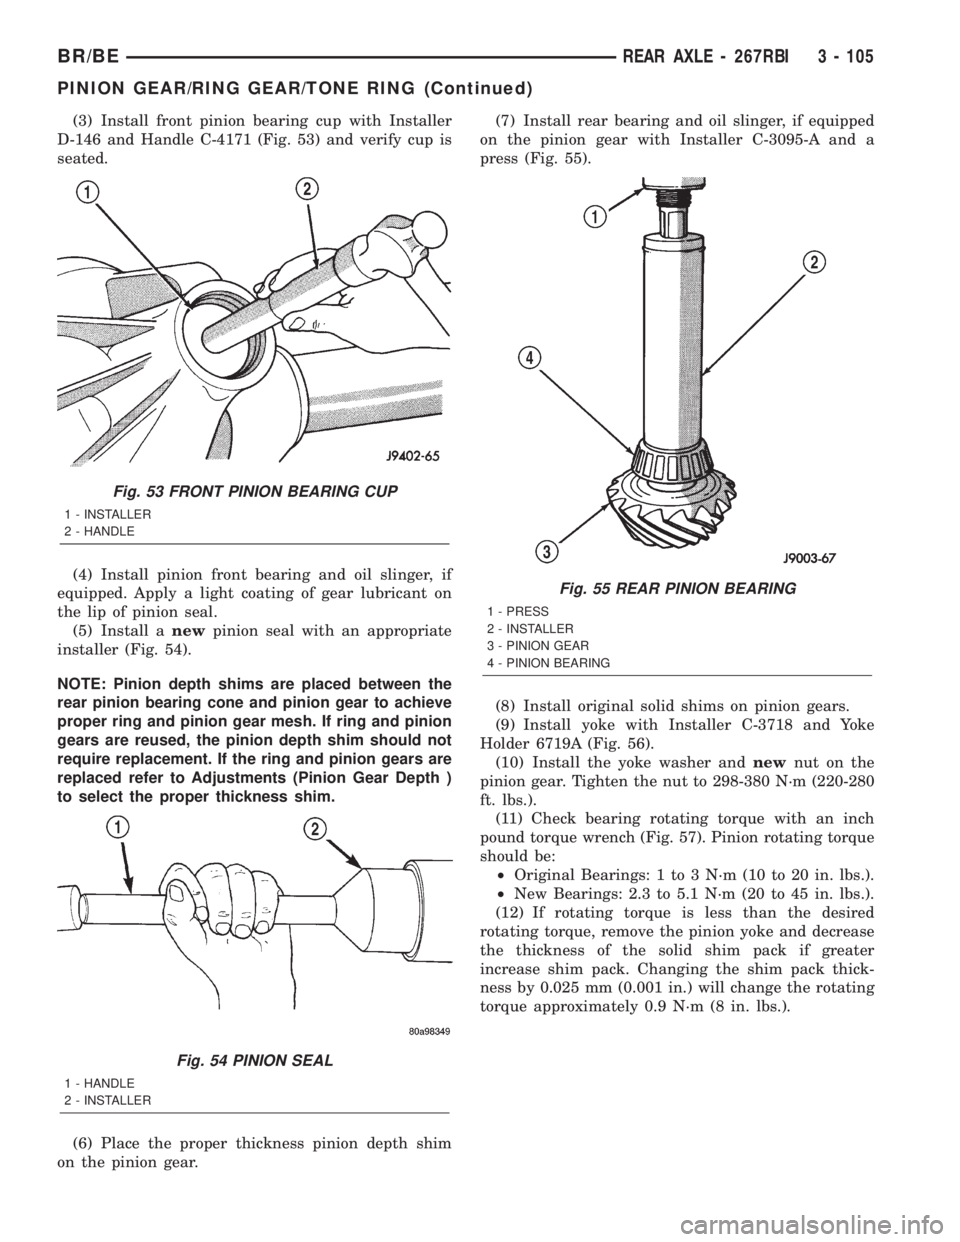
(3) Install front pinion bearing cup with Installer
D-146 and Handle C-4171 (Fig. 53) and verify cup is
seated.
(4) Install pinion front bearing and oil slinger, if
equipped. Apply a light coating of gear lubricant on
the lip of pinion seal.
(5) Install anewpinion seal with an appropriate
installer (Fig. 54).
NOTE: Pinion depth shims are placed between the
rear pinion bearing cone and pinion gear to achieve
proper ring and pinion gear mesh. If ring and pinion
gears are reused, the pinion depth shim should not
require replacement. If the ring and pinion gears are
replaced refer to Adjustments (Pinion Gear Depth )
to select the proper thickness shim.
(6) Place the proper thickness pinion depth shim
on the pinion gear.(7) Install rear bearing and oil slinger, if equipped
on the pinion gear with Installer C-3095-A and a
press (Fig. 55).
(8) Install original solid shims on pinion gears.
(9) Install yoke with Installer C-3718 and Yoke
Holder 6719A (Fig. 56).
(10) Install the yoke washer andnewnut on the
pinion gear. Tighten the nut to 298-380 N´m (220-280
ft. lbs.).
(11) Check bearing rotating torque with an inch
pound torque wrench (Fig. 57). Pinion rotating torque
should be:
²Original Bearings: 1 to 3 N´m (10 to 20 in. lbs.).
²New Bearings: 2.3 to 5.1 N´m (20 to 45 in. lbs.).
(12) If rotating torque is less than the desired
rotating torque, remove the pinion yoke and decrease
the thickness of the solid shim pack if greater
increase shim pack. Changing the shim pack thick-
ness by 0.025 mm (0.001 in.) will change the rotating
torque approximately 0.9 N´m (8 in. lbs.).
Fig. 53 FRONT PINION BEARING CUP
1 - INSTALLER
2 - HANDLE
Fig. 54 PINION SEAL
1 - HANDLE
2 - INSTALLER
Fig. 55 REAR PINION BEARING
1 - PRESS
2 - INSTALLER
3 - PINION GEAR
4 - PINION BEARING
BR/BEREAR AXLE - 267RBI 3 - 105
PINION GEAR/RING GEAR/TONE RING (Continued)
Page 161 of 2255

(13) Invert the differential case.
(14) Position exciter ring on differential case.
(15) Using a brass drift, slowly and evenly tap the
exciter ring into position.
(16) Invert differential case and start two ring
gear bolts. This will provide case-to-ring gear bolt
hole alignment.
(17) Invert the differential case in the vise.
(18) Installnewring gear bolts and alternately
tighten to 176 N´m (130 ft. lbs.) (Fig. 58).
CAUTION: Never reuse the ring gear bolts. The
bolts can fracture causing extensive damage.
(19) Install differential in housing and verify gear
mesh and contact pattern.
(20) Install differential cover and fill with gear
lubricant.
Fig. 56 PINION YOKE INSTALLER
1 - INSTALLER
2 - HOLDER
Fig. 57 PINION ROTATING TORQUE
1 -TORQUE WRENCH
2 - PINION YOKE
Fig. 58 RING GEAR BOLT
1 - TORQUE WRENCH
2 - RING GEAR BOLT
3 - RING GEAR
4 - CASE
3 - 106 REAR AXLE - 267RBIBR/BE
PINION GEAR/RING GEAR/TONE RING (Continued)
Page 162 of 2255

REAR AXLE - 286RBI
TABLE OF CONTENTS
page page
REAR AXLE - 286RBI
DESCRIPTION........................107
OPERATION..........................108
DIAGNOSIS AND TESTING - AXLE.........108
REMOVAL............................112
INSTALLATION........................112
ADJUSTMENTS.......................112
SPECIFICATIONS
REAR AXLE - 286RBI.................120
SPECIAL TOOLS
REAR AXLE - 286 RBI.................120
AXLE SHAFTS
REMOVAL............................123
INSTALLATION........................123
AXLE BEARINGS
REMOVAL............................123
INSTALLATION........................123
PINION SEAL
REMOVAL............................123INSTALLATION........................124
DIFFERENTIAL
REMOVAL............................125
DISASSEMBLY........................126
ASSEMBLY...........................126
INSTALLATION........................126
DIFFERENTIAL - TRAC-LOK
DIAGNOSIS AND TESTING - TRAC-LOKT....128
DISASSEMBLY........................128
ASSEMBLY...........................129
DIFFERENTIAL CASE BEARINGS
REMOVAL............................129
INSTALLATION........................129
PINION GEAR/RING GEAR/TONE RING
REMOVAL............................131
INSTALLATION........................132
REAR AXLE - 286RBI
DESCRIPTION
The Rear Beam-design Iron (RBI) axle housings
consist of an iron center casting (differential housing)
with axle shaft tubes extending from either side. The
tubes are pressed into the differential housing and
welded. The axles are full-floating axle shafts, that
are supported by the axle housing tubes. The full-
float axle shafts are retained by bolts attached to the
hub.
The differential case for the standard differential is
a one-piece design. Differential bearing preload and
ring gear backlash are adjusted by the use of shims
located between the differential bearing cones andcase. Outboard protective spacers are located
between the differential bearing cup and housing.
Pinion bearing preload is set and maintained by the
use of shims. Pinion height is controlled by a shim
pack located under the inner pinion bearing cup. The
differential cover provides a means for inspection and
service.
Axles equipped with a Trac-Loktdifferential are
optional. The differential contains two clutch packs,
four pinion gears, and a one-piece pinion mate cross
shaft to provide increased torque to the non-slipping
wheel in addition to the standard differential compo-
nents. A Trac-loktdifferential for the has a two-piece
differential case.
BR/BEREAR AXLE - 286RBI 3 - 107
Page 163 of 2255

OPERATION
STANDARD DIFFERENTIAL
The axle receives power from the transmission/
transfer case through the rear propeller shaft. The
rear propeller shaft is connected to the pinion gear
which rotates the differential through the gear mesh
with the ring gear bolted to the differential case. The
engine power is transmitted to the axle shafts
through the pinion mate and side gears. The side
gears are splined to the axle shafts.
During straight-ahead driving, the differential pin-
ion gears do not rotate on the pinion mate shaft. This
occurs because input torque applied to the gears is
divided and distributed equally between the two side
gears. As a result, the pinion gears revolve with the
pinion mate shaft but do not rotate around it (Fig. 1).
When turning corners, the outside wheel must travel
a greater distance than the inside wheel to complete a
turn. The difference must be compensated for to prevent
the tires from scuffing and skidding through turns. To
accomplish this, the differential allows the axle shafts
to turn at unequal speeds (Fig. 2). In this instance, the
input torque applied to the pinion gears is not divided
equally. The pinion gears now rotate around the pinion
mate shaft in opposite directions. This allows the side
gear and axle shaft attached to the outside wheel to
rotate at a faster speed.
TRAC-LOKŸ DIFFERENTIAL
The Trac-lokŸ clutches are engaged by two concur-
rent forces. The first being the preload force exerted
through Belleville spring washers within the clutch
packs. The second is the separating forces generatedby the side gears as torque is applied through the
ring gear (Fig. 3).
The Trac-lokŸ design provides the differential
action needed for turning corners and for driving
straight ahead during periods of unequal traction.
When one wheel looses traction, the clutch packs
transfer additional torque to the wheel having the
most traction. Trac-lokŸ differentials resist wheel
spin on bumpy roads and provide more pulling power
when one wheel looses traction. Pulling power is pro-
vided continuously until both wheels loose traction. If
both wheels slip due to unequal traction, Trac-lokŸ
operation is normal. In extreme cases of differences
of traction, the wheel with the least traction may
spin.
DIAGNOSIS AND TESTING - AXLE
GEAR NOISE
Axle gear noise can be caused by insufficient lubri-
cant, incorrect backlash, incorrect pinion depth, tooth
contact, worn/damaged gears, or the carrier housing
not having the proper offset and squareness.
Gear noise usually happens at a specific speed
range. The noise can also occur during a specific type
of driving condition. These conditions are accelera-
tion, deceleration, coast, or constant load.
When road testing, first warm-up the axle fluid by
driving the vehicle at least 5 miles and then acceler-
ate the vehicle to the speed range where the noise is
the greatest. Shift out-of-gear and coast through the
peak-noise range. If the noise stops or changes
greatly:
²Check for insufficient lubricant.
²Incorrect ring gear backlash.
²Gear damage.
Differential side gears and pinions can be checked
by turning the vehicle. They usually do not cause
Fig. 1 STRAIGHT AHEAD DRIVING
1 - IN STRAIGHT AHEAD DRIVING EACH WHEEL ROTATES AT
100% OF CASE SPEED
2 - PINION GEAR
3 - SIDE GEAR
4 - PINION GEARS ROTATE WITH CASE
Fig. 2 ON TURNS
1 - PINION GEARS ROTATE ON PINION SHAFT
3 - 108 REAR AXLE - 286RBIBR/BE
REAR AXLE - 286RBI (Continued)