2002 DODGE RAM steering gear
[x] Cancel search: steering gearPage 1417 of 2255
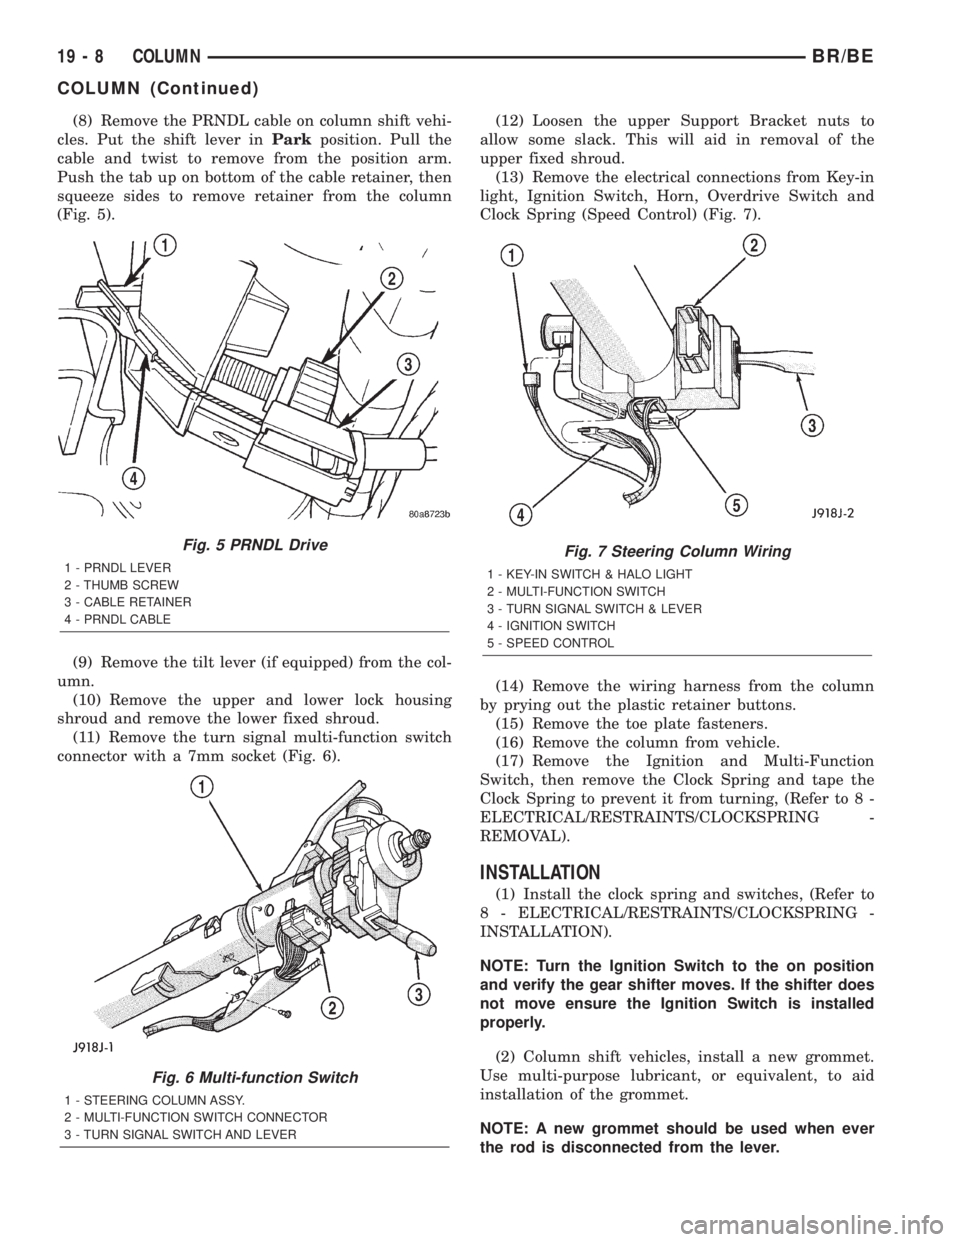
(8) Remove the PRNDL cable on column shift vehi-
cles. Put the shift lever inParkposition. Pull the
cable and twist to remove from the position arm.
Push the tab up on bottom of the cable retainer, then
squeeze sides to remove retainer from the column
(Fig. 5).
(9) Remove the tilt lever (if equipped) from the col-
umn.
(10) Remove the upper and lower lock housing
shroud and remove the lower fixed shroud.
(11) Remove the turn signal multi-function switch
connector with a 7mm socket (Fig. 6).(12) Loosen the upper Support Bracket nuts to
allow some slack. This will aid in removal of the
upper fixed shroud.
(13) Remove the electrical connections from Key-in
light, Ignition Switch, Horn, Overdrive Switch and
Clock Spring (Speed Control) (Fig. 7).
(14) Remove the wiring harness from the column
by prying out the plastic retainer buttons.
(15) Remove the toe plate fasteners.
(16) Remove the column from vehicle.
(17) Remove the Ignition and Multi-Function
Switch, then remove the Clock Spring and tape the
Clock Spring to prevent it from turning, (Refer to 8 -
ELECTRICAL/RESTRAINTS/CLOCKSPRING -
REMOVAL).
INSTALLATION
(1) Install the clock spring and switches, (Refer to
8 - ELECTRICAL/RESTRAINTS/CLOCKSPRING -
INSTALLATION).
NOTE: Turn the Ignition Switch to the on position
and verify the gear shifter moves. If the shifter does
not move ensure the Ignition Switch is installed
properly.
(2) Column shift vehicles, install a new grommet.
Use multi-purpose lubricant, or equivalent, to aid
installation of the grommet.
NOTE: A new grommet should be used when ever
the rod is disconnected from the lever.
Fig. 5 PRNDL Drive
1 - PRNDL LEVER
2 - THUMB SCREW
3 - CABLE RETAINER
4 - PRNDL CABLE
Fig. 6 Multi-function Switch
1 - STEERING COLUMN ASSY.
2 - MULTI-FUNCTION SWITCH CONNECTOR
3 - TURN SIGNAL SWITCH AND LEVER
Fig. 7 Steering Column Wiring
1 - KEY-IN SWITCH & HALO LIGHT
2 - MULTI-FUNCTION SWITCH
3 - TURN SIGNAL SWITCH & LEVER
4 - IGNITION SWITCH
5 - SPEED CONTROL
19 - 8 COLUMNBR/BE
COLUMN (Continued)
Page 1418 of 2255
(3) Remove the shipping lock pin if necessary.
(4) Install the column through the floor pan.
(5) Position the column bracket breakaway cap-
sules on the mounting studs. Install, butloose
assemblethe two upper bracket nuts.
(6) With the front wheels in the straight-ahead
position. Align steering column shaft to the coupler.
Install anewpinch bolt and tighten to 49 N´m (36
ft. lbs.).
(7) Clip the wiring harness on the steering column.
Connect the multi- function switch wiring and
tighten with 7mm socket.
(8) Install the upper fixed shroud.
(9) Be sure both breakaway capsules are fully
seated in the slots in the column support bracket.
Pull the column rearward then tighten upper bracket
nuts to 12 N´m (105 in. lbs.).
(10) Tighten the toe plate to floor pan attaching
nuts to 22.5 N´m (200 in. lbs.).
(11) Install the wiring connections to the column.
Install the lower fixed shroud.
(12) Column shift vehicles, install the PRNDL
driver cable. Place shifter in Park position. If indica-tor needs adjusting, turn thumb screw on cable
retainer to adjust cable.
(13) Install the lock housing shrouds. Install the
tilt lever (if equipped).
(14) Install the knee blocker and steering column
opening cover, (Refer to 23 - BODY/INSTRUMENT
PANEL/STEERING COLUMN OPENING COVER -
INSTALLATION).
(15) Install steering wheel and tighten nut to 61
N´m (45 ft. lbs.), (Refer to 19 - STEERING/COL-
UMN/STEERING WHEEL - INSTALLATION).
(16) Install the airbag, (Refer to 8 - ELECTRICAL/
RESTRAINTS/DRIVER AIRBAG - INSTALLATION).
(17) Column shift vehicles, connect the shift link
rod to the transmission shift lever. Use multi-purpose
lubricant, or an equivalent product, to aid the instal-
lation.
(18) Install the battery ground (negative) cable.
(19) Verify operation of the automatic transmission
shift linkage and adjust as necessary, (Refer to 21 -
TRANSMISSION/TRANSAXLE/AUTOMATIC -
44RE/GEAR SHIFT CABLE - ADJUSTMENTS).
SPECIFICATIONS
TORQUE CHART
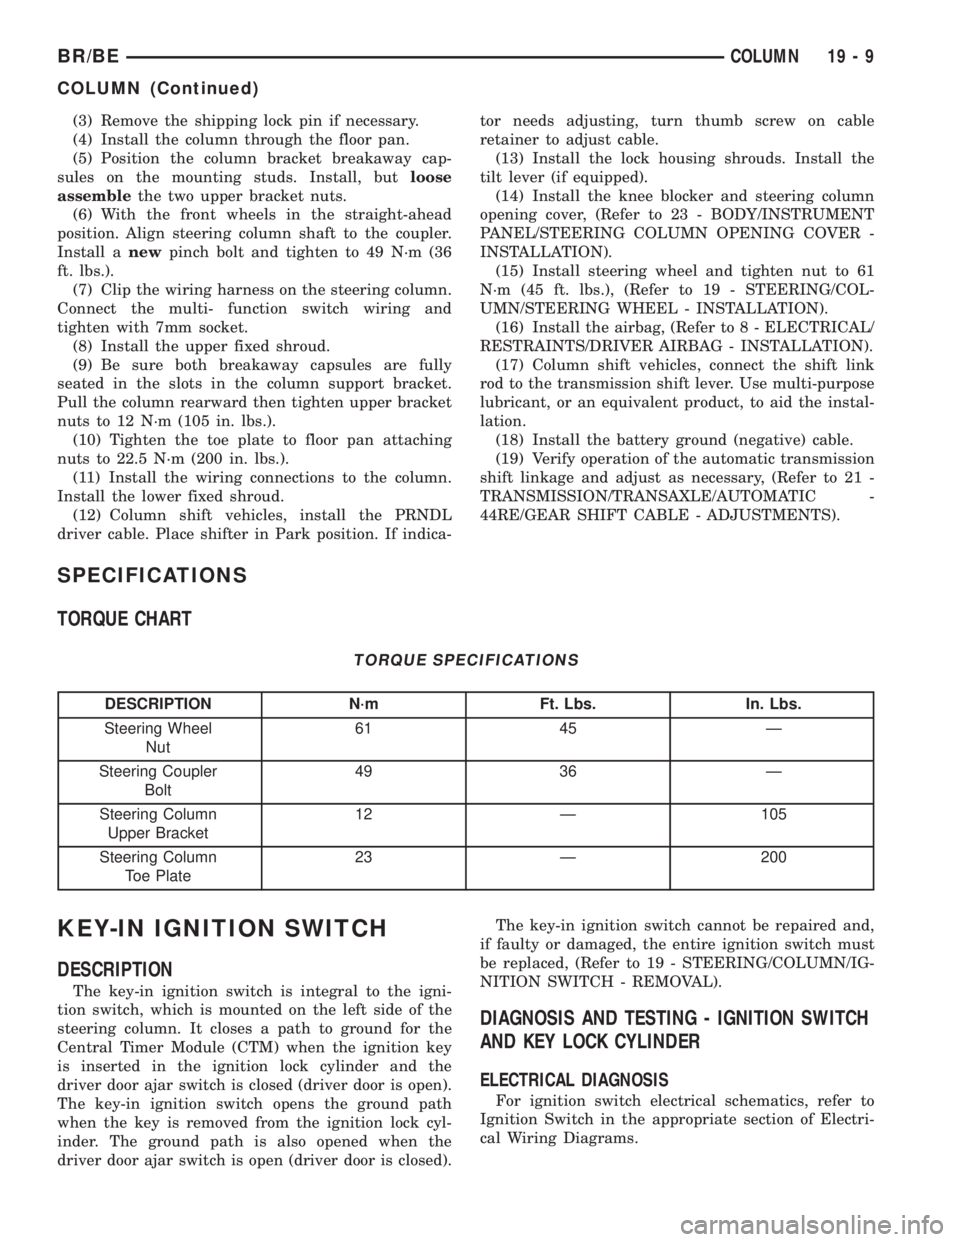
TORQUE SPECIFICATIONS
DESCRIPTION N´m Ft. Lbs. In. Lbs.
Steering Wheel
Nut61 45 Ð
Steering Coupler
Bolt49 36 Ð
Steering Column
Upper Bracket12 Ð 105
Steering Column
Toe Plate23 Ð 200
KEY-IN IGNITION SWITCH
DESCRIPTION
The key-in ignition switch is integral to the igni-
tion switch, which is mounted on the left side of the
steering column. It closes a path to ground for the
Central Timer Module (CTM) when the ignition key
is inserted in the ignition lock cylinder and the
driver door ajar switch is closed (driver door is open).
The key-in ignition switch opens the ground path
when the key is removed from the ignition lock cyl-
inder. The ground path is also opened when the
driver door ajar switch is open (driver door is closed).The key-in ignition switch cannot be repaired and,
if faulty or damaged, the entire ignition switch must
be replaced, (Refer to 19 - STEERING/COLUMN/IG-
NITION SWITCH - REMOVAL).
DIAGNOSIS AND TESTING - IGNITION SWITCH
AND KEY LOCK CYLINDER
ELECTRICAL DIAGNOSIS
For ignition switch electrical schematics, refer to
Ignition Switch in the appropriate section of Electri-
cal Wiring Diagrams.
BR/BECOLUMN 19 - 9
COLUMN (Continued)
Page 1420 of 2255
(1) Install the lock cylinder into the housing using
care to align the end of the lock cylinder with the
ignition switch.
(2) Push the lock cylinder in until it clicks.
IGNITION SWITCH
DESCRIPTION
The electrical ignition switch is located on the
steering column. It is used as the main on/off switch-
ing device for most electrical components. The
mechanical key lock cylinder is used to engage/disen-
gage the electrical ignition switch.
OPERATION
Vehicles equipped with an automatic trans-
mission and a steering column mounted shifter:
an interlock device is located within the steering col-
umn. This interlock device is used to lock the trans-
mission shifter in the PARK position when the key
lock cylinder is in the LOCKED or ACCESSORY
position. If it is difficult to rotate the key to or from
the LOCK or ACCESSORY position, the interlock
device within the steering column may be defective.
This device is not serviceable. If repair is necessary,
the steering column assembly must be replaced.
(Refer to 19 - STEERING/COLUMN - REMOVAL).
Vehicles equipped with a manual transmis-
sion and a floor mounted shifter:on certain mod-
els, a lever is located on the steering column behind
the ignition key lock cylinder. The lever must be
manually operated to allow rotation of the ignitionkey lock cylinder to the LOCK or ACCESSORY posi-
tion. If it is difficult to rotate the key to the LOCK or
ACCESSORY position, the lever mechanism may be
defective. This mechanism is not serviceable. If
repair is necessary, the steering column assembly
must be replaced. (Refer to 19 - STEERING/COL-
UMN - REMOVAL).
On other models, the ignition key cylinder must be
depressed to allow it to be rotated into the LOCK or
ACCESSORY position. If it is difficult to rotate the
key to the LOCK or ACCESSORY position, the lock
mechanism within the steering column may be defec-
tive. This mechanism is not serviceable. If repair is
necessary, the steering column assembly must be
replaced. (Refer to 19 - STEERING/COLUMN -
REMOVAL).
DIAGNOSIS AND TESTING - IGNITION SWITCH
TEST AND REPAIR
If the key removal effort is excessive on a vehicle
with a automatic transmission first adjust the shift
linkage, (Refer to 21 - TRANSMISSION/TRANS-
AXLE/AUTOMATIC - 42RE/GEAR SHIFT CABLE -
ADJUSTMENTS).
If the ignition switch effort is excessive remove the
ignition key cylinder from the steering column. (Refer
to 19 - STEERING/COLUMN/LOCK CYLINDER
HOUSING - INSTALLATION). Check the turning
effort of the key cylinder. If the ignition key cylinder
effort is excessive replace the key cylinder. If the
ignition key cylinder operates properly look for the
following conditions.
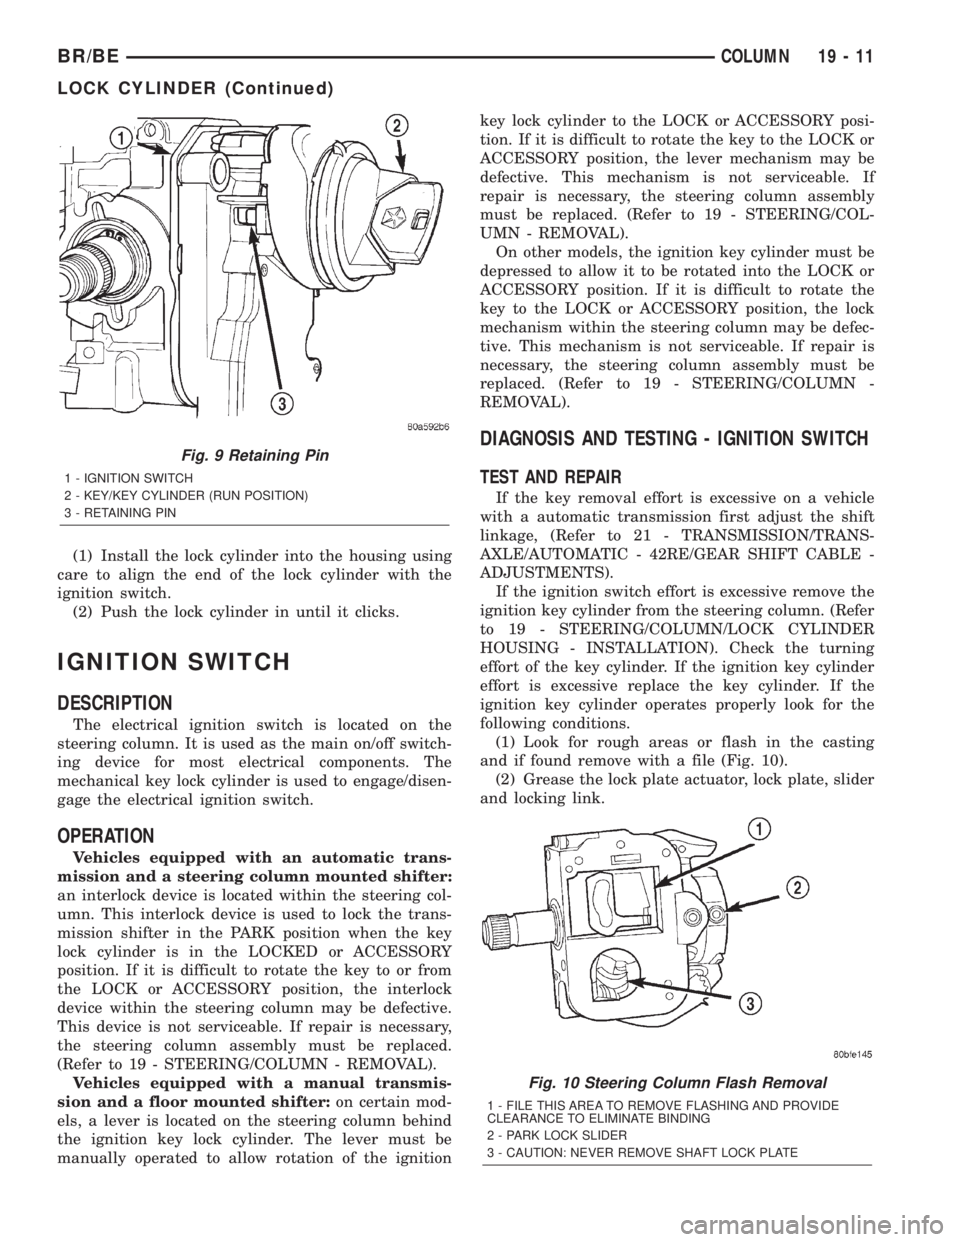
(1) Look for rough areas or flash in the casting
and if found remove with a file (Fig. 10).
(2) Grease the lock plate actuator, lock plate, slider
and locking link.
Fig. 9 Retaining Pin
1 - IGNITION SWITCH
2 - KEY/KEY CYLINDER (RUN POSITION)
3 - RETAINING PIN
Fig. 10 Steering Column Flash Removal
1 - FILE THIS AREA TO REMOVE FLASHING AND PROVIDE
CLEARANCE TO ELIMINATE BINDING
2 - PARK LOCK SLIDER
3 - CAUTION: NEVER REMOVE SHAFT LOCK PLATE
BR/BECOLUMN 19 - 11
LOCK CYLINDER (Continued)
Page 1423 of 2255
(e) After installing the ignition switch rotate the
ignition key from the LOCK to the ON position.
Verify that the park lock slider moves in the slider
slot, allowing the gear shift lever to be moved out
of PARK (automatic transmissions only). If the
slider does not move , and the gear shift lever is
locked in PARK, the ignition switch park lock
dowel pin, on the rear of the ignition switch, is not
properly installed in the slot of the park lock slider
linkage. Remove the ignition switch and reinstall.
(11) Connect the electrical connectors for the igni-
tion switch and halo lamp.
(12) Install the steering column shrouds. Tighten
the screws to 2 N´m (17 in. lbs.).
(13) Install the tilt column lever. (if equipped).
(14) Connect the battery.
(15) Automatic Transmissions Only: The shifter
should lock in the PARK position when the key is in
the LOCK position (if equipped with a shift lock
device). The shifter should unlock when the key is
rotated to the ON position.
(16) Check for proper operation of the ignition
switch in ACCESSARY, LOCK, OFF, ON, RUN and
start positions.
(17) The steering wheel should lock when the key
is in the LOCK position. Rotate the steering wheel at
least 180É to verify. The steering wheel should unlock
when the key is rotated to the ON position.GEAR SHIFT LEVER
REMOVAL
(1) Remove the tilt lever.
(2) Remove the upper and lower shrouds.
(3) Remove the steering column opening cover
(Refer to 23 - BODY/INSTRUMENT PANEL/STEER-
ING COLUMN OPENING COVER - REMOVAL).
(4) Remove the steering column mounting nuts.
(5) Lower the steering column to remove the sec-
ondary shrouds.
(6) Raise the steering column back on the mount-
ing bolts and finger tighten the nuts.
(7) Disconnect over drive switch wiring.
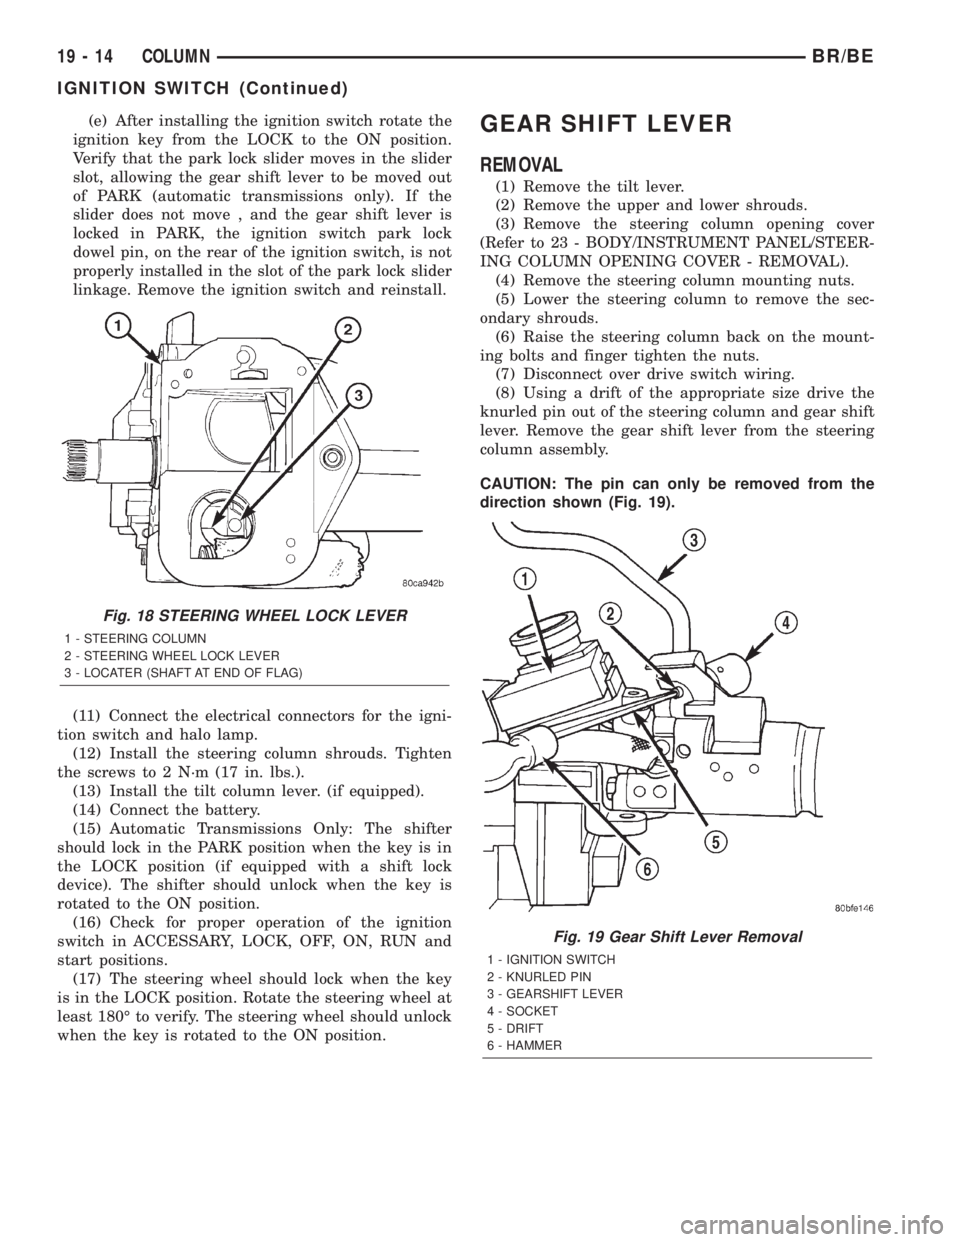
(8) Using a drift of the appropriate size drive the
knurled pin out of the steering column and gear shift
lever. Remove the gear shift lever from the steering
column assembly.
CAUTION: The pin can only be removed from the
direction shown (Fig. 19).
Fig. 18 STEERING WHEEL LOCK LEVER
1 - STEERING COLUMN
2 - STEERING WHEEL LOCK LEVER
3 - LOCATER (SHAFT AT END OF FLAG)
Fig. 19 Gear Shift Lever Removal
1 - IGNITION SWITCH
2 - KNURLED PIN
3 - GEARSHIFT LEVER
4 - SOCKET
5 - DRIFT
6 - HAMMER
19 - 14 COLUMNBR/BE
IGNITION SWITCH (Continued)
Page 1424 of 2255
INSTALLATION
(1) Install the gear shift lever into the steering col-
umn assembly. Align the pin holes in the gear shift
lever and the steering column assembly.
CAUTION: The pin must be installed in the original
direction.
(2) Carefully Install the pin into the steering col-
umn assembly and through the shift lever. If the pin
binds check the alignment on the holes. Be sure pin
is fully installed into the steering column assembly.
(3) Connect over drive switch wiring.
(4) Lower the steering column to install the sec-
ondary shrouds.
(5) Install the steering column mounting nuts.
Tighten the nuts to 12 N´m (105 in. lbs.).
(6) Install the steering column opening cover
(Refer to 23 - BODY/INSTRUMENT PANEL/STEER-ING COLUMN OPENING COVER - INSTALLA-
TION).
(7) Install the upper and lower shrouds.
(8) Install the tilt lever.
STEERING WHEEL
REMOVAL
For steering wheel removal procedure,(Refer to 8 -
ELECTRICAL/RESTRAINTS/CLOCKSPRING -
REMOVAL).
INSTALLATION
For steering wheel installation procedure,(Refer to
8 - ELECTRICAL/RESTRAINTS/CLOCKSPRING -
INSTALLATION).
BR/BECOLUMN 19 - 15
GEAR SHIFT LEVER (Continued)
Page 1425 of 2255
GEAR
TABLE OF CONTENTS
page page
GEAR
DESCRIPTION.........................16
OPERATION...........................16
DIAGNOSIS AND TESTING - POWER
STEERING GEAR LEAKAGE.............16
REMOVAL.............................18
INSTALLATION.........................18
ADJUSTMENTS........................18
SPECIFICATIONS
POWER STEERING GEAR..............21
TORQUE CHART......................21
SPECIAL TOOLS
POWER STEERING GEAR..............22
PITMAN BEARING
REMOVAL.............................22
INSTALLATION.........................23PITMAN SHAFT
REMOVAL.............................24
INSTALLATION.........................25
PITMAN SHAFT SEAL
REMOVAL.............................25
INSTALLATION.........................26
SPOOL VALVE
REMOVAL.............................26
INSTALLATION.........................28
STEERING GEAR HOUSING PLUG
REMOVAL.............................29
INSTALLATION.........................30
WORM SHAFT
REMOVAL.............................30
INSTALLATION.........................31
GEAR
DESCRIPTION
The power steering gear is a recirculating ball type
gear (Fig. 1). The gear ratio's used are 17.5:1 and
14:1.
OPERATION
The gear acts as a rolling thread between the
worm shaft and rack piston. The worm shaft is sup-
ported by a thrust bearing at the lower end and abearing assembly at the upper end. When the worm
shaft is turned from input from the steering column
the rack piston moves. The rack piston teeth mesh
with the pitman shaft. Turning the worm shaft, turns
the pitman shaft, which turns the steering linkage.
DIAGNOSIS AND TESTING - POWER STEERING
GEAR LEAKAGE
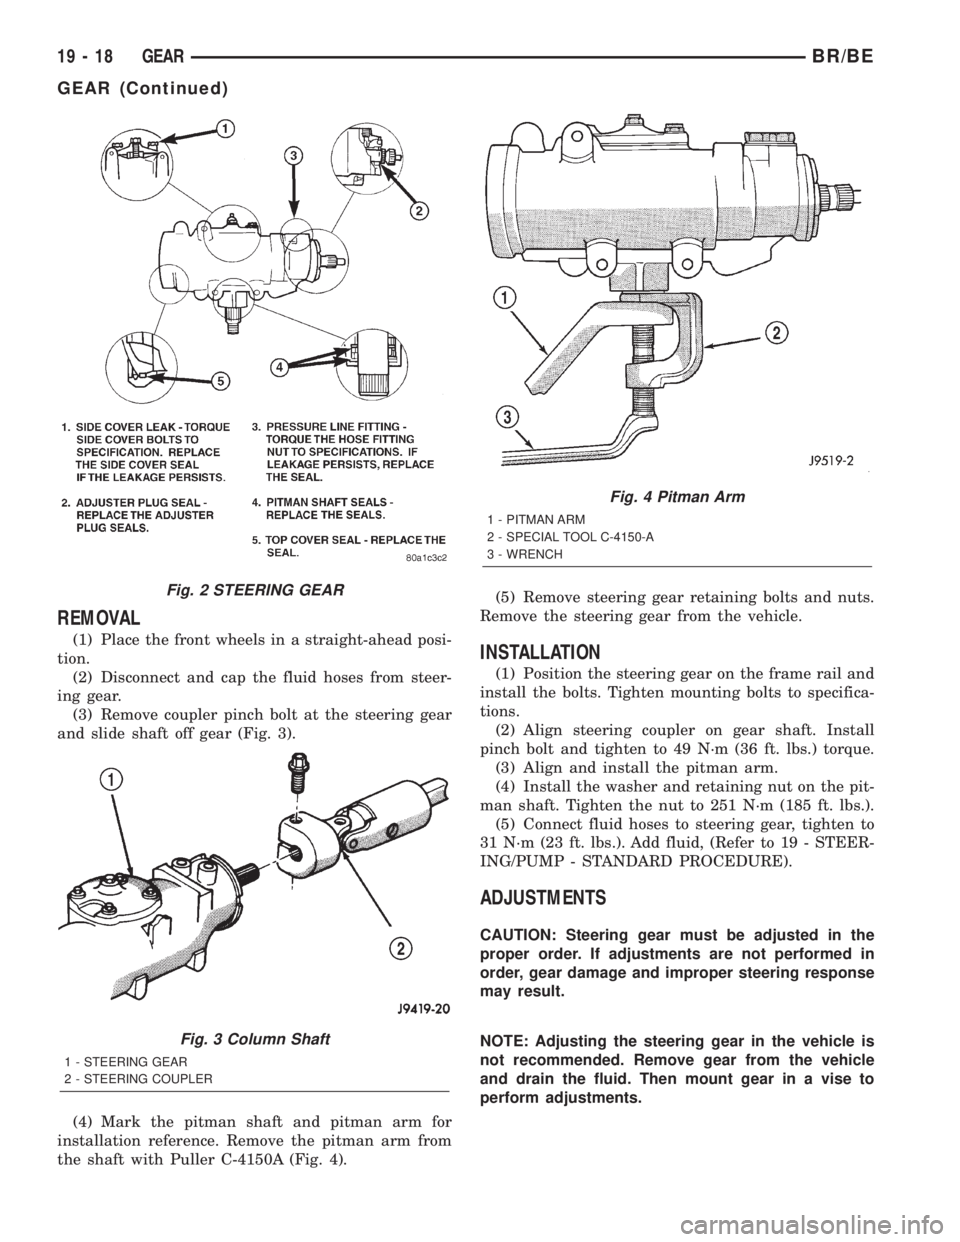
(1) Possible power steering gear leakage areas.
(Fig. 2).
19 - 16 GEARBR/BE
Page 1426 of 2255
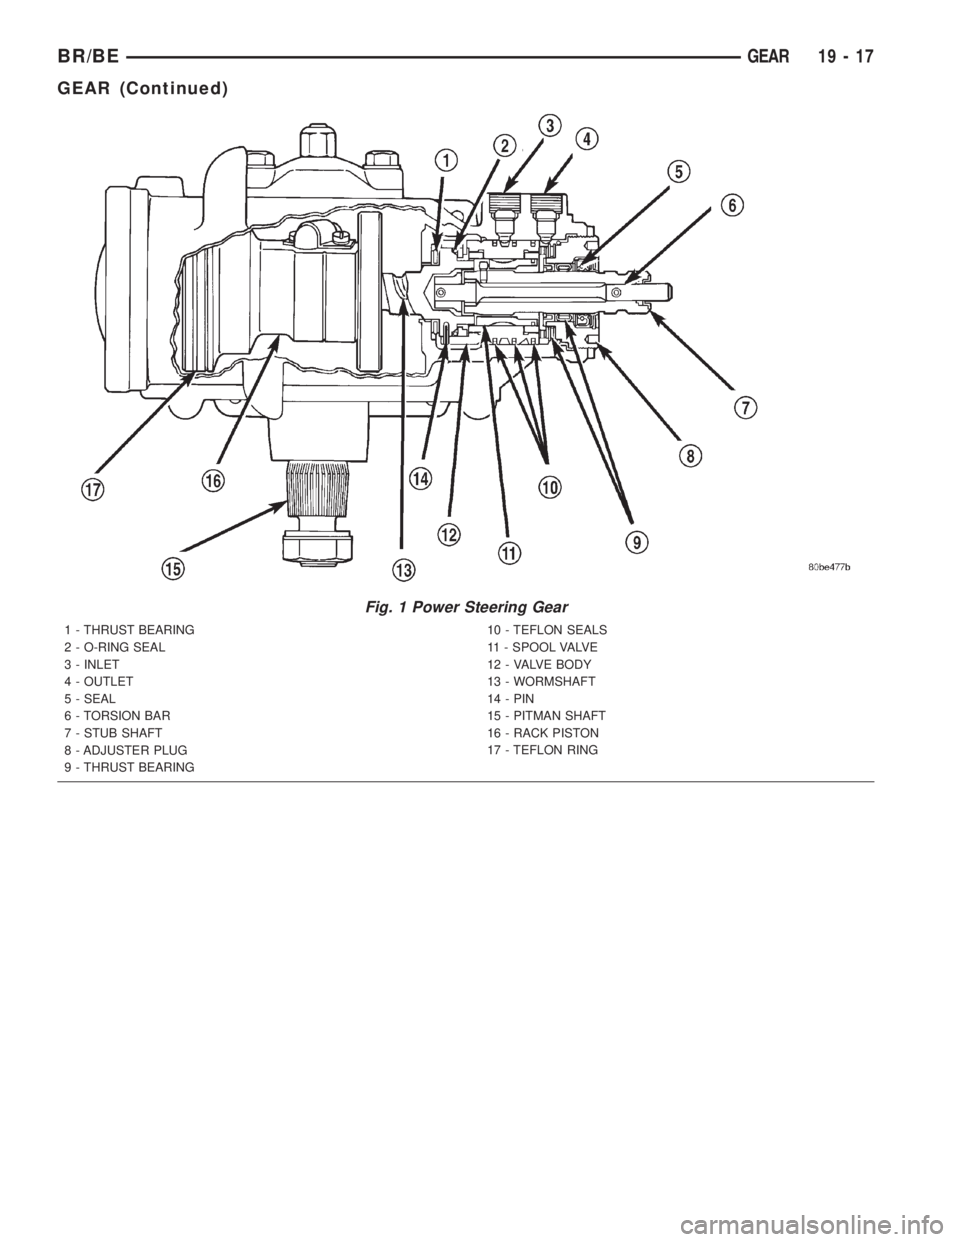
Fig. 1 Power Steering Gear
1 - THRUST BEARING
2 - O-RING SEAL
3 - INLET
4 - OUTLET
5 - SEAL
6 - TORSION BAR
7 - STUB SHAFT
8 - ADJUSTER PLUG
9 - THRUST BEARING10 - TEFLON SEALS
11 - SPOOL VALVE
12 - VALVE BODY
13 - WORMSHAFT
14 - PIN
15 - PITMAN SHAFT
16 - RACK PISTON
17 - TEFLON RING
BR/BEGEAR 19 - 17
GEAR (Continued)
Page 1427 of 2255
REMOVAL
(1) Place the front wheels in a straight-ahead posi-
tion.
(2) Disconnect and cap the fluid hoses from steer-
ing gear.
(3) Remove coupler pinch bolt at the steering gear
and slide shaft off gear (Fig. 3).
(4) Mark the pitman shaft and pitman arm for
installation reference. Remove the pitman arm from
the shaft with Puller C-4150A (Fig. 4).(5) Remove steering gear retaining bolts and nuts.
Remove the steering gear from the vehicle.INSTALLATION
(1) Position the steering gear on the frame rail and
install the bolts. Tighten mounting bolts to specifica-
tions.
(2) Align steering coupler on gear shaft. Install
pinch bolt and tighten to 49 N´m (36 ft. lbs.) torque.
(3) Align and install the pitman arm.
(4) Install the washer and retaining nut on the pit-
man shaft. Tighten the nut to 251 N´m (185 ft. lbs.).
(5) Connect fluid hoses to steering gear, tighten to
31 N´m (23 ft. lbs.). Add fluid, (Refer to 19 - STEER-
ING/PUMP - STANDARD PROCEDURE).
ADJUSTMENTS
CAUTION: Steering gear must be adjusted in the
proper order. If adjustments are not performed in
order, gear damage and improper steering response
may result.
NOTE: Adjusting the steering gear in the vehicle is
not recommended. Remove gear from the vehicle
and drain the fluid. Then mount gear in a vise to
perform adjustments.
Fig. 2 STEERING GEAR
Fig. 3 Column Shaft
1 - STEERING GEAR
2 - STEERING COUPLER
Fig. 4 Pitman Arm
1 - PITMAN ARM
2 - SPECIAL TOOL C-4150-A
3 - WRENCH
19 - 18 GEARBR/BE
GEAR (Continued)