2002 DODGE RAM lock
[x] Cancel search: lockPage 139 of 2255

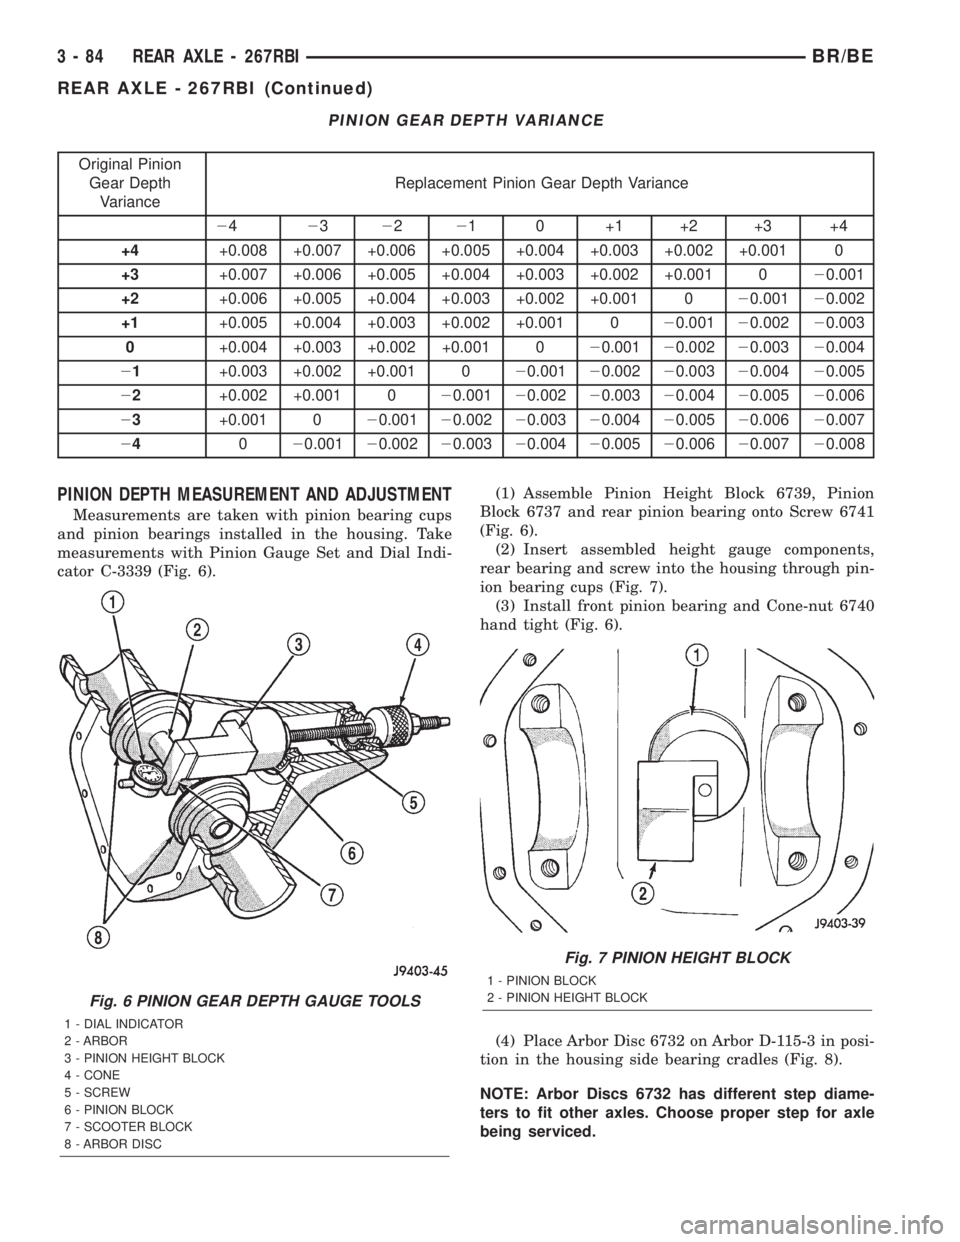
PINION GEAR DEPTH VARIANCE
Original Pinion
Gear Depth
VarianceReplacement Pinion Gear Depth Variance
24232221 0 +1 +2 +3 +4
+4+0.008 +0.007 +0.006 +0.005 +0.004 +0.003 +0.002 +0.001 0
+3+0.007 +0.006 +0.005 +0.004 +0.003 +0.002 +0.001 020.001
+2+0.006 +0.005 +0.004 +0.003 +0.002 +0.001 020.00120.002
+1+0.005 +0.004 +0.003 +0.002 +0.001 020.00120.00220.003
0+0.004 +0.003 +0.002 +0.001 020.00120.00220.00320.004
21+0.003 +0.002 +0.001 020.00120.00220.00320.00420.005
22+0.002 +0.001 020.00120.00220.00320.00420.00520.006
23+0.001 020.00120.00220.00320.00420.00520.00620.007
24020.00120.00220.00320.00420.00520.00620.00720.008
PINION DEPTH MEASUREMENT AND ADJUSTMENT
Measurements are taken with pinion bearing cups
and pinion bearings installed in the housing. Take
measurements with Pinion Gauge Set and Dial Indi-
cator C-3339 (Fig. 6).(1) Assemble Pinion Height Block 6739, Pinion
Block 6737 and rear pinion bearing onto Screw 6741
(Fig. 6).
(2) Insert assembled height gauge components,
rear bearing and screw into the housing through pin-
ion bearing cups (Fig. 7).
(3) Install front pinion bearing and Cone-nut 6740
hand tight (Fig. 6).
(4) Place Arbor Disc 6732 on Arbor D-115-3 in posi-
tion in the housing side bearing cradles (Fig. 8).
NOTE: Arbor Discs 6732 has different step diame-
ters to fit other axles. Choose proper step for axle
being serviced.
Fig. 6 PINION GEAR DEPTH GAUGE TOOLS
1 - DIAL INDICATOR
2 - ARBOR
3 - PINION HEIGHT BLOCK
4 - CONE
5 - SCREW
6 - PINION BLOCK
7 - SCOOTER BLOCK
8 - ARBOR DISC
Fig. 7 PINION HEIGHT BLOCK
1 - PINION BLOCK
2 - PINION HEIGHT BLOCK
3 - 84 REAR AXLE - 267RBIBR/BE
REAR AXLE - 267RBI (Continued)
Page 140 of 2255

(5) Install differential bearing caps on arbor discs
and snug the bearing cap bolts. Then cross tighten
cap bolts to 108 N´m (80 ft. lbs.).
(6) Assemble Dial Indicator C-3339 into Scooter
Block D-115-2 and secure set screw.
(7) Position Scooter Block/Dial Indicator flush on
the pinion height block. Hold scooter block and zero
the dial indicator.
(8) Slowly slide the scooter block across the pinion
height block over to the arbor (Fig. 9). Move the
scooter block till dial indicator crests the arbor, then
record the highest reading.
(9) Select a shim/oil baffle equal to the dial indica-
tor reading plus the pinion depth variance number
etched in the face of the pinion (Fig. 4). For example,
if the depth variance is ±2, add +0.002 in. to the dial
indicator reading.
DIFFERENTIAL SIDE BEARING PRELOAD AND
GEAR BACKLASH
Differential side bearing preload and gear backlash is
achieved by selective shims positioned behind the differ-
ential side bearing cones. The proper shim thickness
can be determined using slip-fit Dummy Bearings D-343
in place of the differential side bearings and a Dial Indi-
cator C-3339. Before proceeding with the differential
bearing preload and gear backlash measurements, mea-
sure the pinion gear depth and prepare the pinion for
installation. Establishing proper pinion gear depth is
essential to establishing gear backlash and tooth con-
tact patterns. After the overall shim thickness to take
up differential side play is measured, the pinion is
installed, and the gear backlash shim thickness is mea-
sured. The overall shim thickness is the total of the dial
indicator reading and the preload specification addedtogether. The gear backlash measurement determines
the thickness of the shim used on the ring gear side of
the differential case. Subtract the gear backlash shim
thickness from the total overall shim thickness and
select that amount for the pinion gear side of the differ-
ential (Fig. 10). Differential shim measurements are
performed with spreader W-129-B removed.
Fig. 8 GAUGE TOOLS IN HOUSING
1 - ARBOR DISC
2 - PINION BLOCK
3 - ARBOR
4 - PINION HEIGHT BLOCK
Fig. 9 PINION GEAR DEPTH MEASUREMENT
1 - ARBOR
2 - SCOOTER BLOCK
3 - DIAL INDICATOR
Fig. 10 SHIM LOCATIONS
1 - PINION GEAR DEPTH SHIM/OIL BAFFLE
2 - DIFFERENTIAL BEARING SHIM
BR/BEREAR AXLE - 267RBI 3 - 85
REAR AXLE - 267RBI (Continued)
Page 149 of 2255

AXLE SHAFTS
REMOVAL
(1) Remove the axle shaft flange bolts.
(2) Slide the axle shaft out from the axle tube.
INSTALLATION
(1) Clean the gasket contact surface area on the
flange with an appropriate solvent. Install a new
flange gasket and slide the axle shaft into the tube.
(2) Install the bolts and tighten to 129 N´m (95 ft.
lbs.).
AXLE BEARINGS
REMOVAL
(1) Remove wheel and tire assembly.
(2) Remove brake drum.
(3) Remove the axle shaft.
(4) Remove the lock wedge and adjustment nut.
Use Socket DD-1241±JD to remove the adjustment
nut.
(5) Remove the hub assembly. The outer axle bear-
ing will slide out as the hub is being removed.
(6) Remove inner grease seal and discard. Use
Installer 5064 and Handle C-4171 to drive grease
seal and inner axle bearing from the hub.
(7) Remove the bearing cups from the hub bore.
Use a brass drift, or an appropriate removal tool, to
tap out the cups.
INSTALLATION
(1) Thoroughly clean both axle bearings and inte-
rior of the hub with an appropriate cleaning solvent.
(2) Install bearing cups with Installer 8151 and
Handle C-4171.
(3)Pack inner and outer bearings with
Mopar wheel bearing grease or equivalent.
(4) Apply grease to inner and outer bearing cup
surfaces.
(5) Install inner axle bearing in the hub.
(6) Installnewgrease seal in hub with Installer
8149 and Handle C-4171.
(7) Inspect bearing and seal contact surfaces on
the axle tube for burrs/roughness. Remove all the
rough contact surfaces from the axle tube.
(8) Carefully slide the hub onto the axle.
CAUTION: Do not let grease seal contact axle tube
threads during installtion.
(9) Install outer axle bearing.
(10) Install hub bearing adjustment nut with
Socket DD-1241±JD.(11) Tighten adjustment nut to 163-190 N´m (120-
140 ft. lbs.) while rotating the wheel. Then loosen
adjustment nut 1/8 to 1/3 of-a-turn to provide 0.025-
0.250mm (0.001-0.009 in.) wheel bearing end play.
(12) Tap locking wedge into the spindle keyway
and adjustment nut.
NOTE: Located locking wedge in a new position in
the adjustment nut.
(13) Install axle shaft and brake drum.
(14) Install the wheel and tire assembly.
PINION SEAL
REMOVAL
(1) Raise and support the vehicle.
(2) Mark universal joint, pinion yoke and shaft for
installation reference.
(3) Disconnect the propeller shaft from the pinion
yoke.
(4) Remove the wheel and tire assemblies.
(5) Remove brake calipers to prevent any drag
that may cause a false bearing preload torque mea-
surement.
(6) Rotate pinion yoke three or four times.
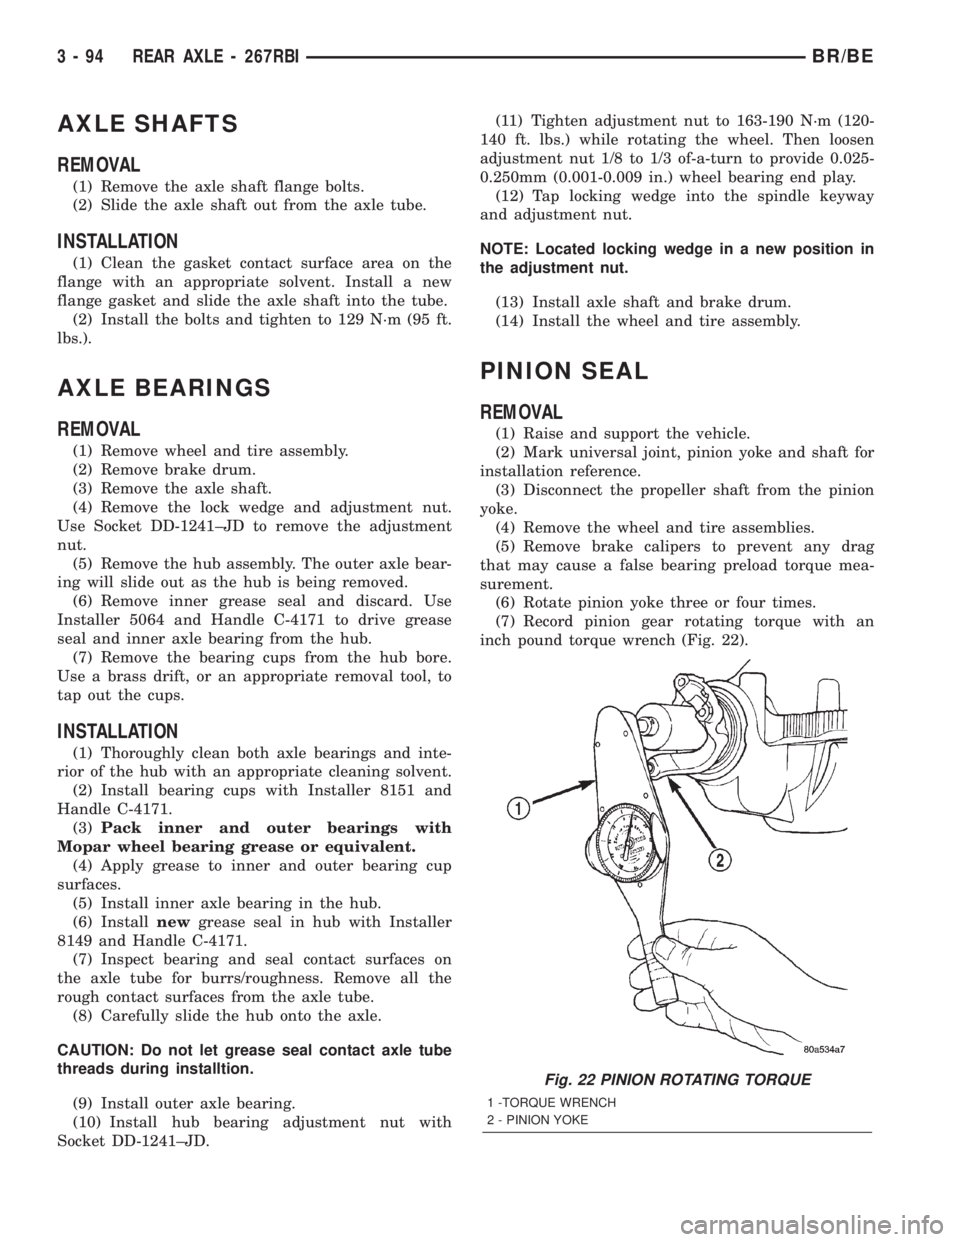
(7) Record pinion gear rotating torque with an
inch pound torque wrench (Fig. 22).
Fig. 22 PINION ROTATING TORQUE
1 -TORQUE WRENCH
2 - PINION YOKE
3 - 94 REAR AXLE - 267RBIBR/BE
Page 153 of 2255

down clamps and tighten the tool turnbuckle finger-
tight.
(2) Install a Pilot Stud C-3288-B at the left side of
the differential housing and attach dial indicator to
the pilot stud. Load the indicator plunger against the
opposite side of the housing and zero the dial indica-
tor.
(3) Spread the housing enough to install the case
in the housing. Measure the distance with the dial
indicator.
CAUTION: Do not spread over 0.50 mm (0.020 in). If
the housing is over-spread, it could be distorted or
damaged.
(4) Remove the dial indicator.
(5) Install differential into the housing. Tap the
differential case with a rawhide/rubber hammer to
ensure the bearings are seated in housing (Fig. 33).
(6) Remove the spreader.
(7) Install bearing caps in their original locations
(Fig. 34) and tighten bearing cap bolts in a criss-
cross pattern to 109 N´m (80 ft. lbs.).
(8) Install axle shafts.
(9) Install the hub bearings.
(10) Apply a bead of red Mopar Silicone Rubber
Sealant or equivalent to the housing cover (Fig. 35).CAUTION: If housing cover is not installed within 3
to 5 minutes, the cover must be cleaned and new
RTV applied or adhesion quality will be compro-
mised.
(11) Install the cover and any identification tag.
Tighten the cover bolts in a criss-cross pattern to 47
N´m (35 ft. lbs.).
(12) Fill the differential with Mopar Hypoid Gear
Lubricant or equivalent to bottom of the fill plug
hole.
Fig. 32 Pinion Mate Shaft Roll-Pin
1 - PUNCH
2 - PINION MATE SHAFT
3 - MATE SHAFT LOCKPIN
Fig. 33 DIFFERENTIAL CASE
1 - RAWHIDE HAMMER
Fig. 34 BEARING CAP IDENTIFICATION
1 - REFERENCE LETTERS
2 - REFERENCE LETTERS
3 - 98 REAR AXLE - 267RBIBR/BE
DIFFERENTIAL (Continued)
Page 154 of 2255

(13) Install the fill hole plug and tighten to 34 N´m
(25 ft. lbs.).
(14) Remove support and lower vehicle.
DIFFERENTIAL - POWR-LOK
DIAGNOSIS AND TESTING - POWR-LOKT
WARNING: WHEN SERVICING VEHICLES WITH A
POWR-LOKTDIFFERENTIAL DO NOT USE THE
ENGINE TO TURN THE AXLE AND WHEELS. BOTH
REAR WHEELS MUST BE RAISED AND THE VEHI-
CLE SUPPORTED. THE AXLE CAN EXERT ENOUGH
FORCE IF ONE WHEEL IS IN CONTACT WITH A
SURFACE TO CAUSE THE VEHICLE TO MOVE.
The differential can be tested without removing the
differential case by measuring rotating torque. Make
sure brakes are not dragging during this measure-
ment.
(1) Place blocks in front and rear of both front
wheels.
(2) Raise one rear wheel until it is completely off
the ground.
(3) Engine off, transmission in neutral, and park-
ing brake off.
(4) Remove wheel and bolt Special Tool 6790 or
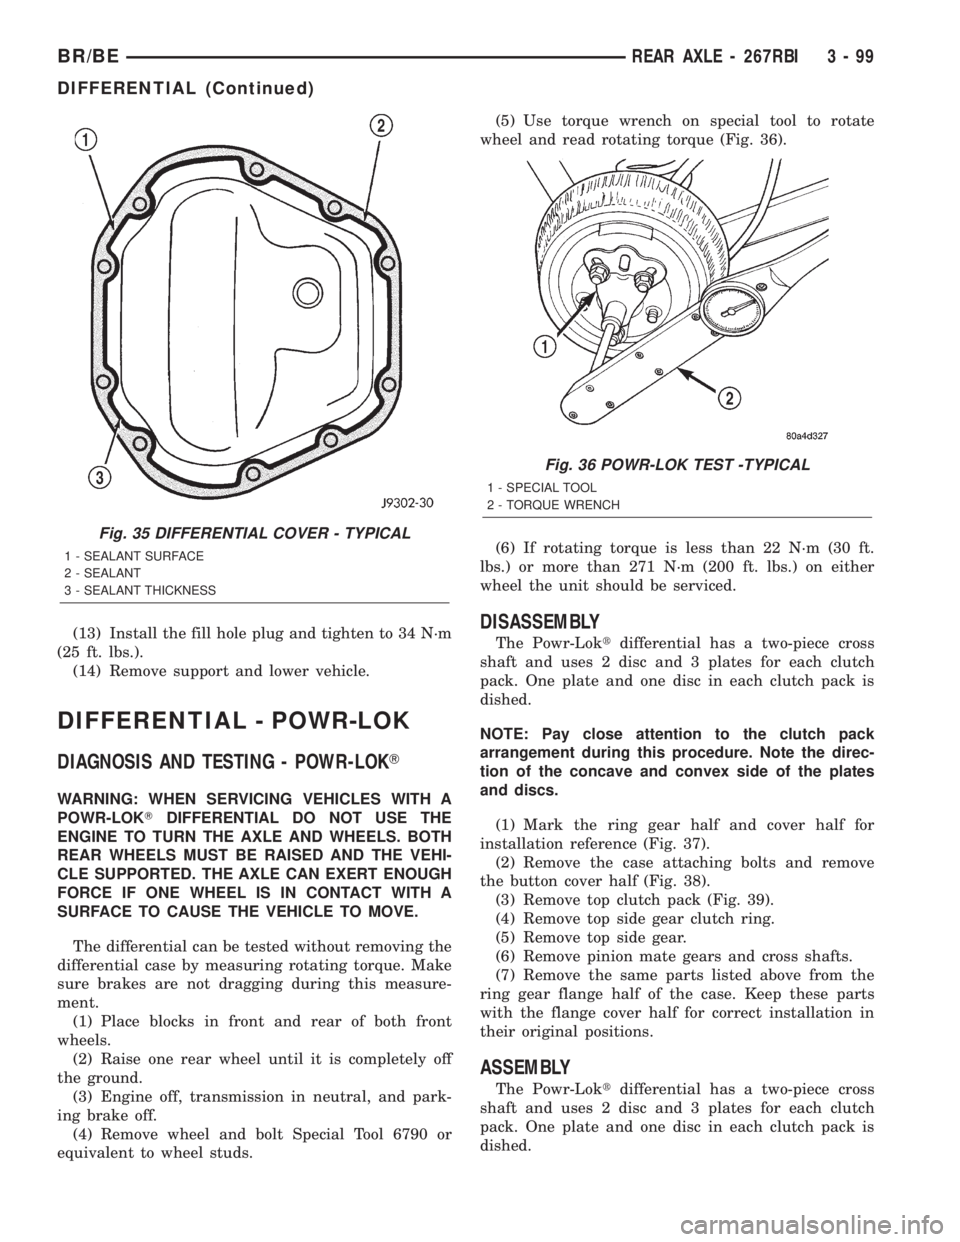
equivalent to wheel studs.(5) Use torque wrench on special tool to rotate
wheel and read rotating torque (Fig. 36).
(6) If rotating torque is less than 22 N´m (30 ft.
lbs.) or more than 271 N´m (200 ft. lbs.) on either
wheel the unit should be serviced.
DISASSEMBLY
The Powr-Loktdifferential has a two-piece cross
shaft and uses 2 disc and 3 plates for each clutch
pack. One plate and one disc in each clutch pack is
dished.
NOTE: Pay close attention to the clutch pack
arrangement during this procedure. Note the direc-
tion of the concave and convex side of the plates
and discs.
(1) Mark the ring gear half and cover half for
installation reference (Fig. 37).
(2) Remove the case attaching bolts and remove
the button cover half (Fig. 38).
(3) Remove top clutch pack (Fig. 39).
(4) Remove top side gear clutch ring.
(5) Remove top side gear.
(6) Remove pinion mate gears and cross shafts.
(7) Remove the same parts listed above from the
ring gear flange half of the case. Keep these parts
with the flange cover half for correct installation in
their original positions.
ASSEMBLY
The Powr-Loktdifferential has a two-piece cross
shaft and uses 2 disc and 3 plates for each clutch
pack. One plate and one disc in each clutch pack is
dished.
Fig. 35 DIFFERENTIAL COVER - TYPICAL
1 - SEALANT SURFACE
2 - SEALANT
3 - SEALANT THICKNESS
Fig. 36 POWR-LOK TEST -TYPICAL
1 - SPECIAL TOOL
2 - TORQUE WRENCH
BR/BEREAR AXLE - 267RBI 3 - 99
DIFFERENTIAL (Continued)
Page 159 of 2255

INSTALLATION
(1) Apply Mopar Door Ease stick lubricant or
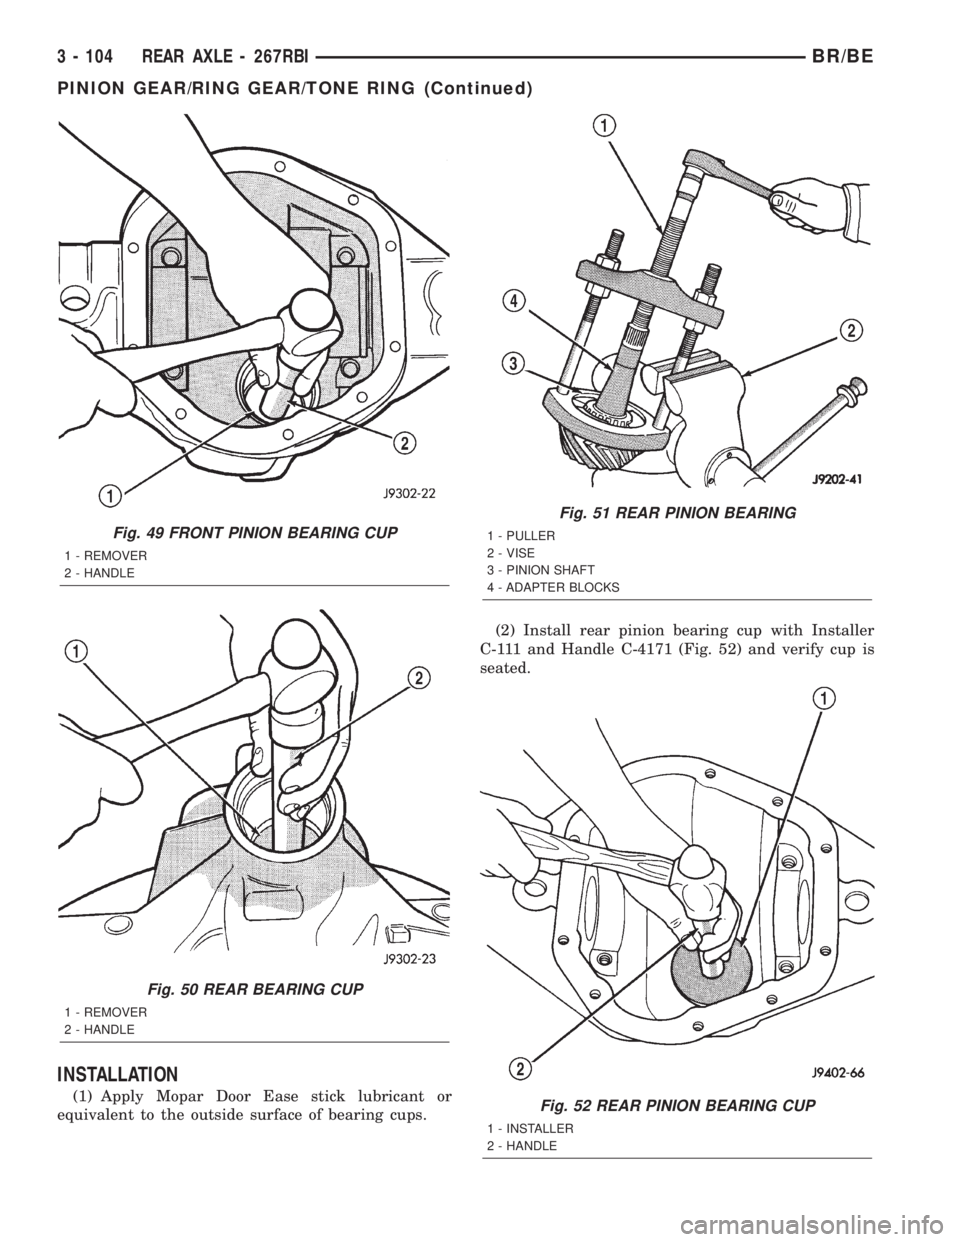
equivalent to the outside surface of bearing cups.(2) Install rear pinion bearing cup with Installer
C-111 and Handle C-4171 (Fig. 52) and verify cup is
seated.
Fig. 49 FRONT PINION BEARING CUP
1 - REMOVER
2 - HANDLE
Fig. 50 REAR BEARING CUP
1 - REMOVER
2 - HANDLE
Fig. 51 REAR PINION BEARING
1 - PULLER
2 - VISE
3 - PINION SHAFT
4 - ADAPTER BLOCKS
Fig. 52 REAR PINION BEARING CUP
1 - INSTALLER
2 - HANDLE
3 - 104 REAR AXLE - 267RBIBR/BE
PINION GEAR/RING GEAR/TONE RING (Continued)
Page 167 of 2255

REMOVAL
(1) Raise and support the vehicle.
(2) Position a suitable lifting device under the
axle.
(3) Secure axle to device.
(4) Remove the wheels and tires.
(5) Remove the RWAL sensor from the differential
housing, if necessary.
(6) Disconnect the brake hose at the axle junction
block.
(7) Disconnect the parking brake cables and cable
brackets.
(8)
Disconnect the vent hose from the axle shaft tube.
(9) Mark the propeller shaft and companion flange
for installation alignment reference.
(10) Remove propeller shaft.
(11) Disconnect shock absorbers from axle.
(12)
Remove the spring clamps and spring brackets.
(13) Separate the axle from the vehicle.
INSTALLATION
(1) Raise the axle with lifting device and align to
the leaf spring centering bolts.
(2) Install the spring clamps and spring brackets.
(3) Install the shock absorbers.
(4) Install the RWAL sensor to the differential
housing, if necessary
(5) Install the parking brake cables and cable
brackets.
(6)
Install the brake hose to the axle junction block.
(7) Install axle vent hose.
(8) Install the propeller shaft with reference marks
aligned.
(9) Install the wheels and tires.
(10) Add gear lubricant, if necessary. Refer to
Specifications for lubricant requirements.
(11) Remove lifting device from axle and lower the
vehicle.
ADJUSTMENTS
Ring and pinion gears are supplied as matched
sets only. The identifying numbers for the ring and
pinion gear are etched into the face of each gear (Fig.
4). A plus (+) number, minus (±) number or zero (0) is
etched into the face of the pinion gear. This number
is the amount (in thousandths of an inch) the depth
varies from the standard depth setting of a pinion
etched with a (0). The standard setting from the cen-
ter line of the ring gear to the back face of the pinion
is 147.625 mm (5.812 in.). The standard depth pro-
vides the best teeth contact pattern. Refer to Back-
lash and Contact Pattern Analysis Paragraph in this
section for additional information.
Compensation for pinion depth variance is
achieved with select shims. The shims are placed
under the inner pinion bearing cone (Fig. 5).If a new gear set is being installed, note the depth
variance etched into both the original and replace-
ment pinion gear. Add or subtract the thickness of
the original depth shims to compensate for the differ-
ence in the depth variances. Refer to the Depth Vari-
ance charts.
Note where Old and New Pinion Marking columns
intersect. Intersecting figure represents plus or
minus amount needed.
Note the etched number on the face of the drive pin-
ion gear (±1, ±2, 0, +1, +2, etc.). The numbers represent
Fig. 4 PINION GEAR ID NUMBERS
1 - PRODUCTION NUMBERS
2 - PINION GEAR DEPTH VARIANCE
3 - GEAR MATCHING NUMBER
Fig. 5 SHIM LOCATIONS
1 - PINION BEARING PRELOAD SHIM
2 - DIFFERENTIAL BEARING SHIM
3 - PINION GEAR DEPTH SHIM
3 - 112 REAR AXLE - 286RBIBR/BE
REAR AXLE - 286RBI (Continued)
Page 168 of 2255

thousands of an inch deviation from the standard. If the
number is negative, add that value to the required
thickness of the depth shim(s). If the number is posi-tive, subtract that value from the thickness of the depth
shim(s). If the number is 0 no change is necessary. Refer
to the Pinion Gear Depth Variance Chart.
PINION GEAR DEPTH VARIANCE
Original
Pinion
Gear
Depth
VarianceReplacement Pinion Gear Depth Variance
24232221 0 +1 +2 +3 +4
+4+0.008 +0.007 +0.006 +0.005 +0.004 +0.003 +0.002 +0.001 0
+3+0.007 +0.006 +0.005 +0.004 +0.003 +0.002 +0.001 020.001
+2+0.006 +0.005 +0.004 +0.003 +0.002 +0.001 020.00120.002
+1+0.005 +0.004 +0.003 +0.002 +0.001 020.00120.00220.003
0+0.004 +0.003 +0.002 +0.001 020.00120.00220.00320.004
21+0.003 +0.002 +0.001 020.00120.00220.00320.00420.005
22+0.002 +0.001 020.00120.00220.00320.00420.00520.006
23+0.001 020.00120.00220.00320.00420.00520.00620.007
24020.00120.00220.00320.00420.00520.00620.00720.008
PINION DEPTH MEASUREMENT AND ADJUSTMENT
Measurements are taken with pinion cups and pin-
ion bearings installed in housing. Take measure-
ments with a Pinion Gauge Set 6730 and Dial
Indicator C-3339 (Fig. 6).
(1) Assemble Pinion Height Block 6739, Pinion
Block 6738 and rear pinion bearing onto Screw 6741
(Fig. 6).
(2) Insert assembled height gauge components,
rear bearing and screw into the housing through pin-
ion bearing cups (Fig. 7).
(3) Install front pinion bearing and Cone 6740
hand tight (Fig. 6).
(4) Place Arbor Disc 6732 on Arbor D-115-3 in posi-
tion in the housing side bearing cradles (Fig. 8).
Install differential bearing caps on Arbor Discs and
snug the bearing cap bolts. Then tighten cap bolts in
a criss-cross pattern to 108 N´m (80 ft. lbs.).
NOTE: Arbor Discs 6732 have different step diame-
ters to fit other axle sizes. Pick correct size step for
axle being serviced.
(5) Assemble Dial Indicator C-3339 into Scooter
Block D-115-2 and secure set screw.
(6) Position Scooter Block/Dial Indicator flush on
the pinion height block. Hold scooter block and zero
the dial indicator.
(7) Slowly slide the scooter block across the pinion
height block over to the arbor (Fig. 9). Move the
scooter block till dial indicator crests the arbor, then
record the highest reading.
Fig. 6 PINION GEAR DEPTH GAUGE
1 - DIAL INDICATOR
2 - ARBOR
3 - PINION HEIGHT BLOCK
4 - CONE
5 - SCREW
6 - PINION BLOCK
7 - SCOOTER BLOCK
8 - ARBOR DISC
BR/BEREAR AXLE - 286RBI 3 - 113
REAR AXLE - 286RBI (Continued)