Page 390 of 497

6-25
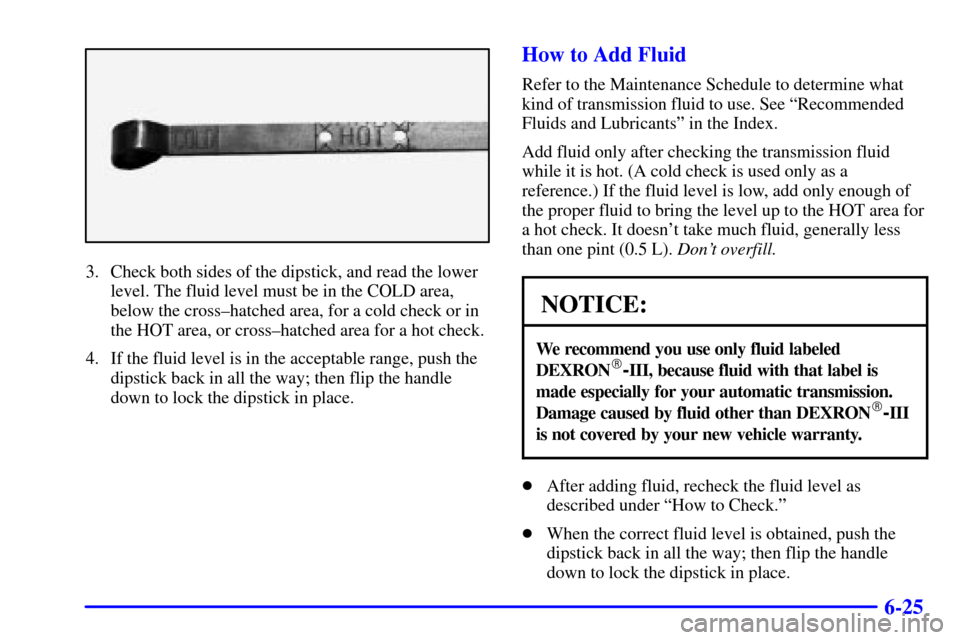
3. Check both sides of the dipstick, and read the lower
level. The fluid level must be in the COLD area,
below the cross±hatched area, for a cold check or in
the HOT area, or cross±hatched area for a hot check.
4. If the fluid level is in the acceptable range, push the
dipstick back in all the way; then flip the handle
down to lock the dipstick in place.
How to Add Fluid
Refer to the Maintenance Schedule to determine what
kind of transmission fluid to use. See ªRecommended
Fluids and Lubricantsº in the Index.
Add fluid only after checking the transmission fluid
while it is hot. (A cold check is used only as a
reference.) If the fluid level is low, add only enough of
the proper fluid to bring the level up to the HOT area for
a hot check. It doesn't take much fluid, generally less
than one pint (0.5 L). Don't overfill.
NOTICE:
We recommend you use only fluid labeled
DEXRON�-III, because fluid with that label is
made especially for your automatic transmission.
Damage caused by fluid other than DEXRON
�-III
is not covered by your new vehicle warranty.
�After adding fluid, recheck the fluid level as
described under ªHow to Check.º
�When the correct fluid level is obtained, push the
dipstick back in all the way; then flip the handle
down to lock the dipstick in place.
Page 412 of 497
6-47 Headlamps
1. Remove the two pins on the top of the headlamp
assembly. To remove the pins, turn the outer pin
outward and pull it straight up. To remove the inner
pin, turn it in and pull it straight up.
A. Low-Beam Headlamp
B. High
-Beam Headlamp
2. Pull the headlamp assembly out.
3. Unplug the electrical connector.
4. Turn the old bulb counterclockwise and remove it
from the headlamp assembly.
5. Put the new bulb into the assembly and turn it
clockwise until it is tight. Use care not to touch the
bulb with your fingers or hands.
6. Plug in the electrical connector.
7. Put the headlamp assembly back into the vehicle.
Install the two pins.
Page 413 of 497
6-48 Front Turn Signal, Sidemarker and
Daytime Running Lamps
A. Sidemarker Lamp
B. Retainer Clip
C. Front Turn Signal Lamp
D. Daytime Running Lamp1. Remove the headlamp assembly as
mentioned previously.
2. Press the retainer clip, located behind the turn signal
housing, towards the outside of the vehicle.
3. Pull the turn signal housing out from the vehicle.
4. Press the locking release lever, turn the bulb
socket counterclockwise and remove it from the
turn signal housing.
5. Remove the old bulb from the bulb socket.
6. Put the new bulb into the bulb socket. Use care not
to touch the bulb with your fingers or hands.
7. Put the bulb socket into the turn signal housing and
turn it clockwise until it locks.
8. Put the turn signal housing back onto the vehicle
placing the hook and posts on the inner side into the
alignment holes first and then the outer side into the
retainer bracket until you hear a click.
9. Put the headlamp assembly back into the vehicle.
Page 414 of 497
6-49 Center High-Mounted Stoplamp (CHMSL)
and Cargo Lamp
1. Remove the screws and lift off the lamp assembly.A. Cargo Lamps
B. Center High
-Mounted Stoplamps
2. Remove the CHMSL bulb holder back plate from the
housing by pressing the release tabs.
3. Remove the CHMSL bulb by pulling the bulb
straight out from the holder back plate. Remove a
cargo bulb by turning the socket counterclockwise
and pulling the bulb straight out.
Page 415 of 497
6-50
4. If a CHMSL bulb is replaced, put the new bulb into
the socket and press it in until it is tight.
If a cargo lamp is replaced, put a new cargo lamp
bulb into the socket and press it in until it is tight
before turning the socket counterclockwise.
5. Put the bulb holder back plate into the lamp housing.
6. Reinstall the lamp assembly and tighten the screws.
Pickup Box Identification Lamps/Fender
Marker Lamps
1. Remove the screws and lamp assembly.
2. Unplug the lamp assembly harness.
3. Use a screwdriver to gently pry the individual lamp
from the lamp housing.
4. Unplug the lamp at the connector.
5. Plug in a new lamp and snap it into the housing.
6. Reinstall the lamp housing.
Page 417 of 497
6-52
3. Press the release tab and turn the bulb
socket counterclockwise to remove it from
the taillamp housing.
4. Pull the old bulb straight out from the socket.
5. Press a new bulb into the socket and turn the socket
clockwise into the taillamp housing until it clicks.
6. Reinstall the rear lamp assembly.
7. Close the tailgate.
Taillamps (Chassis Cab Models)
A. Turn Signal Lamp
B. Stoplamp
C. Back
-up Lamp
1. Using your hands, peel the rubber seal away from
the lens.
2. Lift the lens off the lamp assembly.
3. Pull the old bulb straight out from the socket.
4. Put a new bulb into the socket and press it in until it
is tight.
5. Reinstall the lens and the lens seal.
Page 418 of 497
6-53 Roof Marker Lamps
1. Remove the two screws
and lift off the lens.
2. The center roof marker lamps has six screws
to remove.
3. Turn the old bulb counterclockwise to remove it
from the socket.
Page 419 of 497
6-54
4. Put a new bulb into the
socket and turn
clockwise until it locks
in place.
5. Reinstall the lens and tighten the screws.