2002 CHEVROLET AVEO check oil
[x] Cancel search: check oilPage 2012 of 5127
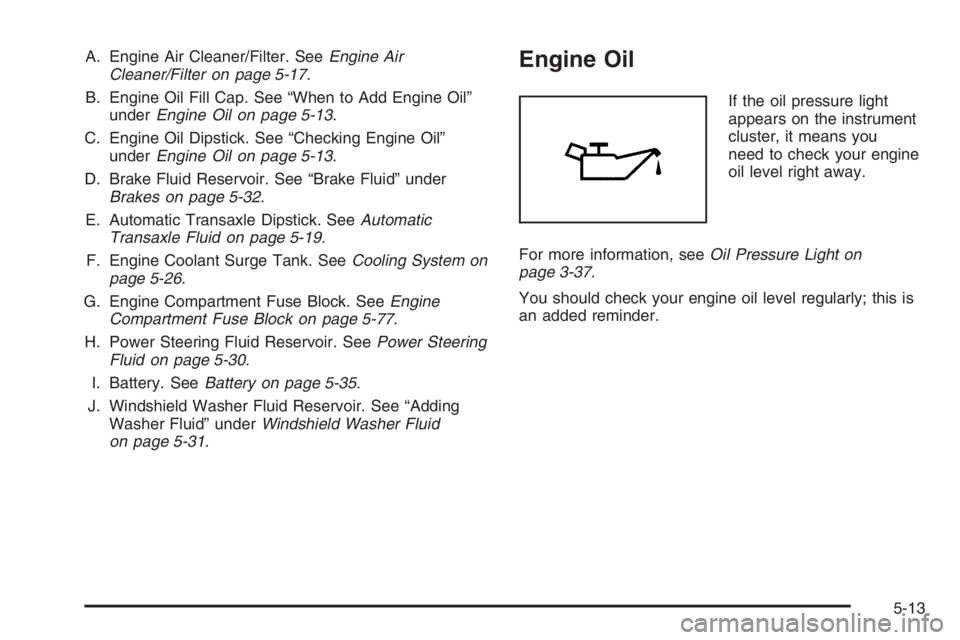
A. Engine Air Cleaner/Filter. SeeEngine Air
Cleaner/Filter on page 5-17.
B. Engine Oil Fill Cap. See “When to Add Engine Oil”
underEngine Oil on page 5-13.
C. Engine Oil Dipstick. See “Checking Engine Oil”
underEngine Oil on page 5-13.
D. Brake Fluid Reservoir. See “Brake Fluid” under
Brakes on page 5-32.
E. Automatic Transaxle Dipstick. SeeAutomatic
Transaxle Fluid on page 5-19.
F. Engine Coolant Surge Tank. SeeCooling System on
page 5-26.
G. Engine Compartment Fuse Block. SeeEngine
Compartment Fuse Block on page 5-77.
H. Power Steering Fluid Reservoir. SeePower Steering
Fluid on page 5-30.
I. Battery. SeeBattery on page 5-35.
J. Windshield Washer Fluid Reservoir. See “Adding
Washer Fluid” underWindshield Washer Fluid
on page 5-31.Engine Oil
If the oil pressure light
appears on the instrument
cluster, it means you
need to check your engine
oil level right away.
For more information, seeOil Pressure Light on
page 3-37.
You should check your engine oil level regularly; this is
an added reminder.
5-13
Page 2013 of 5127
Checking Engine Oil
It is a good idea to check your engine oil every time you
get fuel. In order to get an accurate reading, the oil
must be warm and the vehicle must be on level ground.
The engine oil dipstick handle is a yellow loop. See
Engine Compartment Overview on page 5-12for
the location of the engine oil dipstick.
1. Turn off the engine and give the oil several minutes
to drain back into the oil pan. If you do not do this,
the oil dipstick might not show the actual level.
2. Pull the dipstick and clean it with a paper towel or
cloth, then push it back in all the way. Remove it
again, keeping the tip down and check the level.
When to Add Engine Oil
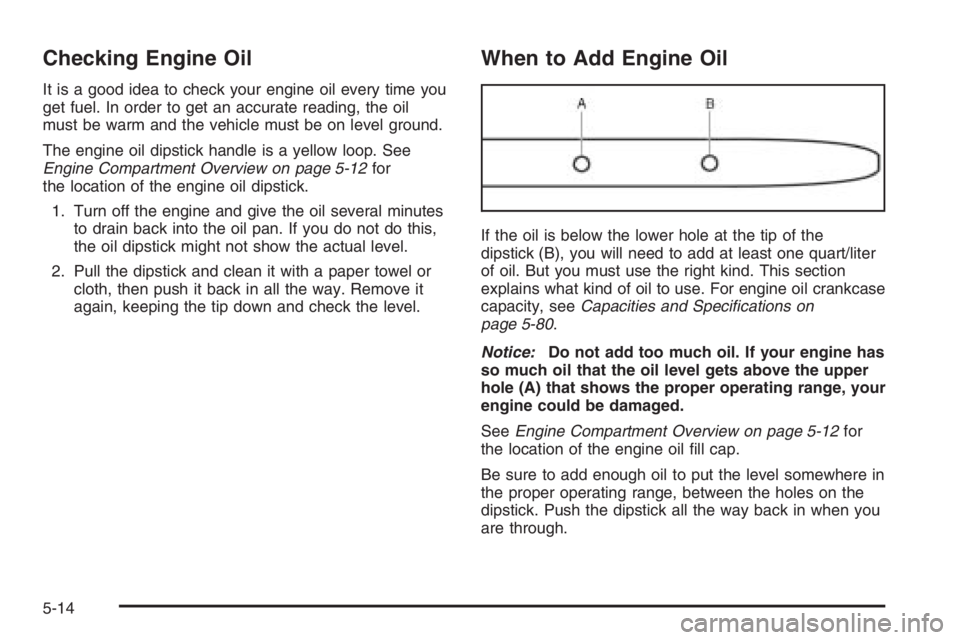
If the oil is below the lower hole at the tip of the
dipstick (B), you will need to add at least one quart/liter
of oil. But you must use the right kind. This section
explains what kind of oil to use. For engine oil crankcase
capacity, seeCapacities and Specifications on
page 5-80.
Notice:Do not add too much oil. If your engine has
so much oil that the oil level gets above the upper
hole (A) that shows the proper operating range, your
engine could be damaged.
SeeEngine Compartment Overview on page 5-12for
the location of the engine oil fill cap.
Be sure to add enough oil to put the level somewhere in
the proper operating range, between the holes on the
dipstick. Push the dipstick all the way back in when you
are through.
5-14
Page 2021 of 5127
Engine Coolant
The following explains your cooling system and how to
add coolant when it is low. If you have a problem
with engine overheating, seeEngine Overheating on
page 5-24.
A 50/50 mixture of clean, drinkable water and proper
coolant will:
•Give freezing protection down to−34°F (−37°C).
•Give boiling protection up to 265°F (129°C).
•Protect against rust and corrosion.
•Help keep the proper engine temperature.
•Let the warning lights and gages work as they
should.
What to Use
Use a 50/50 mixture of clean, drinkable water and coolant
that meets GM Specification 1825M, which will not
damage aluminum parts. You can also use a recycled
coolant conforming to GM Specification 1825M with a
complete coolant flush and refill. If you use this coolant
mixture, you do not need to add anything else.
{CAUTION:
Adding only plain water to your cooling
system can be dangerous. Plain water, or
some other liquid such as alcohol, can boil
before the proper coolant mixture will. Your
vehicle’s coolant warning system is set for the
proper coolant mixture. With plain water or the
wrong mixture, your engine could get too hot
but you would not get the overheat warning.
Your engine could catch re and you or others
could be burned. Use a 50/50 mixture of clean,
drinkable water and the proper coolant.
Notice:If you use an improper coolant mixture, your
engine could overheat and be badly damaged. The
repair cost would not be covered by your warranty.
Too much water in the mixture can freeze and crack
the engine, radiator, heater core, and other parts.
If you have to add coolant more than four times a year,
have your dealer check your cooling system.
5-22
Page 2065 of 5127
Compact Spare Tire
Although the compact spare tire was fully inflated when
your vehicle was new, it can lose air after a time.
Check the inflation pressure regularly. It should be
60 psi (420 kPa).
After installing the compact spare on your vehicle, you
should stop as soon as possible and make sure
your spare tire is correctly inflated. The compact spare
is made to perform well at speeds up to 50 mph
(80 km/h), so you can finish your trip and have your
full-size tire repaired or replaced where you want.
Of course, it is best to replace your spare with a full-size
tire as soon as you can. Your spare will last longer
and be in good shape in case you need it again.
Notice:When the compact spare is installed, do
not take your vehicle through an automatic car wash
with guide rails. The compact spare can get
caught on the rails. That can damage the tire and
wheel, and maybe other parts of your vehicle.
Do not use your compact spare on other vehicles.
And do not mix your compact spare tire or wheel with
other wheels or tires. They will not fit. Keep your
spare tire and its wheel together.
Notice:Tire chains will not t your compact spare.
Using them can damage your vehicle and can
damage the chains too. Do not use tire chains on
your compact spare.
Appearance Care
Cleaning the Inside of Your Vehicle
Your vehicle’s interior will continue to look its best if
it is cleaned often. Although not always visible, dust and
dirt can accumulate on your upholstery. Dirt can
damage carpet, fabric, leather, and plastic surfaces.
Regular vacuuming is recommended to remove particles
from your upholstery. It is important to keep your
upholstery from becoming and remaining heavily soiled.
Soils should be removed as quickly as possible. Your
vehicle’s interior may experience extremes of heat
that could cause stains to set rapidly.
Lighter colored interiors may require more frequent
cleaning. Use care because newspapers and garments
that transfer color to your home furnishings may also
transfer color to your vehicle’s interior.
When cleaning your vehicle’s interior, only use cleaners
specifically designed for the surfaces being cleaned.
Permanent damage may result from using cleaners on
surfaces for which they were not intended. Use glass
cleaner only on glass. Remove any accidental over-spray
from other surfaces immediately. To prevent over-spray,
apply cleaner directly to the cleaning cloth.
5-66
Page 2069 of 5127
Finish Care
Occasional waxing or mild polishing of the vehicle by
hand may be necessary to remove residue from
the paint finish. GM-approved cleaning products can be
obtained from your dealer. SeeVehicle
Care/Appearance Materials on page 5-73.
Notice:Machine compounding or aggressive
polishing on a basecoat/clearcoat paint nish may
damage it. Use only non-abrasive waxes and
polishes that are made for a basecoat/clearcoat
paint nish on your vehicle.
The vehicle has a “basecoat/clearcoat” paint finish. The
clearcoat gives more depth and gloss to the colored
basecoat. Always use waxes and polishes that are
non-abrasive and made for a basecoat/clearcoat paint
finish.
Foreign materials such as calcium chloride and other
salts, ice melting agents, road oil and tar, tree sap, bird
droppings, chemicals from industrial chimneys, etc.,
can damage the vehicle’s finish if they remain on painted
surfaces. Wash the vehicle as soon as possible. If
necessary, use non-abrasive cleaners that are marked
safe for painted surfaces to remove foreign matter.Exterior painted surfaces are subject to aging, weather,
and chemical fallout that can take their toll over a
period of years. To help keep the paint finish looking
new, keep the vehicle in a garage or covered whenever
possible.
Windshield and Wiper Blades
If the windshield is not clear after using the windshield
washer, or if the wiper blade chatters when running,
wax, sap, or other material may be on the blade
or windshield.
Clean the outside of the windshield with a glass
cleaning liquid or powder and water solution. The
windshield is clean if beads do not form when it is rinsed
with water.
Grime from the windshield will stick to the wiper blades
and affect their performance. Clean the blade by
wiping vigorously with a cloth soaked in full-strength
windshield washer solvent. Then rinse the blade
with water.
Check the wiper blades and clean them as necessary;
replace blades that look worn.
5-70
Page 2079 of 5127
Capacities and Specications
The following approximate capacities are given in English and metric conversions. SeePart D: Recommended Fluids
and Lubricants on page 6-25for more information.
ApplicationCapacities
English Metric
Air Conditioning Refrigerant R134a 1.48 lbs 0.67 kg
Cooling System 6.3 qt 6.0 L
Engine Oil with Filter 3.96 qt 3.75 L
Fuel Tank 11.9 gal 45.0 L
Transaxle, Automatic 6.2 qt 5.87 L
Transaxle, Manual 1.9 qt 1.8 L
Wheel Nut Torque 81 lb ft 110Y
All capacities are approximate. When adding, be sure to fill to the appropriate level, as recommended in this
manual. Recheck fluid level after filling.
Engine Specications
Engine VIN Code Transaxle Spark Plug Gap
1.6L L4 (L91) 6Automatic and
Manual0.039-0.043 inch (1.0-1.1 mm)
5-80
Page 2083 of 5127
Maintenance Schedule
Introduction
Important: Keep engine oil at the proper level and
change as recommended.
Have you purchased the GM Protection Plan? The Plan
supplements your new vehicle warranties. See your
Warranty and Owner Assistance booklet or your dealer
for details.
Maintenance Requirements
Maintenance intervals, checks, inspections and
recommended fluids and lubricants as prescribed in this
manual are necessary to keep your vehicle in good
working condition. Any damage caused by failure
to follow scheduled maintenance may not be covered by
warranty.
Your Vehicle and the Environment
Proper vehicle maintenance not only helps to keep your
vehicle in good working condition, but also helps the
environment. Improper vehicle maintenance can
even affect the quality of the air we breathe. Improper
fluid levels or the wrong tire inflation can increase
the level of emissions from your vehicle. To help protect
our environment, and to keep your vehicle in good
condition, be sure to maintain your vehicle properly.
6-2
Page 2087 of 5127
Long Trip/Highway Denition
Follow this scheduled maintenanceonlyif none of the
conditions from the Short Trip/City Scheduled
Maintenance are true. Do not use this schedule if the
vehicle is used for trailer towing, driven in a dusty area
or used off paved roads. Use the Short Trip/City
schedule for these conditions.
Driving a vehicle with a fully warmed engine under
highway conditions will cause engine oil to break down
slower.
Long Trip/Highway Intervals
Every 7,500 Miles (12 500 km):Engine Oil and Filter
Change (or every 12 months, whichever occurs
first). Tire Rotation.
Every 15,000 Miles (25 000 km):Engine Air Cleaner
Filter Inspection. Passenger Compartment Air Filter
Replacement. Drive Belt(s) Inspection.
Every 30,000 Miles (50 000 km):Engine Air Cleaner
Filter Replacement. Spark Plug Replacement. Cooling
System Service. EVAP System Service. PCV System
Service. Timing Belt Inspection. Brake/Clutch Fluid
Change (or 24 months, whichever occurs first).Every 60,000 Miles (100 000 km):Spark Plug Wire
Replacement. Timing Belt Replacement. EVAP System
Solenoid Valve Replacement.
Every 90,000 Miles (150 000 km):Fuel Filter
Replacement. Engine Oil Pan Drain Plug Washer
Replacement.
These intervals only summarize maintenance services.
Be sure to follow the complete scheduled maintenance
on the following pages.
Short Trip/City Scheduled
Maintenance
The services shown in this schedule up to 100,000 miles
(166 000 km) should be repeated after 100,000 miles
(166 000 km) at the same intervals for the life of
this vehicle.
SeePart B: Owner Checks and Services on page 6-18
andPart C: Periodic Maintenance Inspections on
page 6-23.
6-6