Page 108 of 399

2-51
Interior Lamps
Instrument Panel Brightness Knob
This feature controls the brightness of the instrument
panel lights.
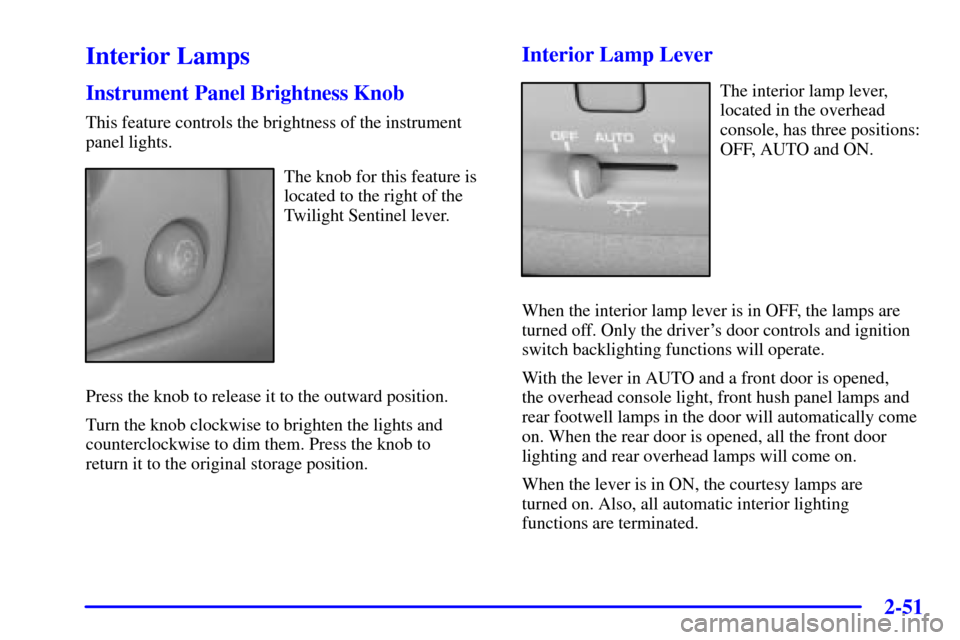
The knob for this feature is
located to the right of the
Twilight Sentinel lever.
Press the knob to release it to the outward position.
Turn the knob clockwise to brighten the lights and
counterclockwise to dim them. Press the knob to
return it to the original storage position.
Interior Lamp Lever
The interior lamp lever,
located in the overhead
console, has three positions:
OFF, AUTO and ON.
When the interior lamp lever is in OFF, the lamps are
turned off. Only the driver's door controls and ignition
switch backlighting functions will operate.
With the lever in AUTO and a front door is opened,
the overhead console light, front hush panel lamps and
rear footwell lamps in the door will automatically come
on. When the rear door is opened, all the front door
lighting and rear overhead lamps will come on.
When the lever is in ON, the courtesy lamps are
turned on. Also, all automatic interior lighting
functions are terminated.
Page 109 of 399

2-52 Illuminated Entry
The illuminated entry system turns on the courtesy
lamps and the backlighting to the door switches and to
the exterior lamp control when a door is opened or if
you press the remote keyless entry transmitter unlock
button. If activated due to the transmitter, the lighting
will remain active for about 40 seconds. Since the
illuminated entry system uses the light sensor, it must be
dark outside in order for the courtesy lamps to turn on.
The courtesy lamps turn off approximately 25 seconds
after the last door is closed. They will dim to off if the
ignition key is placed in ON, or immediately deactivate
if the power locks are activated.
Parade Dimming
This feature prohibits dimming of the digital displays
and backlighting during daylight hours when the key is
in the ignition and the headlamps are on. This feature
operates with the light sensor for the Twilight Sentinel
and is fully automatic. When the light sensor reads
darkness outside and the parking lamps are active,
the digital displays can be adjusted by turning the
instrument panel brightness knob counterclockwise
to dim and clockwise to brighten lighting.
Reading Lamps
The front reading lamps are located in the overhead
console. These lamps and the interior courtesy lamps
come on when a door is opened and it is dark outside.
The rear reading lamps will not come on when a front
door is opened.
The rear courtesy lamps are located on the rear headliner
above the rear seat outboard positions. When a rear door
is opened, both the front and rear reading lamps come
on with the courtesy lamps.
Press the button near each lamp to turn it on and off.
If the reading lamps are left on, they automatically shut
off 10 minutes after the ignition has been turned off.
Battery Load Management
The battery load management feature is designed to
monitor the vehicle's electrical load and determine
when the battery is in a heavy discharge condition.
During times of high electrical loading, the engine
may idle at a higher revolutions per minute (rpm)
setting than normal to make sure the battery charges.
High electrical loads may occur when several of the
following are on: headlamps, high beams, fog lamps,
rear window defogger, the climate control fan at high
speeds, heated seats and engine cooling fans.
Page 115 of 399

2-58
Storage Compartments
Glove Box
The glove box is located in front of the passenger's seat
on the instrument panel. To lock the glove box door,
insert the master key into the lock cylinder and turn it
clockwise. Turn the key counterclockwise to unlock
the door.
Map Pocket
The map/storage pockets are located on each
front door as well as on the passenger's and driver's
front seatbacks.
Center Console Storage
The center console comes with a storage tray, a storage
compartment for CDs or tapes, a dual cupholder that
unfolds, a coinholder, an optional phone and an armrest.
The cupholder can be opened by pressing on the surface
panel located in front of the armrest and unfolding it.
Close the lid to secure it.
Convenience Net
The convenience net attaches to the floor of the trunk.
Put small loads, like grocery bags, behind the net.
It can help keep them from falling over during sharp
turns or quick starts and stops.
The net is not for larger, heavier loads. Store them in the
trunk as far forward as you can. When not using the net,
hook the net to the tabs securing it to the sill plate.
Ashtrays and Cigarette Lighter (Option)
The ashtrays and cigarette lighters may be ordered
through your dealer.
NOTICE:
Don't put papers or other flammable items
into your ashtrays. Hot cigarettes or other
smoking materials could ignite them, causing
a damaging fire.
Page 116 of 399

2-59 Front Ashtray
The front ashtray is located below the climate control
system on the instrument panel.
Press on the lower edge of the cover to access the
ashtray. To clean the ashtray, lift it out by pulling
on the snuffer.
Rear Ashtray
The ashtrays are located on the door armrests.
To use an ashtray, lift the lid.
Cigarette Lighter
NOTICE:
Don't hold a cigarette lighter in with your hand
while it is heating. If you do, it won't be able to
back away from the heating element when it's
ready. That can make it overheat, damaging the
lighter and the heating element.
The front cigarette lighter is located on the center
console in the passenger's side footwell. Open the flip
out door to access the cigarette lighter. Your vehicle
may also have a lighter on the back of the center
console near the rear seat air outlet.
Press the lighter all the way in and release it. It will pop
back out by itself once the element has heated for use.
Cigarette lighters can be used to provide electrical
power to accessories. See ªAccessory Power Outletsº
in the Index for more information.
Sun Visors
Swing down the primary visor to block out glare.
It can also be detached from the center mount and
moved to the side while the auxiliary sunshade remains
to block the glare from the front. The visors also have
side
-to-side slide capability.
The visors also have a storage flap.
Lighted Visor Vanity Mirror
Pull the visor down and lift the cover. Move the slide
switch up or down to brighten or dim the lamp.
Page 121 of 399

2-64
Roadside Assistance with Location: For vehicle
breakdowns, press the OnStar Services button.
An advisor will contact the appropriate help.
Remote Diagnostics: If an instrument panel light comes
on, press the OnStar Services button. An advisor can
perform a check of the engine on
-board computer,
and recommend what action needs to be taken.
OnStar MED
-NET: Med-Net can store your personal
medical history and provide it to emergency personnel
if necessary. (Requires activation and additional fee).
Accident Assist: An advisor can provide step
-by-step
guidance following an accident.
Remote Door Unlock: To contact the center, call
1
-888-4-ONSTAR. You will be required to provide your
security information. An advisor will send a command
to your vehicle to unlock itself. The advisor can delay
unlocking your vehicle. Remote Door Unlock is
disabled 48 hours after the vehicle is parked to maintain
the battery charge.
Vehicle Locator Service: To contact the center, call
1
-888-4-ONSTAR. You will be required to provide your
security information. An advisor will send a command
to your vehicle to sound the horn and/or flash the lamps.Route Support: An advisor can provide directions or
guidance to most places you want to go. In addition,
they can help you locate gas stations, rest areas, ATMs,
hospitals, hotels, stores, eateries and more.
Ride Assist: An advisor can locate transportation in the
event that you are unable to drive.
Concierge Services: The concierge advisor can obtain
tickets, reservations, or help with vacation/trip planning
and other unique items and services.
OnStar System Limitations
Complete limitations can be found on the Subscriber
Services Agreement.
In order to provide you with excellent service, calls with
the OnStar Center may be monitored or recorded.
OnStar service is:
�available in the 48 contiguous United States, Alaska,
Hawaii and Canada;
�available when the vehicle is within the operating
range of a cellular provider;
�subject to limitations caused by atmospheric
conditions, such as severe weather or topographical
conditions, such as mountainous terrain;
�subject to cellular carrier equipment limitations.
Page 127 of 399
2-70
The Instrument Panel -- Your Information System
Page 128 of 399
2-71
The main components of the instrument panel are the following:
A. Air Outlets
B. Driver Information Center (DIC) Buttons
C. Turn Signal/Multifunction Lever
D. HVAC Steering Wheel Controls
(or Cellular Telephone Controls, If Equipped)
E. Instrument Panel Cluster
F. Windshield Wiper/Washer Lever
G. Audio Steering Wheel Controls
H. Ignition Switch
I. Air Vent Control Thumbwheel
J. Hazard Warning Flasher Button
K. Audio SystemL. Exterior Lamp Controls
M. Hood Release
N. Fuel Door Release
O. Trunk Release
P. Cruise Control
Q. Horn
R. Heated Seat Controls
S. Traction Control Switch
T. Console Shift Lever
U. Convenience Storage/Optional Ashtray
V. Climate Controls
W. Glove Box
Page 129 of 399
2-72
Instrument Panel Cluster
Your instrument panel cluster is designed to let you know at a glance how your vehicle is running. You'll know how
fast you're going, how much fuel you're using and many other things you'll need to drive safely and economically.
United States version shown, Canada similar