Page 135 of 357

2-71 Low Traction Light
If you have the
Enhanced Traction
System, this light will
also come on when the
system is limiting
wheel spin.
You may feel or hear the system working, but this is
normal. Slippery road conditions may exist if the
low traction light comes on, so adjust your driving
accordingly. The light will stay on for a few seconds
after the Enhanced Traction System stops limiting wheel
spin. See ªEnhanced Traction Systemº in the Index.
The low traction light also comes on briefly when you
turn the ignition key to RUN. If the light doesn't come
on then, have it fixed so it will be there to tell you when
the Enhanced Traction System is active.
Engine Coolant Temperature Light
This light tells you that
your engine coolant
has overheated or your
radiator cooling fan is
not working.
The light will come on briefly when your ignition is
turned on to show you that it is working.
If you have been operating your vehicle under normal
driving conditions, you should pull off the road, stop
your vehicle and turn off the engine as soon as possible.
See ªEngine Overheatingº in the Index.
Page 230 of 357
5-12
Cooling System
When you decide it's safe to lift the hood, here's what
you'll see:
A. Electric Engine Cooling Fans
B. Radiator Pressure Cap
C. Coolant Recovery Tank
CAUTION:
An electric engine cooling fan under the hood can
start up even when the engine is not running and
can injure you. Keep hands, clothing and tools
away from any underhood electric fan.
If the coolant inside the coolant recovery tank is boiling,
don't do anything else until it cools down. The vehicle
should be parked on a level surface.
Page 231 of 357

5-13
When the engine is cold, the coolant level should be at
or above the COLD mark on the coolant recovery tank.
If it isn't, you may have a leak at the pressure cap or in
the radiator hoses, heater hoses, radiator, water pump or
somewhere else in the cooling system.
CAUTION:
Heater and radiator hoses, and other engine
parts, can be very hot. Don't touch them.
If you do, you can be burned.
Don't run the engine if there is a leak. If you run
the engine, it could lose all coolant. That could
cause an engine fire, and you could be burned.
Get any leak fixed before you drive the vehicle.
If there seems to be no leak, with the engine on, check to
see if the electric engine cooling fans are running. If the
engine is overheating, both fans should be running. If
they aren't, your vehicle needs service.
NOTICE:
Engine damage from running your engine
without coolant isn't covered by your warranty.
See ªOverheated Engine Protection Operating
Modeº in the Index.
NOTICE:
When adding coolant, it is important that you
use only DEX
-COOL� (silicate-free) coolant.
If coolant other than DEX-COOL is added to
the system, premature engine, heater core or
radiator corrosion may result. In addition, the
engine coolant will require change sooner
-- at
30,000 miles (50 000 km) or 24 months,
whichever occurs first. Damage caused by the
use of coolant other than DEX
-COOL� is not
covered by your new vehicle warranty.
Page 232 of 357
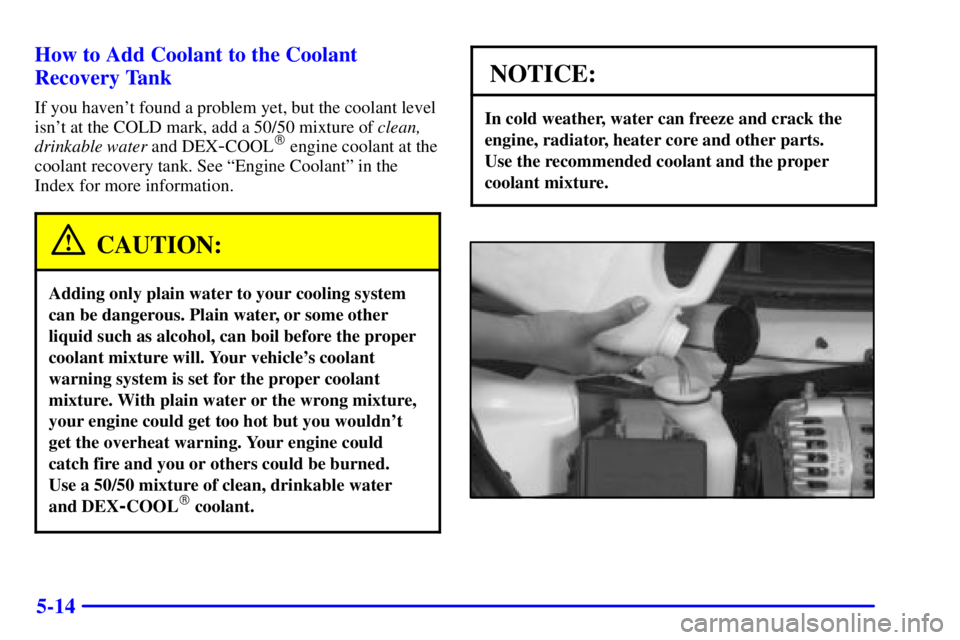
5-14 How to Add Coolant to the Coolant
Recovery Tank
If you haven't found a problem yet, but the coolant level
isn't at the COLD mark, add a 50/50 mixture of clean,
drinkable water and DEX
-COOL� engine coolant at the
coolant recovery tank. See ªEngine Coolantº in the
Index for more information.
CAUTION:
Adding only plain water to your cooling system
can be dangerous. Plain water, or some other
liquid such as alcohol, can boil before the proper
coolant mixture will. Your vehicle's coolant
warning system is set for the proper coolant
mixture. With plain water or the wrong mixture,
your engine could get too hot but you wouldn't
get the overheat warning. Your engine could
catch fire and you or others could be burned.
Use a 50/50 mixture of clean, drinkable water
and DEX
-COOL� coolant.
NOTICE:
In cold weather, water can freeze and crack the
engine, radiator, heater core and other parts.
Use the recommended coolant and the proper
coolant mixture.
Page 233 of 357
5-15
CAUTION:
You can be burned if you spill coolant on hot
engine parts. Coolant contains ethylene glycol
and it will burn if the engine parts are hot
enough. Don't spill coolant on a hot engine.
When the coolant in the coolant recovery tank is at the
COLD mark, start your vehicle.
If the overheat warning continues, there's one more
thing you can try. You can add the proper coolant
mixture directly to the radiator, but be sure the cooling
system is cool before you do it.
CAUTION:
Steam and scalding liquids from a hot cooling
system can blow out and burn you badly.
They are under pressure, and if you turn the
CAUTION: (Continued)
CAUTION: (Continued)
radiator pressure cap -- even a little -- they can
come out at high speed. Never turn the cap
when the cooling system, including the radiator
pressure cap, is hot. Wait for the cooling system
and radiator pressure cap to cool if you ever have
to turn the pressure cap.
Page 234 of 357
5-16 How to Add Coolant to the Radiator
NOTICE:
Your engine has a specific radiator fill procedure.
Failure to follow this procedure could cause your
engine to overheat and be severely damaged.
1. You can remove the radiator pressure cap when the
cooling system, including the radiator pressure cap
and upper radiator hose, is no longer hot.
Turn the pressure cap slowly counterclockwise until
it first stops. (Don't press down while turning the
pressure cap.)
If you hear a hiss, wait for that to stop. A hiss means
there is still some pressure left.
2. Then keep turning the pressure cap, but now push
down as you turn it. Remove the pressure cap.
Page 235 of 357
5-17
CAUTION:
You can be burned if you spill coolant on hot
engine parts. Coolant contains ethylene glycol
and it will burn if the engine parts are hot
enough. Don't spill coolant on a hot engine.
3. After the engine cools, open the coolant air bleed valves.
There are two bleed valves. One is located on the
thermostat housing. The other is located on the
thermostat bypass tube.
4. Fill the radiator
with the proper
DEX
-COOL�
coolant mixture,
up to the base of
the filler neck. See
ªEngine Coolantº
in the Index for
more information
about the proper
coolant mixture.
If you see a stream of coolant coming from an
air bleed valve, close the valve. Otherwise, close the
valves after the radiator is filled.
5. Rinse or wipe any spilled coolant from the engine
and the compartment.
Page 236 of 357
5-18
6. Then fill the coolant recovery tank to the COLD
mark on the coolant recovery tank.
7. Put the cap back on the coolant recovery tank, but
leave the radiator pressure cap off.8. Start the engine and let it run until you can feel the
upper radiator hose getting hot. Watch out for the
engine cooling fans.
9. By this time, the coolant level inside the radiator
filler neck may be lower. If the level is lower, add
more of the proper DEX
-COOL� coolant mixture
through the filler neck until the level reaches the
base of the filler neck.