Page 49 of 104
2
47
Safety check
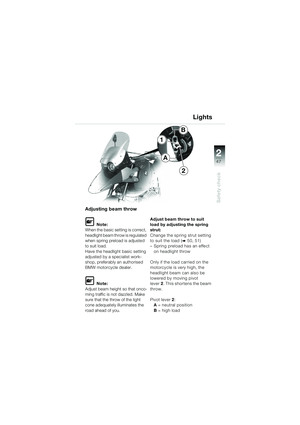
Adjusting beam throw
L Note:
When the basic setting is correct,
headlight beam throw is regulated
when spring preload is adjusted
to suit load.
Have the headlight basic setting
adjusted by a specialist work-
shop, preferably an authorised
BMW motorcycle dealer.
L Note:
Adjust beam height so that onco-
ming traffic is not dazzled. Make
sure that the throw of the light
cone adequately illuminates the
road ahead of you. Adjust beam throw to suit
load by adjusting the spring
strut:
Change the spring strut setting
to suit the load (
b 50, 51)
– Spring preload has an effect on headlight throw
Only if the load carried on the
motorcycle is very high, the
headlight beam can also be
lowered by moving pivot
lever 2. This shortens the beam
throw.
Pivot lever 2 :
A = neutral position
B = high load
1
2 Lights
A
B
10geBKg6.book Seite 47 Dienstag, 19. November 2002 1:11 13
Page 50 of 104
2
48
Safety check
L Note:
Use adjusting screw 1 only for
adjusting the basic setting of
the headlight.
Headlight
basic setting
L Note:
Do not prop the motorcycle on
the centre or side stand. Check tyre pressures and
correct if necessary
Set the spring-strut adjuster
to the position for one-up rid-
ing
– Make sure lever 2 is horizontal
(neutral position)
Position the motorcycle on a
level surface 10 metres
(33 feet) (headlight) from a
light-coloured wall, and with
the rider's weight (approx.
85 kg/187 lbs) on the seat
1
2
Lights
B
A
10geBKg6.book Seite 48 Dienstag, 19. November 2002 1:11 13
Page 51 of 104
2
49
Safety check
Lights
Measure the distance H from
the ground to the centre of
the headlight
Transfer this height H to the
wall and draw a cross on the
wall at this point
Draw a second cross
(x = 15 cm/5.9 in) lower
Switch on the low-beam
headlight
Turn adjusting screw 1 to
align the headlight in such a
way that the light-dark cutoff
starts in the middle of the bot-
tom cross and rises to the
right to the height of the upper
cross, before dropping again. Adjusting screw 1:
– Turn screw counter-clock-
wise: higher
– Turn screw clockwise:
lower
L Note:
Have the headlight basic setting
checked by a specialist work-
shop, preferably an authorised
BMW motorcycle dealer.
10geBKg6.book Seite 49 Dienstag, 19. November 2002 1:11 13
Page 52 of 104
2
50
Safety check
1
S
H
d Warning:
Before riding off, always set
spring preload to suit total
weight.
For off-road riding, increase
spring preload at front and
rear by a suitable amount.
Adjusting front spring
preload
Place motorcycle on centre stand
– Make sure the ground is level and firm
Use hook wrench and exten- sion (wheel-stud wrench) to
adjust preload of spring 1:
Stage 1 – road ( S)
Stage 3 – loose surfaces
(stone chippings etc.)
Stage 5 – off-road ( H)
Suspension spring preload
10geBKg6.book Seite 50 Dienstag, 19. November 2002 1:11 13
Page 53 of 104
2
51
Safety check
H
L
1
d Warning:
Before riding off, always set
spring preload to suit total
weight.
For off-road riding, increase
spring preload at front and
rear by a suitable amount.
For safety reasons, never at-
tempt to alter spring preload
while the motorcycle is being
ridden. Always halt the motor-
cycle before adjusting.
Adjusting rear spring
preload
“LOW” setting (solo):
Turn knob 1 as far as it will go
in “LOW” direction ( L) as indi-
cated by arrow
“HIGH” setting (for off-road
use, or two-up with luggage)
Turn knob 1 as far as it will go
in “HIGH” direction ( H) as
indicated by arrow
Suspension spring preload
10geBKg6.book Seite 51 Dienstag, 19. November 2002 1:11 13
Page 54 of 104
2
52
Safety check
1
Shock-absorber adjustment
d Warning:
Before starting the journey,
adjust the shock absorber to
match total weight.
If spring preload is changed,
the shock absorber has to be
adjusted accordingly.
Place motorcycle on centre stand
– Make sure the ground is level and firm
Adjust the rear shock
absorber with a screwdriver Basic setting
(one-up):
Turn adjusting screw 1 in
direction indicated by arrow H
(clockwise) as far as it will go
Back off adjusting screw 1 half a turn in direction indi-
cated by arrow S (counter-
clockwise)
Hard setting “H”:
Turn adjusting screw 1 in
direction indicated by arrow H
(clockwise) as far as it will go
Soft setting “S”:
Turn adjusting screw 1 in
direction indicated by arrow S
(counter-clockwise) as far as
it will go
10geBKg6.book Seite 52 Dienstag, 19. November 2002 1:11 13
Page 55 of 104
2
53
Safety check
Wheels
Checking wheel rims
d Warning:
Have damaged wheel rims
checked and, if necessary,
replaced by a specialist work-
shop, preferably an author-
ised BMW motorcycle dealer.
Checking spokes
d Warning:
Before riding off, always
make sure that the spokes
are in perfect condition.
Always have damaged
spokes and irregular spoke
tension rectified immediately
by a specialist workshop,
preferably an authorised
BMW motorcycle dealer. Place the motorcycle on its
centre stand.
– Make sure the ground is level and firm
Tap spokes with a screw-
driver and listen for the cor-
rect ringing sound
L Note:
If the note varies, spoke tension
is uneven (some spokes too
loose or too tight).
10geBKg6.book Seite 53 Dienstag, 19. November 2002 1:11 13
Page 56 of 104
2
54
Safety check
Wheels
Checking tyre pressures
d Warning:
Incorrect tyre pressures have
a considerable influence on
handling and on tyre life.
Adjust tyre pressures to suit
total weight. Never exceed ei-
ther the motorcycle’s gross
weight or the individual wheel
load limits (b 57). – When tyres are cold:
Remove valve caps
Check/correct tyre pressure
Tyre pressures for
road tyres and massive-bar
tyres:
front rear
one-up 2.2 bar 2.5 bar
(31.9 psi) 36 psi)
two-up 2.5 bar 2.7 bar
(36 psi) (39 psi)
two-up
and luggage 2.5 bar 2.9 bar (36 psi) (42 psi)
Fully tighten valve caps
Screw valve caps on
tightly
d Warning:
At high road speeds, tyre
valves have a tendency to
open as a result of centrifugal
force.
Use only metal valve caps
with rubber seals.
Valve caps that are screwed
on well prevent air from es-
caping suddenly.
10geBKg6.book Seite 54 Dienstag, 19. November 2002 1:11 13