Page 105 of 151

105n
OverviewControlsMaintenanceRepairsDataIndex
Tire replacement Wheel and tire combinationsTire ageBMW recommends the replacement of
all tires after 6 years at the latest, even
if a tire life of 10 years is possible.
The date on which the tire was manu-
factured is indicated by the code on the
sidewall:
DOT ... 4 101 means that the tire was
produced in the 41st week of the year
2001. Following wheel/tire changesFollowing wheel and/or tire replace-
ment you will need to reinitialize both
the Flat Tire Monitor and the sequential
M gearbox
* SMG II, refer to pages 65,
78.
The right choice
Use only wheels and tires
approved by BMW for the corre-
sponding vehicle model, as otherwise
the tires may make contact with the
body as the result of tolerances despite
the same nominal size being used,
resulting in serious accidents. If non-
approved wheels and tires are used,
BMW cannot evaluate their suitability,
and therefore cannot be held liable for
driving safety.<
BMW tests certain tire brands for each
tire size, classifies them as road-safe
and approves them. Consult your BMW
center for more information. Observe
any country-specific regulations, e.g.
on making a corresponding entry in the
vehicle documents.
The correct wheel and tire combi-
nation affects different systems
such as ABS, DSC, Flat Tire Monitor.
The function of these systems is
impaired if improper wheel and tire
combinations are used.
For this reason, use only tires of the
same brand and tread pattern on the
vehicle and, for example, restore the
approved wheel and tire combination
following a flat tire as soon as possible.<
The use of rims and lug bolts that
do not meet the specifications of
the original factory-installed equipment
will affect the safe operation of your
vehicle and may cause an accident and
personal injury.
Never mix tires of different design, such
as steel-belted radials with radial bias-
belted or bias-ply tires, etc. Mixing tire
types will adversely affect roadholding
and can lead to loss of vehicle
control.<
Storage Store tires in a cool, dry place,
protecting them against light whenever
possible. Protect the tires against
contact with oil, grease and fuel.
Page 106 of 151
 for operation under adverse
winter driving conditions. So-called all-
se")
106n
Special characteristics of winter tires Snow chainsChoosing the right tireBMW recommends winter tires (M+S
radial tires) for operation under adverse
winter driving conditions. So-called all-
season tires with the M+S identification
mark do indeed possess better winter
traction than summer tires that have the
H, V, W, Y and ZR speed ratings, they
generally fail to provide the same levels
of performance as snow tires.
In the interest of safe tracking and
steering response, install winter tires
made by the same manufacturer having
the same tread configuration on all four
wheels. Do not exceed specified
maximum speeds
Never exceed the maximum
speed for which winter tires are
rated.
Unprofessional attempts by laymen to
service tires can lead to damage and
accidents.
Have this work performed by skilled
professionals only. Any BMW center
has the required technical knowledge
and the proper equipment and will be
happy to assist you.<
Tire condition, tire pressureOnce winter tires wear to a tread depth
of less than 0.16 in (4 mm), their perfor-
mance under winter driving conditions
deteriorates noticeably. Worn tires
should therefore be replaced for safety
considerations.
Inflate tires to specified pressure and
have the wheels balanced every time
the tires or wheels have been replaced.Use narrow-link BMW snow chains
* on
winter tires in pairs only and only on the
rear wheels. Comply with all manufac-
turer's safety precautions when
mounting the chains. Do not exceed a
maximum speed of 30 mph (50 km/h)
with snow chains.
After mounting or removing snow
chains, always reinitialize the sequential
M gearbox
* SMG II, refer to page 65.
It is not possible to mount snow
chains on tires with 18- and
19-inch wheels.
Deactivate the Flat Tire Monitor when
using snow chains. Malfunction warn-
ings and undetected losses in pressure
are a possibility when driving with snow
chains.
For additional information, refer to
page 77.<
Page 107 of 151

107n
OverviewControlsMaintenanceRepairsDataIndex
To releasePull the lever located under the left-
hand side of the instrument panel.
Do not attempt to service your
vehicle if you do not have the
required technical background. Failure
to work in an informed, professional
manner when servicing components
and materials constitutes a safety
hazard for vehicle occupants and other
road users. If you are not familiar with
the guidelines, please have the opera-
tions performed by your BMW center.<
To openPull the release handle and open the
hood.
To closePull the hood downwards and allow the
hood to fall from a minimum height of
12 in (30 cm) so that it audibly engages.
Check for proper locking by pulling on
the hood at the left and right above the
headlamps.
To avoid injuries, be sure that the
travel path of the hood is clear
when it is closed, as with all closing
procedures.
If it is determined that the hood is not
completely closed while driving, stop
immediately and close it securely.<
It is not possible to accelerate
from a standing stop using
SMG II
* when the hood is open.<
Hood
Page 108 of 151
108n
Engine compartment essentials1 Filler neck for headlamp and
wind-
shield washer system109
2 Coolant expansion tank112
3 Positive terminal connection for
jump-starting (positive terminal)131 4 Engine oil filler neck110
5 Expansion tank for SMG
* hydraulic
unit (checking and possible refilling
by your BMW center)596 Engine oil dipstick110
7 Filler neck for brake fluid113
Page 109 of 151
109n
OverviewControlsMaintenanceRepairsDataIndex
Washer fluids Headlamp and windshield washer
system Capacity: approx. 5.6 US quarts
(5.3 liters).
Fill with water and Ð if required Ð with a
washer antifreeze (according to manu-
facturer's recommendations).
We recommend that you mix the
washer fluid before adding it to
the reservoir.<
Antifreeze agent for the washer
systems is inflammable. For this
reason, keep it away from sources of
flame and store it only in its original
containers. Store it inaccessible to chil-
dren. Comply with the instructions on
the containers.<
Page 110 of 151

110n
Engine oilChecking engine oil level 1. Park the vehicle on a level surface
2. With the engine warmed to its normal
operating temperature, allow it to idle
for at least 15 seconds, then switch
off
3. After approx. 1 minute, pull the
dipstick out and wipe it off with a
clean lint-free cloth, paper towel, or
similar material
4. Carefully push the dipstick all the
way into the guide tube and pull it
out again
5. The oil level should be between the
two marks on the dipstick.
As with fuel economy, oil consumption
is directly influenced by your driving
style and vehicle operating conditions.
The oil volume between the two marks
on the dipstick corresponds to approx.
1.4 US quarts (1.3 liter).
Adding engine oil While you should wait until the level has
dropped to just above the lower mark
before adding oil, you should never
allow the oil level to fall below this
mark.
Do not fill beyond the upper mark on
the dipstick. Excess oil will damage the
engine.
Before checking the engine oil level
after topping up, restart the engine and
allow it to run to obtain a correct
display. Then proceed as described
under "Checking engine oil level".
Page 111 of 151

111n
OverviewControlsMaintenanceRepairsDataIndex
Engine oil
BMW engines are designed to
operate without oil additives; the
use of additives could lead to damage
in some cases. This is also true for the
manual transmission, the differential,
and the power steering system.<
Recommendation: have the oil changed
by your BMW center only.
Continuous exposure to used oil
has caused cancer in laboratory
testing. For this reason, thoroughly
wash any areas of skin that come into
contact with oil using soap and water.
Always store oils, grease and similar
materials so that they are inaccessible
to children. Comply with warning labels
and information on containers.<
Comply with the applicable envi-
ronmental laws regulating the
disposal of used oil.<
Prescribed engine oilThe quality of the engine oil is
extremely important for the function
and life of an engine. Based on exten-
sive testing, BMW has approved only
certain types of engine oils.
Use only oils approved for your vehicle
model.
Ask your BMW center for details
concerning oils that have been
approved. You can also call BMW of
North America at 1-800-831-1117 or
visit this website: www.bmwusa.com
to obtain this information.< Alternative oil typesShould it not be possible to purchase
an oil approved by BMW, you can also
use other oils for adding smaller quanti-
ties between oil changes as an excep-
tion. The following information must be
specified on the package:
1. Viscosity
preferred: SAE 10W-60
or as an alternative: SAE 5W-40 or
SAE 10W-40
2. Specification
preferred: API SJ/CF
or as an alternative: API SJ
(also SK, SL, S etc.).
Low ambient temperaturesThe oils used by BMW at the factory for
your vehicle model can be used at virtu-
ally any ambient temperature.
However, if the vehicle is exposed to
temperatures below Ð4 7 (Ð20 6) for
extended periods, please have your
BMW center recommend a suitable oil.
Page 112 of 151

112n
Coolant
Do not add coolant to the cooling
system when the engine is hot. If
you attempt to do so, escaping coolant
can cause burns.
To avoid the possibility of damage later
on, never use anything other than
factory-approved, nitrite and amino-
free extended-duty antifreeze with
corrosion inhibitor. Your BMW center is
familiar with the official specifications.
Antifreeze and anti-corrosion agents
are hazardous to health. You should
always store them in their original
containers and in a location inacces-
sible to children. Extended-duty anti-
freeze with corrosion inhibitor contains
ethylene glycol, a flammable
substance. For this reason, do not spill
extended-duty antifreeze with corrosion
inhibitor on hot engine parts. It could
catch fire and cause serious burns.<
Check the coolant level and
add coolant
Check the coolant level when the
engine is cold (approx. 687 or +206).
1. Open the cap for the expansion tank
by turning it slightly counterclock-
wise to allow accumulated pressure
to escape, then open
2. The coolant level is correct when the
upper end of the red float is at least
even with the upper edge of the filler
neck (refer to the arrow in the illustra-
tion), but no more than 0.8 in (2 cm)
above it Ð that is, up to the second
mark on the float (refer also to the
schematic diagram next to the filler
neck)
3. If necessary, add coolant. If the
coolant is low, slowly add
coolant until the correct level is
reached Ñ do not overfill.
Comply with the applicable envi-
ronmental laws regulating the
disposal of extended-duty antifreeze
with corrosion inhibitor.<
 1
1 2
2 3
3 4
4 5
5 6
6 7
7 8
8 9
9 10
10 11
11 12
12 13
13 14
14 15
15 16
16 17
17 18
18 19
19 20
20 21
21 22
22 23
23 24
24 25
25 26
26 27
27 28
28 29
29 30
30 31
31 32
32 33
33 34
34 35
35 36
36 37
37 38
38 39
39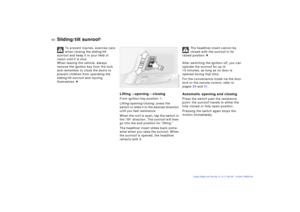 40
40 41
41 42
42 43
43 44
44 45
45 46
46 47
47 48
48 49
49 50
50 51
51 52
52 53
53 54
54 55
55 56
56 57
57 58
58 59
59 60
60 61
61 62
62 63
63 64
64 65
65 66
66 67
67 68
68 69
69 70
70 71
71 72
72 73
73 74
74 75
75 76
76 77
77 78
78 79
79 80
80 81
81 82
82 83
83 84
84 85
85 86
86 87
87 88
88 89
89 90
90 91
91 92
92 93
93 94
94 95
95 96
96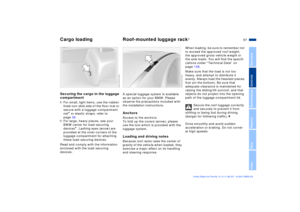 97
97 98
98 99
99 100
100 101
101 102
102 103
103 104
104 105
105 106
106 107
107 108
108 109
109 110
110 111
111 112
112 113
113 114
114 115
115 116
116 117
117 118
118 119
119 120
120 121
121 122
122 123
123 124
124 125
125 126
126 127
127 128
128 129
129 130
130 131
131 132
132 133
133 134
134 135
135 136
136 137
137 138
138 139
139 140
140 141
141 142
142 143
143 144
144 145
145 146
146 147
147 148
148 149
149 150
150131 4")
.
Fill with water and Ð if required Ð with a
washe")