Page 49 of 147

49n
OverviewControlsMaintenanceRepairsDataIndex
Airbags
The airbags do not deploy in
response to minor collisions, rear
impacts and certain kinds of vehicle
rollover.<
For your safety, comply with the
following instructions for the
airbags. If you do not, the airbags may
not be able to provide their maximum
protection. All passengers in the vehicle
should be aware of and comply with
these directions:
The airbags are supplemental restraint
devices designed to provide extra
protection; they are not a substitute for
safety belts. Wear your safety belt at all
times. The airbags will not be triggered
in the event of a minor accident, a
vehicle rollover, or collisions from the
rear. In these instances, the safety belt
provides optimal protection.
Airbags are located under cover panels
in the steering wheel, in the instrument
panel, in the side trim panels in the
front and rear
*, in the roof panels, and
in the sides of the inside roof lining.
Adjust your seat to a position that
provides maximum distance between
you and the steering wheel, the instru-
ment panel and the door while still
allowing comfortable and safe access
to all vehicle controls.
To avoid sustaining hand and arm inju-
ries, always grasp the steering wheel
on the rim with the hands at the 9 and
3 o'clock positions. Do not place your
hands on the center pad.
Never allow any objects to obstruct the
area between the airbag and an occu-
pant.
Do not use the cover panel above the
passenger-side airbag as a storage
area.
Do not apply adhesive materials to the
cover panels of the airbags, cover them
or modify them in any other way.
Do not install a rear-facing child-
restraint system in the front passenger
seat of this vehicle.
Children under 13 years of age and less
than 5 ft (150 cm) tall should ride only in
the rear seat. Infants or small children
should never be held on the lap of a
passenger.
If your vehicle is equipped with side
airbags in the rear passenger area
*, be
sure that child restraints are mounted
correctly, with the greatest-possible
distance between the airbags in the
side trim panels. Do not allow children
to lean out of the child's seat in the
direction of the side trim panels. If they
do so, serious injuries can occur if the
airbag is triggered.
always sit upright and be properly
restrained (infants and small children in
appropriate child-restraint systems;
larger children and adults using the
safety belts). Never let an occupant's
head rest near or on a side airbag: in
the event of deployment the airbag
could cause a serious or fatal injury.
Please note that the word Airbag
embossed on the door trim panel indi-
cates the airbag's location.
Accident research shows that the
safest place for children in an automo-
bile is in the rear seat. However, a child
sitting in the rear seat and not properly
restrained may place his or her head on
or near the airbag, if one is installed.
For example, a child Ñ even though
belted Ñ may fall asleep with his or her
head against the side airbag. It may be
difficult for a driver to ensure that chil-
dren in the rear seat will remain prop-
erly positioned at all times and do not
place their heads on or near the side
airbag.
Therefore, we recommend that the
rear-seat side airbags, if installed, be
deactivated if children will be riding in
the rear seat.
The rear-seat side airbags may already
have been deactivated, either at the
Page 50 of 147
50n
Airbagstime of manufacture or by a BMW
center. Labels in the door opening
should indicate the status of your rear-
seat side airbags. If you are uncertain of
their status, or wish to have the airbags
activated or deactivated, please
contact your BMW center.<
Even when all these guidelines are
observed, there is still a small residual
risk of injuries to the face, hands and
arms occurring from airbag deployment
in isolated instances. The ignition and
inflation noise may induce a mild
temporary hearing loss in sensitive indi-
viduals.This is the right way for a child to sit in a
child restraint when rear side airbags
(arrow) are provided.
This is the right way for a larger child to
sit wearing the safety belt when rear
side airbags (arrow) are provided.
Page 51 of 147

51n
OverviewControlsMaintenanceRepairsDataIndex
Transporting children safelyLATCH child-restraint mounting
system
*
Remove the cover from the outside
mount by pulling forward. When re-
installing ensure that the recess is on
the top.
Tilt the backrest halfway forward to
make the cover easier to remove (refer
to page 91).
The illustration is an example showing
the mounts for a LATCH child-restraint
mounting system at the right rear.
Always follow all manufacturer's
instructions and observe all safety
precautions when installing the LATCH
child-restraint mounting system.<
Commercially available child seats
complying with the legal standard are
designed to be secured with a lap belt
or with the lap belt portion of a combi-
nation lap/shoulder belt.
Improperly or inadequately installed
restraint systems can increase the risk
of injury to children. Always read and
follow the instructions that come with
the system.
If you use a child-restraint system with
a tether strap, three additional tether
anchorage points (refer to the arrows in
the illustration) have been provided.
Depending on the location selected for
seating in the rear passenger area,
attach the tether strap to the corre-
sponding anchorage point to secure the
child-restraint system. Remove the
center cover first.
If the selected seating position is fitted
with a headrest lift the headrest and
pass the tether strap between the
headrest and the backrest.
Adjust the tether strap according to the
child-restraint manufacturer's instruc-
tions.
Before installing any child-
restraint device or child seat,
please read the following:
Never install a rear-facing child-
restraint system in the front passenger
seat of this vehicle.
Your vehicle is equipped with an airbag
supplemental restraint system for the
front passenger. Because the backrest
on any rear-facing child-restraint
system (of the kind designed for infants
under 1 year and 20 lbs/9 kg) would be
within the airbag's deployment range,
you should never mount such a device
in the front passenger seat, as the
impact of the airbag against the child-
restraint's backrest could lead to
serious or fatal injuries.
If it is necessary for a child (not an
infant) to ride in the front seat, certain
precautions should be taken. First,
move the passenger seat as far away
from the instrument panel as possible.
This important precaution is intended to
Page 52 of 147

52n
Transporting children safelymaximize the distance between the
airbag and the child. Older children
should be tightly secured with the
safety belt. Younger children should be
secured in an appropriate forward-
facing child-restraint system that has
first been properly installed with a
safety belt.
Never install a rear-facing child-
restraint system in the front passenger
seat. We strongly urge you to carefully
read and comply with the instructions
for installation and use provided by the
child-restraint's manufacturer whenever
you use such a device.
Always ensure that all occupants (of all
ages) remain properly and securely
restrained at all times.c
All rear seating positions in your vehicle
meet the recommendations of
SAE J1819, an industry recommended
standard for securing child-restraint
systems in motor vehicles.
Securing child-restraint systemAll of the rear belt retractors and the
front passenger's safety belt can be
locked for mounting and securing child-
restraint systems.
A label with the appropriate instructions
for this is located in the immediate
vicinity of the buckle latch of each
safety belt.
To lock the safety beltExtract the entire length of the belt from
the inertia reel mechanism. Allow the
reel to retract the belt somewhat and
engage the buckle, then tighten the belt
against the child-restraint system. The
retraction mechanism is now locked.
The belt cannot be extracted further.
Always observe the installation instruc-
tions provided by the manufacturer of
the child-restraint system.To release the safety beltTo release the safety belt, remove the
child's seat and retract the safety belt to
its end position on the belt retractor.
Page 53 of 147

53n
OverviewControlsMaintenanceRepairsDataIndex
Vehicle Memory, Key Memory How the system functionsNo doubt you have reflected at one
time or another on how great it would
be if you could permanently configure
your vehicle's various features and
adjustments to mirror your own indi-
vidual preferences. In engineering your
vehicle, BMW has incorporated a
number of options for personal adjust-
ment that can be programmed into your
vehicle at your BMW center.
The available configuration data fall into
two categories, according to whether
their primary orientation is the vehicle
(Vehicle Memory) or the individual (Key
Memory). Provided that each person
has a separate remote-control key, you
can have your BMW center enter
adjustment data for as many as four
different individuals into the system.
The system then relies on a bilateral
data exchange to identify the individual
user and dial in the selected settings
whenever the remote control unit is
used to disengage the door locks.
Color-coded decals have been
provided to help you distinguish indi-
vidual keys with different settings.What the system can doYour BMW center can provide you with
details on the capabilities of the Vehicle
Memory and Key Memory systems. A
few examples follow below:
Examples for Vehicle Memory:
>Various signals as acknowledgment
when locking or unlocking your
vehicle, refer to page 29, 31
>Activates/deactivates the "Follow me
home" function, refer to page 77
>Activates/deactivates daytime driving
lamps, refer to page 77.Examples for Key Memory:
>Locks the vehicle when you start off,
refer to page 32
>Automatically adjusts the driver's
seat to the personal programmed
settings when the vehicle is
unlocked, refer to page 45
>Unlocks driver's door first, then
proceeds to disengage the vehicle's
remaining locks, refer to page 29.
You will see this symbol through-
out the Owner's Manual. It is to
remind you at appropriate places of the
settings that are available to you.<
Page 54 of 147

54n
Ignition lock Starting the engine 0 Steering locked
1 Steering unlocked
2 Ignition switched on
3 Starting engine
Vehicles with automatic transmis-
sion:
Do not move the selector lever from
position "P" until the engine is running
(ignition key position 2).
Your vehicle is equipped with an inter-
lock. Therefore, the ignition key cannot
be turned to position 0 and removed
until the selector lever is in
position "P."<
Vehicles with manual transmis-
sion:
Step on the clutch when starting the
vehicle. A lockout prevents the engine
from starting if the clutch is not
depressed.<
Steering lockedThe key can only be inserted and
removed in this position.
After removing the key, turn the
steering wheel slightly to the left or right
until the lock engages.
The sound system remains operational
for approx. 20 minutes after you switch
off the ignition (ignition key in position 0
or key extracted). Simply switch it back
on.Steering unlocked You will find that it is often easier to turn
the ignition key from position 0 to posi-
tion 1 when you move the steering
wheel slightly to help disengage the
lock.
Individual electrical accessories are
ready for operation.
Before starting>Engage the parking brake
>Gearshift lever in neutral, or, with an
automatic transmission, selector
lever in position "P"
>Depress the clutch pedal.
Do not allow the engine to run in
enclosed spaces. The exhaust
gases contain carbon monoxide, an
odorless and colorless, but highly toxic
gas.
Breathing the exhaust gases poses an
extreme health risk, and can lead to
unconsciousness and death.
Do not leave the vehicle unattended
with the engine running. An unat-
tended vehicle with a running engine
represents a potential safety hazard.<
When driving, standing at idle,
and parking the vehicle, take care
to avoid contact between the exhaust
system and flammable materials (grass,
hay, leaves, etc.). Such contact could
lead to a fire, resulting in serious
personal injury and property damage.<
>Start the engine. Do not press the
accelerator pedal.
Page 55 of 147

55n
OverviewControlsMaintenanceRepairsDataIndex
Starting the engine Switching off the engine
Do not actuate the starter for too
short a time, but do not actuate it
for more than approx. 20 seconds.
Release the ignition key immediately
when the engine starts.
Do not allow the engine to warm up by
leaving it running while the vehicle
remains stationary. Instead, drive off
immediately at a moderate engine
speed.<
If the engine does not start on the first
attempt (if it is very hot or cold, for
instance):
>Press the accelerator pedal halfway
down while engaging the starter.
Cold starts at extremely low tempera-
tures of roughly +5 7 (Ð15 6) or below
and at altitudes of over 3,300 ft
(1,000 m):
>On the first start attempt, engage the
starter for a longer period (approx.
10 seconds)
>Press the accelerator pedal halfway
down while engaging the starter.
Engine idle speed is controlled by the
engine computer system. Increased
speeds at start-up are normal and
should decrease as the engine warms
up. If engine speed does not decrease,
service is required.
To prevent the battery from discharging,
always deactivate electrical devices
that are not in use. Switch the ignition
off when the vehicle is not being driven.
Extended starting attempts, char-
acterized by excessively frequent
or long periods with the starter
engaged, can lead to catalyst
damage.<
Turn the ignition key to position 1 or 0.
You should never remove the igni-
tion key when the vehicle is in
motion, as the steering lock could
engage.
When you leave the vehicle, always
remove the ignition key and engage the
steering lock.
Vehicles with manual transmission:
Always engage the parking brake when
parking on hills and slopes, as first gear
or reverse may not provide adequate
resistance to rolling.
Vehicles with automatic transmission:
Place the selector lever in "Park."<
Page 56 of 147

56n
Parking brake Manual transmission The parking brake is designed primarily
to prevent the vehicle from rolling when
it is parked. It operates on the rear
wheels.To engageThe detent engages automatically, the
indicator lamp in the instrument cluster
comes on when the ignition key is in
position 2, refer to page 18.To releasePull up slightly on the lever, press the
button (arrow) and lower the lever.
If exceptional circumstances
make it necessary to engage the
parking brake while the vehicle is in
motion, do not pull it with excessive
pressure. Keep your thumb pressed
against the release button while care-
fully pulling the lever up to apply
moderate pressure.
Excessive pressure can lead to over-
braking and loss of traction (fishtailing)
at the rear axle.
The brake lamps do not come on when
the parking brake is engaged.
Vehicles with manual transmission:
Always engage the parking brake when
parking on hills and inclined surfaces,
as first gear or reverse may not provide
adequate resistance to rolling.
Vehicles with automatic transmission:
place the selector lever in "Park."<
To avoid corrosion and one-sided
braking, apply the parking brake lightly
from time to time when coasting to a
standstill (at a traffic signal, for
instance), provided that it is safe to do
so.
Reverse Select only when the vehicle is
stationary. Press the shift lever to the
left to overcome the slight resistance.
As you do this, the backup lamps will
turn on automatically when the ignition
key is in position 2.
Do not hold the vehicle in place on
slopes by slipping or "riding" the
clutch. Use the parking brake instead.
Riding the clutch leads to severe and
premature clutch wear.<
 1
1 2
2 3
3 4
4 5
5 6
6 7
7 8
8 9
9 10
10 11
11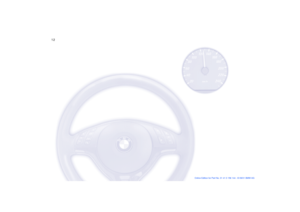 12
12 13
13 14
14 15
15 16
16 17
17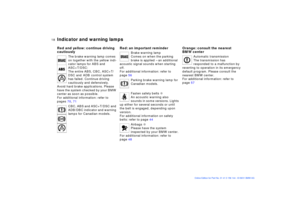 18
18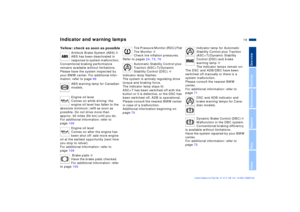 19
19 20
20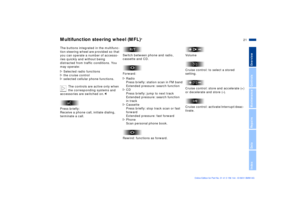 21
21 22
22 23
23 24
24 25
25 26
26 27
27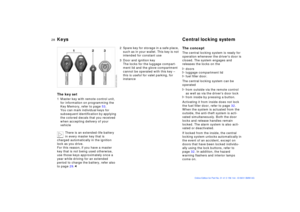 28
28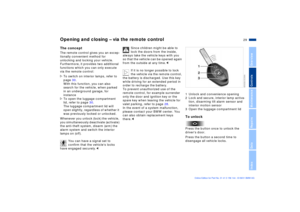 29
29 30
30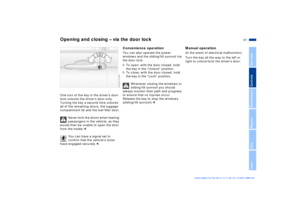 31
31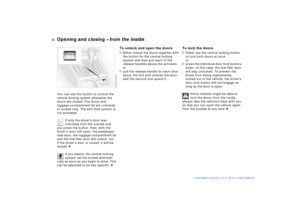 32
32 33
33 34
34 35
35 36
36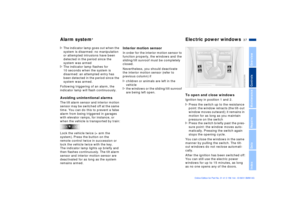 37
37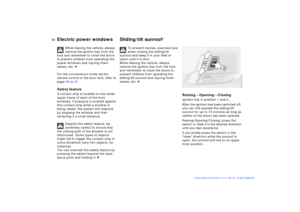 38
38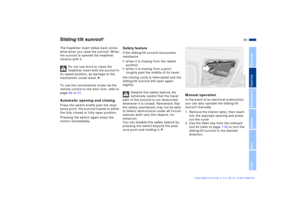 39
39 40
40 41
41 42
42 43
43 44
44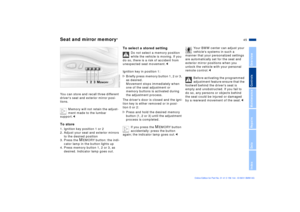 45
45 46
46 47
47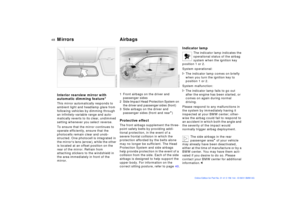 48
48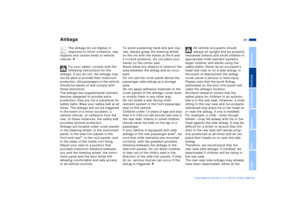 49
49 50
50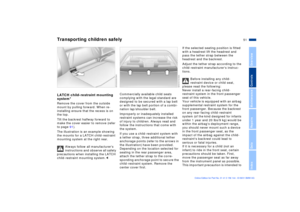 51
51 52
52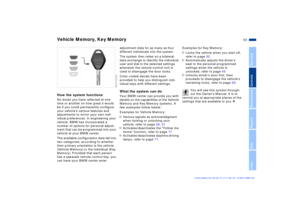 53
53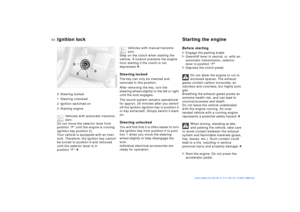 54
54 55
55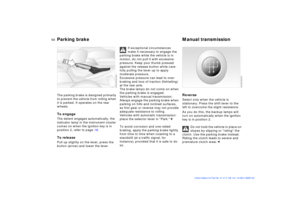 56
56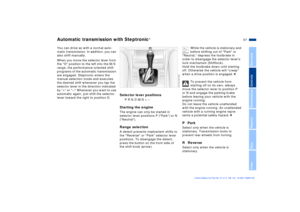 57
57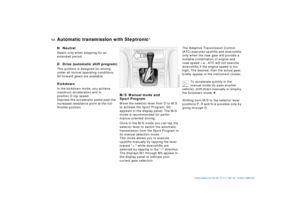 58
58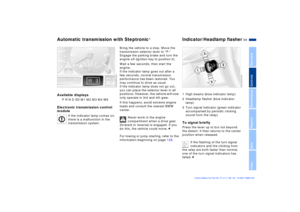 59
59 60
60 61
61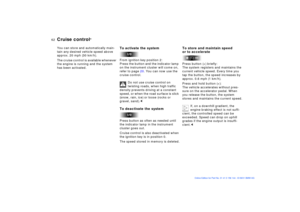 62
62 63
63 64
64 65
65 66
66 67
67 68
68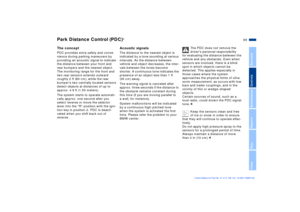 69
69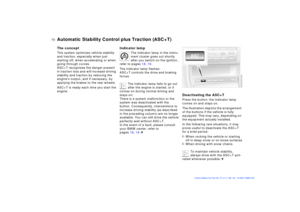 70
70 71
71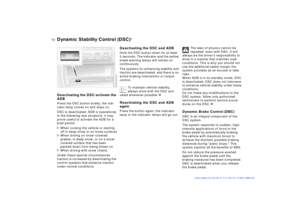 72
72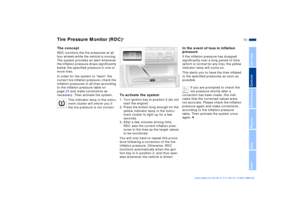 73
73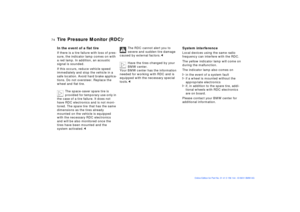 74
74 75
75 76
76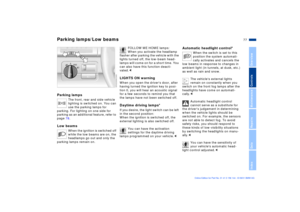 77
77 78
78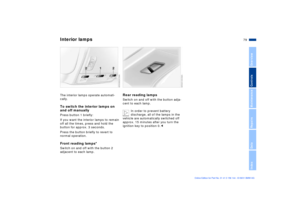 79
79 80
80 81
81 82
82 83
83 84
84 85
85 86
86 87
87 88
88 89
89 90
90 91
91 92
92 93
93 94
94 95
95 96
96 97
97 98
98 99
99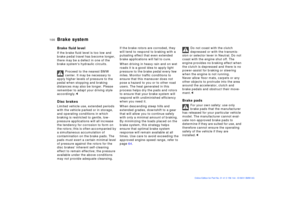 100
100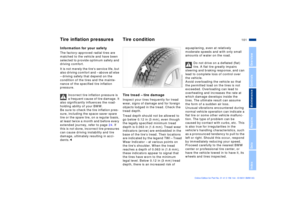 101
101 102
102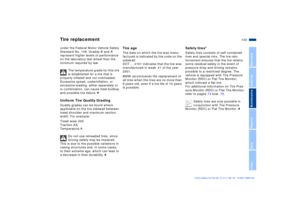 103
103 104
104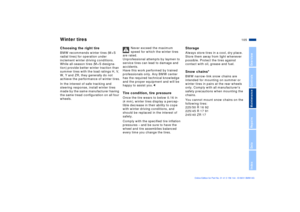 105
105 106
106 107
107 108
108 109
109 110
110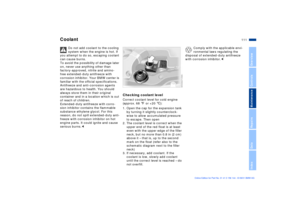 111
111 112
112 113
113 114
114 115
115 116
116 117
117 118
118 119
119 120
120 121
121 122
122 123
123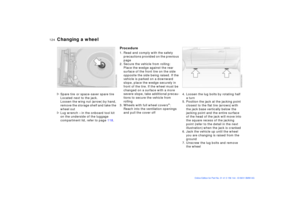 124
124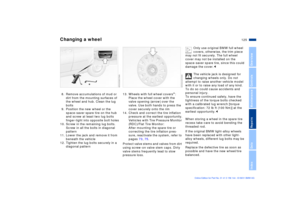 125
125 126
126 127
127 128
128 129
129 130
130 131
131 132
132 133
133 134
134 135
135 136
136 137
137 138
138 139
139 140
140 141
141 142
142 143
143 144
144 145
145 146
146