2001 VOLVO S60 brake
[x] Cancel search: brakePage 85 of 128

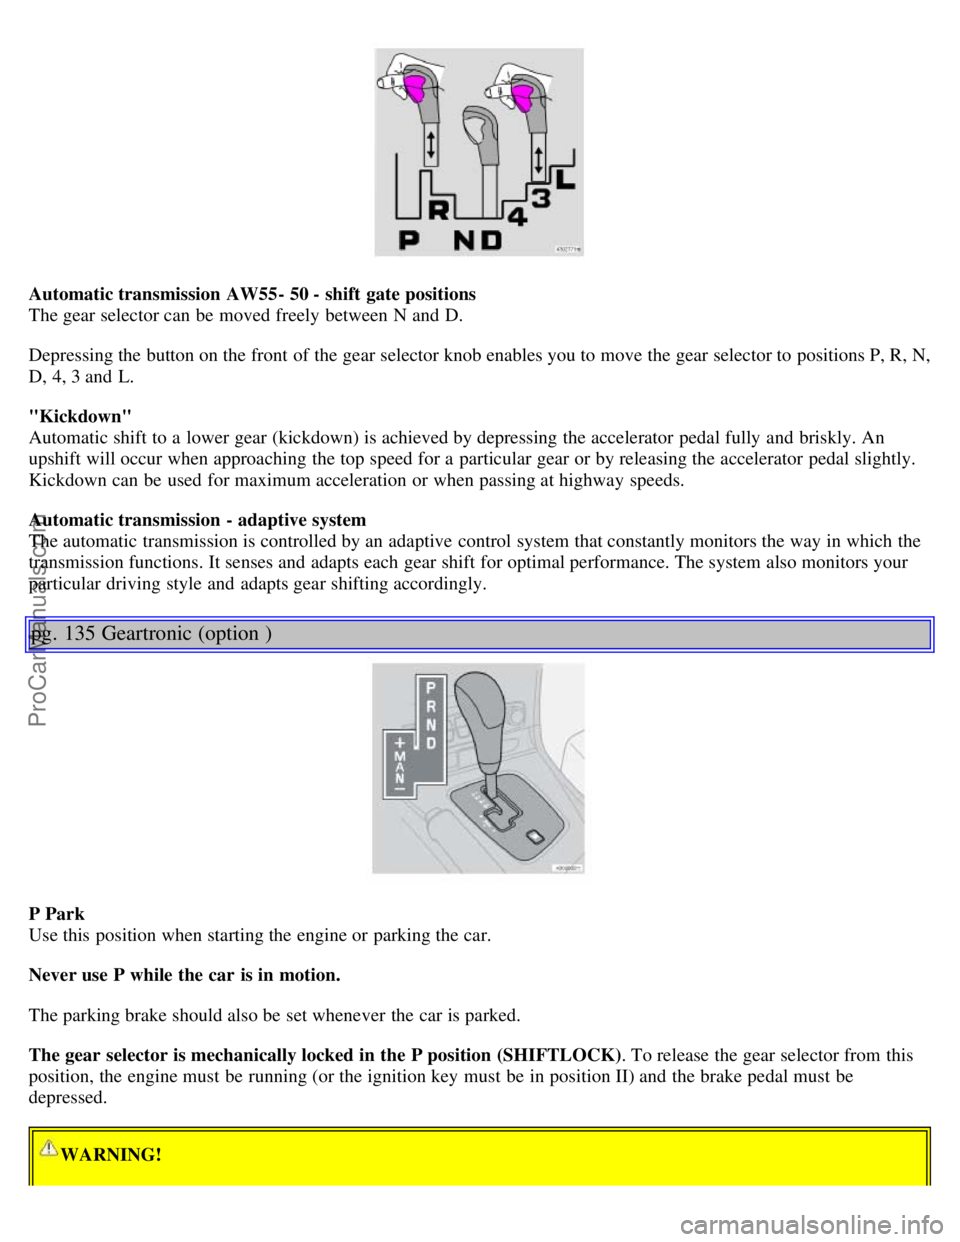
Automatic transmission AW55- 50 - shift gate positions
The gear selector can be moved freely between N and D.
Depressing the button on the front of the gear selector knob enables you to move the gear selector to positions P, R, N,
D, 4, 3 and L.
"Kickdown"
Automatic shift to a lower gear (kickdown) is achieved by depressing the accelerator pedal fully and briskly. An
upshift will occur when approaching the top speed for a particular gear or by releasing the accelerator pedal slightly.
Kickdown can be used for maximum acceleration or when passing at highway speeds.
Automatic transmission - adaptive system
The automatic transmission is controlled by an adaptive control system that constantly monitors the way in which the
transmission functions. It senses and adapts each gear shift for optimal performance. The system also monitors your
particular driving style and adapts gear shifting accordingly.
pg. 135 Geartronic (option )
P Park
Use this position when starting the engine or parking the car.
Never use P while the car is in motion.
The parking brake should also be set whenever the car is parked.
The gear selector is mechanically locked in the P position (SHIFTLOCK). To release the gear selector from this
position, the engine must be running (or the ignition key must be in position II) and the brake pedal must be
depressed.
WARNING!
ProCarManuals.com
Page 86 of 128

Never leave the car unattended when the engine is running. If, by mistake, the gear selector is moved from P, the
car may start moving.
R (Reverse)
Never engage R while the car is moving forward.
N (Neutral)
Neutral - no gear engaged. Use the parking brake.
D (Drive)
D is the normal driving position and should be used as often as possible to help improve fuel economy. The car
should not be moving when shifting from R to the D position.
Automatic transmission - adaptive system
The automatic transmission is controlled by an adaptive control system that constantly monitors the way in which the
transmission functions. It senses and adapts each gear shift for optimal performance. The system also monitors your
particular driving style and adapts gear shifting accordingly.
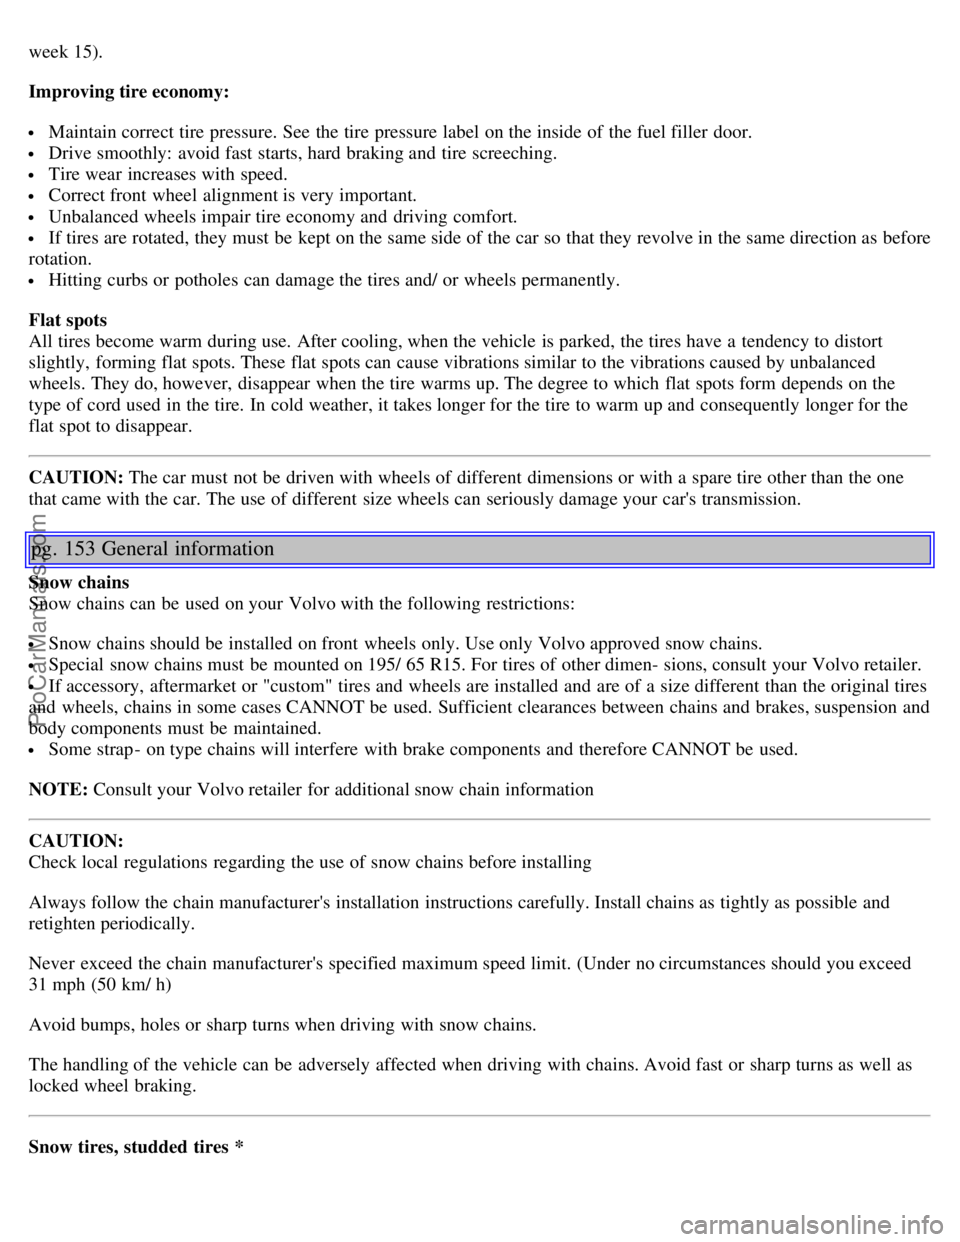
Automatic transmission - shift gate positions
You can move the gear selector freely between the (MAN) ual and (D) rive positions while driving.
Depress the button on the front of the gear selector knob to move between the R, N, D, and P positions.
pg. 136 Geartronic (option )
Manual shifting - Geartronic
You can move the gear selector freely between the (MAN) ual and (D) rive positions while driving. Gears 3, and 4
have a "lock - up" function which reduces engine speed and helps save fuel.
The currently selected gear will be displayed in the instrument panel (see page 30
).
To access the (MAN) ual shifting position from (D) rive, move the gear selector to the left to MAN.
To return to the (D) rive position from MAN, move the gear selector to the right.
While driving
If you select the (MAN) ual position while driving, the gear that was being used in the (D) rive position will also
initially be selected in (MAN) ual position.
Move the gear selector forward (toward "+") to shift to a higher gear or rearward (toward "-") to shift to a lower
gear.
If you hold the gear selector toward "-", the transmission will downshift, one gear at a time, and will utilize the
braking power of the engine. If the current speed is too high for using a lower gear, the downshift will not occur until
the speed has decreased enough to allow the lower gear to be used.
ProCarManuals.com
Page 87 of 128

If you slow down to a very low speed, the transmission will automatically shift down.
When starting in the (MAN) ual position, 3rd gear is the highest gear that may be selected.
NOTE: Kickdown does not function when the transmission is in the manual shift (Geartronic) mode.
Kickdown
Automatic shift to a lower gear (kickdown) is achieved by depressing the accelerator pedal fully and briskly. An
upshift will occur when approaching the top speed for a particular gear or by releasing the accelerator pedal slightly.
Kickdown can be used for maximum acceleration or when passing at highway speeds.
Kickdown does not function when the transmission is in the manual shift (Geartronic) mode.
W - Winter/ Wet driving mode - enhanced vehicle traction
Mode W will only function if the gear selector is in the (D) rive position.
Press the button at the base of the gear selector to engage/ disengage this driving mode (see illustration).
When the W driving mode is engaged, this is displayed in the instrument panel (see page 30).
This mode may be selected for starting/ moving off on slippery roads.
pg. 137 Brake system
BRAKE Brake circuit malfunction
If one of the brake circuits were to malfunction, the red warning light would come on, the pedal travel would increase
slightly, the pedal would feel softer, and extra pressure would be required for normal braking. If the light comes on
while driving or braking, stop immediately and check the brake fluid level in the reservoir.
WARNING!
If the fluid level is below the MIN mark in the reservoir or if a "Brake failure - Service urgent" message is
displayed in the text window: DO NOT DRIVE. Have the car towed to a Volvo retailer and have the brake system
inspected.
NOTE: When the car is at a standstill and the engine is idling, e. g. at a traffic light and the brake pedal is depressed,
the pedal may go down slightly. This is a normal function of the power- assisted brake system.
If the brake power- assist does not function
The power assist to the brakes functions only when the engine is running. When the car is moving without the engine
running, the brake pedal pressure required to stop the car is increased by 3- 4 times and the brake pedal feels stiff.
Water on brake discs and brake pads affects braking
Driving in rain and slush or passing through an automatic car wash can cause water to collect on the brake discs and
pads. This will cause a delay in braking effect when the pedal is depressed. To avoid such a delay when the brakes are
ProCarManuals.com
Page 88 of 128

needed, depress the pedal occasionally when driving through rain, slush etc. This will remove the water from the
brakes. Check that brake application feels normal. This should also be done after washing or starting in very damp or
cold weather.
Severe strain on the brake system
The brakes will be subject to severe strain when driving in mountains or hilly areas or towing. Vehicle speed is
usually slower, which means that the cooling of the brakes is less efficient than when driving on level roads. To
reduce the strain on the brakes, it is advisable not to use the brakes excessively. Instead, shift into a lower gear and let
the engine help with the braking. Do not forget that, if you are towing a trailer, the brakes will be subjected to a
greater than normal load.
pg. 138 Brake system
Anti-lock brakes (ABS)
If the warning lamp lights up there is a malfunction of the ABS system (the standard braking system will however
function) and the vehicle should be driven cautiously to a Volvo retailer for inspection. The Anti-lock Braking
System (ABS) helps to improve vehicle control (stopping and steering) during severe braking conditions by limiting
brake lockup. When the system "senses" impending lockup, braking pressure is automatically modulated in order to
help prevent lockup, which could lead to a skid.
The system performs a self - diagnostic test when the engine is started and when the vehicle first reaches a
speed of approximately 12 mph (20 km/ h). The brake pedal will pulsate several times and a sound may be audible
from the ABS control module. This is normal.
To obtain optimal effect from the ABS system, constant pressure should be kept on the brake pedal, keep constant
pressure on the brake pedal. Do not pump the brake pedal.
The switching of the ABS modulator will be audible and the brake pedal will pulsate during braking. Please be aware
that ABS does not increase the absolute braking potential of the vehicle. While control will be enhanced, ABS will
not shorten stopping distances on slippery surfaces.
ABS with EBD (Electronic Brake Force Distribution)
EBD is an integrated part of the ABS system. EBD regulates the hydraulic pressure to the rear brakes to help provide
optimal braking capacity.
If the BRAKE and ABS warning lights come on at the same time, this could indicate a fault in the brake system.
Stop the car in a suitable place and switch off the engine.
Restart the engine.
If both warning lights go off, no further action is required.
If both lights are still on after the engine has been restarted, switch off the engine again and check the brake fluid
level (see page 170 for the location of the brake fluid reservoir).
If the brake fluid level is above the MIN mark, drive carefully to an authorized Volvo retailer and have the brake
system inspected.
WARNING!
If the fluid level is below the MIN mark in the reservoir or if a "Brake failure - Service urgent" message is
displayed in the text window: DO NOT DRIVE. Have the car towed to a Volvo retailer and have the brake system
inspected.
ProCarManuals.com
Page 91 of 128

week 15).
Improving tire economy:
Maintain correct tire pressure. See the tire pressure label on the inside of the fuel filler door.
Drive smoothly: avoid fast starts, hard braking and tire screeching.
Tire wear increases with speed.
Correct front wheel alignment is very important.
Unbalanced wheels impair tire economy and driving comfort.
If tires are rotated, they must be kept on the same side of the car so that they revolve in the same direction as before
rotation.
Hitting curbs or potholes can damage the tires and/ or wheels permanently.
Flat spots
All tires become warm during use. After cooling, when the vehicle is parked, the tires have a tendency to distort
slightly, forming flat spots. These flat spots can cause vibrations similar to the vibrations caused by unbalanced
wheels. They do, however, disappear when the tire warms up. The degree to which flat spots form depends on the
type of cord used in the tire. In cold weather, it takes longer for the tire to warm up and consequently longer for the
flat spot to disappear.
CAUTION: The car must not be driven with wheels of different dimensions or with a spare tire other than the one
that came with the car. The use of different size wheels can seriously damage your car's transmission.
pg. 153 General information
Snow chains
Snow chains can be used on your Volvo with the following restrictions:
Snow chains should be installed on front wheels only. Use only Volvo approved snow chains.
Special snow chains must be mounted on 195/ 65 R15. For tires of other dimen- sions, consult your Volvo retailer.
If accessory, aftermarket or "custom" tires and wheels are installed and are of a size different than the original tires
and wheels, chains in some cases CANNOT be used. Sufficient clearances between chains and brakes, suspension and
body components must be maintained.
Some strap - on type chains will interfere with brake components and therefore CANNOT be used.
NOTE: Consult your Volvo retailer for additional snow chain information
CAUTION:
Check local regulations regarding the use of snow chains before installing
Always follow the chain manufacturer's installation instructions carefully. Install chains as tightly as possible and
retighten periodically.
Never exceed the chain manufacturer's specified maximum speed limit. (Under no circumstances should you exceed
31 mph (50 km/ h)
Avoid bumps, holes or sharp turns when driving with snow chains.
The handling of the vehicle can be adversely affected when driving with chains. Avoid fast or sharp turns as well as
locked wheel braking.
Snow tires, studded tires *
ProCarManuals.com
Page 94 of 128

Changing wheels
The spare wheel is located under the carpet on the trunk floor. The jack and crank are secured in the wheel recess.
There are two jack attachment points on each side of the car (see illustration on next page). To change a wheel:
Engage the parking brake.
Put the gear selector in (P) ark (automatic transmission) or reverse (manual trans - mission).
Remove the wheel cap (where applicable) using the lug wrench in the tool kit.
With the car still on the ground, use the lug wrench to loosen the wheel bolts 1/ 2 - 1 turn. Turn the bolts
counterclockwise to loosen.
CAUTION:
The car must not be driven with wheels of different dimensions or with a spare tire other than the one that came with
the car. The use of different size wheels can seriously damage your car's transmission.
Correct tightening torque on wheel bolts must be observed. The wheel bolts should never be greased or lubricated.
The extended, chromed wheel bolts must not be used with steel rims, as they make it impos - sible to fit the hub caps.
pg. 157 Changing wheels
ProCarManuals.com
Page 95 of 128

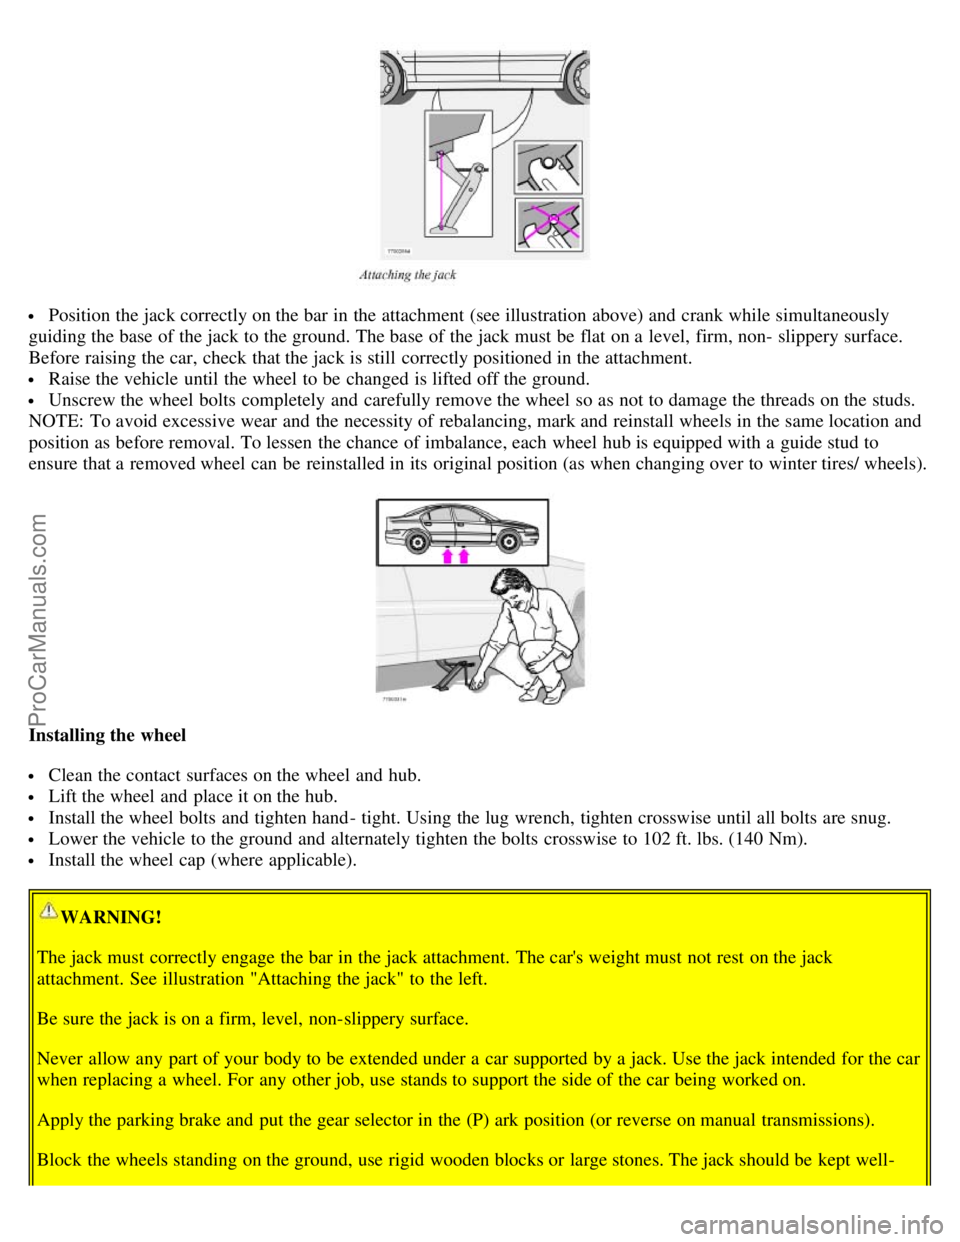
Position the jack correctly on the bar in the attachment (see illustration above) and crank while simultaneously
guiding the base of the jack to the ground. The base of the jack must be flat on a level, firm, non- slippery surface.
Before raising the car, check that the jack is still correctly positioned in the attachment.
Raise the vehicle until the wheel to be changed is lifted off the ground.
Unscrew the wheel bolts completely and carefully remove the wheel so as not to damage the threads on the studs.
NOTE: To avoid excessive wear and the necessity of rebalancing, mark and reinstall wheels in the same location and
position as before removal. To lessen the chance of imbalance, each wheel hub is equipped with a guide stud to
ensure that a removed wheel can be reinstalled in its original position (as when changing over to winter tires/ wheels).
Installing the wheel
Clean the contact surfaces on the wheel and hub.
Lift the wheel and place it on the hub.
Install the wheel bolts and tighten hand - tight. Using the lug wrench, tighten crosswise until all bolts are snug.
Lower the vehicle to the ground and alternately tighten the bolts crosswise to 102 ft. lbs. (140 Nm).
Install the wheel cap (where applicable).
WARNING!
The jack must correctly engage the bar in the jack attachment. The car's weight must not rest on the jack
attachment. See illustration "Attaching the jack" to the left.
Be sure the jack is on a firm, level, non-slippery surface.
Never allow any part of your body to be extended under a car supported by a jack. Use the jack intended for the car
when replacing a wheel. For any other job, use stands to support the side of the car being worked on.
Apply the parking brake and put the gear selector in the (P) ark position (or reverse on manual transmissions).
Block the wheels standing on the ground, use rigid wooden blocks or large stones. The jack should be kept well-
ProCarManuals.com
Page 98 of 128

Automatic car wash
An automatic car wash is a simple and quick way of washing the car. Bear in mind, however, that an automatic car
wash can never replace a proper handwashing. During the first months of the car's life - while the paint is still curing
- we recommend that you handwash the car.
WARNING!
When the car is driven immediately after being washed, apply the brakes several times in order to remove any
moisture from the brake linings. Engine cleaning agents should not be used when the engine is warm. This
constitutes a fire risk.
Automatic washing - simple and quick
We do NOT recommend washing your car in an automatic wash during the first six months (because the paint will
not have hardened sufficiently).
An automatic wash is a simple and quick way to clean your car, but it is worth remembering that it may not be as
pg. 161 Washing and cleaning the car
thorough as when you yourself go over the car with sponge and water. Keeping the underbody clean is most
important, especially in the winter. Some automatic washers do not have facilities for washing the underbody.
Before driving into an automatic car wash, make sure that side view mirrors, auxiliary lamps, etc, are secure, and
that any antenna( s) are retracted or removed. Otherwise there is risk of the machine dislodging them.
Polishing and Waxing
Normally, polishing is not required during the first year after delivery, however, waxing may be beneficial.
Before applying polish or wax the car must be washed and dried. Tar spots can be removed with kerosene or tar
remover. Difficult spots may require a fine rubbing compound.
After polishing use liquid or paste wax.
Several commercially available products contain both polish and wax.
Waxing alone does not substitute for polishing a dull surface.
A wide range of polymer- based car waxes can be purchased today. These waxes are easy to use and produce a
long-lasting, high- gloss finish that protects thebodywork against oxidation, road dirt and fading.
Do not polish or wax your car in direct sunlight (the surface of the car should not be warmer than 113° F (45° C).
Cleaning the upholstery
The fabric can be cleaned with soapy water or a detergent. For more difficult spots caused by oil, ice cream, shoe
polish, grease, etc., use a clothing/ fabric stain remover.
The plastic in the upholstery can be cleaned with a soft cloth and mild soap solution.
Leather upholstery/ suede- like upholstery (alcanteraª) can be cleaned with a soft cloth and mild soap solution. For
more difficult spots, Volvo offers a leather care kit.
Under no circumstances should gasoline, naphtha or similar cleaning agents be used on the plastic or the leather
since these can cause damage.
Cleaning the seat belts
Clean only with lukewarm water and a mild soap solution.
Cleaning floor mats
The floor mats should be vacuumed or brushed clean regularly, especially during winter when they should be taken
out for drying. Spots on textile mats can be removed with a mild detergent.
ProCarManuals.com