Page 41 of 88
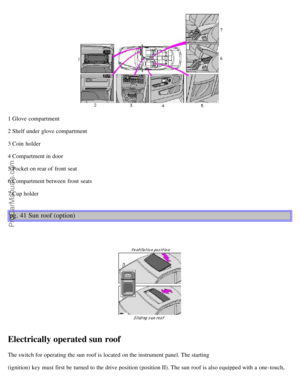
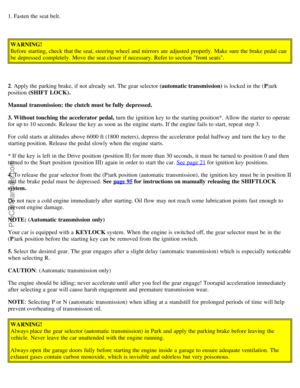
ark (automatic) or in")
The spare wheel is located under the carpet on the trunk floor. The jack and crank are secured in the wheel recess.
· Engage the parking brake.
· Put the gear selector in (P)ark (automatic) or in Reverse (manual).
· With the car still on the ground, use the lug wrench to loosen the wheel bolts 1/2 -1 turn. Turn the bolts
counterclockwise to loosen.
· Fold out the crank handle on the jack by pressing the knob on the handle downward. To attach the jack, refer to the
illustration on the following page.
CAUTION: The car must not be driven with wheels of different dimensions or with a spare tire other than the one that
came with the car. The use of different size wheels can seriously damage your car's transmission.
NOTE: To avoid excessive wear and the necessity of rebalancing, mark and reinstall wheels in the same location and
position as before removal. To lessen the chance of imbalance, each wheel hub is equipped with a guide stud to ensure
that a removed wheel can be reinstalled in its original position (as when changing over to winter tires/wheels).
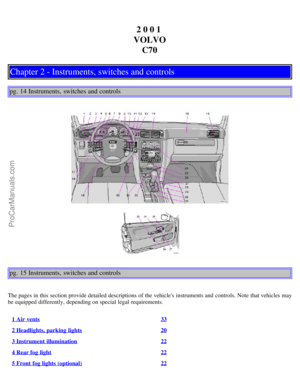
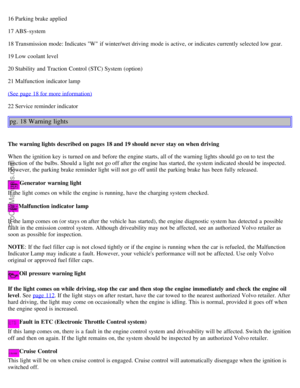
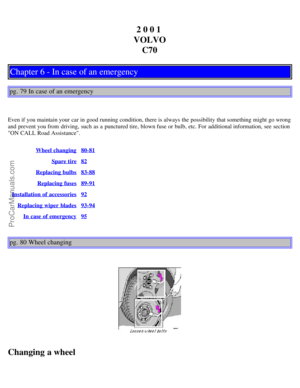
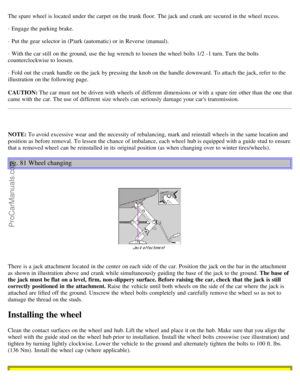
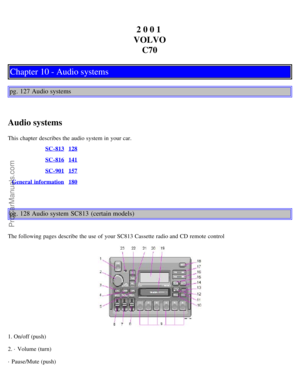
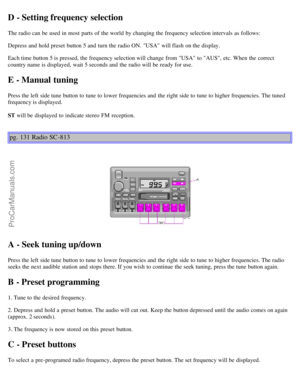
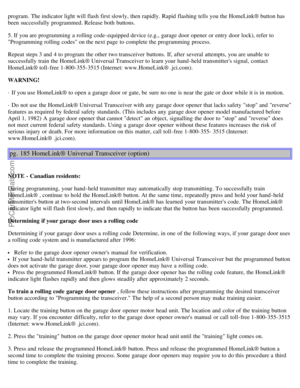
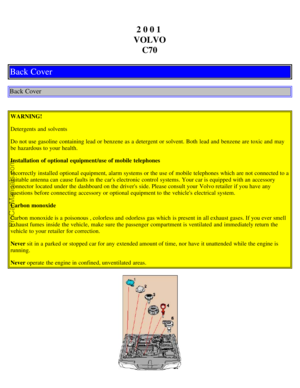
pg. 81 Wheel changing
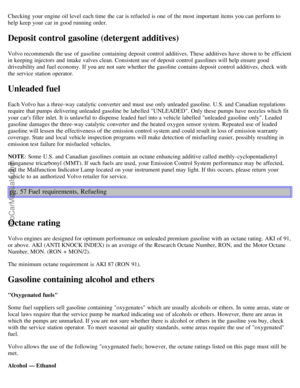
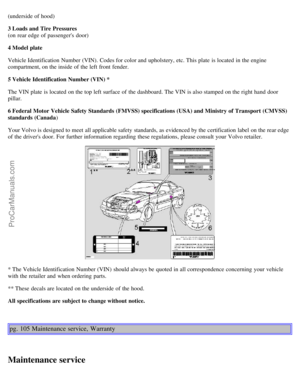
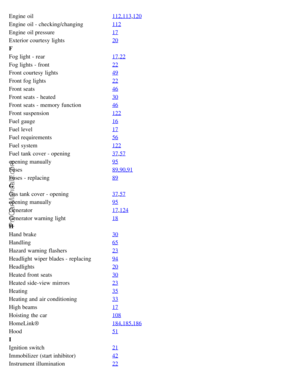
There is a jack attachment located in the center on each side of the car. Position the jack on the bar in the attachment
as shown in illustration above and crank while simultaneously guiding the base of the jack to the ground. The base of
the jack must be flat on a level, firm, non-slippery surface. Before raising the car, check that the jack is still
correctly positioned in the attachment. Raise the vehicle until both wheels on the side of the car where the jack is
attached are lifted off the ground. Unscrew the wheel bolts completely and carefully remove the wheel so as not to
damage the thread on the studs.
Installing the wheel
Clean the contact surfaces on the wheel and hub. Lift the wheel and place it on the hub. Make sure that you align the
wheel with the guide stud on the wheel hub prior to installation. Install the wheel bolts crosswise (see illustration) and
tighten by turning lightly clockwise. Lower the vehicle to the ground and alternately tighten the bolts to 100 ft. lbs.
(136 Nm). Install the wheel cap (where applicable).
ProCarManuals.com
Page 42 of 88
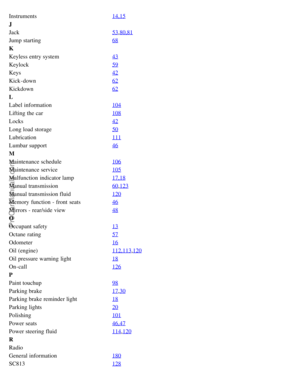
. The cars weight must not rest on the jack
attachment (B).
· Be sure the jack is on a firm, level, non-slippery")
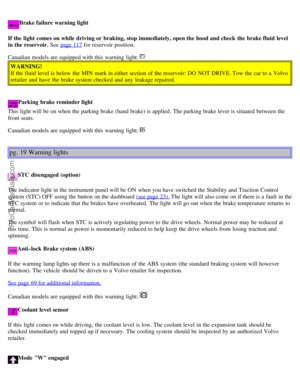
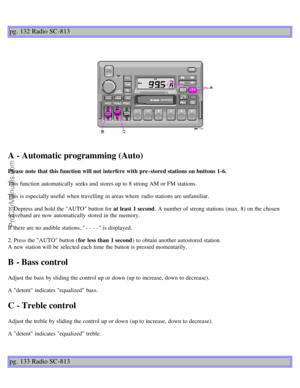
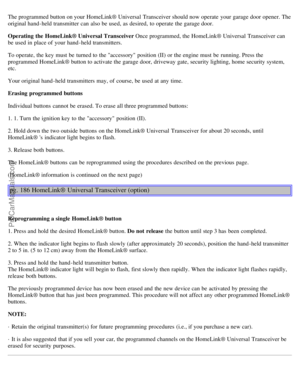
WARNING!
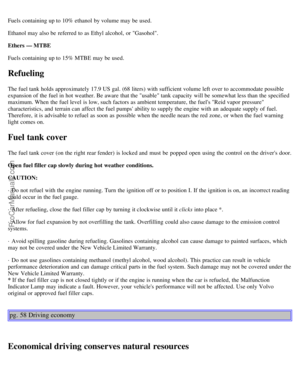
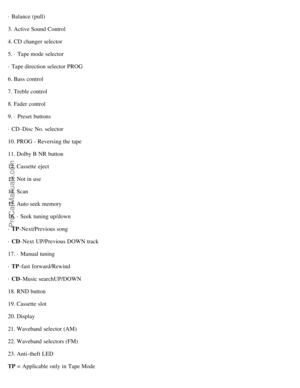
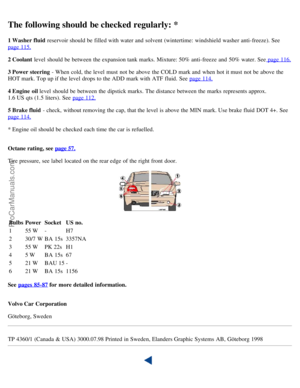
· The jack's attachment must engage the bar in the jack attachment (A). The car's weight must not rest on the jack
attachment (B).
· Be sure the jack is on a firm, level, non-slippery surface.
· Never allow any part of your body to be extended under a car supported by a jack.
· Use the jack intended for the car when replacing a wheel. For any other job, use stands to support the side of the
car being worked on. -
· Apply the parking brake, select position P (automatic transmission) or Reverse gear (manual transmission).
· Block the wheels standing on the ground, use rigid wooden blocks or large stones.
· The jack should be kept well-greased.
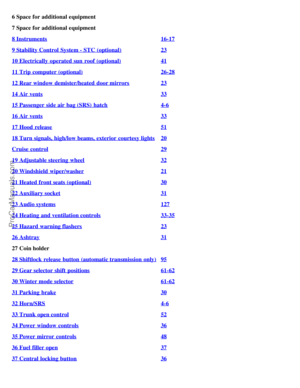
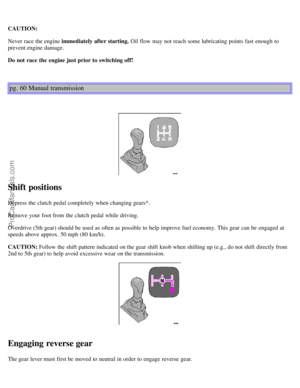
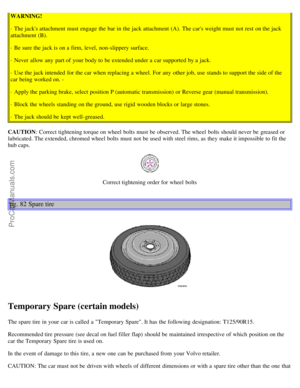
CAUTION : Correct tightening torque on wheel bolts must be observed. The wheel bolts should never be greased or
lubricated. The extended, chromed wheel bolts must not be used with steel rims, as they make it impossible to fit the
hub caps.
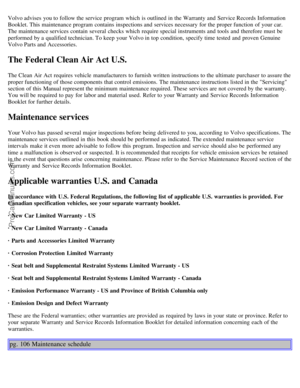
Correct tightening order for wheel bolts
pg. 82 Spare tire
Temporary Spare (certain models)
The spare tire in your car is called a "Temporary Spare". It has the following designation: T125/90R15.
Recommended tire pressure (see decal on fuel filler flap) should be maintained irrespective of which position on the
car the Temporary Spare tire is used on.
In the event of damage to this tire, a new one can be purchased from your Volvo retailer.
CAUTION: The car must not be driven with wheels of different dimensions or with a spare tire other than the one that
ProCarManuals.com
Page 43 of 88

came with the car. The use of different size wheels can seriously damage your car's transmission.
WARNING!
Current legislation prohibits the use of the "Temporary Spare" tire other than as a temporary replacement for a
punctured tire. In other words, it must be replaced as soon as possible by a standard tire. Roadholding, etc., may be
affected with the "Temporary Spare" in use. Do not, therefore, exceed 50 mph (80 km/h).
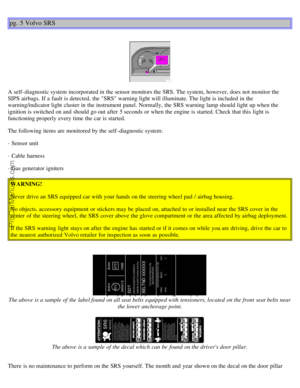
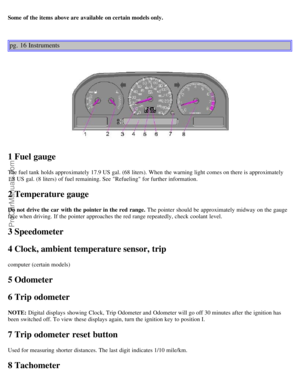
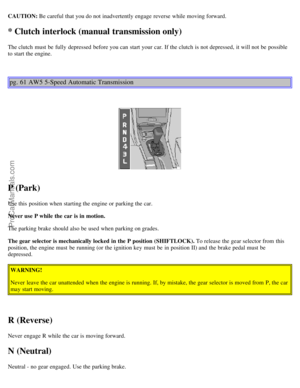
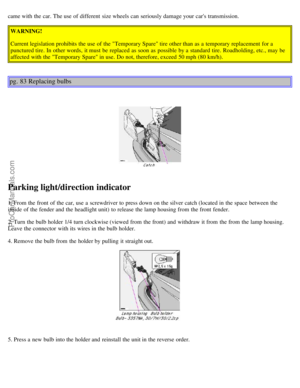
pg. 83 Replacing bulbs
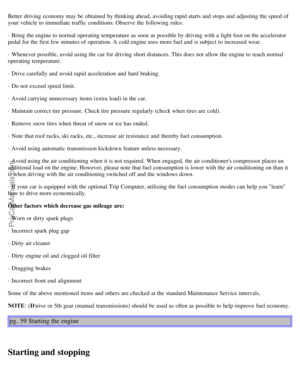
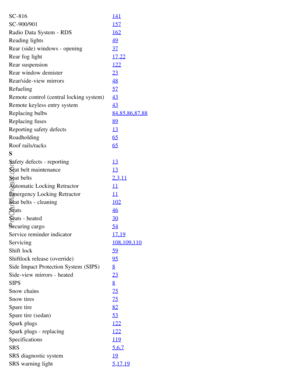
Parking light/direction indicator
1. From the front of the car, use a screwdriver to press down on the silver catch (located in the space between the
inside of the fender and the headlight unit) to release the lamp housing from the front fender.
2. Turn the bulb holder 1/4 turn clockwise (viewed from the front) and withdraw it from the from the lamp housing.
Leave the connector with its wires in the bulb holder.
4. Remove the bulb from the holder by pulling it straight out.
5. Press a new bulb into the holder and reinstall the unit in the reverse order.
ProCarManuals.com
Page 44 of 88
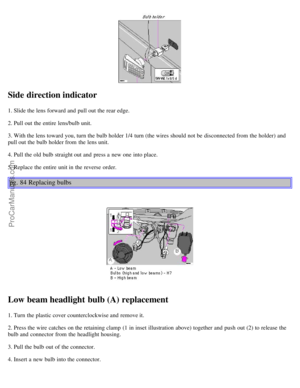
Side direction indicator
1. Slide the lens forward and pull out the rear edge.
2. Pull out the entire lens/bulb unit.
3. With the lens toward you, turn the bulb holder 1/4 turn (the wires should not be disconnected from the holder) and
pull out the bulb holder from the lens unit.
4. Pull the old bulb straight out and press a new one into place.
5. Replace the entire unit in the reverse order.
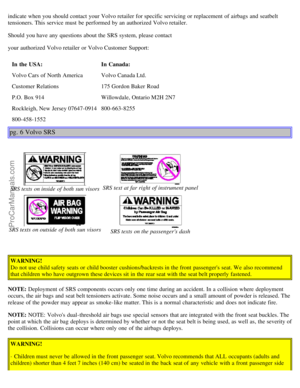
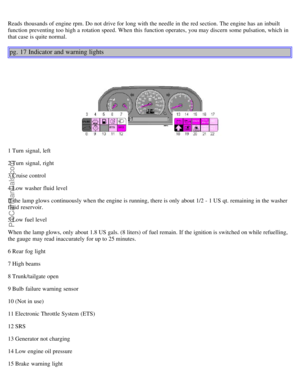
pg. 84 Replacing bulbs
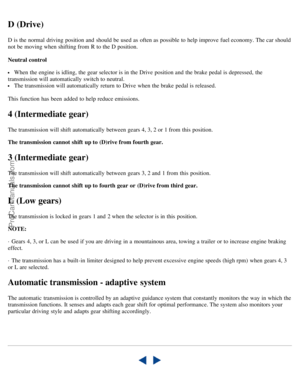
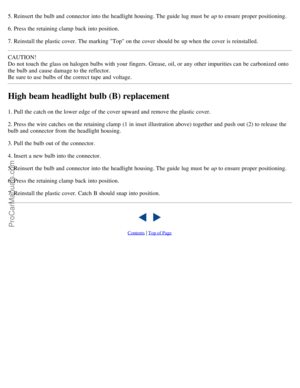
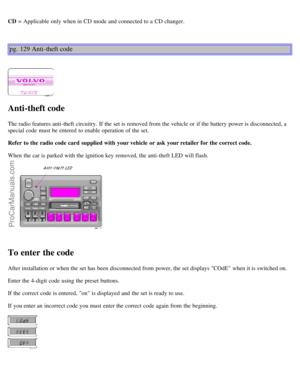
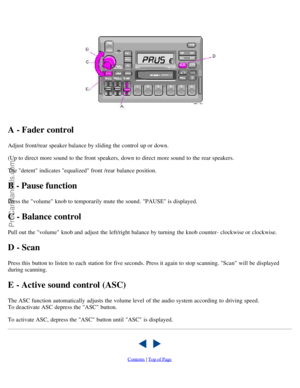
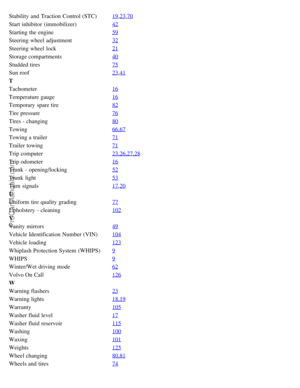
Low beam headlight bulb (A) replacement
1. Turn the plastic cover counterclockwise and remove it.
2. Press the wire catches on the retaining clamp (1 in inset illustration above) together and push out (2) to release the
bulb and connector from the headlight housing.
3. Pull the bulb out of the connector.
4. Insert a new bulb into the connector.
ProCarManuals.com
Page 45 of 88

5. Reinsert the bulb and connector into the headlight housing. The guide lug must be up to ensure proper positioning.
6. Press the retaining clamp back into position.
7. Reinstall the plastic cover. The marking "Top" on the cover should be up when the cover is reinstalled.
CAUTION!
Do not touch the glass on halogen bulbs with your fingers. Grease, oil, or any other impurities can be carbonized onto
the bulb and cause damage to the reflector.
Be sure to use bulbs of the correct tupe and voltage.
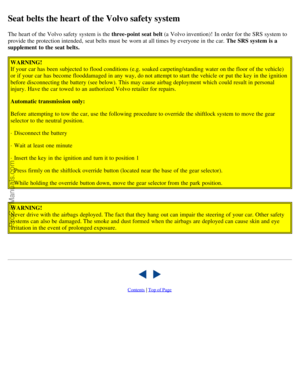
High beam headlight bulb (B) replacement
1. Pull the catch on the lower edge of the cover upward and remove the plastic cover.
2. Press the wire catches on the retaining clamp (1 in inset illustration above) together and push out (2) to release the
bulb and connector from the headlight housing.
3. Pull the bulb out of the connector.
4. Insert a new bulb into the connector.
5. Reinsert the bulb and connector into the headlight housing. The guide lug must be up to ensure proper positioning.
6. Press the retaining clamp back into position.
7. Reinstall the plastic cover. Catch B should snap into position.
Contents | Top of Page
ProCarManuals.com
Page 46 of 88

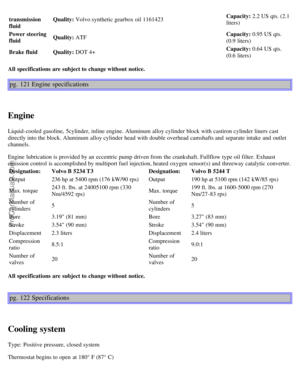
2 0 0 1
VOLVO C70
Chapter 7 - Car care
pg. 97 Car care
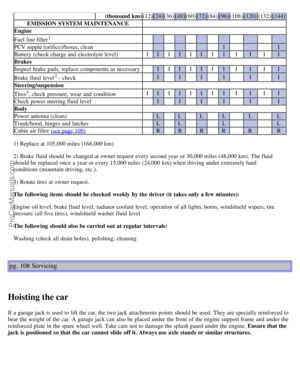
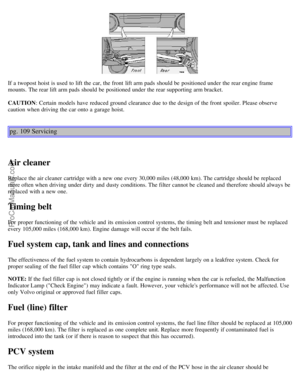
Car care includes not only maintaining the appearance of the car, but also protecting the car exterior from the effects of
air pollution, rain, mud or road salt. The paintwork should also be touched up immediately, if damaged, to prevent rust
formation. Paint touchup
98-99
Washing100
Automatic car washing, Polishing and waxing101
Cleaning the upholstery102
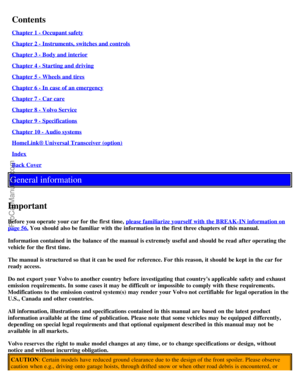
pg. 98 Paint touch up
Paint touchup
Paint damage requires immediate attention to avoid rusting. Make it a habit to check the finish regularly when washing
the car for instance. Touchup if necessary.
Paint repairs require special equipment and skill. Contact your Volvo retailer for any extensive damage.
Minor scratches can be repaired by using Volvo touchup paint.
NOTE: When ordering touchup paint from your Volvo retailer, use the paint code indicated on the model plate. The
plate is located in the engine compartment, on the inside of the left front fender.
h2>Minor stone chips and scratches
ProCarManuals.com
Page 47 of 88
Material:
Primer can
Paint touchup bottle
Brush
Masking tape
NOTE: When touching up the car, it should be clean and dry. The surface temperature should be above 60° F (15° C).
Scratches on the surface
If the stone chip has not penetrated down to the metal and an undamaged layer of paint remains, the touchup paint can
be applied as soon as the spot has been cleaned.
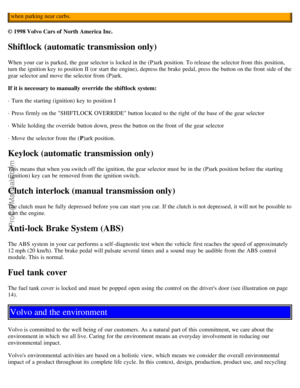
pg. 99 Paint touch up
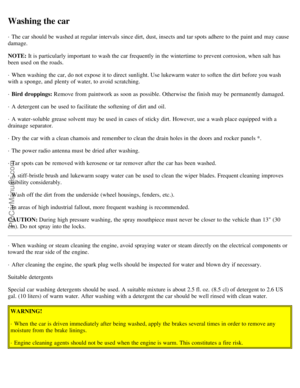
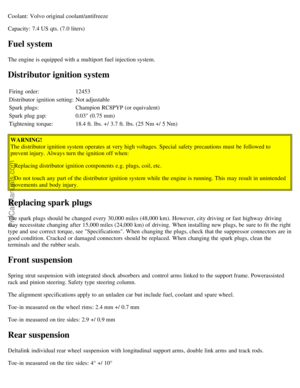
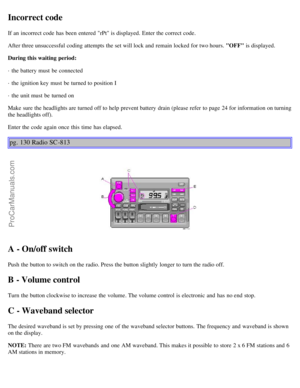
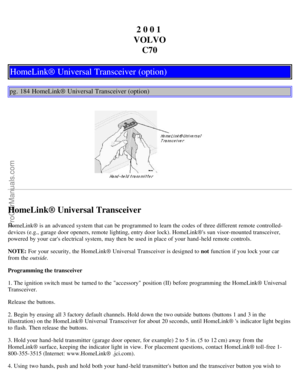
Deep scratches
1. Place a strip of masking tape over the damaged surface. Pull the tape off so that any loose flakes of paint adhere to
it.
2. Thoroughly mix the primer and apply it with a small brush.
When the primer surface is dry, the paint can be applied using a brush. Mix the paint thoroughly; apply several thin
paint coats and let dry after each application.
3. If there is a longer scratch, you may want to protect surrounding paint by masking it off.
pg. 100 Washing
ProCarManuals.com
Page 48 of 88

Washing the car
· The car should be washed at regular intervals since dirt, dust, insects and tar spots adhere to the paint and may cause
damage.
NOTE: It is particularly important to wash the car frequently in the wintertime to prevent corrosion, when salt has
been used on the roads.
· When washing the car, do not expose it to direct sunlight. Use lukewarm water to soften the dirt before you wash
with a sponge, and plenty of water, to avoid scratching.
· Bird droppings: Remove from paintwork as soon as possible. Otherwise the finish may be permanently damaged.
· A detergent can be used to facilitate the softening of dirt and oil.
· A water-soluble grease solvent may be used in cases of sticky dirt. However, use a wash place equipped with a
drainage separator.
· Dry the car with a clean chamois and remember to clean the drain holes in the doors and rocker panels *.
· The power radio antenna must be dried after washing.
· Tar spots can be removed with kerosene or tar remover after the car has been washed.
· A stiff-bristle brush and lukewarm soapy water can be used to clean the wiper blades. Frequent cleaning improves
visibility considerably.
· Wash off the dirt from the underside (wheel housings, fenders, etc.).
· In areas of high industrial fallout, more frequent washing is recommended.
CAUTION: During high pressure washing, the spray mouthpiece must never be closer to the vehicle than 13" (30
cm). Do not spray into the locks.
· When washing or steam cleaning the engine, avoid spraying water or steam directly on the electrical components or
toward the rear side of the engine.
· After cleaning the engine, the spark plug wells should be inspected for water and blown dry if necessary.
Suitable detergents
Special car washing detergents should be used. A suitable mixture is about 2.5 fl. oz. (8.5 cl) of detergent to 2.6 US
gal. (10 liters) of warm water. After washing with a detergent the car should be well rinsed with clean water.
WARNING!
· When the car is driven immediately after being washed, apply the brakes several times in order to remove any
moisture from the brake linings.
· Engine cleaning agents should not be used when the engine is warm. This constitutes a fire risk.
ProCarManuals.com


.
Scratches on the s")