Page 2923 of 4323

D13867
AT134±01
D12704
Orange
Blue
Clamp
ClampBolt
Bolt
D12739
D12704
Orange
Blue
Clamp
Clamp
A B
± AUTOMATIC TRANSMISSION (A750E, A750F)ATF TEMPERATURE SENSOR
AT±7
2915 Author�: Date�:
2005 SEQUOIA (RM1146U)
ATF TEMPERATURE SENSOR
ON±VEHICLE REPAIR
1. DRAIN AUTOMATIC TRANSMISSION FLUID
(a) Remove the drain plug and gasket, and drain the ATF.
(b) Install a new gasket and the drain plug.
Torque: 20 N´m (204 kgf´cm, 15 ft´lbf)
2. REMOVE OIL PAN (See page AT±10)
3. REMOVE OIL STRAINER (See page AT±10)
4. REMOVE ATF TEMPERATURE SENSOR
(a) Disconnect the 7 solenoid valve connectors.
(b) Remove the 2 bolts, clamps and ATF temperature sen-
sors.
(c) Disconnect the transmission wire connector.
(d) Remove the bolt and the transmission wire harness.
5. INSTALL ATF TEMPERATURE SENSOR
(a) Install the transmission wire harness.
(b) Install the bolt.
Torque: 5.4 N´m (55 kgf´cm, 48 in.´lbf)
(c) Connect the transmission wire connector.
(d) Connect the 7 solenoid valve connectors.
(e) Install the 2 ATF temperature sensors and clamps to the
valve body with the 2 bolts.
HINT:
In order to install the ATF temperature sensors properly, check
the wire harness color prior to installation.
Torque:
A: 11 N´m (112 kgf´cm, 8 ft´lbf)
B: 10 N´m (100 kgf´cm, 7 ft´lbf)
Bolt length:
Bolt A: 36 mm (1.42 in.)
Bolt B: 12 mm (0.47 in.)
Sensor wire harness:
Wire harnessColor
for linear controlOrange
for oil temp. warning lampBlue
6. INSTALL OIL STRAINER (See page AT±10)
Page 2926 of 4323

D13867
AT136±01
D13866
AT0103
D12703
D12704
Orange
Blue
Clamp
ClampBolt
Bolt AT±10
± AUTOMATIC TRANSMISSION (A750E, A750F)VALVE BODY ASSEMBLY
2918 Author�: Date�:
2005 SEQUOIA (RM1146U)
VALVE BODY ASSEMBLY
ON±VEHICLE REPAIR
1. DRAIN AUTOMATIC TRANSMISSION FLUID
(a) Remove the drain plug and gasket, and drain the ATF.
(b) Install a new gasket and the drain plug.
Torque: 20 N´m (204 kgf´cm, 15 ft´lbf)
2. REMOVE OIL PAN
NOTICE:
Some fluid will remain in the oil pan.
(a) Remove the 20 bolts.
(b) Remove the oil pan gasket.
3. EXAMINE PARTICLES IN PAN
Remove the magnets and use them to collect any steel par-
ticles. Carefully look at the foreign matter and particles in the
pan and on the magnets to anticipate the type of wear you will
find in the transmission.
Steel (magnetic) ... bearing, gear and clutch plate wear
Brass (non±magnetic) ... bushing wear
4. REMOVE OIL STRAINER
Remove the 4 bolts, the oil strainer and the O±ring.
NOTICE:
Be careful as some fluid will come out with the oil strainer.
5. REMOVE ATF TEMPERATURE SENSOR
(a) Disconnect the 7 solenoid valve connectors.
(b) Remove the 2 bolts, clamps and ATF temperature sen-
sors.
Page 2928 of 4323

D12705
D12704
Orange
Blue
Clamp
Clamp
A B
D12703
D13866
AT±12
± AUTOMATIC TRANSMISSION (A750E, A750F)VALVE BODY ASSEMBLY
2920 Author�: Date�:
2005 SEQUOIA (RM1146U)
(b) Install the 19 bolts and the valve body.
Torque: 11 N´m (112 kgf´cm, 8 ft´lbf)
Bolt length:
Bolt A: 25 mm (0.98 in.)
Bolt B: 36 mm (1.42 in.)
10. INSTALL TEMPERATURE SENSOR
(a) Connect the 7 solenoid valve connectors.
(b) Install the 2 temperature sensors and clamps to the valve
body with the 2 bolts.
HINT:
In order to install the ATF temperature sensors properly, check
the wire harness color prior to installation.
Torque:
A: 11 N´m (112 kgf´cm, 8 ft´lbf)
B: 10 N´m (100 kgf´cm, 7 ft´lbf)
Bolt length:
Bolt A: 36 mm (1.42 in.)
Bolt B: 12 mm (0.47 in.)
Sensor wire harness:
Wire harnessColor
for linear controlOrange
for oil temp. warning lampBlue
11. INSTALL OIL STRAINER
(a) Install a new O±ring.
(b) Install the oil strainer with the 4 bolts.
Torque: 10 N´m (100 kgf´cm, 7 ft´lbf)
12. INSTALL OIL PAN
HINT:
Remove any packing material, and be careful not to spill oil on
the contacting surfaces of the transmission case and the oil
pan.
Using a new gasket, install the oil pan with the 20 bolts.
Torque: 4.4 N´m (45 kgf´cm, 39 in´lbf)
Page 3003 of 4323
F07987
R16053
PR±12
± PROPELLER SHAFTSPIDER BEARING
2995 Author�: Date�:
2005 SEQUOIA (RM1146U)
6. INSTALL SNAP RINGS
(a) Install 2 new snap rings of equal thickness which will allow
for 0 to 0.05 mm (0 to 0.0020 in.) axial play.
HINT:
Do not reuse the snap rings.
4WD rear propeller shaft:
ColorMarkThickness mm (in.)
None±2.00 (0.0784)
Light brown±2.03 (0.0799)
Blue±2.06 (0.0811)
None±2.09 (0.0823)
±11.99 (0.0783)
±22.01 (0.0791)
±32.03 (0.0799)
±42.05 (0.0807)
±52.07 (0.0815)
±62.09 (0.0823)
±72.11 (0.0831)
±82.13 (0.0839)
±92.15 (0.0846)
±102.17 (0.0854)
2WD and 4WD front propeller shaft:
ColorThickness mm (in.)
Blue1.638 (0.0645)
Yellow1.588 (0.0625)
Silver1.537 (0.0605)
Copper1.511 (0.0595)
Black1.486 (0.0585)
Red1.435 (0.0565)
Green1.384 (0.0545)
(b) Using a hammer, tap the yoke until there is no clearance
between the bearing outer race and snap ring.
Page 4004 of 4323

05_SEQUOIA_U (L/O 0408)
145
2005 SEQUOIA from Aug. '04 Prod. (OM34424U)
The lights automatically turn off after 30
seconds when all the side doors and back
door are closed with the ignition key in
the ªACCº or ªLOCKº position and the le-
ver at position 2.
The lights also automatically turn off when
the driver 's door is opened with the lever
at position 1.
If the doors are locked by the wireless
remote control transmitter, the lights auto-
matically turn off immediately.
To turn them on again, turn the key to the
ªONº position or actuate the headlight
switch.
If you are going to park for over one
week, make sure the headlight switch is
off.
The time before the headlights turn off
can be changed. For details, contact your
Toyota dealer.
NOTICE
To prevent the battery from being dis-
charged, do not leave the lights on
for a long period when the engine is
not running.
Daytime running light system (all mod-
els sold in Canada and some models
sold in the U.S.A.)
The headlights turn on when the parking
brake is released with the engine started,
even with the light switch in the ªOFFº
position. They will not go off until the
ignition switch is turned off.
To turn on the other exterior lights and
instrument panel lights, twist the knob to
position 1.
Under the daytime running light system,
the headlights turn on at reduced intensity.
Twist the knob to position 2 to turn to full
intensity for driving at night.
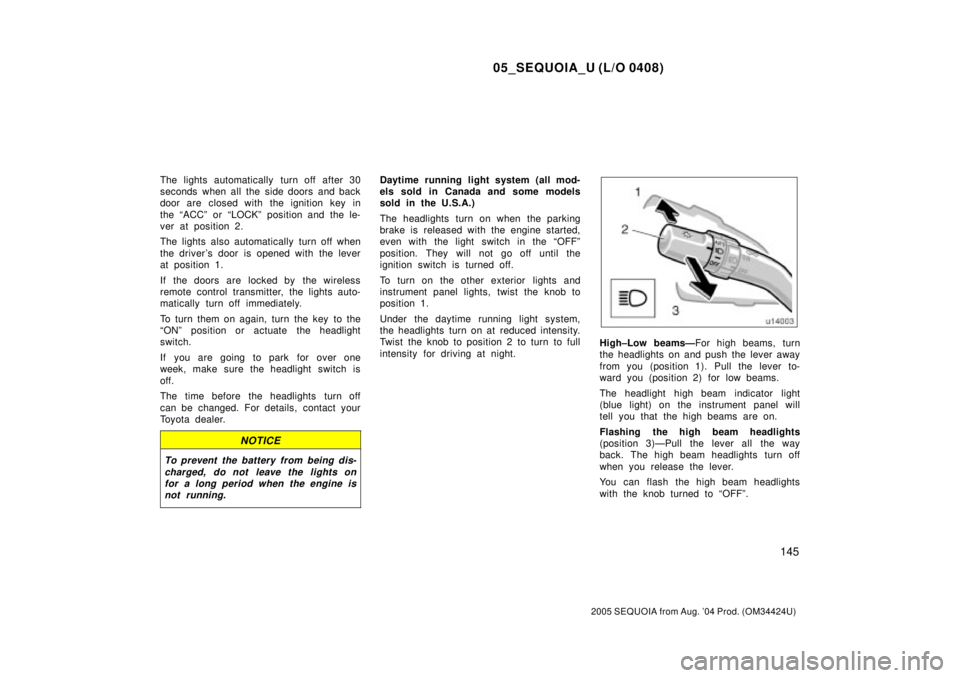
High±Low beamsÐFor high beams, turn
the headlights on and push the lever away
from you (position 1). Pull the lever to-
ward you (position 2) for low beams.
The headlight high beam indicator light
(blue light) on the instrument panel will
tell you that the high beams are on.
Flashing the high beam headlights
(position 3)ÐPull the lever all the way
back. The high beam headlights turn off
when you release the lever.
You can flash the high beam headlights
with the knob turned to ªOFFº.
Page 4006 of 4323

05_SEQUOIA_U (L/O 0408)
147
2005 SEQUOIA from Aug. '04 Prod. (OM34424U)
Daytime running light system (all mod-
els sold in Canada and some models
sold in the U.S.A.)
The headlights turn on at reduced intensi-
ty when the parking brake is released with
the engine started, even with the light
switch in the ªOFFº position. They will not
go off until the ignition switch is turned
off.
To turn on the other exterior lights and
instrument panel lights, twist the knob to
position 1.
Twist the knob to position 2 to turn to full
intensity for driving at night.
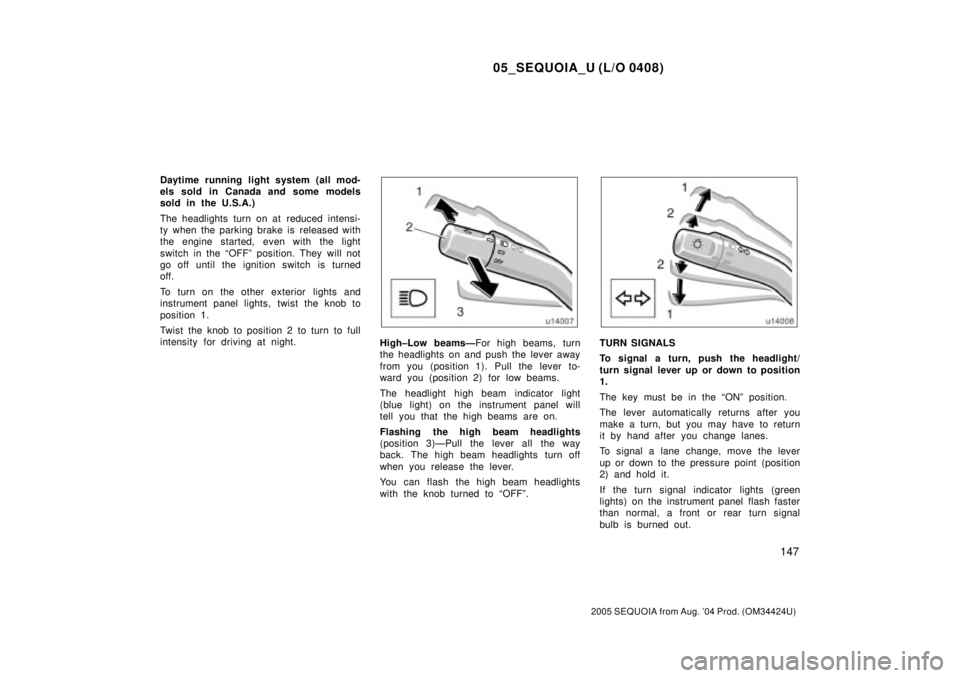
High±Low beamsÐFor high beams, turn
the headlights on and push the lever away
from you (position 1). Pull the lever to-
ward you (position 2) for low beams.
The headlight high beam indicator light
(blue light) on the instrument panel will
tell you that the high beams are on.
Flashing the high beam headlights
(position 3)ÐPull the lever all the way
back. The high beam headlights turn off
when you release the lever.
You can flash the high beam headlights
with the knob turned to ªOFFº.TURN SIGNALS
To signal a turn, push the headlight/
turn signal lever up or down to position
1.
The key must be in the ªONº position.
The lever automatically returns after you
make a turn, but you may have to return
it by hand after you change lanes.
To signal a lane change, move the lever
up or down to the pressure point (position
2) and hold it.
If the turn signal indicator lights (green
lights) on the instrument panel flash faster
than normal, a front or rear turn signal
bulb is burned out.
Page 4082 of 4323
05_SEQUOIA_U (L/O 0408)
223
2005 SEQUOIA from Aug. '04 Prod. (OM34424U)
TYPE (Program Types)
When you push the ªTYPEº button while
receiving an RDS station, the current pro-
gram type appears on the display.
Each time you push this button, the pro-
gram type changes as in the following:
�ROCK
�EASY LIS (Easy listening)
�CLS/JAZZ (Classical music and Jazz)
�R&B (Rhythm and Blues)
�INFORM (Information)
�RELIGION
�MISC (Miscellaneous)
�ALERT (Emergency message)
Page 4103 of 4323
05_SEQUOIA_U (L/O 0408)
244
2005 SEQUOIA from Aug. '04 Prod. (OM34424U)
SELECTING THE MODE
Use the joy stick to select the mode.
Push the ªENTº button to enter the mode.The mode display which is selected by
the joy stick is colored blue. When the
ªENTº button is pushed, the mode display
changes to green. If the mode display is
gray, it cannot be selected.
The ªSpeaker soundº on the mode display
is selected on the front audio system.Radio
Cassette tape player and compact disc
player