Page 399 of 1943
BODY ± AERODYNAMICS
182BO12
182BO13
Front Fairing Rear Fairing137
AERODYNAMICS
�DESCRIPTION
To improve aerodynamic performance, the following measures have been taken.
�The shapes of the front pillar, outside rear view mirror, and the front windshield glass have been optimized
to achieve a smooth air flow.
�The height and the shape of the front bumper have been optimized in order to rectify the airflow under the
floor and along the body sides.
�The shapes of the engine undercover, fuel tank bottom surface, and the rear floor bottom surface have been
optimized to achieve a smooth underbody air flow.
�A front and rear fairings are provided to smooth out the airflow around the tires and reduce the air resis-
tance while the vehicle is in motion.
Page 508 of 1943

MA02F±02
MA±2
± MAINTENANCEINSIDE VEHICLE
55 Author�: Date�:
2001 PRIUS (RM778U)
INSIDE VEHICLE
GENERAL MAINTENANCE
These are maintenance and inspection items which are considered to be the owner's responsibility.
They can be done by the owner or they can have them done at a service shop.
These items include those which should be checked on a daily basis, those which, in most cases, do not
require (special) tools and those which are considered to be reasonable for the owner to do.
Items and procedures for general maintenance are as follows.
1. GENERAL NOTES
�Maintenance items may vary from country to country. Check the owner's manual supplement in which
the maintenance schedule is shown.
�Every service item in the periodic maintenance schedule must be performed.
�Periodic maintenance service must be performed according to whichever interval in the periodic main-
tenance schedule occurs first, the odometer reading (miles) or the time interval (months).
�Maintenance service after the last period should be performed at the same interval as before unless
otherwise noted.
2. LIGHTS
(a) Check that the headlights, stop lights, taillights, turn signal lights, and other lights are all working.
(b) Check the headlight aim.
3. WARNING LIGHTS AND BUZZERS
Check that all warning lights and buzzers function properly.
4. HORN
Check that it is working.
5. WINDSHIELD GLASS
Check for scratches, pits or abrasions.
6. WINDSHIELD WIPER AND WASHER
(a) Check operation of the wipers and washer.
(b) Check that the wipers do not streak.
7. WINDSHIELD DEFROSTER
Check that air comes out from the defroster outlet when operating the heater or air conditioner.
8. REAR VIEW MIRROR
Check that it is mounted securely.
9. SUN VISORS
Check that they move freely and are mounted securely.
10. STEERING WHEEL
Check that it has the specified freeplay. Be alert for changes in steering condition, such as hard steering,
excessive freeplay or strange noises.
11. SEATS
(a) Check that the seat adjusters operate smoothly.
(b) Check that all latches lock securely in any position.
(c) Check that the head restraints move up and down smoothly and that the locks hold securely in any
latch position.
(d) For fold±down seat backs, check that the latches lock securely.
12. SEAT BELTS
(a) Check that the seat belt system such as the buckles, retractors and anchors operate properly and
smoothly.
(b) Check that the belt webbing is not cut, frayed, worn or damaged.
Page 609 of 1943

SS1HM±01
± SERVICE SPECIFICATIONSBODY
SS±35
157 Author�: Date�:
2001 PRIUS (RM778U)
BODY
TORQUE SPECIFICATION
Part tightenedN´mkgf´cmft´lbf
FRONT BUMPER±±±
Side marker x Bumper1.71715 in.´lbf
HOOD±±±
Hood x Hinge131309
Hood lock x Body8.38574 in.´lbf
FRONT DOOR±±±
Outside view mirror x Door7.88069 in.´lbf
Window regulator arm x Door4.95043 in.´lbf
Window regulator body x Door8.38574 in.´lbf
Door lock x Door Bolt:4.95043 in.´lbf
Door lock x Door Screw:4.95043 in.´lbf
Outside handle x Door5.45548 in.´lbf
Hinge x Body4344032 in.´lbf
Hinge x Door4344032 in.´lbf
Door lock striker x Body2323017 in.´lbf
REAR DOOR±±±
Window regulator x Door5.45548 in.´lbf
Door lock x Door4.95043 in.´lbf
Outside handle x Body5.45548 in.´lbf
Hinge x Body2526019
Hinge x Door3031022
Door lock striker x Body2323017
LUGGAGE COMPARTMENT DOOR AND HINGE±±±
Door lock x Door5.45548 in.´lbf
Hinge x Door8.38574 in.´lbf
Door lock striker x Body5.45548 in.´lbf
FRONT WIPER AND WASHER±±±
Wiper arm x Wiper link2627020
Wiper motor x Wiper link Bolt:5.45548 in.´lbf
Wiper motor x Wiper link Nut:1717513
Wiper link x Outer front cowl top panel7.47565 in.´lbf
Outer front cowl top panel x Body5.45548 in.´lbf
ROOF HEADLINING±±±
Inner rear view mirror x Body2.93026 in.´lbf
INSTRUMENT PANEL±±±
Front passenger airbag assembly x Reinforcement2020415
FRONT SEAT±±±
Seat cushion frame x Body3738027
Seatback assembly x Seat cushion frame4344032
REAR SEAT±±±
Seatback assembly x Body7.98170 in.´lbf
Page 1868 of 1943

BO3PY±01
H13603
2 Clips
H15356
H15357
± BODYWINDSHIELD
BO±45
2001 PRIUS (RM778U)
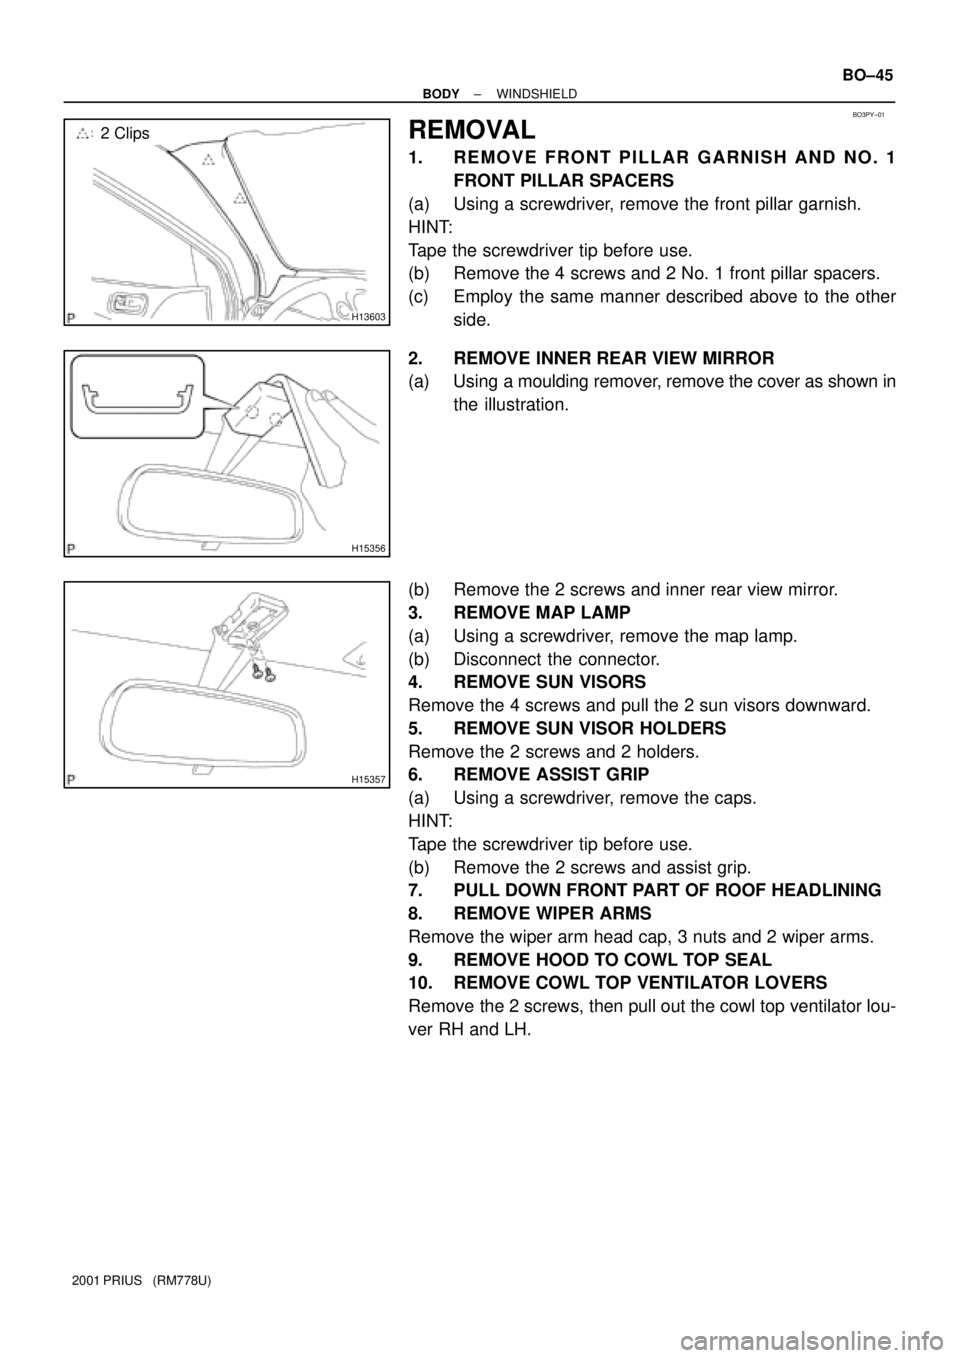
REMOVAL
1. REMOVE FRONT PILLAR GARNISH AND NO. 1
FRONT PILLAR SPACERS
(a) Using a screwdriver, remove the front pillar garnish.
HINT:
Tape the screwdriver tip before use.
(b) Remove the 4 screws and 2 No. 1 front pillar spacers.
(c) Employ the same manner described above to the other
side.
2. REMOVE INNER REAR VIEW MIRROR
(a) Using a moulding remover, remove the cover as shown in
the illustration.
(b) Remove the 2 screws and inner rear view mirror.
3. REMOVE MAP LAMP
(a) Using a screwdriver, remove the map lamp.
(b) Disconnect the connector.
4. REMOVE SUN VISORS
Remove the 4 screws and pull the 2 sun visors downward.
5. REMOVE SUN VISOR HOLDERS
Remove the 2 screws and 2 holders.
6. REMOVE ASSIST GRIP
(a) Using a screwdriver, remove the caps.
HINT:
Tape the screwdriver tip before use.
(b) Remove the 2 screws and assist grip.
7. PULL DOWN FRONT PART OF ROOF HEADLINING
8. REMOVE WIPER ARMS
Remove the wiper arm head cap, 3 nuts and 2 wiper arms.
9. REMOVE HOOD TO COWL TOP SEAL
10. REMOVE COWL TOP VENTILATOR LOVERS
Remove the 2 screws, then pull out the cowl top ventilator lou-
ver RH and LH.
Page 1874 of 1943
H15357
H13603
2 Clips
± BODYWINDSHIELD
BO±51
2001 PRIUS (RM778U)
20. INSTALL INNER REAR VIEW MIRROR
(a) Install the inner rear view mirror with the 2 screws.
Torque: 2.9 N´m (30 kgf´cm, 26 in.´lbf)
(b) Install the cover.
21. INSTALL FRONT PILLAR GARNISH AND NO. 1 FRONT
PILLAR SPACERS
(a) Install the 2 No. 1 front pillar spacers and 4 screws.
(b) Install the front pillar garnish to the body.
(c) Employ the same manner described above to the other
side.
Page 1890 of 1943

H15356
H15357
H15383
H15358P
H15359P BO±72
± BODYROOF HEADLINING
2001 PRIUS (RM778U)
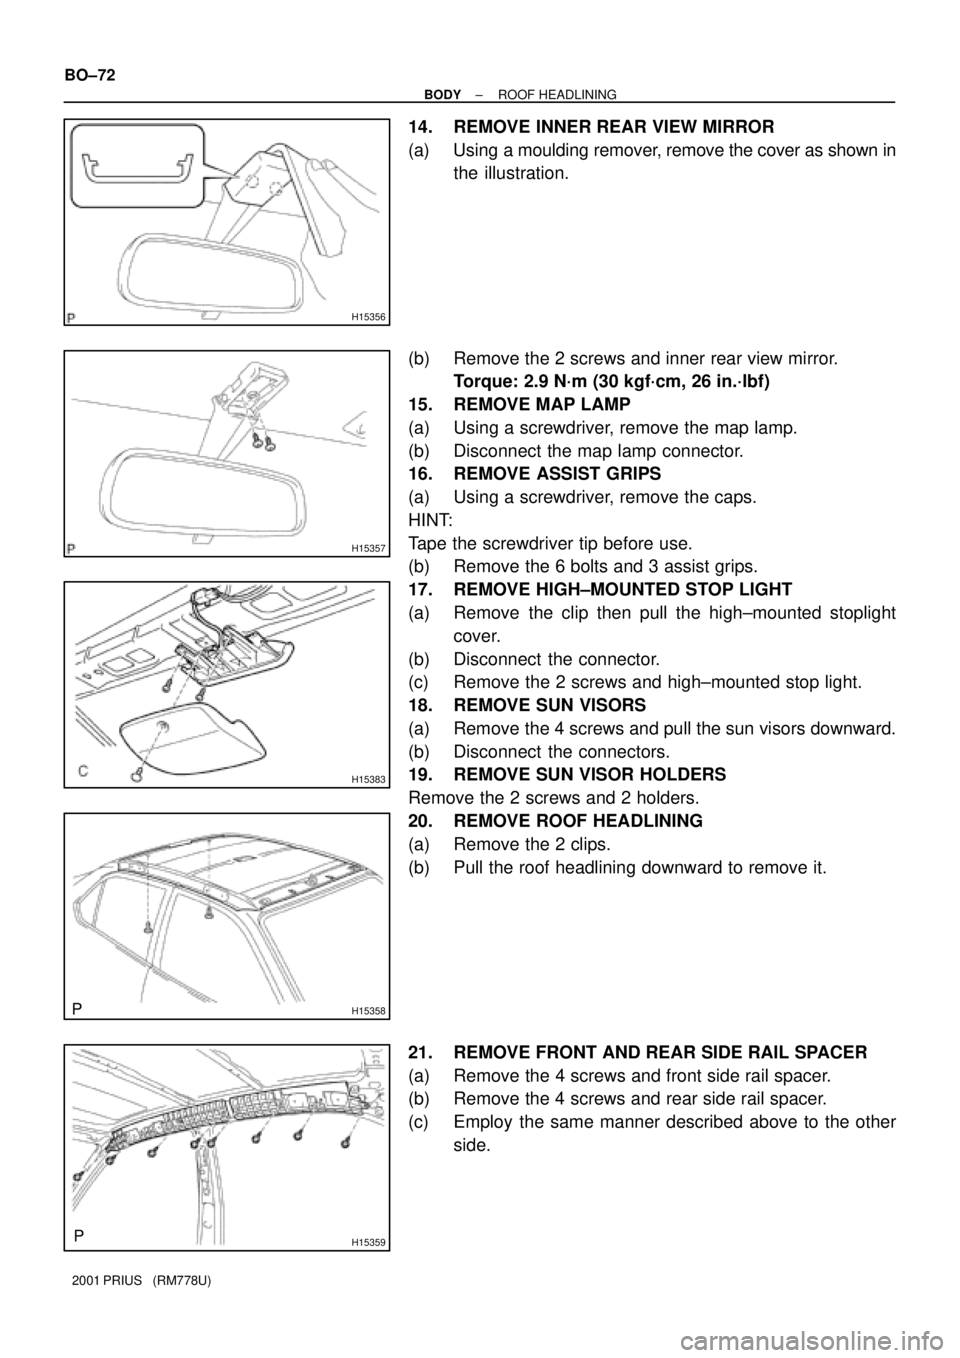
14. REMOVE INNER REAR VIEW MIRROR
(a) Using a moulding remover, remove the cover as shown in
the illustration.
(b) Remove the 2 screws and inner rear view mirror.
Torque: 2.9 N´m (30 kgf´cm, 26 in.´lbf)
15. REMOVE MAP LAMP
(a) Using a screwdriver, remove the map lamp.
(b) Disconnect the map lamp connector.
16. REMOVE ASSIST GRIPS
(a) Using a screwdriver, remove the caps.
HINT:
Tape the screwdriver tip before use.
(b) Remove the 6 bolts and 3 assist grips.
17. REMOVE HIGH±MOUNTED STOP LIGHT
(a) Remove the clip then pull the high±mounted stoplight
cover.
(b) Disconnect the connector.
(c) Remove the 2 screws and high±mounted stop light.
18. REMOVE SUN VISORS
(a) Remove the 4 screws and pull the sun visors downward.
(b) Disconnect the connectors.
19. REMOVE SUN VISOR HOLDERS
Remove the 2 screws and 2 holders.
20. REMOVE ROOF HEADLINING
(a) Remove the 2 clips.
(b) Pull the roof headlining downward to remove it.
21. REMOVE FRONT AND REAR SIDE RAIL SPACER
(a) Remove the 4 screws and front side rail spacer.
(b) Remove the 4 screws and rear side rail spacer.
(c) Employ the same manner described above to the other
side.