Page 36 of 1943

2001 PRIUS (EWD414U)
G ELECTRICAL WIRING ROUTING
Position of Parts in Instrument Panel
A 7 A/C Amplifier
A 8 A/C Amplifier
A 9 A/C Amplifier
A 10 A/C Room Temp. Sensor
A 11 A/C Solar Sensor
A 12 A/C Thermistor
A 13 Accel Position Sensor
A 14 Air Inlet Control Servo Motor
A 15 Air Mix Control Servo Motor
A 16 Air Vent Mode Control Servo Motor
A 17 Airbag Sensor Assembly
A 18 Airbag Sensor Assembly
A 19 Airbag Sensor Assembly
A 20 Airbag Squib (Front Passenger Airbag Assembly)
A 21 Airbag Squib (Steering Wheel Pad)
A 22 Ashtray Illumination
B 5 Back±Up Light Relay
B 6 Blower Motor
B 7 Blower Motor Linear Controller
B 8 Body ECU
B 9 Body ECU
B 10 Brake ECU
B 11 Brake ECU
B 12 Brake ECU
B 13 Brake ECU
B 14 Brake Warning BuzzerC 7 Center Cluster SW
C 8 Cigarette Lighter
C 9 Cigarette Lighter Illumination
C 10 Combination Meter
C 11 Combination Meter
C 12 Combination SW
C 13 Combination SW
C 14 Combination SW
D 2 Data Link Connector 3
D 3 Daytime Running Light Relay
D 4 Diode (Door Courtesy)
D 5 Diode (Daytime Running Light)
E 3 EMPS ECU
E 4 EMPS ECU
E 5 EMPS ECU
E 6 EMPS ECU
E 7 Engine Control Module
E 8 Engine Control Module
E 9 Engine Control Module
E 10 Engine Control Module
Page 1682 of 1943
BR1JA±01
F12629
Front Door Scuff Plate Cowl Side TrimHood Lock Release
Lever Lower Column CoverRadio Tuner Opening CoverCluster Finish Panel
Assembly Hazard Warning Switch
Lower Center Cluster
Finish PanelGlove Compartment
Door Finish PanelInstrument PanelNo. 3 Register No. 2 Side Defroster
Nozzle
Front Pillar GarnishPassenger Air Bag
Assembly Cluster Finish Panel
Combination Meter
Lower Finish PanelSteering Wheel Pad Steering Wheel
Spiral CableUpper Column Cover
Front Door Scuff PlateCowl Side Trim No. 1 RegisterNo. 1 Side Defroster
NozzleFront Pillar Garnish
: Specified torqueN´m (kgf´cm, ft´lbf)
50 (510, 37)
BR±10
± BRAKEPARKING BRAKE PEDAL
2001 PRIUS (RM778U)
COMPONENTS
Page 1881 of 1943
BO3TB±01
H15446
Passenger Airbag Assembly
Front Pillar Garnish
No. 2 Side Defroster Nozzle
No. 3 Register
Cluster Finish
Panel
Front Pillar
Garnish
Combination Meter
No. 1 Side Defroster Nozzle
Instrument Panel
No. 1 Register
Instrument Panel
Reinforcement
Upper Column Cover
Spiral Cable
Lower Column Cover
Lower Finish Panel
Front Door Scuff Plate
Cowl Side
TrimHood Lock Release LeverFront Door
Scuff Plate
Rear Console Box
Console Compartment
Door
Lower Center
Cluster Finish Panel
Glove Compartment
Door
Cowl Side Trim
Steering Wheel
Steering Wheel Pad
Finish Panel
No. 1 BraceCluster Finish
Panel Assembly
Radio Tuner Opening Cover
Hazard Warning Switch
N´m (kgf´cm, ft´lbf)
: Spesified torque
A
A
B
BNNC
HH
G
GG
G
D
D
II
G
G
D
D
I
O
50 (510, 37)
20 (204, 15)
KK
w/ Glove compartment door reinforcement:
Glove Compartment Door Reinforcement
L
L
HH
LL
EE
FF
± BODYINSTRUMENT PANEL
BO±59
1844 Author�: Date�:
2001 PRIUS (RM778U)
INSTRUMENT PANEL
COMPONENTS
Page 1884 of 1943

BO3TC±01
H154373 Clips
H154384 Clips
H15519
BO±62
± BODYINSTRUMENT PANEL
2001 PRIUS (RM778U)
REMOVAL
1. REMOVE STEERING WHEEL PAD AND STEERING
WHEEL (See page SR±4)
2. REMOVE FRONT DOOR SCUFF PLATES
3. REMOVE COWL SIDE TRIMS
4. REMOVE FRONT PILLAR GARNISHES
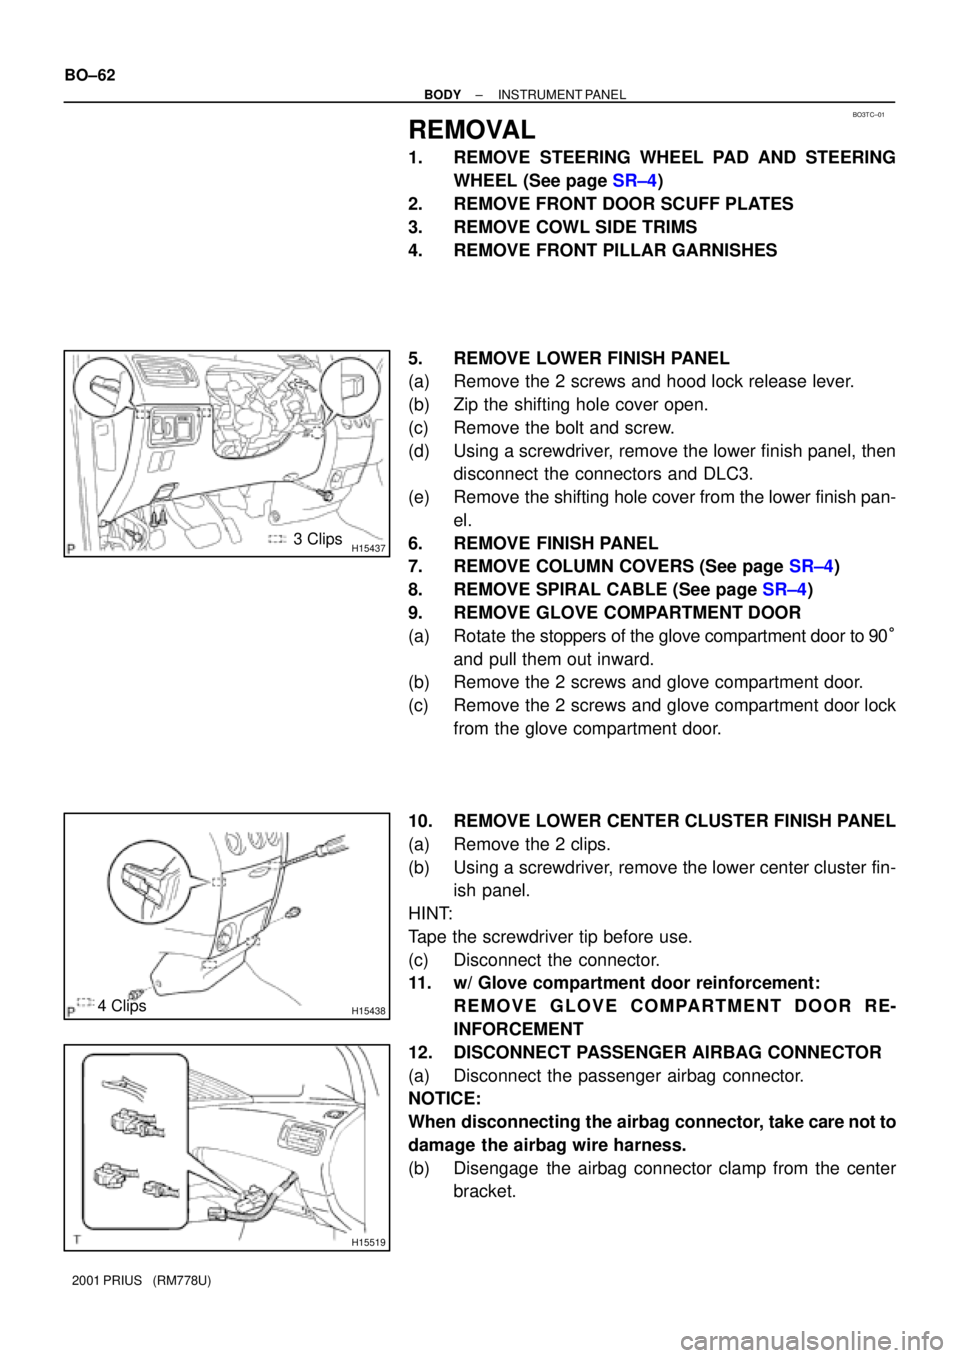
5. REMOVE LOWER FINISH PANEL
(a) Remove the 2 screws and hood lock release lever.
(b) Zip the shifting hole cover open.
(c) Remove the bolt and screw.
(d) Using a screwdriver, remove the lower finish panel, then
disconnect the connectors and DLC3.
(e) Remove the shifting hole cover from the lower finish pan-
el.
6. REMOVE FINISH PANEL
7. REMOVE COLUMN COVERS (See page SR±4)
8. REMOVE SPIRAL CABLE (See page SR±4)
9. REMOVE GLOVE COMPARTMENT DOOR
(a) Rotate the stoppers of the glove compartment door to 90°
and pull them out inward.
(b) Remove the 2 screws and glove compartment door.
(c) Remove the 2 screws and glove compartment door lock
from the glove compartment door.
10. REMOVE LOWER CENTER CLUSTER FINISH PANEL
(a) Remove the 2 clips.
(b) Using a screwdriver, remove the lower center cluster fin-
ish panel.
HINT:
Tape the screwdriver tip before use.
(c) Disconnect the connector.
11. w/ Glove compartment door reinforcement:
REMOVE GLOVE COMPARTMENT DOOR RE-
INFORCEMENT
12. DISCONNECT PASSENGER AIRBAG CONNECTOR
(a) Disconnect the passenger airbag connector.
NOTICE:
When disconnecting the airbag connector, take care not to
damage the airbag wire harness.
(b) Disengage the airbag connector clamp from the center
bracket.
Page 1885 of 1943

H15508
H15509
H154392 Clips
H154406 Clips
H15441
2 Clips
± BODYINSTRUMENT PANEL
BO±63
2001 PRIUS (RM778U)
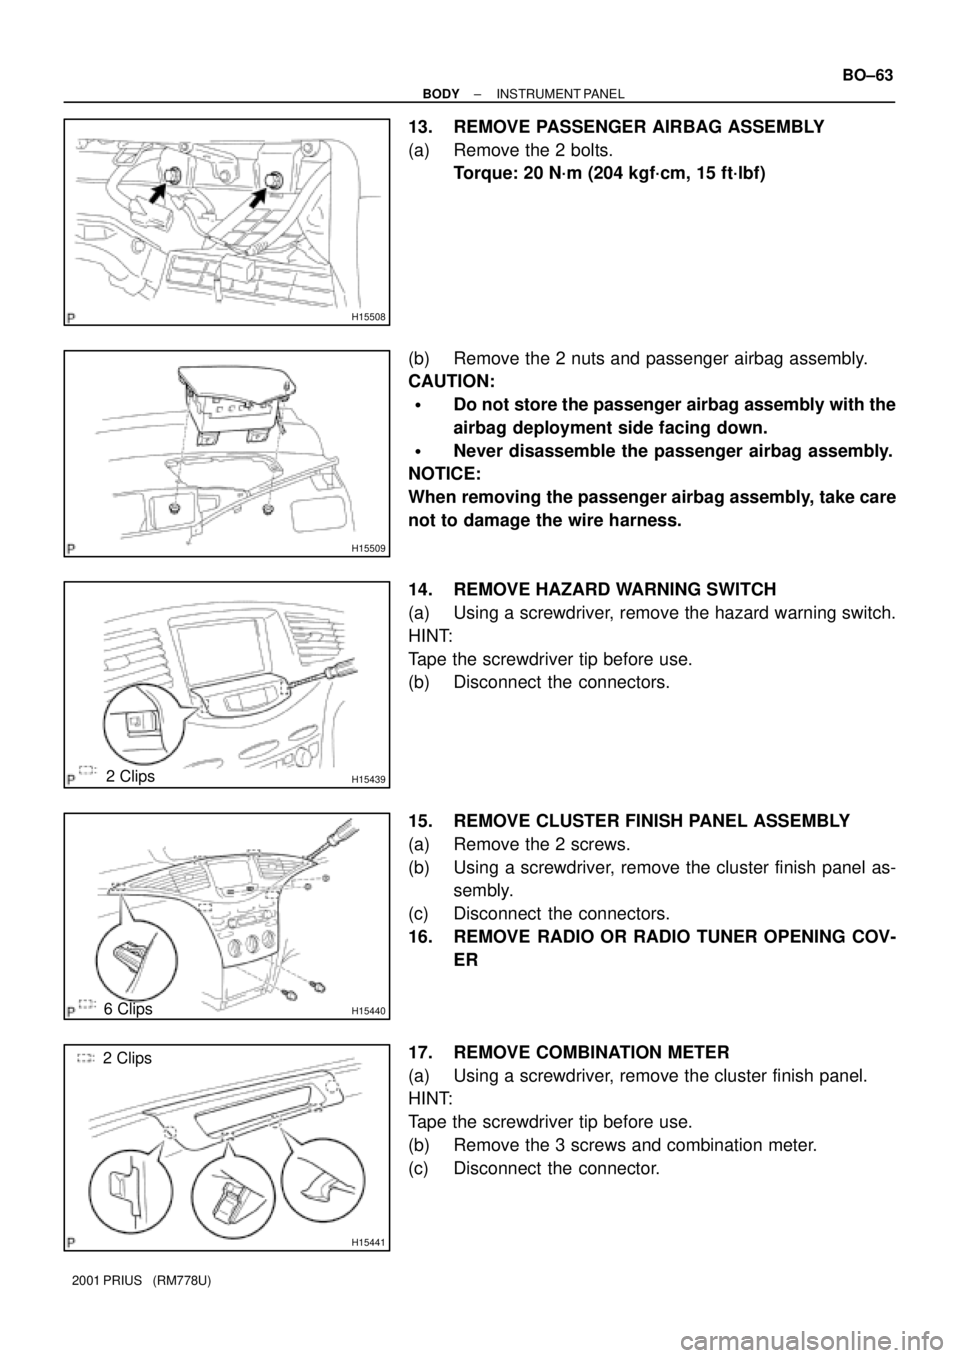
13. REMOVE PASSENGER AIRBAG ASSEMBLY
(a) Remove the 2 bolts.
Torque: 20 N´m (204 kgf´cm, 15 ft´lbf)
(b) Remove the 2 nuts and passenger airbag assembly.
CAUTION:
�Do not store the passenger airbag assembly with the
airbag deployment side facing down.
�Never disassemble the passenger airbag assembly.
NOTICE:
When removing the passenger airbag assembly, take care
not to damage the wire harness.
14. REMOVE HAZARD WARNING SWITCH
(a) Using a screwdriver, remove the hazard warning switch.
HINT:
Tape the screwdriver tip before use.
(b) Disconnect the connectors.
15. REMOVE CLUSTER FINISH PANEL ASSEMBLY
(a) Remove the 2 screws.
(b) Using a screwdriver, remove the cluster finish panel as-
sembly.
(c) Disconnect the connectors.
16. REMOVE RADIO OR RADIO TUNER OPENING COV-
ER
17. REMOVE COMBINATION METER
(a) Using a screwdriver, remove the cluster finish panel.
HINT:
Tape the screwdriver tip before use.
(b) Remove the 3 screws and combination meter.
(c) Disconnect the connector.