Page 1640 of 1943
D09706
D09886
FIPG
D09885
D09695
D09938
1 ± 1.5 mm
(0.039 ± 0.059 in.)SST
± HYBRID TRANSAXLEHYBRID TRANSAXLE ASSEMBLY
HT±39
2001 PRIUS (RM778U)
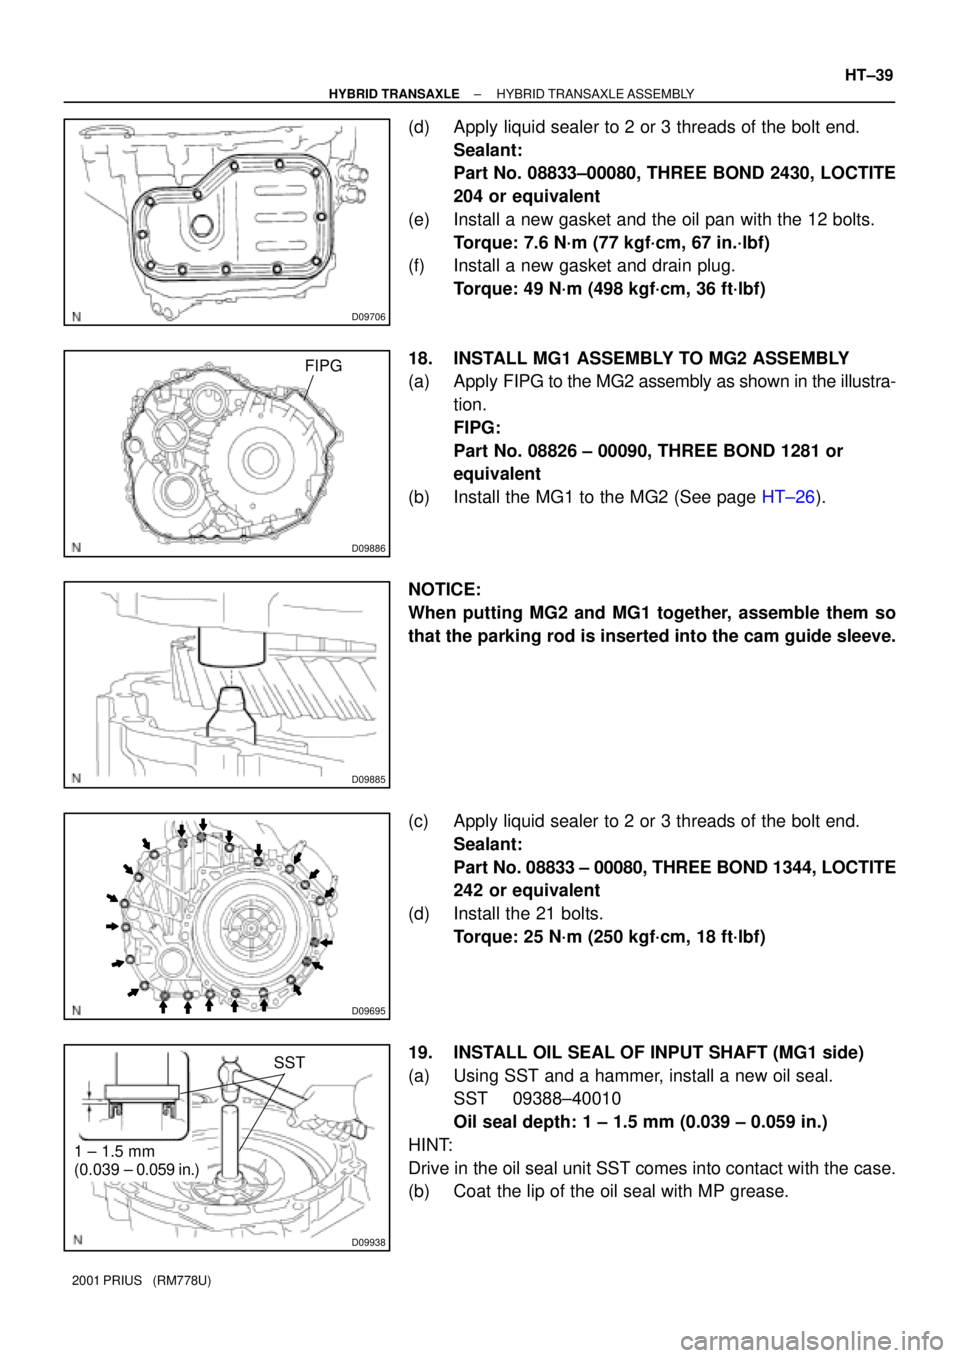
(d) Apply liquid sealer to 2 or 3 threads of the bolt end.
Sealant:
Part No. 08833±00080, THREE BOND 2430, LOCTITE
204 or equivalent
(e) Install a new gasket and the oil pan with the 12 bolts.
Torque: 7.6 N´m (77 kgf´cm, 67 in.´lbf)
(f) Install a new gasket and drain plug.
Torque: 49 N´m (498 kgf´cm, 36 ft´lbf)
18. INSTALL MG1 ASSEMBLY TO MG2 ASSEMBLY
(a) Apply FIPG to the MG2 assembly as shown in the illustra-
tion.
FIPG:
Part No. 08826 ± 00090, THREE BOND 1281 or
equivalent
(b) Install the MG1 to the MG2 (See page HT±26).
NOTICE:
When putting MG2 and MG1 together, assemble them so
that the parking rod is inserted into the cam guide sleeve.
(c) Apply liquid sealer to 2 or 3 threads of the bolt end.
Sealant:
Part No. 08833 ± 00080, THREE BOND 1344, LOCTITE
242 or equivalent
(d) Install the 21 bolts.
Torque: 25 N´m (250 kgf´cm, 18 ft´lbf)
19. INSTALL OIL SEAL OF INPUT SHAFT (MG1 side)
(a) Using SST and a hammer, install a new oil seal.
SST 09388±40010
Oil seal depth: 1 ± 1.5 mm (0.039 ± 0.059 in.)
HINT:
Drive in the oil seal unit SST comes into contact with the case.
(b) Coat the lip of the oil seal with MP grease.
Page 1643 of 1943
D09715
D09889
FIPG
D09714
HT±42
± HYBRID TRANSAXLEHYBRID TRANSAXLE ASSEMBLY
2001 PRIUS (RM778U)
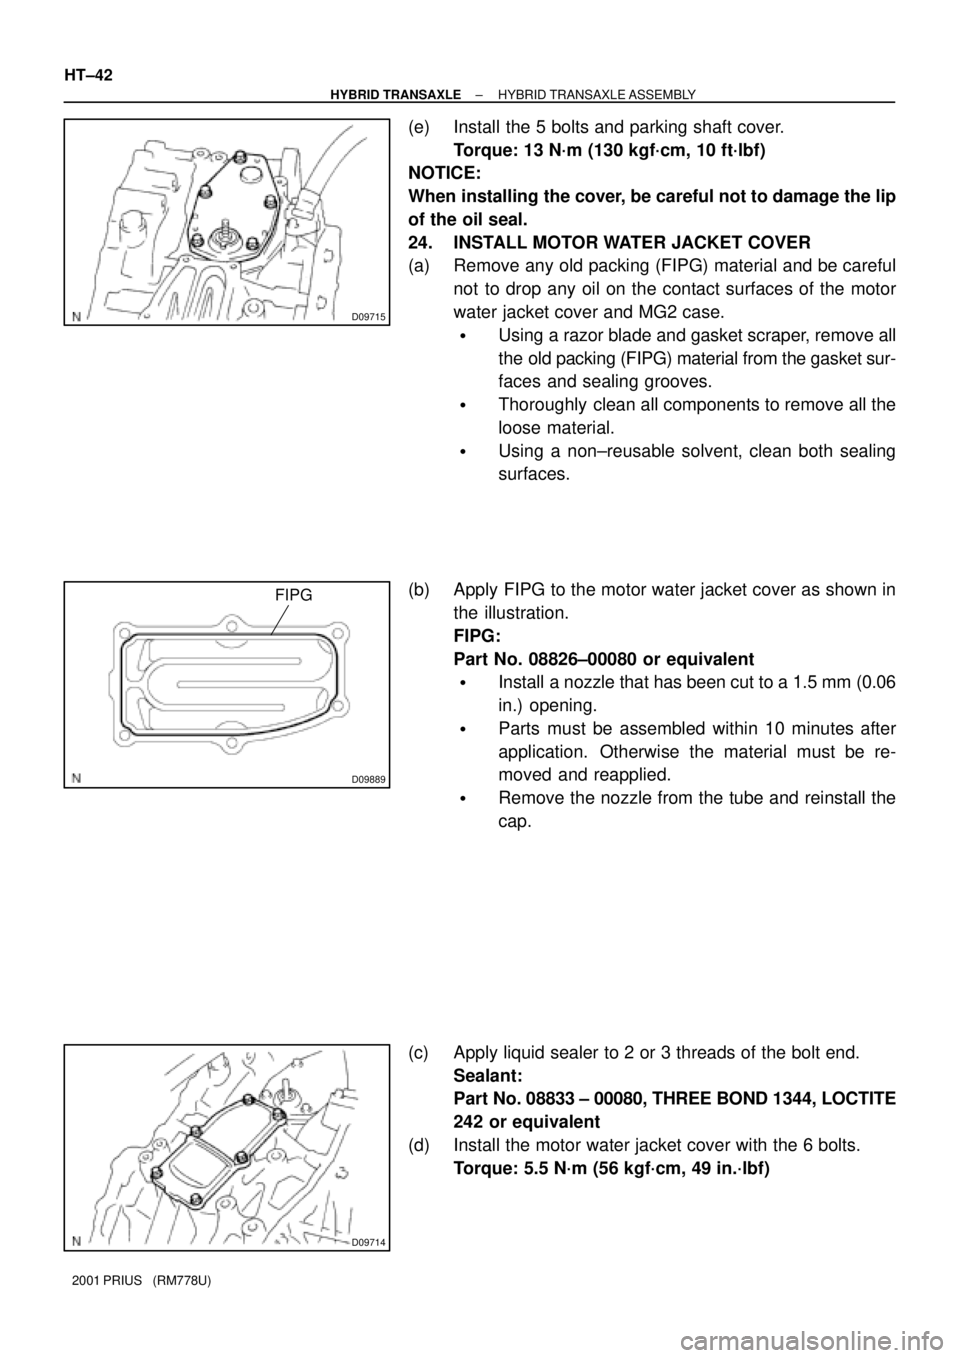
(e) Install the 5 bolts and parking shaft cover.
Torque: 13 N´m (130 kgf´cm, 10 ft´lbf)
NOTICE:
When installing the cover, be careful not to damage the lip
of the oil seal.
24. INSTALL MOTOR WATER JACKET COVER
(a) Remove any old packing (FIPG) material and be careful
not to drop any oil on the contact surfaces of the motor
water jacket cover and MG2 case.
�Using a razor blade and gasket scraper, remove all
the old packing (FIPG) material from the gasket sur-
faces and sealing grooves.
�Thoroughly clean all components to remove all the
loose material.
�Using a non±reusable solvent, clean both sealing
surfaces.
(b) Apply FIPG to the motor water jacket cover as shown in
the illustration.
FIPG:
Part No. 08826±00080 or equivalent
�Install a nozzle that has been cut to a 1.5 mm (0.06
in.) opening.
�Parts must be assembled within 10 minutes after
application. Otherwise the material must be re-
moved and reapplied.
�Remove the nozzle from the tube and reinstall the
cap.
(c) Apply liquid sealer to 2 or 3 threads of the bolt end.
Sealant:
Part No. 08833 ± 00080, THREE BOND 1344, LOCTITE
242 or equivalent
(d) Install the motor water jacket cover with the 6 bolts.
Torque: 5.5 N´m (56 kgf´cm, 49 in.´lbf)
Page 1644 of 1943
D09735
D09713
D09890
FIPG
± HYBRID TRANSAXLEHYBRID TRANSAXLE ASSEMBLY
HT±43
2001 PRIUS (RM778U)
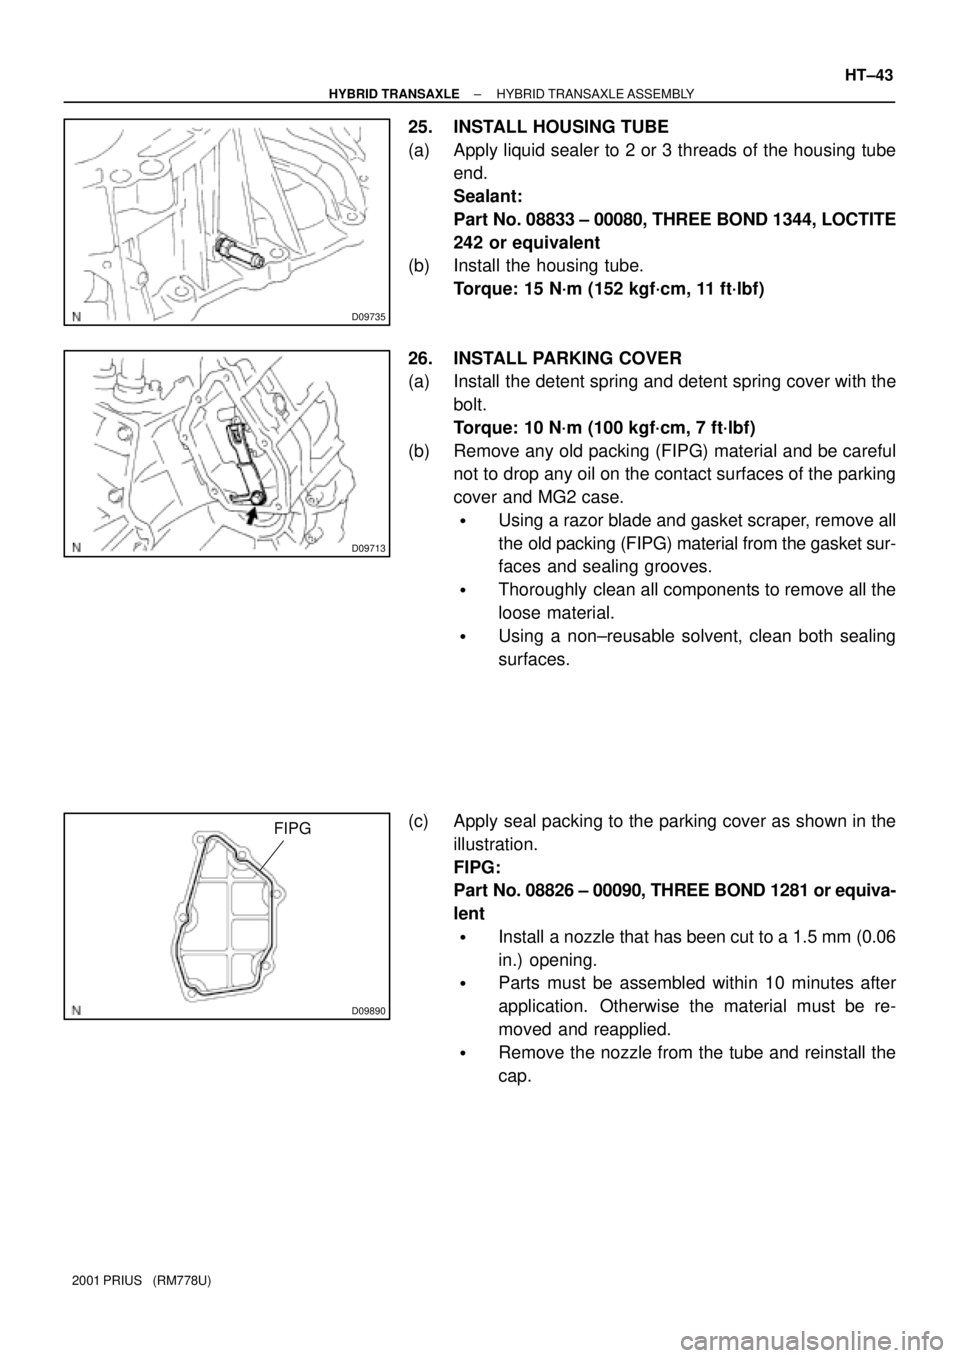
25. INSTALL HOUSING TUBE
(a) Apply liquid sealer to 2 or 3 threads of the housing tube
end.
Sealant:
Part No. 08833 ± 00080, THREE BOND 1344, LOCTITE
242 or equivalent
(b) Install the housing tube.
Torque: 15 N´m (152 kgf´cm, 11 ft´lbf)
26. INSTALL PARKING COVER
(a) Install the detent spring and detent spring cover with the
bolt.
Torque: 10 N´m (100 kgf´cm, 7 ft´lbf)
(b) Remove any old packing (FIPG) material and be careful
not to drop any oil on the contact surfaces of the parking
cover and MG2 case.
�Using a razor blade and gasket scraper, remove all
the old packing (FIPG) material from the gasket sur-
faces and sealing grooves.
�Thoroughly clean all components to remove all the
loose material.
�Using a non±reusable solvent, clean both sealing
surfaces.
(c) Apply seal packing to the parking cover as shown in the
illustration.
FIPG:
Part No. 08826 ± 00090, THREE BOND 1281 or equiva-
lent
�Install a nozzle that has been cut to a 1.5 mm (0.06
in.) opening.
�Parts must be assembled within 10 minutes after
application. Otherwise the material must be re-
moved and reapplied.
�Remove the nozzle from the tube and reinstall the
cap.
Page 1645 of 1943
D09712
D09725
D09724
D09723
O±Ring
D09722
HT±44
± HYBRID TRANSAXLEHYBRID TRANSAXLE ASSEMBLY
2001 PRIUS (RM778U)
(d) Install the parking cover with the 6 bolts.
Torque: 5.5 N´m (56 kgf´cm, 49 in.´lbf)
27. INSTALL OIL PUMP
(a) Apply ATF to individual sliding parts.
(b) Install the oil pump drive shaft.
(c) Install the oil pump driven rotor and drive rotor.
(d) Install a new O±ring without twisting it..
(e) Apply liquid sealer to 2 or 3 threads of the bolt end.
Sealant:
Part No. 08833 ± 00080, THREE BOND 1344, LOCTITE
242 or equivalent
(f) Install the oil pump cover with the 5 bolts.
Torque: 5.5 N´m (56 kgf´cm, 49 in.´lbf)
Page 1646 of 1943
D09721
D09710
D09733
D09895
D09932
± HYBRID TRANSAXLEHYBRID TRANSAXLE ASSEMBLY
HT±45
2001 PRIUS (RM778U)
(g) Install a new O±ring to the plug.
(h) Install the plug.
Torque: 7.35 N´m (75 kgf´cm, 65 in.´lbf)
28. INSTALL WIRING HARNESS CONNECTOR (MG2 side)
Install the 2 wiring harness connectors with the 2 bolts.
Torque: 5.5 N´m (56 kgf´cm, 49 in.´lbf)
29. INSTALL WIRING HARNESS CONNECTOR (MG1 side)
Install the wiring harness connector with the bolt.
Torque: 5.5 N´m (56 kgf´cm, 49 in.´lbf)
30. INSTALL 4 WATER JACKET UNIONS
(a) Apply liquid sealer to 2 or 3 threads of the union end.
Sealant:
Part No. 08833 ± 00080, THREE BOND 1344, LOCTITE
242 or equivalent
(b) Install the 4 water jacket unions.
Torque: 50 N´m (510 kgf´cm, 37 ft´lbf)
31. INSTALL HIGH±VOLTAGE CABLE
(a) Install the high±voltage cable with the 3 bolts.
Torque: 18 N´m (183 kgf´cm, 13 ft´lbf)
Page 1647 of 1943
D09933
D09891
FIPG
D09731
HT±46
± HYBRID TRANSAXLEHYBRID TRANSAXLE ASSEMBLY
2001 PRIUS (RM778U)
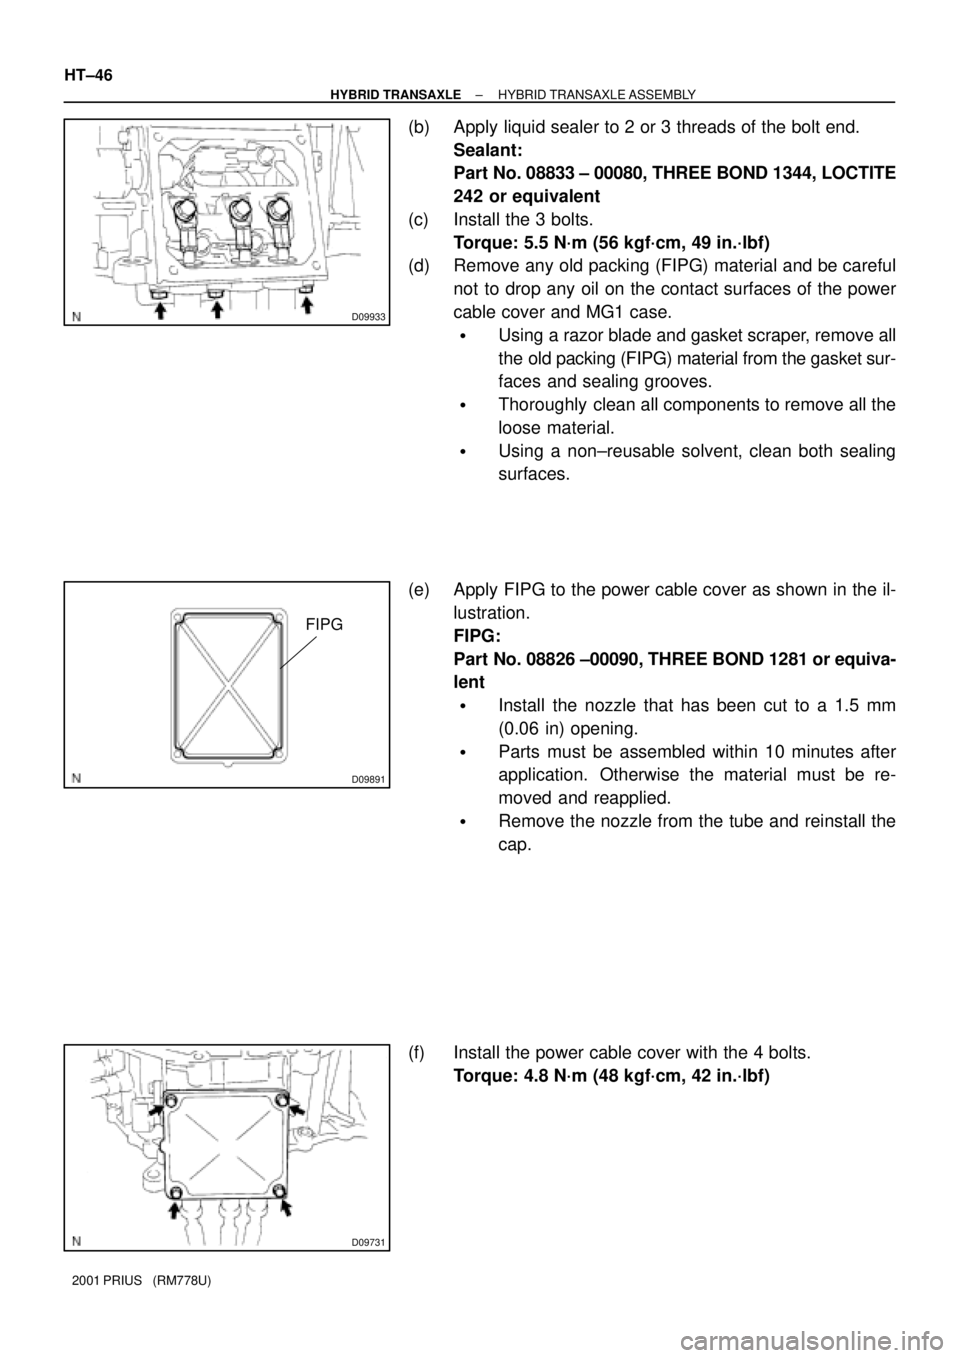
(b) Apply liquid sealer to 2 or 3 threads of the bolt end.
Sealant:
Part No. 08833 ± 00080, THREE BOND 1344, LOCTITE
242 or equivalent
(c) Install the 3 bolts.
Torque: 5.5 N´m (56 kgf´cm, 49 in.´lbf)
(d) Remove any old packing (FIPG) material and be careful
not to drop any oil on the contact surfaces of the power
cable cover and MG1 case.
�Using a razor blade and gasket scraper, remove all
the old packing (FIPG) material from the gasket sur-
faces and sealing grooves.
�Thoroughly clean all components to remove all the
loose material.
�Using a non±reusable solvent, clean both sealing
surfaces.
(e) Apply FIPG to the power cable cover as shown in the il-
lustration.
FIPG:
Part No. 08826 ±00090, THREE BOND 1281 or equiva-
lent
�Install the nozzle that has been cut to a 1.5 mm
(0.06 in) opening.
�Parts must be assembled within 10 minutes after
application. Otherwise the material must be re-
moved and reapplied.
�Remove the nozzle from the tube and reinstall the
cap.
(f) Install the power cable cover with the 4 bolts.
Torque: 4.8 N´m (48 kgf´cm, 42 in.´lbf)
Page 1648 of 1943
D09709
± HYBRID TRANSAXLEHYBRID TRANSAXLE ASSEMBLY
HT±47
2001 PRIUS (RM778U)
32. INSTALL MOUNTING BRACKET
(a) Apply liquid sealer to 2 or 3 threads of the bolt end.
Sealant:
Part No. 08833 ± 00070, THREE BOND 1324 or
equivalent
(b) Install the mounting bracket with the 3 bolts.
Torque: 52 N´m (530 kgf´cm, 38 ft´lbf)
Page 1657 of 1943
F07326
� �
1
2
: Use with adjusting bolt
F12938
Bolt
Adjusting
ValueSet BoltAdjusting Bolt90105±15001 90105±15004 90105±15005 90105±15006
121212121 Dot
2 Dots3 Dots
±1°30' ± ±1°15'
±1°15' ± ±1°00'
±1°00' ± ±45'
±45' ± ±30'
±30' ± ±15'
0' ± 15'
15' ± 30'
30' ± 45'
45' ± 1°00'
1°00' ± 1°15' ±15' ± 0'
1°15' ± 1°30'
± SUSPENSION AND AXLEFRONT WHEEL ALIGNMENT
SA±5
1455 Author�: Date�:
2001 PRIUS (RM778U)
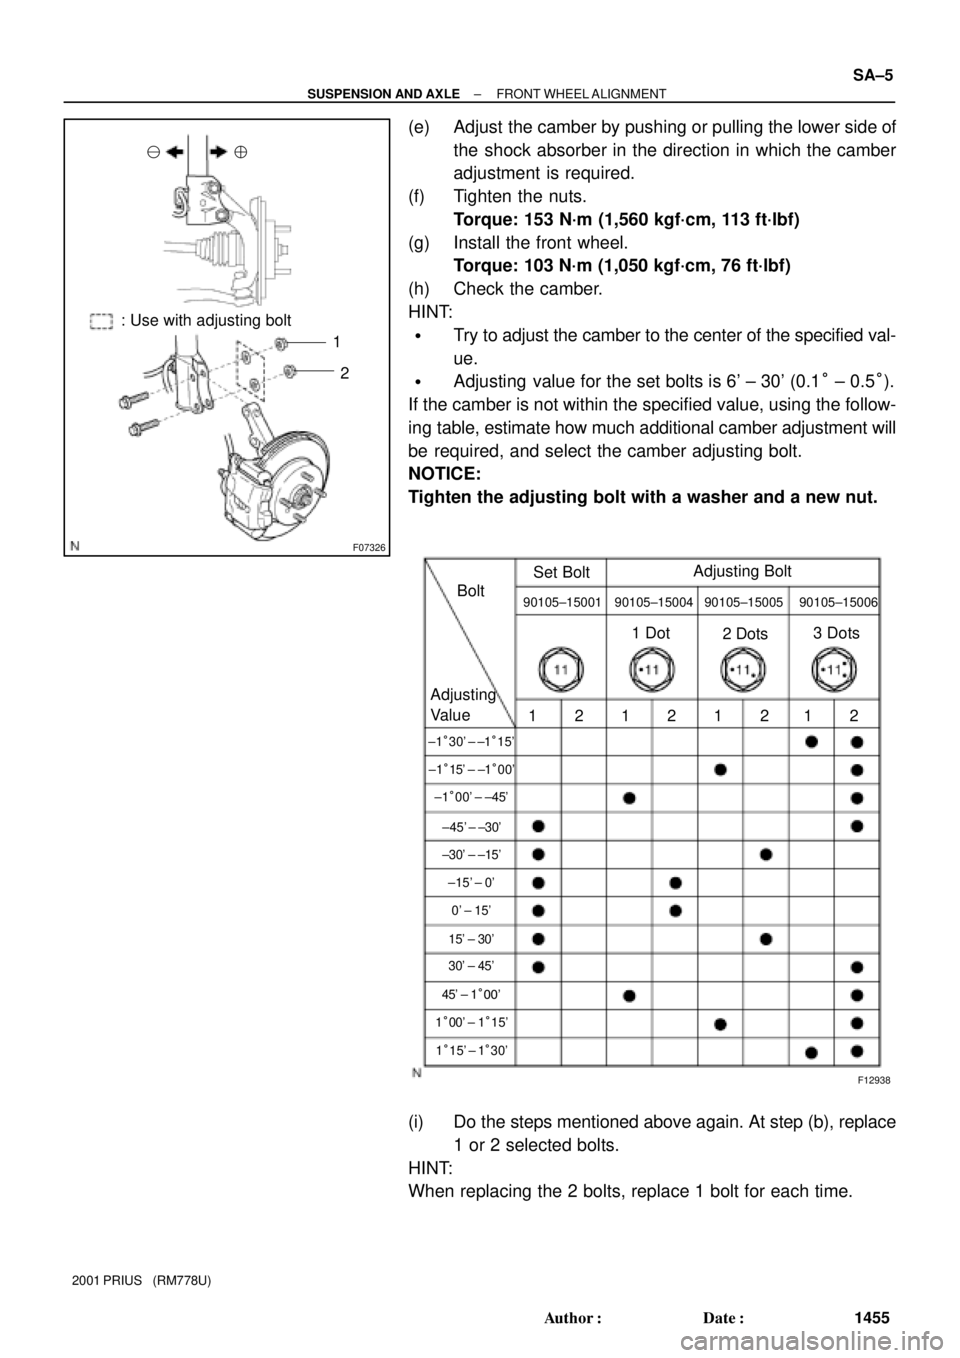
(e) Adjust the camber by pushing or pulling the lower side of
the shock absorber in the direction in which the camber
adjustment is required.
(f) Tighten the nuts.
Torque: 153 N´m (1,560 kgf´cm, 113 ft´lbf)
(g) Install the front wheel.
Torque: 103 N´m (1,050 kgf´cm, 76 ft´lbf)
(h) Check the camber.
HINT:
�Try to adjust the camber to the center of the specified val-
ue.
�Adjusting value for the set bolts is 6' ± 30' (0.1° ± 0.5°).
If the camber is not within the specified value, using the follow-
ing table, estimate how much additional camber adjustment will
be required, and select the camber adjusting bolt.
NOTICE:
Tighten the adjusting bolt with a washer and a new nut.
(i) Do the steps mentioned above again. At step (b), replace
1 or 2 selected bolts.
HINT:
When replacing the 2 bolts, replace 1 bolt for each time.