2001 NISSAN X-TRAIL oil filter
[x] Cancel search: oil filterPage 9 of 3833

PRECAUTIONS
GI-7
C
D
E
F
G
H
I
J
K
L
MB
GI
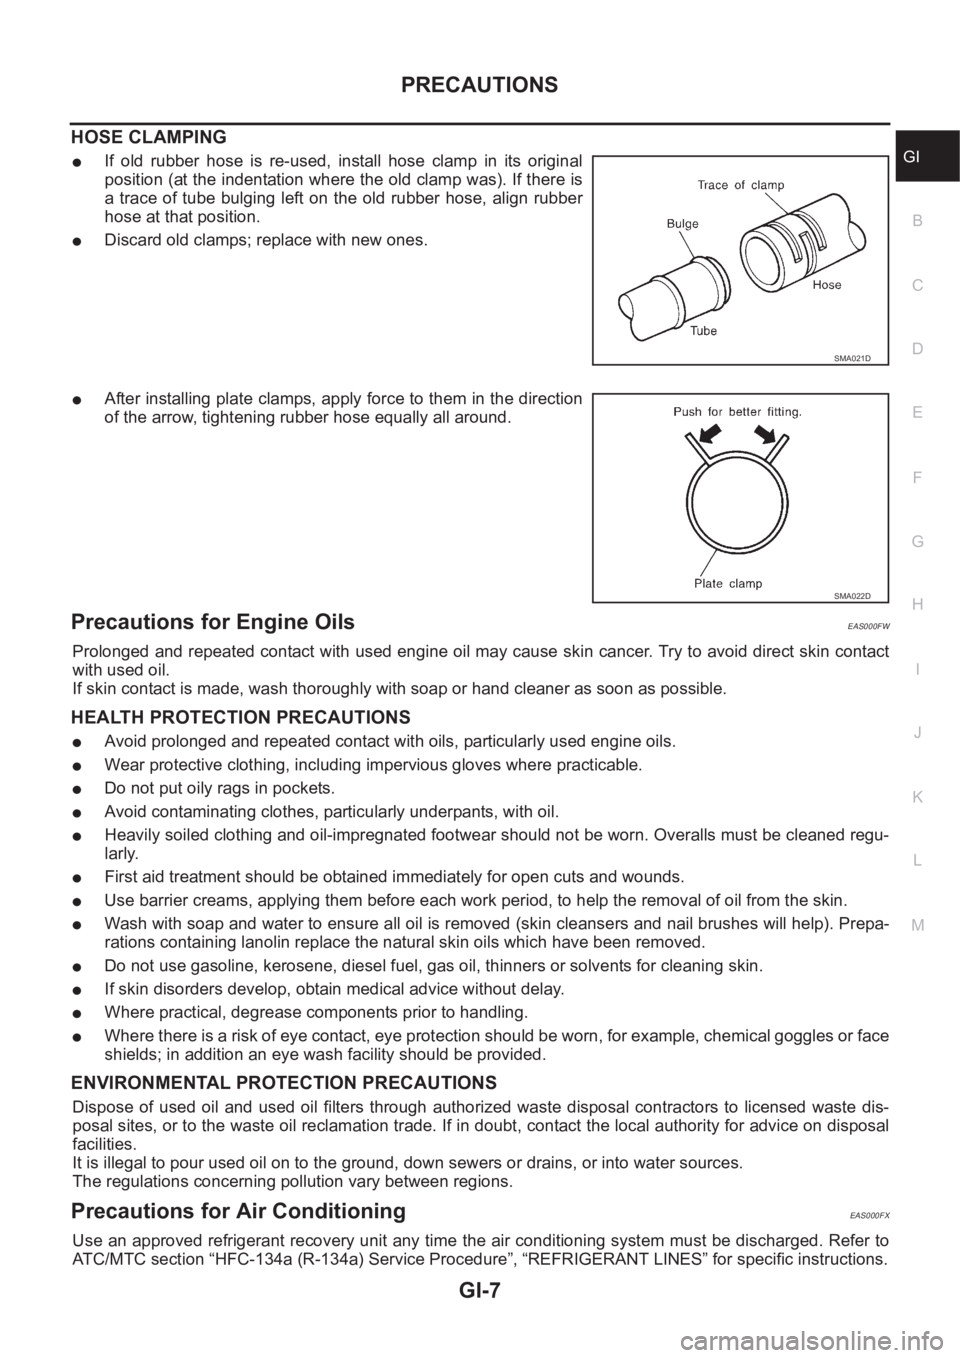
HOSE CLAMPING
●If old rubber hose is re-used, install hose clamp in its original
position (at the indentation where the old clamp was). If there is
a trace of tube bulging left on the old rubber hose, align rubber
hose at that position.
●Discard old clamps; replace with new ones.
●After installing plate clamps, apply force to them in the direction
of the arrow, tightening rubber hose equally all around.
Precautions for Engine OilsEAS000FW
Prolonged and repeated contact with used engine oil may cause skin cancer. Try to avoid direct skin contact
with used oil.
If skin contact is made, wash thoroughly with soap or hand cleaner as soon as possible.
HEALTH PROTECTION PRECAUTIONS
●Avoid prolonged and repeated contact with oils, particularly used engine oils.
●Wear protective clothing, including impervious gloves where practicable.
●Do not put oily rags in pockets.
●Avoid contaminating clothes, particularly underpants, with oil.
●Heavily soiled clothing and oil-impregnated footwear should not be worn. Overalls must be cleaned regu-
larly.
●First aid treatment should be obtained immediately for open cuts and wounds.
●Use barrier creams, applying them before each work period, to help the removal of oil from the skin.
●Wash with soap and water to ensure all oil is removed (skin cleansers and nail brushes will help). Prepa-
rations containing lanolin replace the natural skin oils which have been removed.
●Do not use gasoline, kerosene, diesel fuel, gas oil, thinners or solvents for cleaning skin.
●If skin disorders develop, obtain medical advice without delay.
●Where practical, degrease components prior to handling.
●Where there is a risk of eye contact, eye protection should be worn, for example, chemical goggles or face
shields; in addition an eye wash facility should be provided.
ENVIRONMENTAL PROTECTION PRECAUTIONS
Dispose of used oil and used oil filters through authorized waste disposal contractors to licensed waste dis-
posal sites, or to the waste oil reclamation trade. If in doubt, contact the local authority for advice on disposal
facilities.
It is illegal to pour used oil on to the ground, down sewers or drains, or into water sources.
The regulations concerning pollution vary between regions.
Precautions for Air Conditioning EAS000FX
Use an approved refrigerant recovery unit any time the air conditioning system must be discharged. Refer to
ATC/MTC section “HFC-134a (R-134a) Service Procedure”, “REFRIGERANT LINES” for specific instructions.
SMA021D
SMA022D
Page 51 of 3833

EM-1
ENGINE MECHANICAL
B ENGINE
CONTENTS
C
D
E
F
G
H
I
J
K
L
M
SECTION
A
EM
ENGINE MECHANICAL
QR
PRECAUTIONS .......................................................... 5
Precautions for Drain Engine Coolant ...................... 5
Precautions for Disconnecting Fuel Piping .............. 5
Precautions for Removal and Disassembly ............. 5
Precautions for Inspection, Repair and Replace-
ment ......................................................................... 5
Precautions for Assembly and Installation ............... 5
Parts Requiring Angular Tightening ......................... 5
Precautions For Liquid Gasket ................................. 6
REMOVAL OF LIQUID GASKET .......................... 6
LIQUID GASKET APPLICATION PROCEDURE ..... 6
PREPARATION ........................................................... 7
Special Service Tools ............................................... 7
Commercial Service Tools ........................................ 8
NOISE, VIBRATION, AND HARSHNESS (NVH)
TROUBLESHOOTING .............................................. 10
NVH Troubleshooting —Engine Noise ................... 10
Use the Chart Below to Help You Find the Cause
of the Symptom. ...................................................... 11
DRIVE BELTS ........................................................... 12
Checking Drive Belts .............................................. 12
Tension Adjustment ................................................ 12
Removal and Installation ........................................ 12
REMOVAL ........................................................... 12
INSTALLATION ................................................... 13
Removal and Installation of Drive Belt Auto-Ten-
sioner ..................................................................... 13
REMOVAL ........................................................... 13
INSTALLATION ................................................... 13
AIR CLEANER AND AIR DUCT ............................... 14
Removal and Installation ........................................ 14
REMOVAL ........................................................... 14
INSTALLATION ................................................... 14
CHANGING AIR CLEANER FILTER ................... 15INTAKE MANIFOLD ................................................. 16
Removal and Installation ........................................ 16
QR20DE .............................................................. 16
QR25DE .............................................................. 17
REMOVAL ........................................................... 17
INSPECTION AFTER REMOVAL ....................... 20
INSTALLATION ................................................... 20
INSPECTION AFTER INSTALLATION ................ 22
EXHAUST MANIFOLD AND THREE WAY CATA-
LYST .......................................................................... 24
Removal and Installation ........................................ 24
REMOVAL ........................................................... 24
INSPECTION AFTER REMOVAL ....................
... 25
INSTALLATION ................................................... 25
OIL PAN AND OIL STRAINER ................................. 26
Removal and Installation ........................................ 26
REMOVAL ........................................................... 26
INSPECTION AFTER REMOVAL ....................... 27
INSTALLATION ................................................... 27
INSPECTION AFTER INSTALLATION ................ 28
IGNITION COIL ......................................................... 29
Removal and Installation ........................................ 29
REMOVAL ........................................................... 29
INSTALLATION ................................................... 29
SPARK PLUG ........................................................... 30
Removal and Installation ........................................ 30
REMOVAL ........................................................... 30
INSPECTION AFTER REMOVAL ....................... 30
INSTALLATION ................................................... 31
FUEL INJECTOR AND FUEL TUBE ........................ 32
Removal and Installation ........................................ 32
QR20DE .............................................................. 32
QR25DE .............................................................. 32
REMOVAL ........................................................... 33
INSTALLATION ................................................... 33
INSPECTION AFTER INSTALLATION ................ 34
ROCKER COVER ..................................................... 35
Removal and Installation ........................................ 35
REMOVAL ........................................................... 35
INSTALLATION ................................................... 36
Page 53 of 3833

EM-3
C
D
E
F
G
H
I
J
K
L
M
EMA Parts Requiring Angular Tightening ...................... 110
Precautions For Liquid Gasket ............................. . 111
REMOVAL OF LIQUID GASKET ...................... . 111
LIQUID GASKET APPLICATION PROCEDURE . . 111
PREPARATION ........................................................112
Special Service Tools ............................................ 112
Commercial Service Tools ..................................... 115
NOISE, VIBRATION, AND HARSHNESS (NVH)
TROUBLESHOOTING .............................................116
NVH Troubleshooting —Engine Noise .................. 116
Use the Chart Below to Help You Find the Cause
of the Symptom. .................................................... 117
DRIVE BELTS ..........................................................118
Checking Drive Belts ............................................. 118
Tension Adjustment ............................................... 118
AIR CONDITIONER COMPRESSOR BELT ...... 119
ALTERNATOR AND WATER PUMP BELT ........ 119
Removal and Installation ....................................... 119
REMOVAL .......................................................... 119
INSTALLATION .................................................. 119
AIR CLEANER AND AIR DUCT ............................. 120
Removal and Installation ...................................... 120
REMOVAL ......................................................... 120
INSTALLATION ................................................. 120
CHANGING AIR CLEANER FILTER ................. 121
CHARGE AIR COOLER ......................................... 122
Removal and Installation ...................................... 122
REMOVAL ......................................................... 122
INSPECTION AFTER REMOVAL ..................... 122
INSTALLATION ................................................. 122
INTAKE MANIFOLD ............................................... 123
Removal and Installation ...................................... 123
REMOVAL ......................................................... 123
INSPECTION AFTER REMOVAL ..................... 124
INSTALLATION ................................................. 124
INSPECTION AFTER INSTALLATION ............. 125
CATALYST .............................................................. 126
Removal and Installation ...................................... 126
REMOVAL ......................................................... 126
INSTALLATION ................................................. 126
EXHAUST MANIFOLD AND TURBOCHARGER .. 127
Removal and Installation ...................................... 127
REMOVAL ......................................................... 127
INSTALLATION ................................................. 128
INSPECTION AFTER INSTALLATION ............. 128
Disassembly and Assembly ................................. 129
REMOVAL ......................................................... 129
INSPECTION AFTER REMOVAL ..................... 129
Turbocharger ........................................................ 130
ROTOR SHAFT CLEARANCE ......................... 130
ROTOR SHAFT END PLAY .............................. 130
TURBINE WHEEL ............................................. 131
COMPRESSOR WHEEL .................................. 131
WASTEGATE VALVE ACTUATOR ................... 131
TROUBLE DIAGNOSIS OF TURBOCHARGER . 132OIL PAN AND OIL STRAINER ...............................133
Removal and Installation ......................................133
REMOVAL .........................................................133
INSPECTION AFTER REMOVAL .....................135
INSTALLATION .................................................135
INSPECTION AFTER INSTALLATION ..............137
GLOW PLUG ..........................................................138
Removal and Installation ......................................138
REMOVAL .........................................................138
INSTALLATION .................................................138
VACUUM PUMP ......................................................139
Removal and Installation ......................................139
MODELS PRODUCED BEFORE MARCH 2001 .139
MODELS PRODUCED SINCE APRIL 2001 .....140
INSPECTION BEFORE REMOVAL ..................140
REMOVAL .........................................................140
INSTALLATION .................................................141
INSPECTION AFTER INSTALLATION ..............142
Disassembly and Assembly ..................................142
DISASSEMBLY .................................................142
ASSEMBLY .......................................................142
INJECTION TUBE AND FUEL INJECTOR ............144
Removal and Installation ......................................144
REMOVAL .........................................................144
INSTALLATION .................................................145
INSPECTION AFTER INSTALLATION ..............146
FUEL SUPPLY PUMP .............................................147
Removal and Installation ......................................147
REMOVAL .........................................................147
INSPECTION AFTER REMOVAL .....................152
INSTALLATION .................................................152
ROCKER COVER ...................................................156
Removal and Installation ......................................156
REMOVAL .........................................................156
INSTALLATION .................................................157
INSPECTION AFTER INSTALLATION .............
.157
CAMSHAFT ............................................................158
Removal and Installation ......................................158
REMOVAL .........................................................158
INSPECTION AFTER REMOVAL .....................159
INSTALLATION .................................................162
Valve Clearance ...................................................163
INSPECTION ....................................................163
ADJUSTMENTS ................................................164
SECONDARY TIMING CHAIN ................................167
Removal and Installation ......................................167
REMOVAL .........................................................167
INSPECTION AFTER REMOVAL .....................169
INSTALLATION .................................................170
PRIMARY TIMING CHAIN ......................................172
Removal and Installation ......................................172
REMOVAL .........................................................174
INSPECTION AFTER REMOVAL .....................177
INSTALLATION .................................................177
CYLINDER HEAD .................................................. .182
On-Vehicle Service ...............................................182
CHECKING COMPRESSION PRESSURE .......182
Removal and Installation ......................................183
REMOVAL .........................................................183
Page 76 of 3833
![NISSAN X-TRAIL 2001 Service Repair Manual EM-26
[QR]
OIL PAN AND OIL STRAINER
OIL PAN AND OIL STRAINER
P F P : 1111 0
Removal and InstallationEBS00KNE
REMOVAL
WARNING:
To avoid the danger of being scalded, never drain the engine oil when the NISSAN X-TRAIL 2001 Service Repair Manual EM-26
[QR]
OIL PAN AND OIL STRAINER
OIL PAN AND OIL STRAINER
P F P : 1111 0
Removal and InstallationEBS00KNE
REMOVAL
WARNING:
To avoid the danger of being scalded, never drain the engine oil when the](/manual-img/5/57405/w960_57405-75.png)
EM-26
[QR]
OIL PAN AND OIL STRAINER
OIL PAN AND OIL STRAINER
P F P : 1111 0
Removal and InstallationEBS00KNE
REMOVAL
WARNING:
To avoid the danger of being scalded, never drain the engine oil when the engine is hot.
1. Remove engine undercover both side.
2. Drain engine oil. Refer to LU-8, "
Changing Engine Oil" .
3. Remove lower oil pan bolts, Loosen bolts in the reverse order of
that shown in the figure.
KBIA0095E
1. Oil level gauge guide 2. Oil pan upper 3. Cylinder block
4. Oil filter 5. Oil strainer 6. Drain plug
7. Oil pan lower 8. Rear plate cover
KBIA0096E
Page 224 of 3833
![NISSAN X-TRAIL 2001 Service Repair Manual EM-174
[YD22DDTi]
PRIMARY TIMING CHAIN
REMOVAL
1. Remove engine coolant reservoir tank.
2. Remove charge air cooler and bracket. Refer to EM-122, "
Removal and Installation" .
3. Remove air cl NISSAN X-TRAIL 2001 Service Repair Manual EM-174
[YD22DDTi]
PRIMARY TIMING CHAIN
REMOVAL
1. Remove engine coolant reservoir tank.
2. Remove charge air cooler and bracket. Refer to EM-122, "
Removal and Installation" .
3. Remove air cl](/manual-img/5/57405/w960_57405-223.png)
EM-174
[YD22DDTi]
PRIMARY TIMING CHAIN
REMOVAL
1. Remove engine coolant reservoir tank.
2. Remove charge air cooler and bracket. Refer to EM-122, "
Removal and Installation" .
3. Remove air cleaner and air duct. Refer to EM-120, "
Removal and Installation" .
4. Remove rocker cover. Refer to EM-156, "
Removal and Installation" .
5. Remove RH engine mount insulator and bracket. Refer to EM-193, "
Removal and Installation" .
6. Pull power steering reservoir tank out of brackets to move power steering piping.
CAUTION:
To avoid removing power steering reservoir tank out of brackets move it with power steering pip-
ing aside.
7. Remove oil pan. Refer to EM-133, "
Removal and Installation" .
8. Remove oil filter bracket. Refer to LU-22, "
OIL FILTER BRACKET" .
9. Remove injection tube and fuel injector. Refer to EM-144, "
Removal and Installation" .
10. Remove secondary timing chain and associated parts. Refer to EM-167, "
Removal and Installation" .
11. When removing rear chain case, remove camshaft sprockets. Refer to EM-158, "
Removal and Installa-
tion" .
12. Remove crankshaft pulley.
a. Hold crankshaft pulley with the pulley holder (SST).
b. Loosen crankshaft pulley fixing bolt and pull out the bolt approx-
imately 10 mm (0.39 in).
c. Using pulley puller (SST), remove crankshaft pulley.
●Use two M6 bolts with approx. 60 mm (2.36 in) shank length
for securing crankshaft pulley.
13. Remove oil pump housing.
●Loosen bolts in the reverse order of that shown in the figure
and remove them.
●Use seal cutter (SST) etc. for removal.
14. Remove front oil seal from oil pump housing.
●Punch out the seal off from the back surface of the oil pump
using a flat-bladed screwdriver.
●Be careful not to damage the oil pump housing.
7. Chain guide 8. Spacer 9. Front chain case
10. Crankshaft pulley 11. Front oil seal 12. Oil pump housing
13. Primary timing chain 14. Oil pump drive spacer 15. Crankshaft sprocket
16. Secondary timing chain 17. Rear chain case 18. Power steering pump
JEM131G
JEM132G
JEM133G
Page 281 of 3833

LU-1
ENGINE LUBRICATION SYSTEM
B ENGINE
CONTENTS
C
D
E
F
G
H
I
J
K
L
M
SECTION
A
LU
ENGINE LUBRICATION SYSTEM
QR
PRECAUTIONS .......................................................... 3
Precautions For Liquid Gasket ................................. 3
REMOVAL OF LIQUID GASKET .......................... 3
LIQUID GASKET APPLICATION PROCEDURE ..... 3
PREPARATION ........................................................... 4
Special Service Tools ............................................... 4
LUBRICATION SYSTEM ............................................ 5
Lubrication Circuit .................................................... 5
System Drawing ....................................................... 6
ENGINE OIL ............................................................... 7
Inspection ................................................................. 7
ENGINE OIL LEVEL ............................................. 7
ENGINE OIL APPEARANCE ................................ 7
ENGINE OIL LEAKAGE ........................................ 7
OIL PRESSURE CHECK ...................................... 7
Changing Engine Oil ................................................ 8
OIL FILTER ................................................................. 9
Removal and Installation .......................................... 9
REMOVAL ............................................................. 9
INSTALLATION ..................................................... 9
OIL PUMP ................................................................. 10
Removal and Installation ........................................ 10
Disassembly and Assembly ................................... 10
DISASSEMBLY ................................................... 10
INSPECTION AFTER DISASSEMBLY ............... 10
ASSEMBLY ......................................................... 12
OIL COOLER ............................................................ 13
Removal and Installation ........................................ 13
REMOVAL ........................................................... 13
INSPECTION ...................................................... 13
INSTALLATION ................................................... 13
SERVICE DATA AND SPECIFICATIONS (SDS) ...... 14
Standard and Limit ................................................. 14
OIL PRESSURE .................................................. 14
OIL PUMP ........................................................... 14
REGULATOR VALVE .......................................... 14
ENGINE OIL CAPACITY ..................................... 14
Tightening Torque ................................................... 14
YD22DDTi
PRECAUTIONS ........................................................ 15
Precautions For Liquid Gasket ............................... 15
REMOVAL OF LIQUID GASKET ......................... 15
LIQUID GASKET APPLICATION PROCEDURE ... 15
PREPARATION ......................................................... 16
Special Service Tools ............................................. 16
LUBRICATION SYSTEM .......................................... 17
Lubrication Circuit ................................................... 17
ENGINE OIL .............................................................. 18
Inspection ............................................................... 18
ENGINE OIL LEVEL AND MUDDINESS ............. 18
ENGINE OIL LEAKAGE ...................................... 18
ENGINE OIL PRESSURE CHECK ..................... 18
Changing Engine Oil ............................................ ... 19
OIL FILTER ............................................................... 20
Removal and Installation ........................................ 20
REMOVAL ........................................................... 20
INSTALLATION ................................................... 21
OIL FILTER BRACKET ............................................. 22
Removal and Installation ........................................ 22
REMOVAL ........................................................... 22
INSTALLATION ................................................... 22
OIL PUMP ................................................................. 23
Removal and Installation ........................................ 23
Disassembly and Assembly .................................... 23
DISASSEMBLY ................................................... 23
INSPECTION AFTER DISASSEMBLY ................ 23
ASSEMBLY ......................................................... 24
OIL COOLER ............................................................ 25
Removal and Installation ........................................ 25
REMOVAL ........................................................... 25
INSPECTION ...................................................... 25
INSTALLATION ................................................... 25
SERVICE DATA AND SPECIFICATIONS (SDS) ...... 26
Standard and Limit .................................................. 26
OIL PRESSURE .................................................. 26
OIL PUMP ........................................................... 26
REGULATOR VALVE .......................................... 26
Page 284 of 3833
![NISSAN X-TRAIL 2001 Service Repair Manual LU-4
[QR]
PREPARATION
PREPARATION
PFP:00002
Special Service ToolsEBS00KO0
Tool number
Tool nameDescription
ST25051001
Oil pressure gaugeMeasuring oil pressure
Maximum measuring range:
2,452 kPa (25 kg NISSAN X-TRAIL 2001 Service Repair Manual LU-4
[QR]
PREPARATION
PREPARATION
PFP:00002
Special Service ToolsEBS00KO0
Tool number
Tool nameDescription
ST25051001
Oil pressure gaugeMeasuring oil pressure
Maximum measuring range:
2,452 kPa (25 kg](/manual-img/5/57405/w960_57405-283.png)
LU-4
[QR]
PREPARATION
PREPARATION
PFP:00002
Special Service ToolsEBS00KO0
Tool number
Tool nameDescription
ST25051001
Oil pressure gaugeMeasuring oil pressure
Maximum measuring range:
2,452 kPa (25 kg/cm
2 , 356 psi)
ST25052000
HoseAdapting oil pressure gauge to cylinder block
KV10115801
Oil filter wrenchRemoving and installing oil filter
a: 64.3 mm (2.531 in)
WS39930000
Tube presserPressing the tube of liquid gasket
S-NT050
S-NT559
S-NT375
S-NT052
Page 287 of 3833
![NISSAN X-TRAIL 2001 Service Repair Manual ENGINE OIL
LU-7
[QR]
C
D
E
F
G
H
I
J
K
L
MA
LU
ENGINE OILPFP:KLA92
InspectionEBS00KO3
ENGINE OIL LEVEL
●Before starting the engine, put vehicle horizontally then check
the engine oil leve NISSAN X-TRAIL 2001 Service Repair Manual ENGINE OIL
LU-7
[QR]
C
D
E
F
G
H
I
J
K
L
MA
LU
ENGINE OILPFP:KLA92
InspectionEBS00KO3
ENGINE OIL LEVEL
●Before starting the engine, put vehicle horizontally then check
the engine oil leve](/manual-img/5/57405/w960_57405-286.png)
ENGINE OIL
LU-7
[QR]
C
D
E
F
G
H
I
J
K
L
MA
LU
ENGINE OILPFP:KLA92
InspectionEBS00KO3
ENGINE OIL LEVEL
●Before starting the engine, put vehicle horizontally then check
the engine oil level. If the engine is already started, stop it and
allow 10 minutes before checking.
●Check that the engine oil level is within the range shown in the
figure.
●If it is out of range, adjust it.
ENGINE OIL APPEARANCE
●Check the engine oil for white turbidity or remarkable contamination.
●If the engine oil becomes turbid and white, it is highly probable that it is contaminated with engine coolant.
Find the cause and repair.
ENGINE OIL LEAKAGE
Check for engine oil leakage around the following area.
●Oil pan
●Oil pan drain plug
●Oil pressure switch
●Oil filter
●Oil cooler
●Intake valve timing control cover and intake valve timing control solenoid valve
●Front cover
●Mating surface between cylinder block and cylinder head
●Mating surface between cylinder head and rocker cover
●Crankshaft oil seal.
OIL PRESSURE CHECK
WARNING:
●Be careful not to burn yourself, as the engine oil is hot.
●Engine oil pressure check should be done in “ Parking
position” (A/T model) or “Neutral position” (M/T model).
1. Check engine oil level. Refer to LU-7, "
ENGINE OIL LEVEL" .
2. Remove the undercover.
3. Remove the oil pressure switch to connect the oil pressure
gauge.
4. After warming up the engine, check that oil pressure corre-
sponding to the engine speed is produced.
Engine oil pressure [Engine oil temperature at 80 °C (176 °F)]
5. After checking, install the oil pressure switch as follows.
a. Remove old sealant adhering to the switch and engine.
b. Apply thread sealant.
Use Genuine Liquid Gasket or equivalent.
PBIC0249E
KBIA0275E
Engine speed (rpm) Idle speed 2,000 6,000
Engine pressure
kPa (bar, kg/cm
2 , psi)Approx. 98 (0.98, 1.0, 14) or more Approx. 294 (2.9, 3.0, 43) or more Approx. 392 (3.9, 4.0, 57) or more