2001 NISSAN X-TRAIL ignition
[x] Cancel search: ignitionPage 2653 of 3833
TROUBLE DIAGNOSIS
TF-43
C
E
F
G
H
I
J
K
L
MA
B
TF
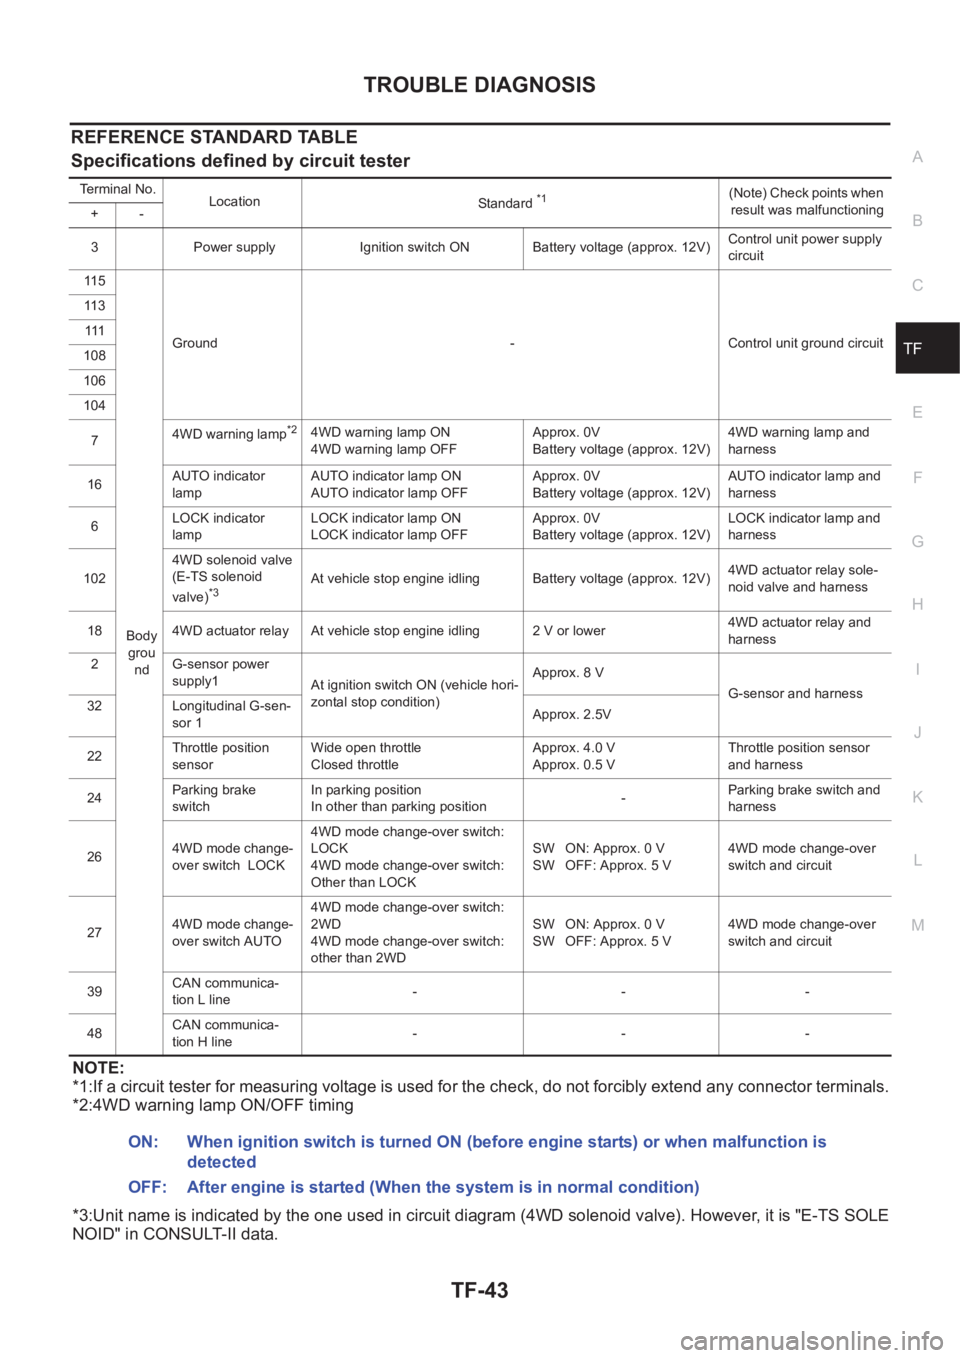
REFERENCE STANDARD TABLE
Specifications defined by circuit tester
NOTE:
*1:If a circuit tester for measuring voltage is used for the check, do not forcibly extend any connector terminals.
*2:4WD warning lamp ON/OFF timing
*3:Unit name is indicated by the one used in circuit diagram (4WD solenoid valve). However, it is "E-TS SOLE
NOID" in CONSULT-II data.
Terminal No.
Location
Standard *1(Note) Check points when
result was malfunctioning
+-
3 Power supply Ignition switch ON Battery voltage (approx. 12V)Control unit power supply
circuit
11 5
Body
grou
ndGround - Control unit ground circuit 11 3
111
108
106
104
74WD warning lamp
*24WD warning lamp ON
4WD warning lamp OFFApprox. 0V
Battery voltage (approx. 12V)4WD warning lamp and
harness
16AUTO indicator
lampAUTO indicator lamp ON
AUTO indicator lamp OFFApprox. 0V
Battery voltage (approx. 12V)AUTO indicator lamp and
harness
6LOCK indicator
lampLOCK indicator lamp ON
LOCK indicator lamp OFFApprox. 0V
Battery voltage (approx. 12V)LOCK indicator lamp and
harness
1024WD solenoid valve
(E-TS solenoid
valve)
*3At vehicle stop engine idling Battery voltage (approx. 12V)4WD actuator relay sole-
noid valve and harness
18 4WD actuator relay At vehicle stop engine idling 2 V or lower4WD actuator relay and
harness
2 G-sensor power
supply1
At ignition switch ON (vehicle hori-
zontal stop condition)Approx. 8 V
G-sensor and harness
32 Longitudinal G-sen-
sor 1Approx. 2.5V
22Throttle position
sensorWide open throttle
Closed throttleApprox. 4.0 V
Approx. 0.5 VThrottle position sensor
and harness
24Parking brake
switchIn parking position
In other than parking position-Parking brake switch and
harness
264WD mode change-
over switch LOCK4WD mode change-over switch:
LOCK
4WD mode change-over switch:
Other than LOCKSW ON: Approx. 0 V
SW OFF: Approx. 5 V4WD mode change-over
switch and circuit
274WD mode change-
over switch AUTO4WD mode change-over switch:
2WD
4WD mode change-over switch:
other than 2WDSW ON: Approx. 0 V
SW OFF: Approx. 5 V4WD mode change-over
switch and circuit
39CAN communica-
tion L line---
48CAN communica-
tion H line---
ON: When ignition switch is turned ON (before engine starts) or when malfunction is
detected
OFF: After engine is started (When the system is in normal condition)
Page 2654 of 3833
TF-44
TROUBLE DIAGNOSIS
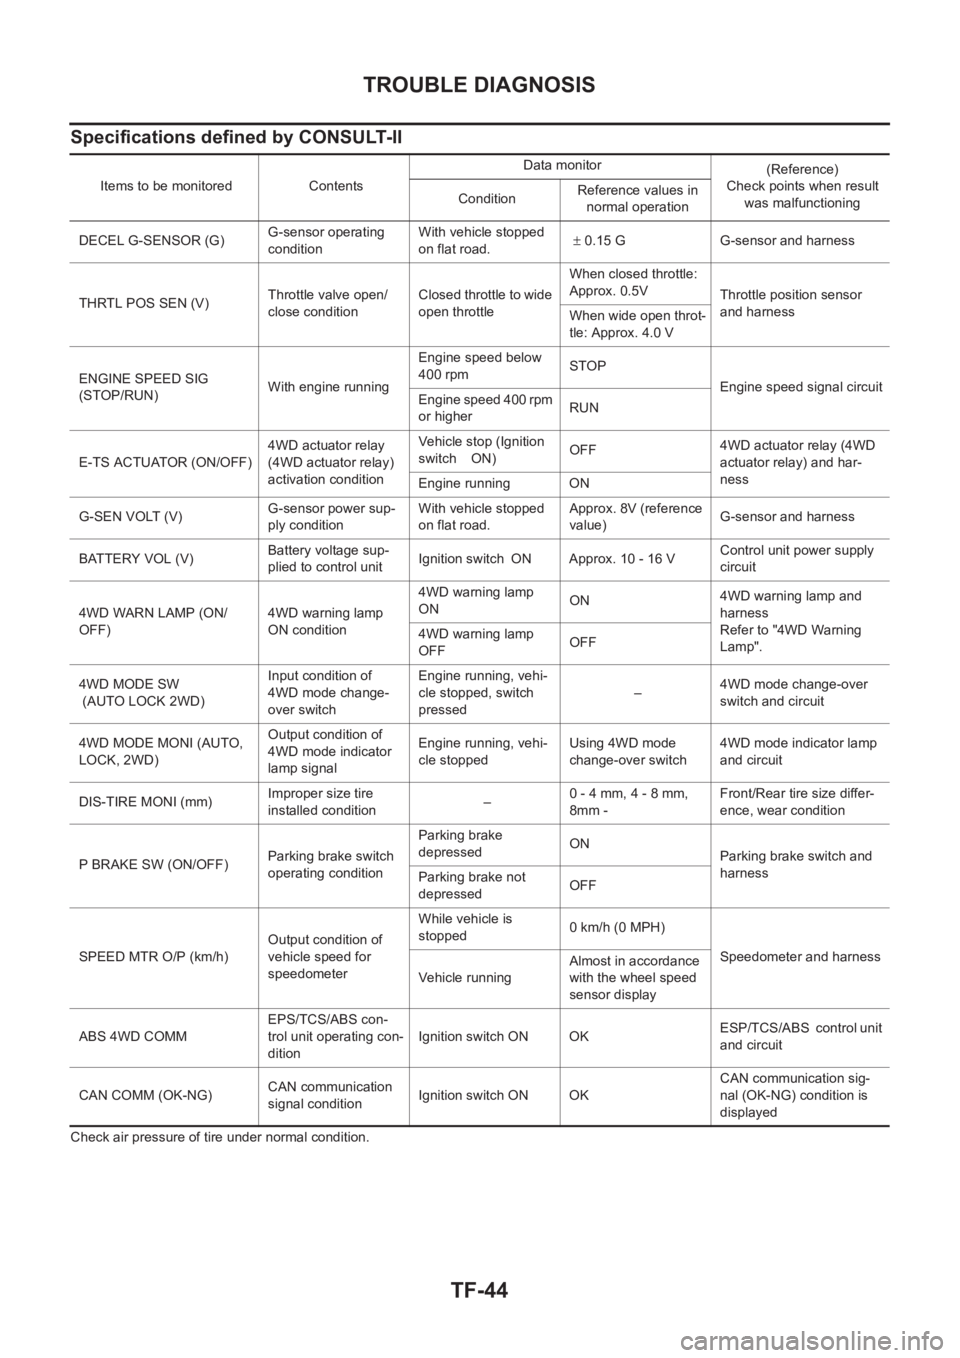
Specifications defined by CONSULT-II
Check air pressure of tire under normal condition.Items to be monitored ContentsData monitor
(Reference)
Check points when result
was malfunctioning ConditionReference values in
normal operation
DECEL G-SENSOR (G)G-sensor operating
conditionWith vehicle stopped
on flat road.± 0.15 G G-sensor and harness
THRTL POS SEN (V)Throttle valve open/
close conditionClosed throttle to wide
open throttleWhen closed throttle:
Approx. 0.5V
Throttle position sensor
and harness
When wide open throt-
tle: Approx. 4.0 V
ENGINE SPEED SIG
(STOP/RUN)With engine runningEngine speed below
400 rpmSTOP
Engine speed signal circuit
Engine speed 400 rpm
or higherRUN
E-TS ACTUATOR (ON/OFF)4WD actuator relay
(4WD actuator relay)
activation conditionVehicle stop (Ignition
switch ON)OFF4WD actuator relay (4WD
actuator relay) and har-
ness
Engine running ON
G-SEN VOLT (V)G-sensor power sup-
ply conditionWith vehicle stopped
on flat road.Approx. 8V (reference
value)G-sensor and harness
BATTERY VOL (V)Battery voltage sup-
plied to control unitIgnition switch ON Approx. 10 - 16 VControl unit power supply
circuit
4WD WARN LAMP (ON/
OFF)4WD warning lamp
ON condition4WD warning lamp
ONON4WD warning lamp and
harness
Refer to "4WD Warning
Lamp". 4WD warning lamp
OFFOFF
4WD MODE SW
(AUTO LOCK 2WD)Input condition of
4WD mode change-
over switchEngine running, vehi-
cle stopped, switch
pressed–4WD mode change-over
switch and circuit
4WD MODE MONI (AUTO,
LOCK, 2WD)Output condition of
4WD mode indicator
lamp signalEngine running, vehi-
cle stoppedUsing 4WD mode
change-over switch4WD mode indicator lamp
and circuit
DIS-TIRE MONI (mm)Improper size tire
installed condition
–0 - 4 mm, 4 - 8 mm,
8mm -Front/Rear tire size differ-
ence, wear condition
P BRAKE SW (ON/OFF)Parking brake switch
operating conditionParking brake
depressedON
Parking brake switch and
harness
Parking brake not
depressedOFF
SPEED MTR O/P (km/h)Output condition of
vehicle speed for
speedometerWhile vehicle is
stopped 0 km/h (0 MPH)
Speedometer and harness
Ve h i c le r u n n in gAlmost in accordance
with the wheel speed
sensor display
ABS 4WD COMMEPS/TCS/ABS con-
trol unit operating con-
ditionIgnition switch ON OKESP/TCS/ABS control unit
and circuit
CAN COMM (OK-NG)CAN communication
signal conditionIgnition switch ON OKCAN communication sig-
nal (OK-NG) condition is
displayed
Page 2655 of 3833
TROUBLE DIAGNOSIS
TF-45
C
E
F
G
H
I
J
K
L
MA
B
TF
CONSULT-II functionsEDS000HA
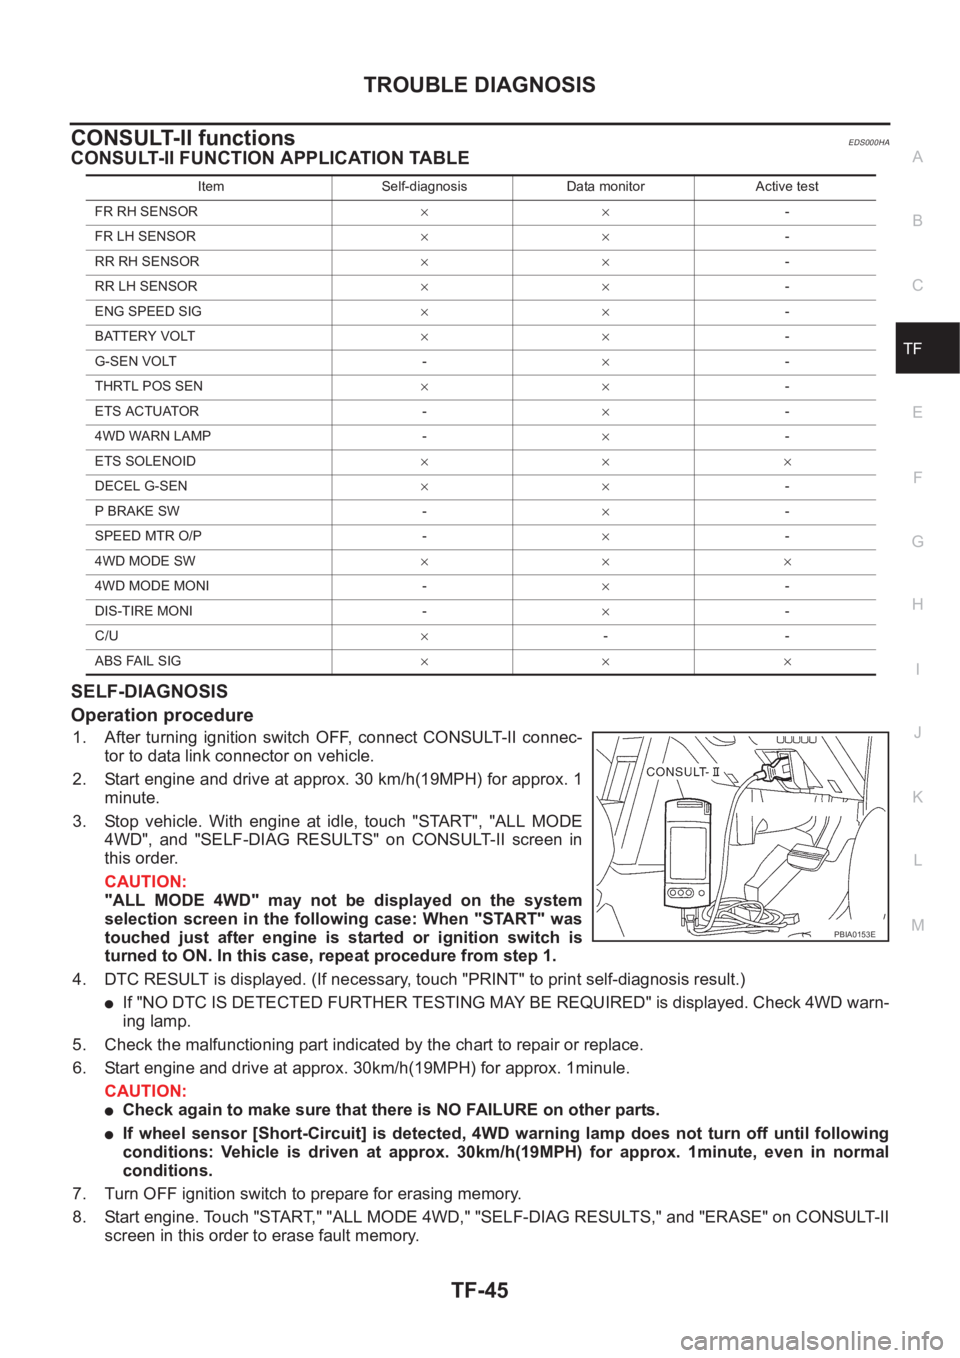
CONSULT-II FUNCTION APPLICATION TABLE
SELF-DIAGNOSIS
Operation procedure
1. After turning ignition switch OFF, connect CONSULT-II connec-
tor to data link connector on vehicle.
2. Start engine and drive at approx. 30 km/h(19MPH) for approx. 1
minute.
3. Stop vehicle. With engine at idle, touch "START", "ALL MODE
4WD", and "SELF-DIAG RESULTS" on CONSULT-II screen in
this order.
CAUTION:
"ALL MODE 4WD" may not be displayed on the system
selection screen in the following case: When "START" was
touched just after engine is started or ignition switch is
turned to ON. In this case, repeat procedure from step 1.
4. DTC RESULT is displayed. (If necessary, touch "PRINT" to print self-diagnosis result.)
●If "NO DTC IS DETECTED FURTHER TESTING MAY BE REQUIRED" is displayed. Check 4WD warn-
ing lamp.
5. Check the malfunctioning part indicated by the chart to repair or replace.
6. Start engine and drive at approx. 30km/h(19MPH) for approx. 1minule.
CAUTION:
●Check again to make sure that there is NO FAILURE on other parts.
●If wheel sensor [Short-Circuit] is detected, 4WD warning lamp does not turn off until following
conditions: Vehicle is driven at approx. 30km/h(19MPH) for approx. 1minute, even in normal
conditions.
7. Turn OFF ignition switch to prepare for erasing memory.
8. Start engine. Touch "START," "ALL MODE 4WD," "SELF-DIAG RESULTS," and "ERASE" on CONSULT-II
screen in this order to erase fault memory.
Item Self-diagnosis Data monitor Active test
FR RH SENSOR××-
FR LH SENSOR××-
RR RH SENSOR××-
RR LH SENSOR××-
ENG SPEED SIG××-
BATTERY VOLT××-
G-SEN VOLT -×-
THRTL POS SEN××-
ETS ACTUATOR -×-
4WD WARN LAMP -×-
ETS SOLENOID×××
DECEL G-SEN××-
P BRAKE SW -×-
SPEED MTR O/P -×-
4WD MODE SW×××
4WD MODE MONI -×-
DIS-TIRE MONI -×-
C/U×--
ABS FAIL SIG×××
PBIA0153E
Page 2656 of 3833
TF-46
TROUBLE DIAGNOSIS
CAUTION:
If memory cannot be erased, proceed to 5.
9. Drive at approx. 30 km/h (19MPH) for approx. 1 minute. Be sure 4WD warning lamp is OFF.
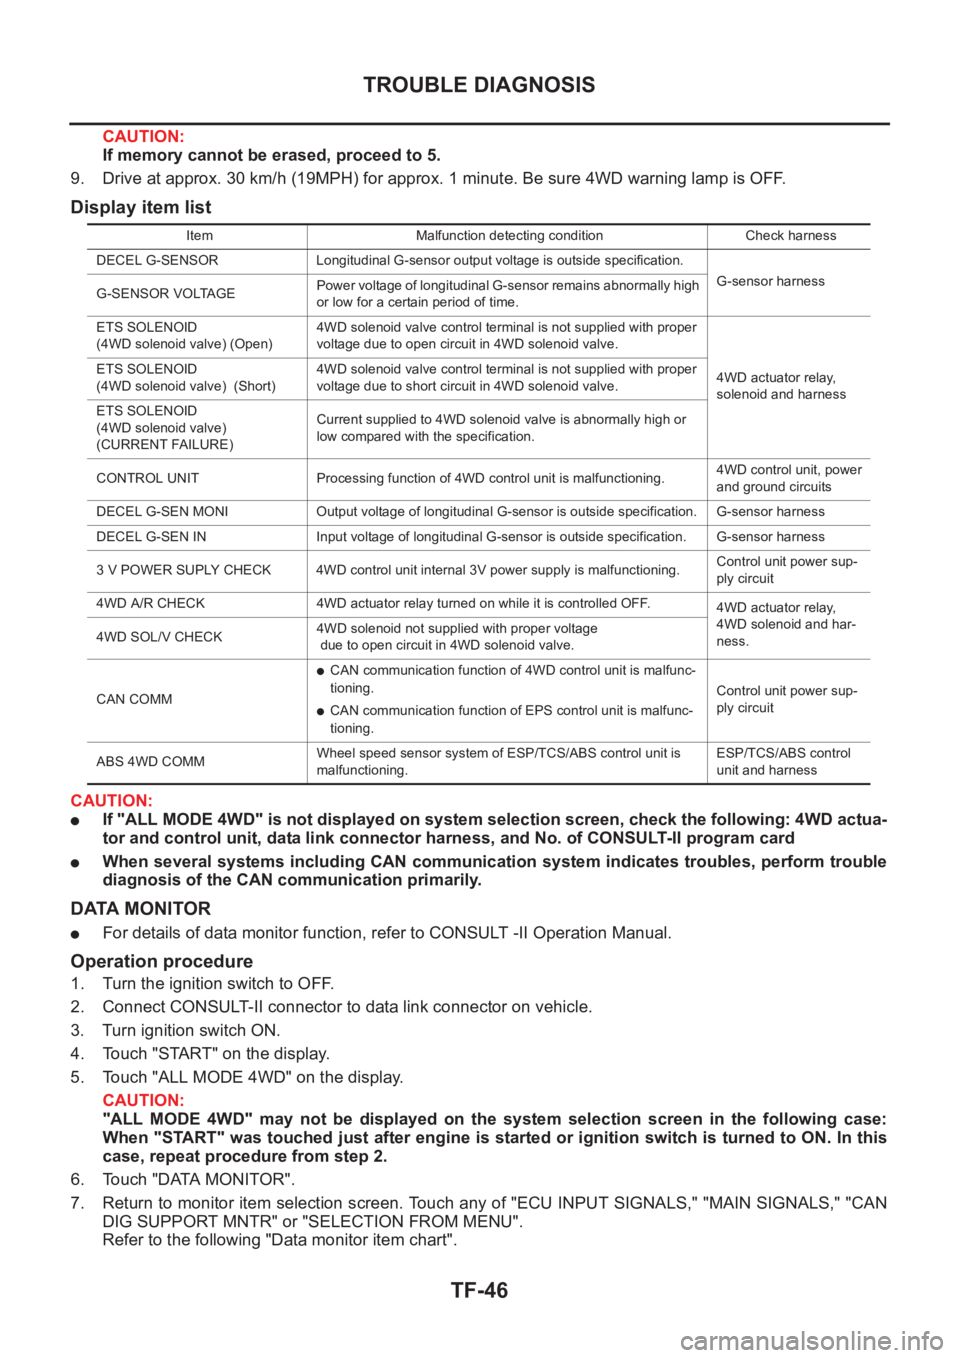
Display item list
CAUTION:
●If "ALL MODE 4WD" is not displayed on system selection screen, check the following: 4WD actua-
tor and control unit, data link connector harness, and No. of CONSULT-II program card
●When several systems including CAN communication system indicates troubles, perform trouble
diagnosis of the CAN communication primarily.
DATA MONITOR
●For details of data monitor function, refer to CONSULT -II Operation Manual.
Operation procedure
1. Turn the ignition switch to OFF.
2. Connect CONSULT-II connector to data link connector on vehicle.
3. Turn ignition switch ON.
4. Touch "START" on the display.
5. Touch "ALL MODE 4WD" on the display.
CAUTION:
"ALL MODE 4WD" may not be displayed on the system selection screen in the following case:
When "START" was touched just after engine is started or ignition switch is turned to ON. In this
case, repeat procedure from step 2.
6. Touch "DATA MONITOR".
7. Return to monitor item selection screen. Touch any of "ECU INPUT SIGNALS," "MAIN SIGNALS," "CAN
DIG SUPPORT MNTR" or "SELECTION FROM MENU".
Refer to the following "Data monitor item chart".
Item Malfunction detecting condition Check harness
DECEL G-SENSOR Longitudinal G-sensor output voltage is outside specification.
G-sensor harness
G-SENSOR VOLTAGEPower voltage of longitudinal G-sensor remains abnormally high
or low for a certain period of time.
ETS SOLENOID
(4WD solenoid valve) (Open)4WD solenoid valve control terminal is not supplied with proper
voltage due to open circuit in 4WD solenoid valve.
4WD actuator relay,
solenoid and harness ETS SOLENOID
(4WD solenoid valve) (Short)4WD solenoid valve control terminal is not supplied with proper
voltage due to short circuit in 4WD solenoid valve.
ETS SOLENOID
(4WD solenoid valve)
(CURRENT FAILURE)Current supplied to 4WD solenoid valve is abnormally high or
low compared with the specification.
CONTROL UNIT Processing function of 4WD control unit is malfunctioning.4WD control unit, power
and ground circuits
DECEL G-SEN MONI Output voltage of longitudinal G-sensor is outside specification. G-sensor harness
DECEL G-SEN IN Input voltage of longitudinal G-sensor is outside specification. G-sensor harness
3 V POWER SUPLY CHECK 4WD control unit internal 3V power supply is malfunctioning.Control unit power sup-
ply circuit
4WD A/R CHECK 4WD actuator relay turned on while it is controlled OFF.
4WD actuator relay,
4WD solenoid and har-
ness. 4WD SOL/V CHECK4WD solenoid not supplied with proper voltage
due to open circuit in 4WD solenoid valve.
CAN COMM
●CAN communication function of 4WD control unit is malfunc-
tioning.
●CAN communication function of EPS control unit is malfunc-
tioning.Control unit power sup-
ply circuit
ABS 4WD COMMWheel speed sensor system of ESP/TCS/ABS control unit is
malfunctioning.ESP/TCS/ABS control
unit and harness
Page 2659 of 3833
TROUBLE DIAGNOSIS
TF-49
C
E
F
G
H
I
J
K
L
MA
B
TF
4WD solenoid valve
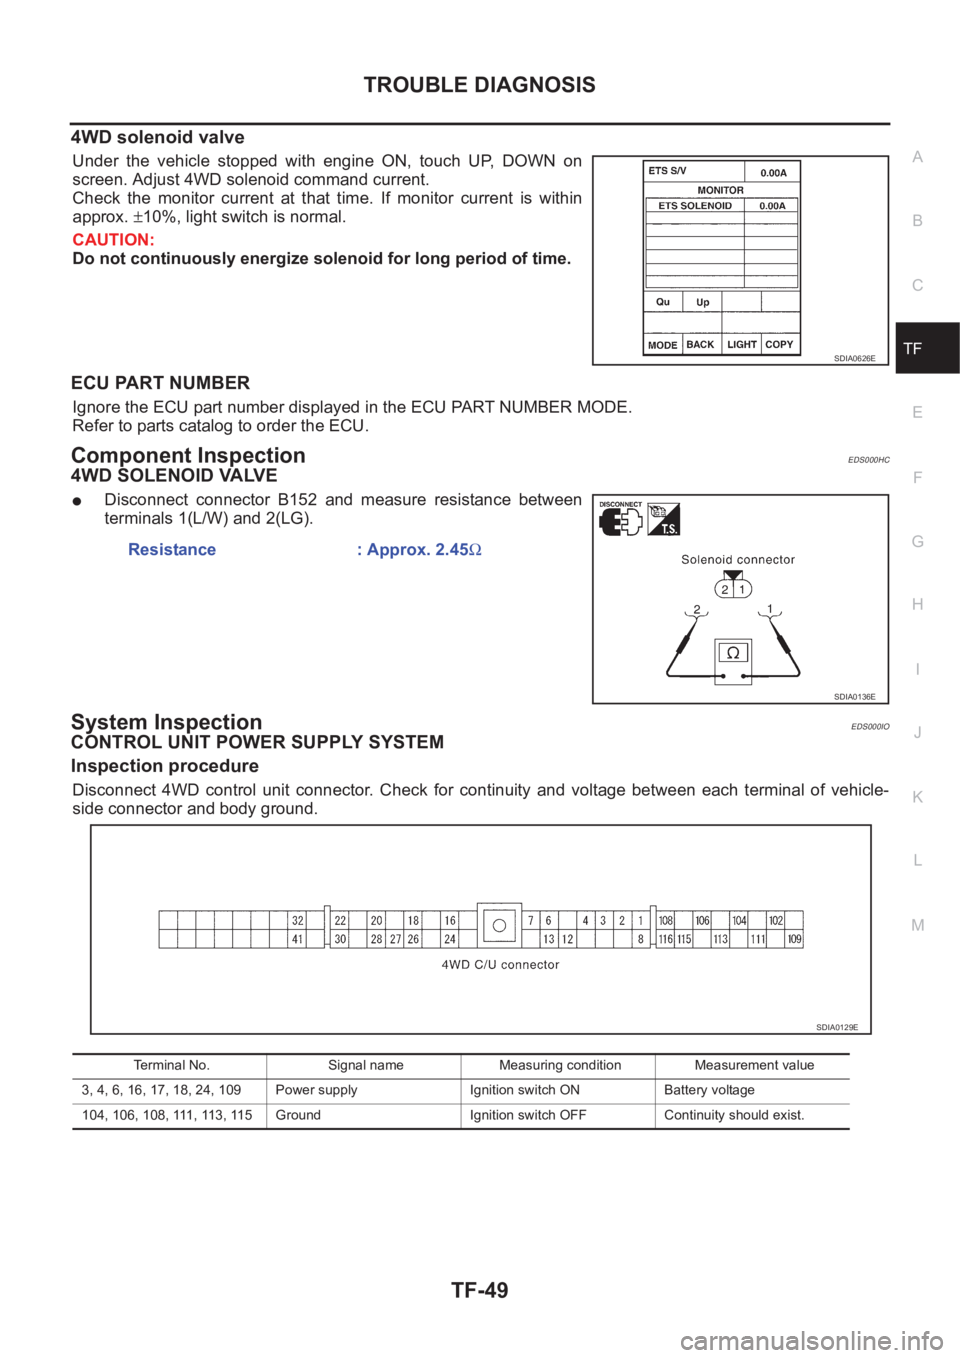
Under the vehicle stopped with engine ON, touch UP, DOWN on
screen. Adjust 4WD solenoid command current.
Check the monitor current at that time. If monitor current is within
approx. ±10%, light switch is normal.
CAUTION:
Do not continuously energize solenoid for long period of time.
ECU PART NUMBER
Ignore the ECU part number displayed in the ECU PART NUMBER MODE.
Refer to parts catalog to order the ECU.
Component InspectionEDS000HC
4WD SOLENOID VALVE
●Disconnect connector B152 and measure resistance between
terminals 1(L/W) and 2(LG).
System InspectionEDS000IO
CONTROL UNIT POWER SUPPLY SYSTEM
Inspection procedure
Disconnect 4WD control unit connector. Check for continuity and voltage between each terminal of vehicle-
side connector and body ground.
SDIA0626E
Resistance : Approx. 2.45Ω
SDIA0136E
Terminal No. Signal name Measuring condition Measurement value
3, 4, 6, 16, 17, 18, 24, 109 Power supply Ignition switch ON Battery voltage
104, 106, 108, 111, 113, 115 Ground Ignition switch OFF Continuity should exist.
SDIA0129E
Page 2661 of 3833
TROUBLE DIAGNOSIS
TF-51
C
E
F
G
H
I
J
K
L
MA
B
TF
3.G-SENSOR UNIT INSPECTION
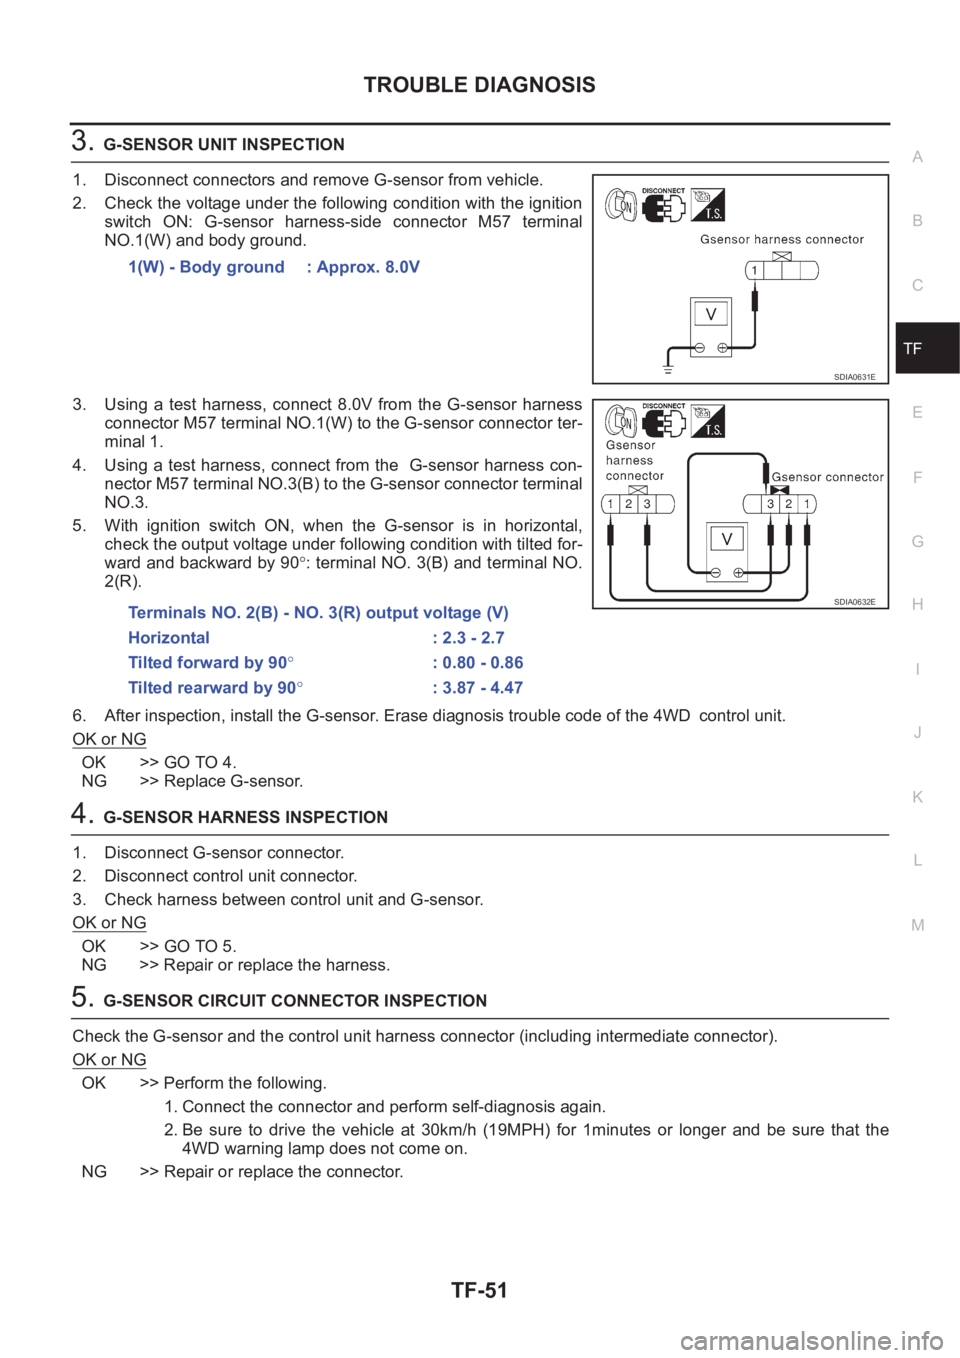
1. Disconnect connectors and remove G-sensor from vehicle.
2. Check the voltage under the following condition with the ignition
switch ON: G-sensor harness-side connector M57 terminal
NO.1(W) and body ground.
3. Using a test harness, connect 8.0V from the G-sensor harness
connector M57 terminal NO.1(W) to the G-sensor connector ter-
minal 1.
4. Using a test harness, connect from the G-sensor harness con-
nector M57 terminal NO.3(B) to the G-sensor connector terminal
NO.3.
5. With ignition switch ON, when the G-sensor is in horizontal,
check the output voltage under following condition with tilted for-
ward and backward by 90°: terminal NO. 3(B) and terminal NO.
2(R).
6. After inspection, install the G-sensor. Erase diagnosis trouble code of the 4WD control unit.
OK or NG
OK >> GO TO 4.
NG >> Replace G-sensor.
4.G-SENSOR HARNESS INSPECTION
1. Disconnect G-sensor connector.
2. Disconnect control unit connector.
3. Check harness between control unit and G-sensor.
OK or NG
OK >> GO TO 5.
NG >> Repair or replace the harness.
5.G-SENSOR CIRCUIT CONNECTOR INSPECTION
Check the G-sensor and the control unit harness connector (including intermediate connector).
OK or NG
OK >> Perform the following.
1. Connect the connector and perform self-diagnosis again.
2. Be sure to drive the vehicle at 30km/h (19MPH) for 1minutes or longer and be sure that the
4WD warning lamp does not come on.
NG >> Repair or replace the connector.1(W) - Body ground : Approx. 8.0V
SDIA0631E
Terminals NO. 2(B) - NO. 3(R) output voltage (V)
Horizontal : 2.3 - 2.7
Tilted forward by 90°: 0.80 - 0.86
Tilted rearward by 90°: 3.87 - 4.47SDIA0632E
Page 2663 of 3833
TROUBLE DIAGNOSIS
TF-53
C
E
F
G
H
I
J
K
L
MA
B
TF
6.CHECK 4WD ACTUATOR RELAY POWER CIRCUIT
1. Disconnect the 4WD control unit connector.
2. Turn the ignition switch ON and check voltage between the 4WD control unit harness connector E122 ter-
minal No.18 (BR/W) and body ground.
OK or NG
OK >> GO TO 7.
NG >>
●Check items below. Perform self-diagnosis again.
–Check fuse 10 A (#8).
–Check harness and connectors between the fuse 10 A (#8), the 4WD actuator relay and the
4WD control unit.
7.CHECK 4WD ACTUATOR RELAY GROUND CIRCUIT
1. Disconnect the 4WD actuator relay connector.
2. Check continuity between the 4WD actuator relay harness connector E10 terminal No.3 (B) and body
ground.
OK or NG
OK >> 1. Connect the connector and perform self-diagnosis again.
2. Follow self-diagnosis procedure and, at the end, be sure to drive the vehicle at 30 km/h (19
MPH) for at least 1 minute and check that the 4WD warning lamp does not turn ON.
NG >> Repair or replace harness.
CAN COMMUNICATION SYSTEM
Checking procedure
1.INSPECTION START
Check the self-diagnosis results with CONSULT-II.
Status of "CAN communications" is OK?
YES >> After printing out self-diagnosis results, go to 2.
NO >> Checking is completed.
2.SYMPTOM CHECK
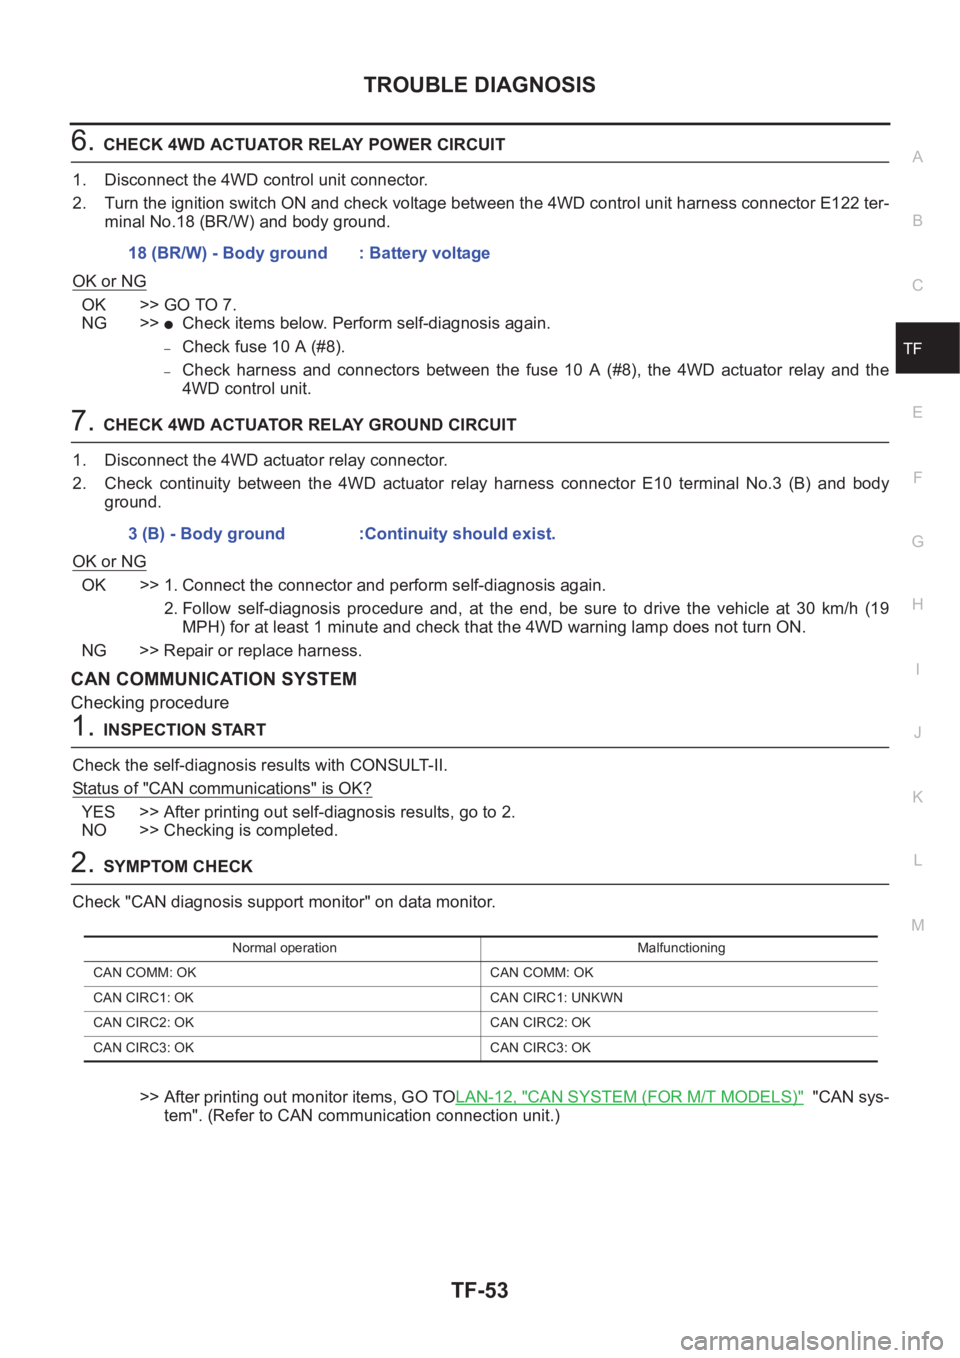
Check "CAN diagnosis support monitor" on data monitor.
>> After printing out monitor items, GO TOLAN-12, "
CAN SYSTEM (FOR M/T MODELS)" "CAN sys-
tem". (Refer to CAN communication connection unit.) 18 (BR/W) - Body ground : Battery voltage
3 (B) - Body ground :Continuity should exist.
Normal operation Malfunctioning
CAN COMM: OK CAN COMM: OK
CAN CIRC1: OK CAN CIRC1: UNKWN
CAN CIRC2: OK CAN CIRC2: OK
CAN CIRC3: OK CAN CIRC3: OK
Page 2664 of 3833
TF-54
TROUBLE DIAGNOSIS
4WD MODE SWITCH SYSTEM
1. INPUT SIGNAL CHECK
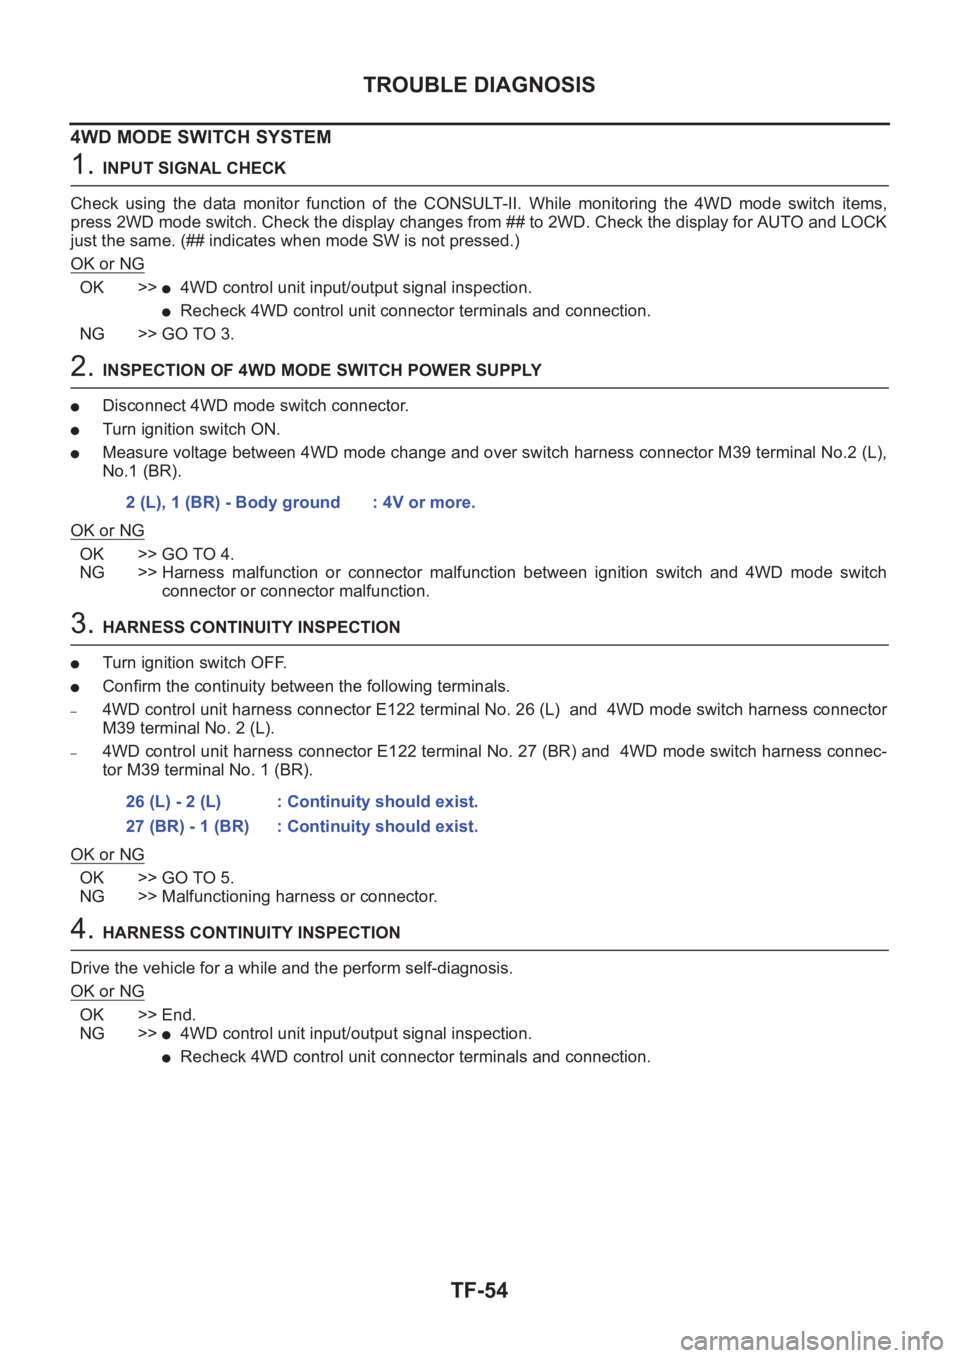
Check using the data monitor function of the CONSULT-II. While monitoring the 4WD mode switch items,
press 2WD mode switch. Check the display changes from ## to 2WD. Check the display for AUTO and LOCK
just the same. (## indicates when mode SW is not pressed.)
OK or NG
OK >>●4WD control unit input/output signal inspection.
●Recheck 4WD control unit connector terminals and connection.
NG >> GO TO 3.
2. INSPECTION OF 4WD MODE SWITCH POWER SUPPLY
●Disconnect 4WD mode switch connector.
●Turn ignition switch ON.
●Measure voltage between 4WD mode change and over switch harness connector M39 terminal No.2 (L),
No.1 (BR).
OK or NG
OK >> GO TO 4.
NG >> Harness malfunction or connector malfunction between ignition switch and 4WD mode switch
connector or connector malfunction.
3. HARNESS CONTINUITY INSPECTION
●Turn ignition switch OFF.
●Confirm the continuity between the following terminals.
–4WD control unit harness connector E122 terminal No. 26 (L) and 4WD mode switch harness connector
M39 terminal No. 2 (L).
–4WD control unit harness connector E122 terminal No. 27 (BR) and 4WD mode switch harness connec-
tor M39 terminal No. 1 (BR).
OK or NG
OK >> GO TO 5.
NG >> Malfunctioning harness or connector.
4. HARNESS CONTINUITY INSPECTION
Drive the vehicle for a while and the perform self-diagnosis.
OK or NG
OK >> End.
NG >>
●4WD control unit input/output signal inspection.
●Recheck 4WD control unit connector terminals and connection. 2 (L), 1 (BR) - Body ground : 4V or more.
26 (L) - 2 (L) : Continuity should exist.
27 (BR) - 1 (BR) : Continuity should exist.