Page 1076 of 1306

Removal and Installation Ð Diagnosis
Sensor Unit
CAUTION:
+Before servicing SRS, turn the ignition switch off, disconnect battery ground cable and wait at
least 3 minutes.
+Do not use old bolts and nuts after removal; replace with new ones.
+Check diagnosis sensor unit for proper installation.
+Check diagnosis sensor unit to ensure it is free of deformities, dents, cracks or rust. If it shows
any visible signs of damage, replace it with a new one.
+Check diagnosis sensor unit brackets to ensure they are free of deformities and rust.
+After replacement of diagnosis sensor unit, check SRS function and perform self-diagnosis for
SRS. Refer to ªSelf-diagnosisº for details. (RS-3020)
+Do not attempt to disassemble diagnosis sensor unit.
+Replace diagnosis sensor unit if it has been dropped or sustained an impact.
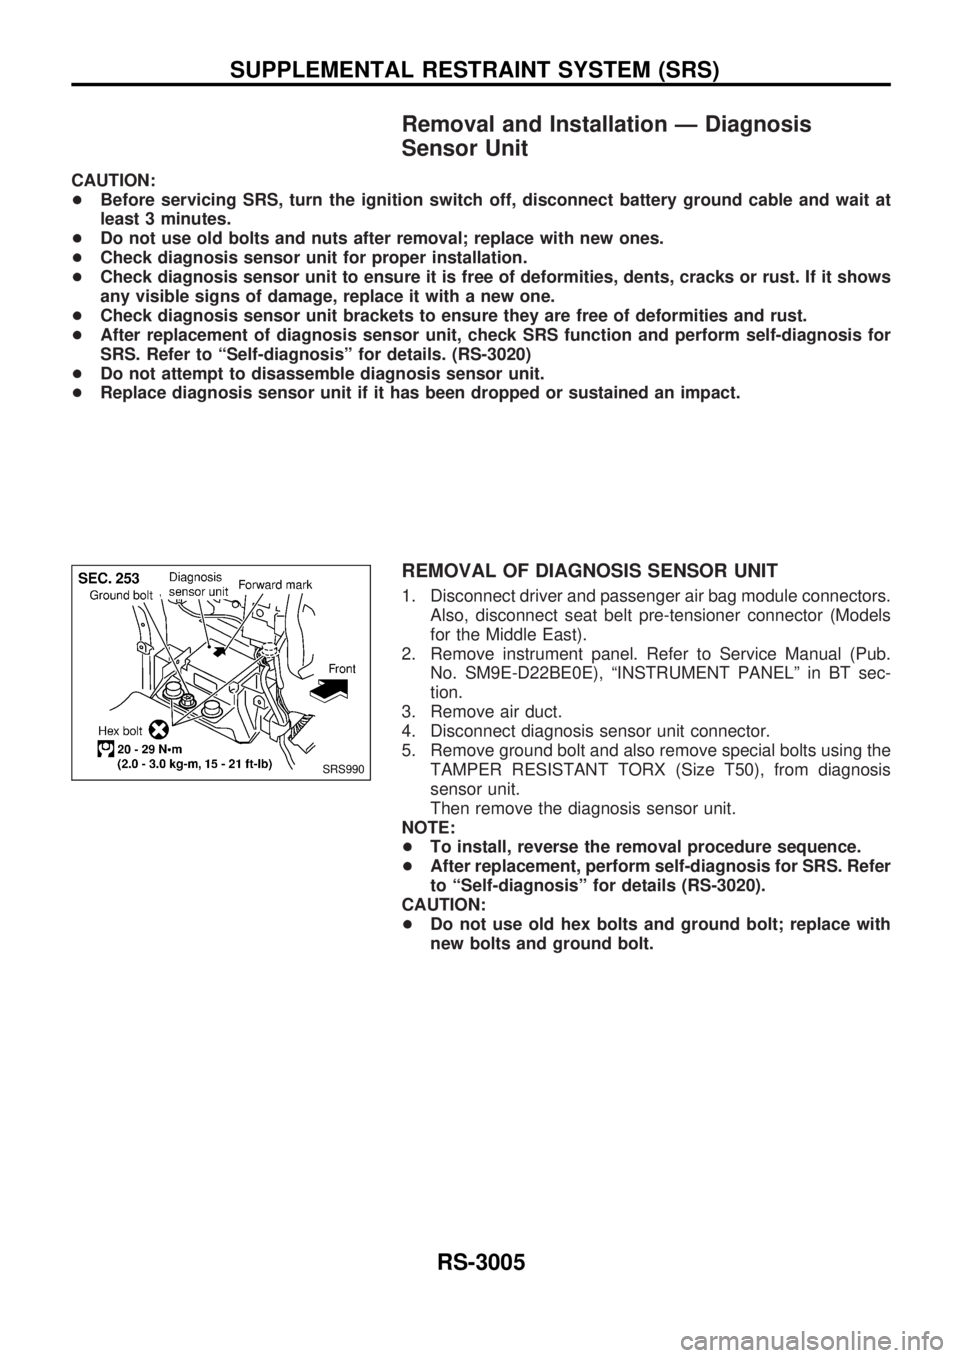
REMOVAL OF DIAGNOSIS SENSOR UNIT
1. Disconnect driver and passenger air bag module connectors.
Also, disconnect seat belt pre-tensioner connector (Models
for the Middle East).
2. Remove instrument panel. Refer to Service Manual (Pub.
No. SM9E-D22BE0E), ªINSTRUMENT PANELº in BT sec-
tion.
3. Remove air duct.
4. Disconnect diagnosis sensor unit connector.
5. Remove ground bolt and also remove special bolts using the
TAMPER RESISTANT TORX (Size T50), from diagnosis
sensor unit.
Then remove the diagnosis sensor unit.
NOTE:
+To install, reverse the removal procedure sequence.
+After replacement, perform self-diagnosis for SRS. Refer
to ªSelf-diagnosisº for details (RS-3020).
CAUTION:
+Do not use old hex bolts and ground bolt; replace with
new bolts and ground bolt.
SRS990
SUPPLEMENTAL RESTRAINT SYSTEM (SRS)
RS-3005
Page 1080 of 1306

If air bag warning lamp blinks or stays ON (at the Usermode),
it shows the spiral cable may be snapped due to its improper
position. Perform self-diagnosis again (use CONSULT-II or
warning lamp). If a malfunction is detected, replace the spi-
ral cable with a new one.
14. Perform self-diagnosis again to check that no malfunction is
detected.
Removal Ð Front Passenger Air Bag Module
CAUTION:
+Before servicing SRS, turn the ignition switch off, dis-
connect battery ground cable and wait for at least 3 min-
utes.
+Always work from the side of or under air bag module.
1. Remove glove box assembly. Refer to ªINSTRUMENT
PANELº in BT section of Service Manual (Pub. No. SM9E-
D22BG0) for details.
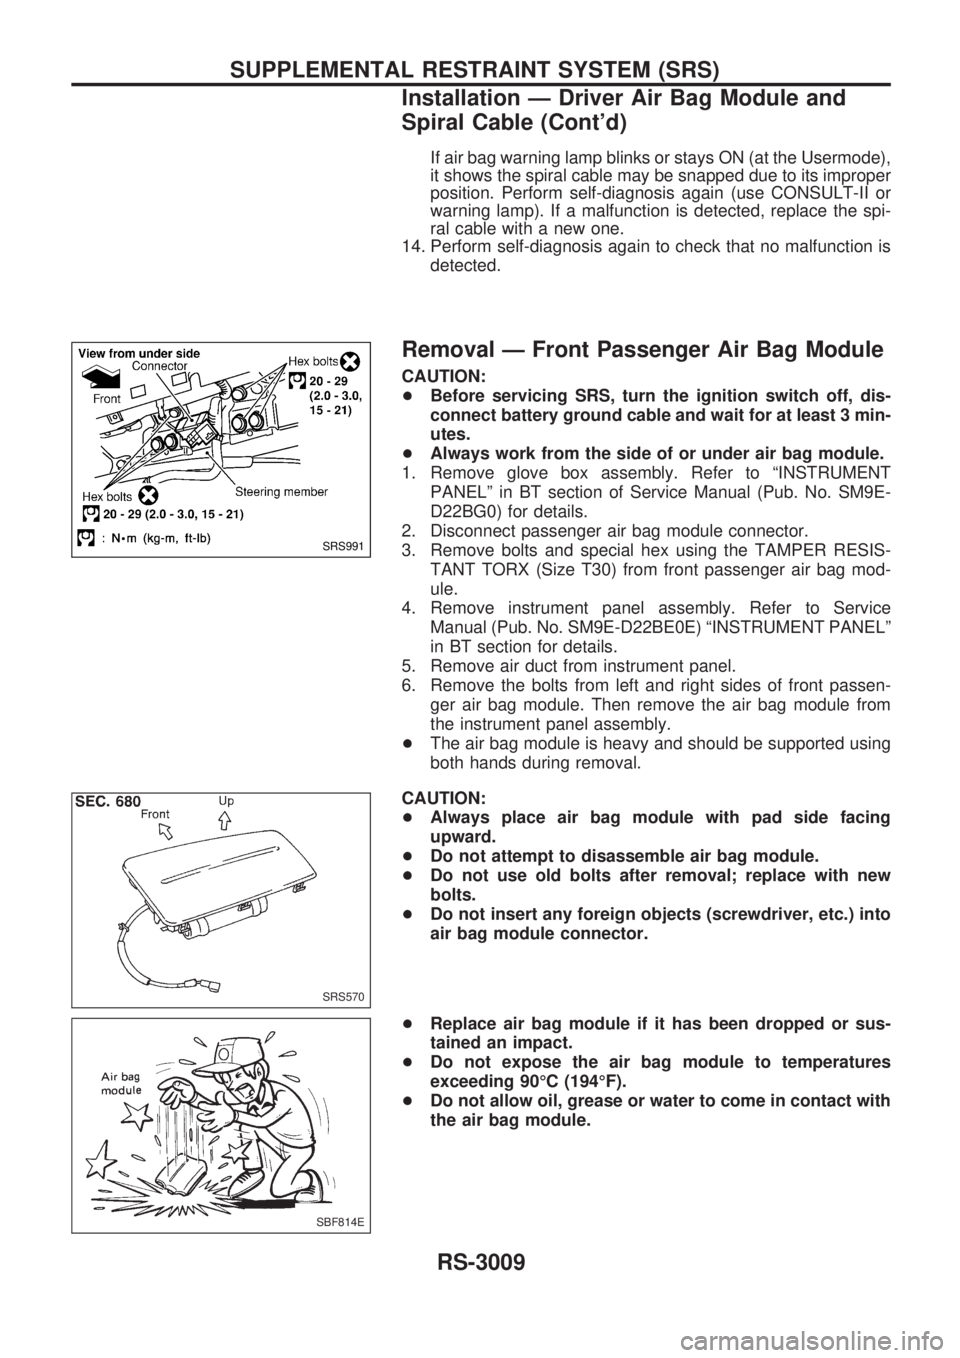
2. Disconnect passenger air bag module connector.
3. Remove bolts and special hex using the TAMPER RESIS-
TANT TORX (Size T30) from front passenger air bag mod-
ule.
4. Remove instrument panel assembly. Refer to Service
Manual (Pub. No. SM9E-D22BE0E) ªINSTRUMENT PANELº
in BT section for details.
5. Remove air duct from instrument panel.
6. Remove the bolts from left and right sides of front passen-
ger air bag module. Then remove the air bag module from
the instrument panel assembly.
+The air bag module is heavy and should be supported using
both hands during removal.
CAUTION:
+Always place air bag module with pad side facing
upward.
+Do not attempt to disassemble air bag module.
+Do not use old bolts after removal; replace with new
bolts.
+Do not insert any foreign objects (screwdriver, etc.) into
air bag module connector.
+Replace air bag module if it has been dropped or sus-
tained an impact.
+Do not expose the air bag module to temperatures
exceeding 90ÉC (194ÉF).
+Do not allow oil, grease or water to come in contact with
the air bag module.
SRS991
SRS570
SBF814E
SUPPLEMENTAL RESTRAINT SYSTEM (SRS)
Installation Ð Driver Air Bag Module and
Spiral Cable (Cont'd)
RS-3009
Page 1081 of 1306
Installation Ð Front Passenger Air Bag
Module
+Always work from the side of or under air bag module.
1. Install front passenger air bag module to instrument panel
assembly.
2. Install air duct to instrument panel.
3. Install instrument panel.
+Ensure harness is not caught between rear of air bag mod-
ule and steering member.
4. Install front passenger air bag module to steering member.
5. Connect air bag module connector.
6. Install glove box assembly.
SRS992
SUPPLEMENTAL RESTRAINT SYSTEM (SRS)
RS-3010
Page 1108 of 1306

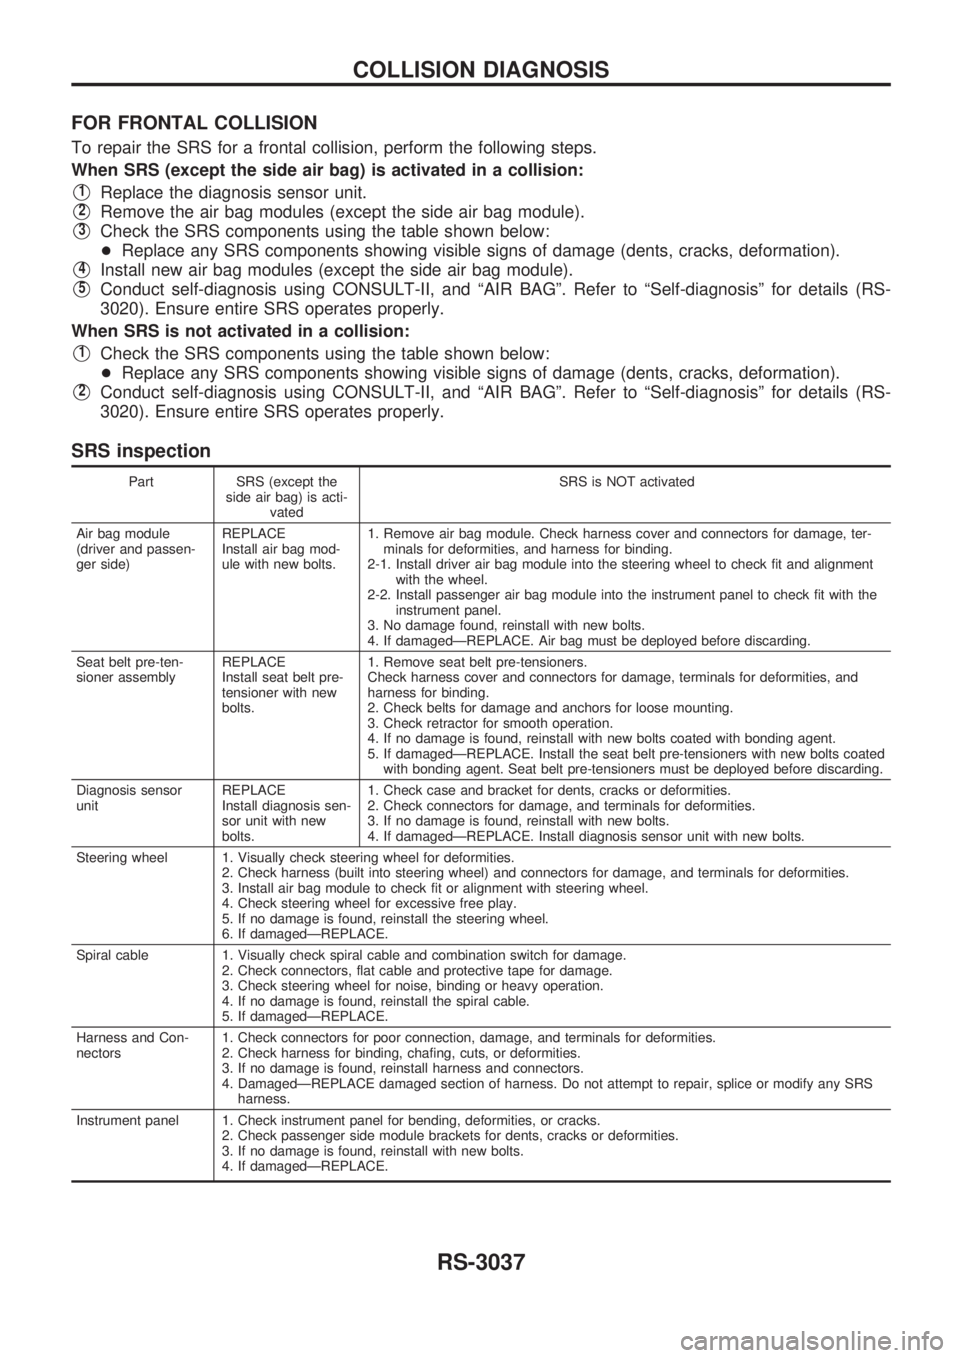
FOR FRONTAL COLLISION
To repair the SRS for a frontal collision, perform the following steps.
When SRS (except the side air bag) is activated in a collision:
V1Replace the diagnosis sensor unit.
V2Remove the air bag modules (except the side air bag module).
V3Check the SRS components using the table shown below:
+Replace any SRS components showing visible signs of damage (dents, cracks, deformation).
V4Install new air bag modules (except the side air bag module).
V5Conduct self-diagnosis using CONSULT-II, and ªAIR BAGº. Refer to ªSelf-diagnosisº for details (RS-
3020). Ensure entire SRS operates properly.
When SRS is not activated in a collision:
V1Check the SRS components using the table shown below:
+Replace any SRS components showing visible signs of damage (dents, cracks, deformation).
V2Conduct self-diagnosis using CONSULT-II, and ªAIR BAGº. Refer to ªSelf-diagnosisº for details (RS-
3020). Ensure entire SRS operates properly.
SRS inspection
Part SRS (except the
side air bag) is acti-
vatedSRS is NOT activated
Air bag module
(driver and passen-
ger side)REPLACE
Install air bag mod-
ule with new bolts.1. Remove air bag module. Check harness cover and connectors for damage, ter-
minals for deformities, and harness for binding.
2-1. Install driver air bag module into the steering wheel to check fit and alignment
with the wheel.
2-2. Install passenger air bag module into the instrument panel to check fit with the
instrument panel.
3. No damage found, reinstall with new bolts.
4. If damagedÐREPLACE. Air bag must be deployed before discarding.
Seat belt pre-ten-
sioner assemblyREPLACE
Install seat belt pre-
tensioner with new
bolts.1. Remove seat belt pre-tensioners.
Check harness cover and connectors for damage, terminals for deformities, and
harness for binding.
2. Check belts for damage and anchors for loose mounting.
3. Check retractor for smooth operation.
4. If no damage is found, reinstall with new bolts coated with bonding agent.
5. If damagedÐREPLACE. Install the seat belt pre-tensioners with new bolts coated
with bonding agent. Seat belt pre-tensioners must be deployed before discarding.
Diagnosis sensor
unitREPLACE
Install diagnosis sen-
sor unit with new
bolts.1. Check case and bracket for dents, cracks or deformities.
2. Check connectors for damage, and terminals for deformities.
3. If no damage is found, reinstall with new bolts.
4. If damagedÐREPLACE. Install diagnosis sensor unit with new bolts.
Steering wheel 1. Visually check steering wheel for deformities.
2. Check harness (built into steering wheel) and connectors for damage, and terminals for deformities.
3. Install air bag module to check fit or alignment with steering wheel.
4. Check steering wheel for excessive free play.
5. If no damage is found, reinstall the steering wheel.
6. If damagedÐREPLACE.
Spiral cable 1. Visually check spiral cable and combination switch for damage.
2. Check connectors, flat cable and protective tape for damage.
3. Check steering wheel for noise, binding or heavy operation.
4. If no damage is found, reinstall the spiral cable.
5. If damagedÐREPLACE.
Harness and Con-
nectors1. Check connectors for poor connection, damage, and terminals for deformities.
2. Check harness for binding, chafing, cuts, or deformities.
3. If no damage is found, reinstall harness and connectors.
4. DamagedÐREPLACE damaged section of harness. Do not attempt to repair, splice or modify any SRS
harness.
Instrument panel 1. Check instrument panel for bending, deformities, or cracks.
2. Check passenger side module brackets for dents, cracks or deformities.
3. If no damage is found, reinstall with new bolts.
4. If damagedÐREPLACE.
COLLISION DIAGNOSIS
RS-3037
Page 1115 of 1306

Supplemental Restraint System (SRS) ªAIR
BAGº and ªSEAT BELT PRE-TENSIONERº
The Supplemental Restraint System such as ªAIR BAGº and ªSEAT BELT PRE-TENSIONERº used along
with a seat belt, helps to reduce the risk or severity of injury to the driver and front passenger in a frontal
collision. The SRS system composition which is available to NISSAN MODEL D22 is as follows (The com-
position varies according to the destination and optional equipment.):
Driver air bag module (located in the center of the steering wheel), front passenger air bag module (located
on the instrument panel on passenger side), seat belt pre-tensioner, a diagnosis sensor unit, warning lamp,
wiring harness and spiral cable.
Information necessary to service the system safely is included in theRS sectionof this Service Manual.
WARNING:
+To avoid rendering the SRS inoperative, which could increase the risk of personal injury or death
in the event of a collision which would result in air bag inflation, all maintenance must be per-
formed by an authorized NISSAN dealer.
+Improper maintenance, including incorrect removal and installation of the SRS, can lead to per-
sonal injury caused by unintentional activation of the system. For removal of Spiral Cable and
Air Bag Module, see the RS section.
+Do not use electrical test equipment on any circuit related to the SRS unless instructed to in this
Service Manual. SRS wiring harnesses can be identified by yellow harness connector.
PRECAUTIONS
EL-3004
Page 1275 of 1306
Main Harness
INSTRUMENT PANEL Ð LHD MODELS
HEL851B
HARNESS LAYOUT
EL-3164
Page 1277 of 1306
INSTRUMENT PANEL Ð RHD MODELS
HEL853B
HARNESS LAYOUT
Main Harness (Cont'd)
EL-3166
Page:
< prev 1-8 9-16 17-24