2001 NISSAN PATHFINDER ECO mode
[x] Cancel search: ECO modePage 49 of 289

INSTALLATION ON FRONT
PASSENGER SEAT
WARNING
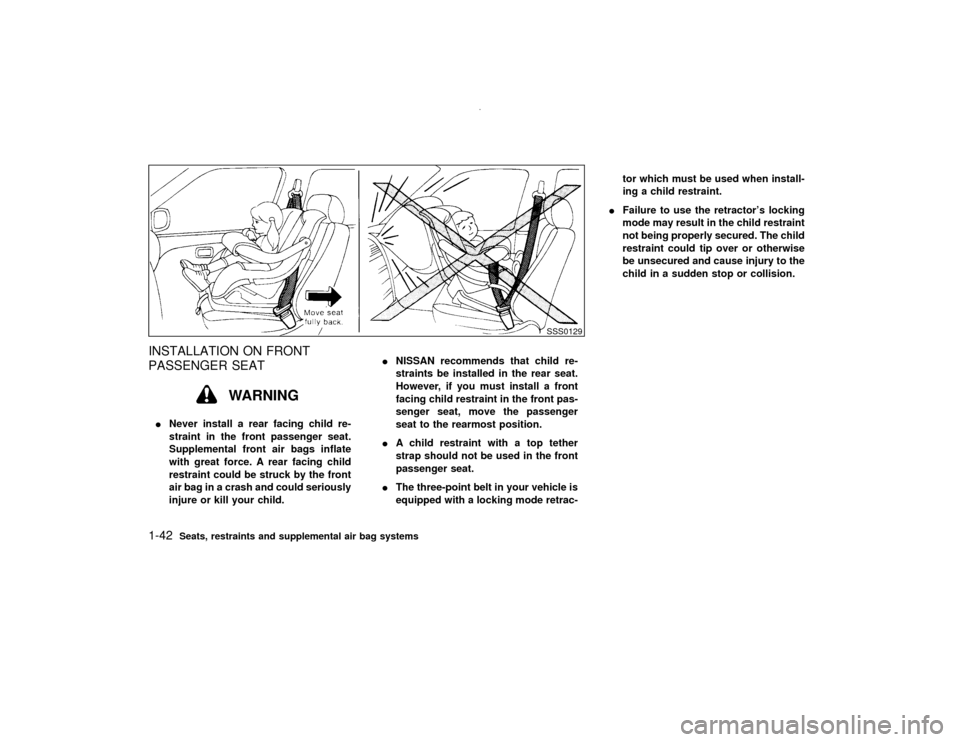
INever install a rear facing child re-
straint in the front passenger seat.
Supplemental front air bags inflate
with great force. A rear facing child
restraint could be struck by the front
air bag in a crash and could seriously
injure or kill your child.INISSAN recommends that child re-
straints be installed in the rear seat.
However, if you must install a front
facing child restraint in the front pas-
senger seat, move the passenger
seat to the rearmost position.
IA child restraint with a top tether
strap should not be used in the front
passenger seat.
IThe three-point belt in your vehicle is
equipped with a locking mode retrac-tor which must be used when install-
ing a child restraint.
IFailure to use the retractor's locking
mode may result in the child restraint
not being properly secured. The child
restraint could tip over or otherwise
be unsecured and cause injury to the
child in a sudden stop or collision.
SSS0129
1-42
Seats, restraints and supplemental air bag systems
Z
00.1.10/R50-D/V5
X
Page 65 of 289

4WD warning light (model)
The four wheel drive warning light comes on
when the key switch is turned to ON. It turns off
soon after the engine is started.
If the engine or vehicle is not functioning
properly, the warning light will either remain
illuminated or blink. See ª4WD warning lightº in
the ª5. Starting and drivingº section.
CAUTION
IIf the warning light comes on or
blinks during operation, have your
vehicle checked by an authorized
NISSAN dealer as soon as possible.
IDo not drive on dry hard surface
roads in the 4H or 4LO position. If the
4WD warning light turns on when you
are driving on dry hard surface roads
Iin the AUTO or 4H position, shift
the 4WD shift switch to 2WD.
Iin the 4LO position, stop the ve-
hicle, move the automatic trans-
mission lever to the N position,and shift the 4WD shift switch to
2WD.
If the warning light is still on after the
above operation, have your vehicle
checked by an authorized NISSAN
dealer as soon as possible.
Low fuel warning light
This light comes on when the fuel in the tank is
getting low. Refuel as soon as it is convenient,
preferably before the fuel gauge reaches E.
There will be a small reserve of fuel remain-
ing in the tank when the fuel gauge needle
reaches E.
Low washer fluid warning
light (Canada only)
This light comes on when the washer fluid in
the washer tank is at a low level. Add washer
fluid as necessary. See ªWindow washer fluidº
in the ª8. Do-it-yourselfº section.
Seat belt warning light and
chime
The light and chime remind you to fasten seat
belts. The light illuminates whenever the igni-tion key is turned to ON, and will remain
illuminated until the driver's seat belt is fas-
tened. At the same time, the chime will sound
for about six seconds unless the driver's seat
belt is securely fastened.
See ªSeat beltsº in the ª1. Seats, restraints and
supplemental air bag systemsº section for pre-
cautions on seat belt usage.
Supplemental air bag warning
light
After turning the ignition key to the ON posi-
tion, the supplemental air bag light will illumi-
nate. The supplemental air bag warning light
will turn off after about 7 seconds if the supple-
mental front air bag and supplemental side air
bag systems and pre-tensioner seat belt are
operational.
If any of the following conditions occur, the
supplemental air bag and pre-tensioner seat
belt need servicing and your vehicle must be
taken to your nearest authorized NISSAN
dealer.
IThe supplemental air bag warning light
remains on after approximately 7 seconds.
IThe supplemental air bag light flashes in-
termittently.
2-12
Instruments and controls
Z
00.1.10/R50-D/V5
X
Page 66 of 289

IThe supplemental air bag light does not
come on at all.
Unless checked and repaired, the supplemen-
tal restraint system and/or the pre-tensioner
seat belt may not function properly. For addi-
tional information, see ªSupplemental restraint
systemº in the ª1. Seats, restraints and supple-
mental air bag systemsº section.
WARNING
If the supplemental air bag warning light
is on, it could mean that the supplemen-
tal front air bag system, supplemental
side air bag system (if so equipped)
and/or pre-tensioner seat belt may not
operate in an accident.
Tire carrier open warning light
(if so equipped)
This light comes on when the tire carrier is not
closed securely while the ignition key is ON.
INDICATOR LIGHTS
Cruise main switch indicator
light (if so equipped)
The light comes on when the main switch is
turned on.
Cruise set switch indicator
light (if so equipped)
The light comes on while the vehicle speed is
controlled by the cruise control system. If the
light blinks while the engine is running, it may
indicate the cruise control system is not func-
tioning properly. Have the system checked by
your NISSAN dealer.
4WD indicator light
(
model)
This light comes on when the transfer shift
control lever is in the 4H or 4L position.
4WD shift indicator light
(
model)
The light should turn off within 1 second after
turning the ignition switch to ON.
While the engine is running, the 4WD shift
indicator light will illuminate the position se-
lected by the 4WD shift switch.The 4WD shift indicator light may blink
while shifting from one drive mode to the
other.
High beam indicator light
(Blue)
This light comes on when the headlight high
beam is on, and goes out when the low beams
are selected.
Malfunction indicator lamp
(MIL)
If the Malfunction indicator lamp comes on
steady or blinks while the engine is running, it
may indicate a potential emission control mal-
function.
The Malfunction indicator lamp may also come
on steady if the fuel filler cap is loose or
missing, or if the vehicle runs out of fuel.
Check to make sure the fuel filler cap is
installed and closed tightly, and that the ve-
hicle has at least 3 US gallons (14 liters) of fuel
in the fuel tank.
After a few driving trips, the
lamp should
turn off if no other potential emission control
system malfunction exists.
Operation
The Malfunction indicator lamp will come on in
one of two ways:
Instruments and controls
2-13
Z
00.1.10/R50-D/V5
X
Page 67 of 289

IMalfunction indicator lamp on steady Ð An
emission control system malfunction has
been detected. Check the fuel filler cap. If
the fuel filler cap is loose or missing, tighten
or install the cap and continue to drive the
vehicle. The
lamp should turn off after
a few driving trips. If the
lamp does
not turn off after a few driving trips, have the
vehicle inspected by an authorized NISSAN
dealer. You do not need to have your
vehicle towed to the dealer.
IMalfunction indicator lamp blinking Ð An
engine misfire has been detected which
may damage the emission control system.
To reduce or avoid emission control system
damage:
* do not drive at speeds above 45 MPH (72
km/h).
* avoid hard acceleration or deceleration.
* avoid steep uphill grades.
* if possible, reduce the amount of cargo
being hauled or towed.
The malfunction indicator lamp may stop blink-
ing and come on steady.
Have the vehicle inspected by an authorized
NISSAN dealer. You do not need to have your
vehicle towed to the dealer.
CAUTION
Continued vehicle operation without
having the emission control system
checked and repaired as necessary
could lead to poor driveability, reduced
fuel economy, and possible damage to
the emission control system.
Overdrive off indicator light
(Automatic transmission
models only)
This light comes on during driving when the
overdrive switch is pressed to prevent over-
drive operation.
The O/D OFF indicator light comes on for two
seconds each time the ignition key is turned
ON. This shows the light is functioning prop-
erly.If the O/D OFF indicator light blinks for
approximately 8 seconds after coming on for
2 seconds, have your NISSAN dealer check
the transmission and repair it if necessary.The automatic transmission is equipped with
an electronic Fail-Safe mode. This system
allows the vehicle to be driven even in theevent of damage to the electrical circuits. If this
occurs, the gears automatically engage and
lock into 3rd gear.
See ªDriving the vehicleº in the ª5. Starting
and drivingº section for failsafe before vis-
iting your NISSAN dealer.
Transfer 4LO position
indicator light (
model)
The light should turn off within 1 second after
turning the ignition switch to ON.
This light comes on when the 4WD shift switch
is set in the 4LO position with ignition key in
the ON position.
If the 4WD shift switch is set in the 4LO
position and the light blinks, stop the vehicle,
drive slowly forward and the light will turn on.
When you shift between 4H and 4LO, stop the
vehicle, move the automatic transmission se-
lector lever to the N position, and press the
4WD shift switch and move it in 4LO or 4H.
The transfer case may be damaged if you shift
the switch while driving.
You cannot move the transfer 4WD shift switch
between 4H and 4LO unless you have first
stopped the vehicle and moved the automatic
transmission shift lever to neutral. Make sure
2-14
Instruments and controls
Z
00.1.10/R50-D/V5
X
Page 94 of 289

WARNING
IDo not use the Integrated HomeLink
Universal Transceiver with any ga-
rage door opener that lacks safety
stop and reverse features as required
by federal safety standards. (These
standards became effective for
opener models manufactured after
April 1, 1982.) A garage door opener
which cannot detect an object in the
path of a closing garage door and
then automatically stop and reverse,
does not meet current federal safety
standards. Using a garage door
opener without these features in-
creases the risk of serious injury or
death.
IDuring programming, your garage
door or gate may open or close. Make
sure that people and objects are clear
of the garage door or gate that you
are programming.
IYour vehicle's engine should be
turned off while programming the In-tegrated HomeLink
Universal Trans-
ceiver.
PROGRAMMING HomeLink1. With the ignition key in the OFF position,
press and hold the two outside buttons, and
release when the indicator light begins to
flash (approximately 20 seconds). This pro-
cedure erases the factory set default codes
and does not have to be followed when
programming additional hand-held trans-
mitters.
2. Hold the end of the hand-held transmitter
(from the device you wish to train) approxi-
mately 2 to 5 inches (50 to 127 mm) away
from the surface of HomeLink
keeping the
indicator light in view.SPA0609A
Instruments and controls
2-41
Z
00.1.10/R50-D/V5
X
Page 104 of 289

It is possible to lock/unlock all doors and
activate the panic alarm by using the remote
controller from outside the vehicle.
Before locking the doors, make sure the
key is not left in the vehicle.
The remote controller can operate at a dis-
tance of approximately 33 ft (10 m) from the
vehicle. (The effective distance depends upon
the conditions around the vehicle.)
As many as four remote controllers can be
used with one vehicle. For information con-
cerning the purchase and use of additional
remote controllers, contact your NISSAN
dealer.
The multi-remote controller will not function
when:
Ithe battery is dead,
Ithe distance between the vehicle and the
remote controller is over 33 ft (10 m).
The panic alarm will not activate when the
key is in the ignition switch.
CAUTION
The following conditions or occurrences
will damage the remote controller.IDo not allow the remote controller to
become wet.
IDo not drop the remote controller.
IDo not strike the remote controller
sharply against another object.
IDo not place the remote controller for
an extended period in an area where
temperatures exceed 140ÉF (60ÉC).
If a multi-remote controller is lost or
stolen, NISSAN recommends erasing
the ID code of that controller. This will
prevent the controller from unautho-
rized use to unlock the vehicle. For in-
formation regarding the erasing proce-
dure, please contact an authorized
NISSAN dealer.
HOW TO USE MULTI-REMOTE
CONTROL SYSTEM
Setting hazard indicator and horn
modeThis vehicle is set in hazard indicator and horn
mode when you first receive the vehicle.In hazard indicator and horn mode, when the
LOCK button is pushed, the hazard indicator
flashes twice and the horn chirps once. When
the UNLOCK button is pushed, the hazard
indicator flashes once.
If hazard indicator and horn mode is not nec-
essary, you can switch to hazard indicator only
mode by following the switching procedure
below.
In hazard indicator only mode, when the LOCK
button is pushed, the hazard indicator flashes
twice. When the UNLOCK button is pushed,
neither the hazard indicator nor the horn oper-
ates.
(Switching procedure)
Press and hold the LOCK and UNLOCK but-
tons on the multi-remote controller simulta-
neously for at least 2 seconds to switch from
one mode to the other.
When pushing the buttons to set hazard indi-
cator only mode, the hazard indicator flashes 3
times.
When pushing the buttons to set hazard indi-
cator and horn mode, the hazard indicator
flashes once and the horn chirps once.
MULTI-REMOTE CONTROL
SYSTEM
Pre-driving checks and adjustments
3-5
Z
00.1.10/R50-D/V5
X
Page 119 of 289

Open or close, and adjust the air flow direction
of ventilators.
: This symbol indicates that the vents are
closed when the vent switch is moved
to the left.: This symbol indicates that the vents are
open when the vent switch is moved to
the right.
WARNING
IThe air conditioner cooling function
operates only when the engine is run-
ning.
IDo not leave children, impaired
adults, or pets alone in your vehicle.
On hot, sunny days, temperatures in
a closed vehicle could quickly be-
come high enough to cause severe or
possibly fatal injuries to people or
animals.
IDo not use the recirculation mode for
long periods as it may cause the
interior air to become stale and the
windows to fog up.
IPositioning of the heating or air con-
ditioning controls should not be done
while driving so full attention may be
given to vehicle operation.
SAA0444
VENTILATORS
HEATER AND AIR CONDITIONER
(Manual)4-2
Heater, air conditioner and audio systems
Z
00.1.10/R50-D/V5
X
Page 125 of 289

Start the engine and operate the controls to
activate the air conditioner.
WARNING
IThe air conditioner cooling function
operates only when the engine is run-
ning.
IDo not leave children, impaired
adults, or pets alone in your vehicle.
On hot, sunny days, temperatures in
a closed vehicle could quickly be-
come high enough to cause severe or
possibly fatal injuries to people or
animals.
IDo not use the recirculation mode for
long periods as it may cause the
interior air to become stale and the
windows to fog up.
IPositioning of the heating or air con-
ditioning controls should not be done
while driving so full attention may be
given to vehicle operation.
SAA0449
HEATER AND AIR CONDITIONER
(Automatic)4-8
Heater, air conditioner and audio systems
Z
00.1.10/R50-D/V5
X