2001 NISSAN ALTIMA ECU
[x] Cancel search: ECUPage 186 of 258

CAUTION
Oil level should be checked regularly.
Operating the engine with an insuffi-
cient amount of oil can damage the
engine, and such damage is not cov-
ered by warranty.
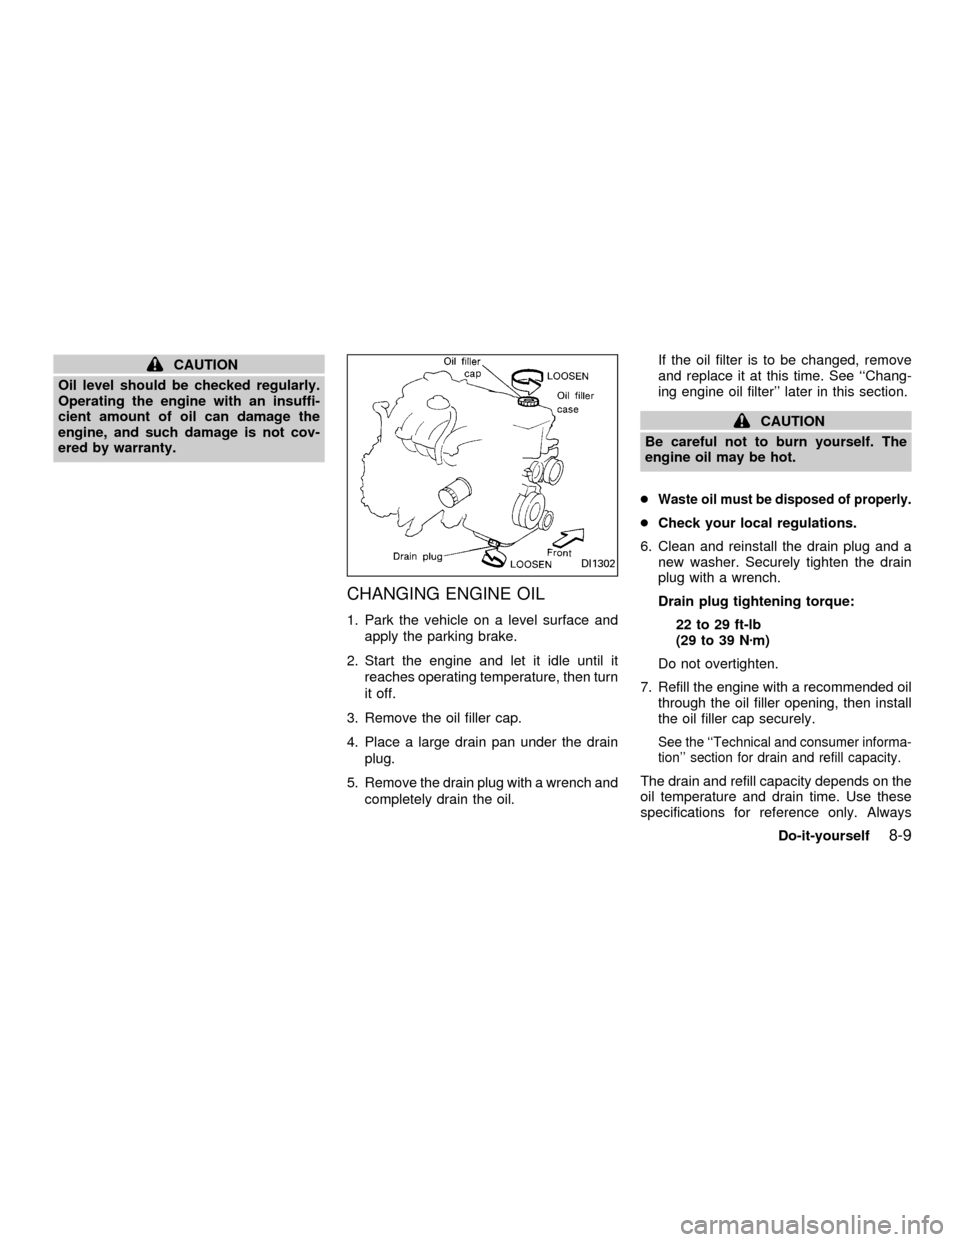
CHANGING ENGINE OIL
1. Park the vehicle on a level surface and
apply the parking brake.
2. Start the engine and let it idle until it
reaches operating temperature, then turn
it off.
3. Remove the oil filler cap.
4. Place a large drain pan under the drain
plug.
5. Remove the drain plug with a wrench and
completely drain the oil.If the oil filter is to be changed, remove
and replace it at this time. See ``Chang-
ing engine oil filter'' later in this section.
CAUTION
Be careful not to burn yourself. The
engine oil may be hot.
c
Waste oil must be disposed of properly.
cCheck your local regulations.
6. Clean and reinstall the drain plug and a
new washer. Securely tighten the drain
plug with a wrench.
Drain plug tightening torque:
22 to 29 ft-lb
(29 to 39 Nzm)
Do not overtighten.
7. Refill the engine with a recommended oil
through the oil filler opening, then install
the oil filler cap securely.
See the ``Technical and consumer informa-
tion'' section for drain and refill capacity.
The drain and refill capacity depends on the
oil temperature and drain time. Use these
specifications for reference only. Always
DI1302
Do-it-yourself8-9
ZX
Page 191 of 258

For USA
Fill the window washer fluid reservoir peri-
odically. Perform the refilling operation
more often under driving conditions that
require an increased amount of window
washer fluid.
For Canada
Add window washer fluid when thelight comes on.
CAUTION
Do not substitute engine anti-freeze
coolant for windshield washer solution.
This may result in damage to the paint.cKeep the battery surface clean and dry.
Any corrosion should be washed off with
a solution of baking soda and water.
cMake certain the terminal connections
are clean and securely tightened.
c
If the vehicle is not to be used for 30 days or
longer, disconnect the negative (Ð) battery
terminal cable to prevent discharge.
WARNING
cDo not expose the battery to flames
or electrical sparks. Hydrogen gas
generated by the battery is explo-
sive. Do not allow battery fluid to
contact your skin, eyes, fabrics, or
painted surfaces. After touching a
battery or battery cap, do not touch
or rub your eyes. Thoroughly wash
your hands. If the acid contacts your
eyes, skin or clothing, immediately
flush with water for at least 15 min-
utes and seek medical attention.
cWhen working on or near the battery,
always wear suitable eye protection
and remove all jewelry.cBattery posts, terminals and related
accessories contain lead and lead
compounds. Wash hands after han-
dling.
cKeep the battery out of the reach of
children.
BATTERY
8-14Do-it-yourself
ZX
Page 193 of 258

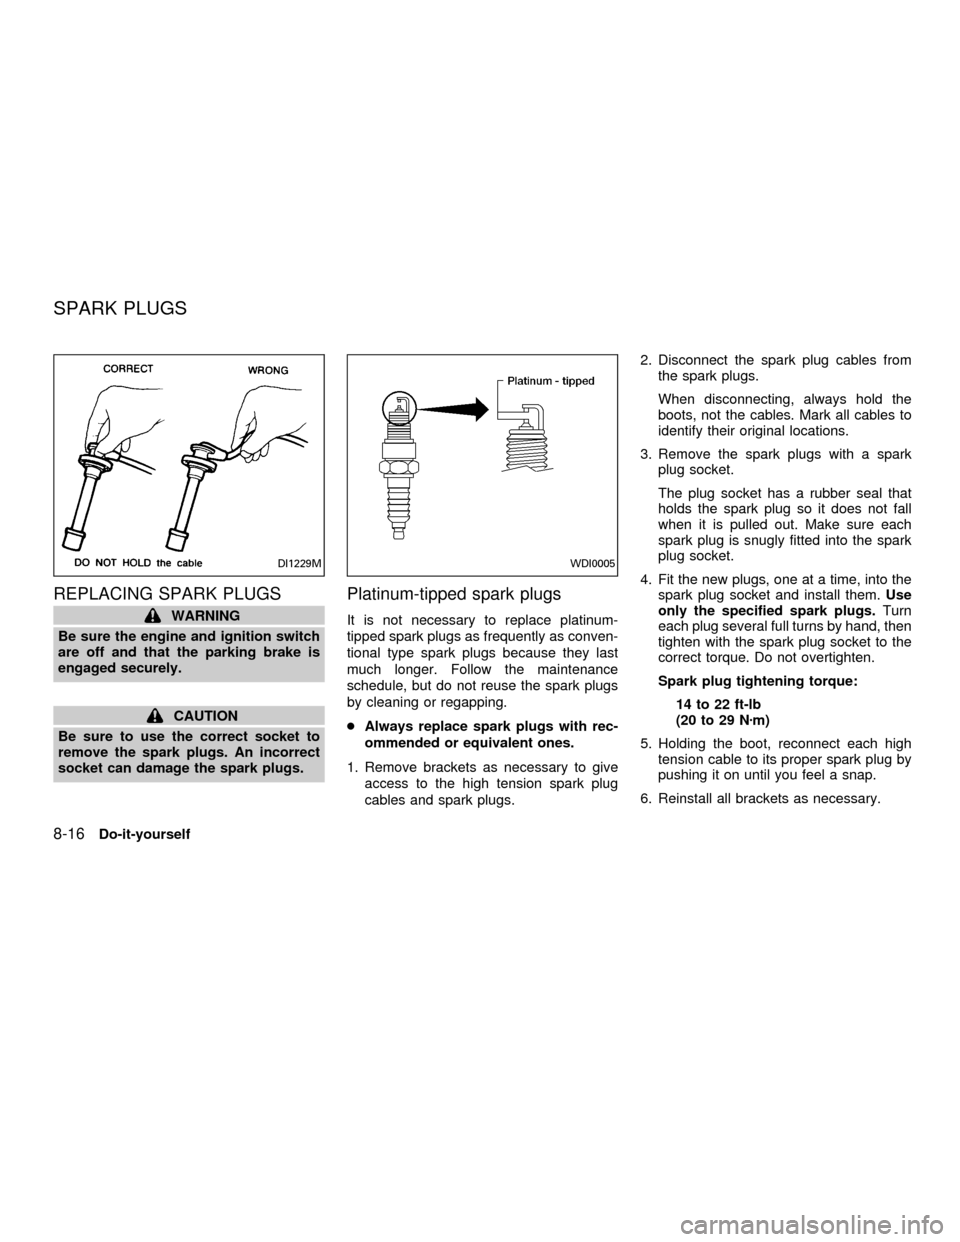
REPLACING SPARK PLUGS
WARNING
Be sure the engine and ignition switch
are off and that the parking brake is
engaged securely.
CAUTION
Be sure to use the correct socket to
remove the spark plugs. An incorrect
socket can damage the spark plugs.
Platinum-tipped spark plugs
It is not necessary to replace platinum-
tipped spark plugs as frequently as conven-
tional type spark plugs because they last
much longer. Follow the maintenance
schedule, but do not reuse the spark plugs
by cleaning or regapping.
cAlways replace spark plugs with rec-
ommended or equivalent ones.
1. Remove brackets as necessary to give
access to the high tension spark plug
cables and spark plugs.2. Disconnect the spark plug cables from
the spark plugs.
When disconnecting, always hold the
boots, not the cables. Mark all cables to
identify their original locations.
3. Remove the spark plugs with a spark
plug socket.
The plug socket has a rubber seal that
holds the spark plug so it does not fall
when it is pulled out. Make sure each
spark plug is snugly fitted into the spark
plug socket.
4. Fit the new plugs, one at a time, into the
spark plug socket and install them.Use
only the specified spark plugs.Turn
each plug several full turns by hand, then
tighten with the spark plug socket to the
correct torque. Do not overtighten.
Spark plug tightening torque:
14 to 22 ft-lb
(20 to 29 Nzm)
5. Holding the boot, reconnect each high
tension cable to its proper spark plug by
pushing it on until you feel a snap.
6. Reinstall all brackets as necessary.
DI1229MWDI0005
SPARK PLUGS
8-16Do-it-yourself
ZX
Page 200 of 258

Replace the battery in the multi-remote con-
troller as follows:
1. Open the lid using a coin.
2. Replace the battery with a new one.Recommended battery: Sanyo CR2025 or
equivalent.
3. Close the lid securely.
4. Press the
button, then thebutton
two or three times to check the multi-remotecontroller operation.
Each time the
button is pressed, the
hazard lights flash once.
If the battery is removed for any reason
other than replacement, perform step 4.
cAn improperly disposed battery can
hurt the environment. Always confirm
local regulations for battery disposal.
cThe multi-remote controller is water-
resistant; however, if it does get wet,
immediately wipe completely dry.
cThe operational range of the multi-
remote controller extends to approxi-
mately 33 ft (10 m) from the vehicle.
This range may vary with conditions.
FCC Notice:
Changes or modifications not expressly
approved by the manufacturer for com-
pliance could void the user's authority to
operate the equipment.
This device complies with part 15 of the
FCC Rules and RSS-210 of Industry
Canada.
APD1026
MULTI-REMOTE CONTROLLER
BATTERY REPLACEMENT
Do-it-yourself8-23
ZX
Page 213 of 258

Summer tires
NISSAN specifies summer tires on some
models to provide superior performance on
dry roads. Summer tire performance in
snow and ice is substantially reduced. Sum-
mer tires do not have the tire traction rating
M&S on the tire sidewall.
If you plan to operate your vehicle in snowy
or icy conditions, NISSAN recommends the
use of SNOW or ALL SEASON tires on all
four wheels.
Snow tires
If snow tires are needed, it is necessary to
select tires equivalent in size and load rating
to the original equipment tires. If you do not,
it can adversely affect the safety and han-
dling of your vehicle.
Generally, snow tires have lower speed
ratings than factory equipped tires and may
not match the potential maximum vehicle
speed. Never exceed the maximum speed
rating of the tire.
For additional traction on icy roads, studded
tires may be used. However, some U.S
States and Canadian Provinces prohibit
their use. Check local, state and provinciallaws before installing studded tires. Skid
and traction capabilities of studded snow
tires on wet or dry surfaces may be poorer
than that of non-studded snow tires.
TIRE CHAINS
Use of tire chains may be prohibited accord-
ing to location. Check the local laws before
installing tire chains. When installing tire
chains, make sure they are of proper size
for the tires on your vehicle and are installed
according to the chain manufacturer's sug-
gestions.Use only SAE class ``S'' chains.
Other types may damage your vehicle. Use
chain tensioners when recommended by
the tire chain manufacturer to ensure a tight
fit. Loose end links of the tire chain must be
secured or removed to prevent the possibil-
ity of whipping action damage to the fenders
or underbody. If possible, avoid fully loading
your vehicle when using tire chains. In ad-
dition, drive at a reduced speed. Otherwise,
your vehicle may be damaged and/or ve-
hicle handling and performance may be
adversely affected.
Never install tire chains on TEMPORARY
USE ONLY spare tires. Do not use tire
chains on dry roads.Tire chains must be installed only on the
front wheels and not on the rear wheels.
CHANGING TIRES AND WHEELS
Tire rotation
Tires should be rotated every 7,500 miles
(12,000 km).
See ``Flat tire'' in the ``In case of emergency''
section for tire replacing procedures.
As soon as possible, tighten the wheel
nuts to the specified torque with a nut
tightening torque:
72 to 87 ft-lb (98 to 118 Nzm)
ADI1115
8-36Do-it-yourself
ZX
Page 220 of 258

cluding the spare, and adjust to the speci-
fied pressure if necessary. Check carefully
for damage, cuts or excessive wear.
Wheel nuts* ÐWhen checking the tires,
make sure no wheel nuts are missing, and
check for any loose wheel nuts. Tighten if
necessary.
Tire rotation* ÐTires should be rotated
every 7,500 miles (12,000 km).
Wheel alignment and balance ÐIf the
vehicle should pull to either side while driv-
ing on a straight and level road, or if you
detect uneven or abnormal tire wear, there
may be a need for a wheel alignment.
If the steering wheel or seat vibrates at
normal highway speeds, wheel balancing
may be needed.
Windshield wiper blades* ÐCheck for
cracks or wear if they do not wipe properly.
Doors and engine hood ÐCheck that all
doors and the hood operate properly. Also
ensure all latches lock securely. Lubricate
hinges, latches, rollers and links if neces-
sary. Make sure the secondary latch keeps
the hood from opening when the primary
latch is released.When driving in areas using road salt or
other corrosive materials, check lubrication
frequently.
Lights* ÐMake sure the headlights, stop
lights, tail lights, turn signal lights, and other
lights are all operating properly and installed
securely. Also check headlight aim.
INTERIOR MAINTENANCE
The maintenance items listed here should
be checked on a regular basis, such as
when performing periodic maintenance,
cleaning the vehicle, etc.
Additional information on the following
items with an ``*'' is found in the ``Do-it-
yourself'' section of this manual.
Warning lights and chimes ÐMake sure
all warning lights and buzzers/chimes are
operating properly.
Windshield wiper and washer* ÐCheck
that the wipers and washer operate properly
and that the wipers do not streak.
Windshield defroster ÐCheck that the air
comes out of the defroster outlets properly
and in sufficient quantity when operating the
heater or air conditioner.Steering wheel ÐCheck for changes in
the steering conditions, such as excessive
freeplay, hard steering or strange noises.
Seats ÐCheck seat position controls such
as seat adjusters, seatback recliner, etc. to
ensure they operate smoothly and all
latches lock securely in every position.
Check that the head restraints move up and
down smoothly and the locks (if so
equipped) hold securely in all latched posi-
tions.
Seat belts ÐCheck that all parts of the seat
belt system (for example, buckles, anchors,
adjusters and retractors) operate properly
and smoothly, and are installed securely.
Check the belt webbing for cuts, fraying,
wear or damage.
Accelerator pedal ÐCheck the pedal for
smooth operation and make sure the pedal
does not catch or require uneven effort.
Keep the floor mat away from the pedal.
Clutch pedal* ÐMake sure the pedal
operates smoothly and check that it has the
proper free travel.
Brakes ÐCheck that the brakes do not pull
the vehicle to one side when applied.
Maintenance
9-3
ZX
Page 221 of 258

Brake pedal and booster* ÐCheck the
pedal for smooth operation and make sure it
has the proper distance under it when de-
pressed fully. Check the brake booster func-
tion. Be certain to keep the floor mat away
from the pedal.
Parking brake* ÐCheck that the lever has
the proper travel and confirm that your
vehicle is held securely on a fairly steep hill
with only the parking brake applied.
Automatic transmission P position
mechanism ÐOn a fairly steep hill check
that your vehicle is held securely with the
shift selector lever in the P (Park) position
without applying any brakes.
Under the hood and vehicle
The maintenance items listed here should
be checked periodically, such as each time
you check the engine oil or refuel.
Additional information on the items
marked with an ª*º can be found in the
ªDo-it-yourself'' section of this manual.
Windshield washer fluid* ÐCheck that
there is adequate fluid in the tank.
Engine oil level* ÐCheck the level after
parking the vehicle on a level surface, withthe engine off. Wait a few minutes for the oil
to drain back into the oil pan.
Brake and (if so equipped) clutch fluid
levels* ÐMake sure that the brake and
clutch fluid level are between the MIN and
MAX lines on each reservoir.
Power steering fluid level* and lines Ð
Check the level when the fluid is cold and
with the engine off. Check the lines for
proper attachment, leaks, cracks, etc.
Automatic transmission fluid level* Ð
Check the level after putting the shift selec-
tor lever in P (Park) with the engine idling at
operating temperature.
Engine coolant level* ÐCheck the cool-
ant level when the engine is cold.
Radiator and hoses ÐCheck the front of
the radiator and clean off any dirt, insects,
leaves, etc., that may have accumulated.
Make sure the hoses have no cracks, de-
formation, rot or loose connections.
Engine drive belts* ÐMake sure the drive
belts are not frayed, worn, cracked or oily.
Battery* ÐCheck the fluid level in each
cell. It should be between the MAX and MIN
lines.Exhaust system ÐMake sure there are no
cracks, holes, loose joints or supports. If the
sound of the exhaust seems unusual or
there is a smell of exhaust fumes, immedi-
ately have the exhaust system inspected by
a qualified individual. (See the carbon mon-
oxide warning in the ``Starting and driving''
section of this manual.)
Underbody ÐThe underbody is frequently
exposed to corrosive substances such as
those used on icy roads or to control dust. It
is very important to remove these sub-
stances from the underbody, otherwise rust
may form on the floor pan, frame, fuel
linesand exhaust system. At the end of
winter, the underbody should be thoroughly
flushed with plain water, especially those
areas where mud and dirt may accumulate.
See the ``Appearance and care'' section for
additional information.
Fluid leaks ÐCheck under the vehicle for
fuel, oil, water or other fluid leaks after the
vehicle has been parked for a while. Water
dripping from the air conditioner after use is
normal. If you should notice any leaks or if
gasoline fumes are evident, check for the
cause and have it corrected immediately by
an authorized NISSAN dealer.
9-4Maintenance
ZX
Page 243 of 258

maximum total weight (load) limit speci-
fied for the vehicle.
cGAWR (Gross Axle Weight Rating) -
maximum weight (load) limit specified for
the front or rear axle.
DETERMINING VEHICLE LOAD
CAPACITY
The load capacity of this vehicle is determined
by weight, not by available cargo space. For
example, a luggage rack, bike carrier, cartop
carrier or similar equipment does not increase
load carrying capacity of your vehicle.
To determine vehicle load capacity:
Vehicle weight can be determined by using
a commercial-grade scale, found at places
such as a truck stop, gravel quarry, grain
elevator, or a scrap metal recycling facility.
1)
Determine the curb weight of your vehicle.
2) Compare the curb weight amount to the
GVWR specified for your vehicle to de-
termine how much more weight your
vehicle can carry.
3) After loading (cargo and passengers),
re-weigh your vehicle to determine if
either GVWR or GAWR for your vehicle
is exceeded. If GVWR is exceeded, re-move cargo as necessary. If either the
front or rear GAWR is exceeded, shift the
load or remove cargo as necessary.
LOADING TIPS
cThe GVW must not exceed GVWR or
GAWR as specified on the FMVSS Cer-
tification Label.
cDo not load the front and rear axle to the
GAWR. Doing so will exceed the GVWR.
WARNING
c
Properly secure all cargo to help pre-
vent it from sliding or shifting. Do not
place cargo higher than the seat-
backs. In a sudden stop or collision,
unsecured cargo could cause per-
sonal injury.
cDo not load your vehicle any heavier
than the GVWR or the maximum
front and rear GAWRs. If you do,
parts of your vehicle can break, or it
can change the way your vehicle
handles. This could result in loss of
control and cause personal injury.cOverloading can shorten the life of
the vehicle. Failures caused by over-
loading are not covered by the vehi-
cle's warranty.
10-14Technical and consumer information
ZX