2001 NISSAN ALMERA service
[x] Cancel search: servicePage 559 of 2898
ComponentNJBR0141
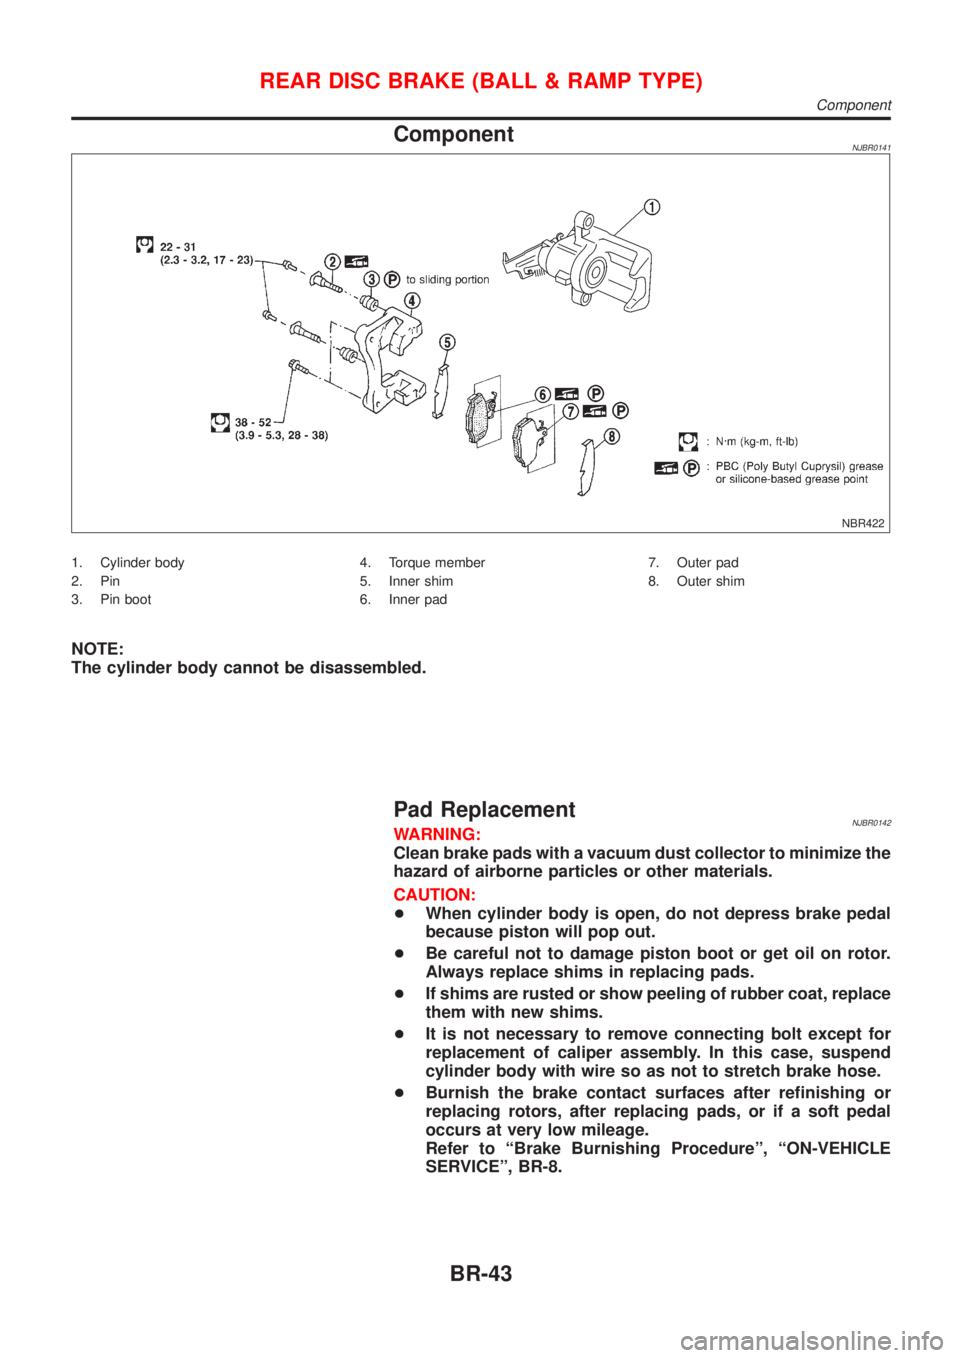
NBR422
1. Cylinder body
2. Pin
3. Pin boot4. Torque member
5. Inner shim
6. Inner pad7. Outer pad
8. Outer shim
NOTE:
The cylinder body cannot be disassembled.
Pad ReplacementNJBR0142WARNING:
Clean brake pads with a vacuum dust collector to minimize the
hazard of airborne particles or other materials.
CAUTION:
+When cylinder body is open, do not depress brake pedal
because piston will pop out.
+Be careful not to damage piston boot or get oil on rotor.
Always replace shims in replacing pads.
+If shims are rusted or show peeling of rubber coat, replace
them with new shims.
+It is not necessary to remove connecting bolt except for
replacement of caliper assembly. In this case, suspend
cylinder body with wire so as not to stretch brake hose.
+Burnish the brake contact surfaces after refinishing or
replacing rotors, after replacing pads, or if a soft pedal
occurs at very low mileage.
Refer to ªBrake Burnishing Procedureº, ªON-VEHICLE
SERVICEº, BR-8.
REAR DISC BRAKE (BALL & RAMP TYPE)
Component
BR-43
Page 562 of 2898
SBR219C
ROTORNJBR0145S02Rubbing SurfaceNJBR0145S0201Check rotor for roughness, cracks or chips.
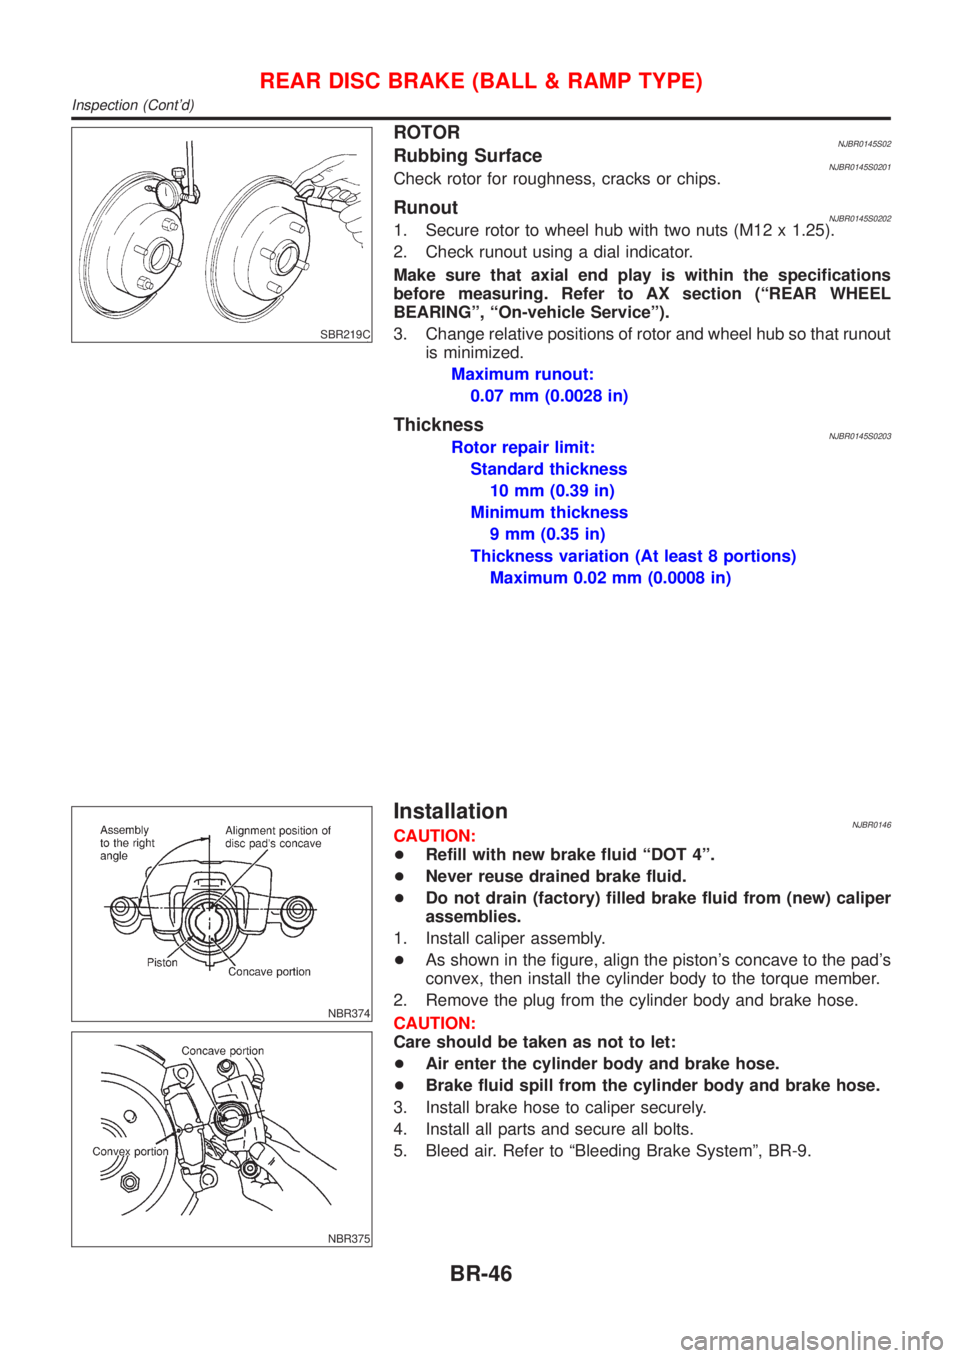
RunoutNJBR0145S02021. Secure rotor to wheel hub with two nuts (M12 x 1.25).
2. Check runout using a dial indicator.
Make sure that axial end play is within the specifications
before measuring. Refer to AX section (ªREAR WHEEL
BEARINGº, ªOn-vehicle Serviceº).
3. Change relative positions of rotor and wheel hub so that runout
is minimized.
Maximum runout:
0.07 mm (0.0028 in)
ThicknessNJBR0145S0203Rotor repair limit:
Standard thickness
10 mm (0.39 in)
Minimum thickness
9 mm (0.35 in)
Thickness variation (At least 8 portions)
Maximum 0.02 mm (0.0008 in)
NBR374
NBR375
InstallationNJBR0146CAUTION:
+Refill with new brake fluid ªDOT 4º.
+Never reuse drained brake fluid.
+Do not drain (factory) filled brake fluid from (new) caliper
assemblies.
1. Install caliper assembly.
+As shown in the figure, align the piston's concave to the pad's
convex, then install the cylinder body to the torque member.
2. Remove the plug from the cylinder body and brake hose.
CAUTION:
Care should be taken as not to let:
+Air enter the cylinder body and brake hose.
+Brake fluid spill from the cylinder body and brake hose.
3. Install brake hose to caliper securely.
4. Install all parts and secure all bolts.
5. Bleed air. Refer to ªBleeding Brake Systemº, BR-9.
REAR DISC BRAKE (BALL & RAMP TYPE)
Inspection (Cont'd)
BR-46
Page 587 of 2898
SEF233G
SEF234G
How to Perform Trouble Diagnoses for Quick
and Accurate Repair
NJBR0094INTRODUCTIONNJBR0094S01The ABS system has an electronic control unit to control major
functions. The control unit accepts input signals from sensors and
instantly drives actuator. It is essential that both kinds of signals are
proper and stable. It is also important to check for conventional
problems: such as air leaks in the booster or lines, lack of brake
fluid, or other problems with the brake system.
It is much more difficult to diagnose a problem that occurs intermit-
tently rather than continuously. Most intermittent problems are
caused by poor electric connections or faulty wiring. In this case,
careful checking of suspicious circuits may help prevent the
replacement of good parts.
A visual check only may not find the cause of the problems, so a
road test should be performed.
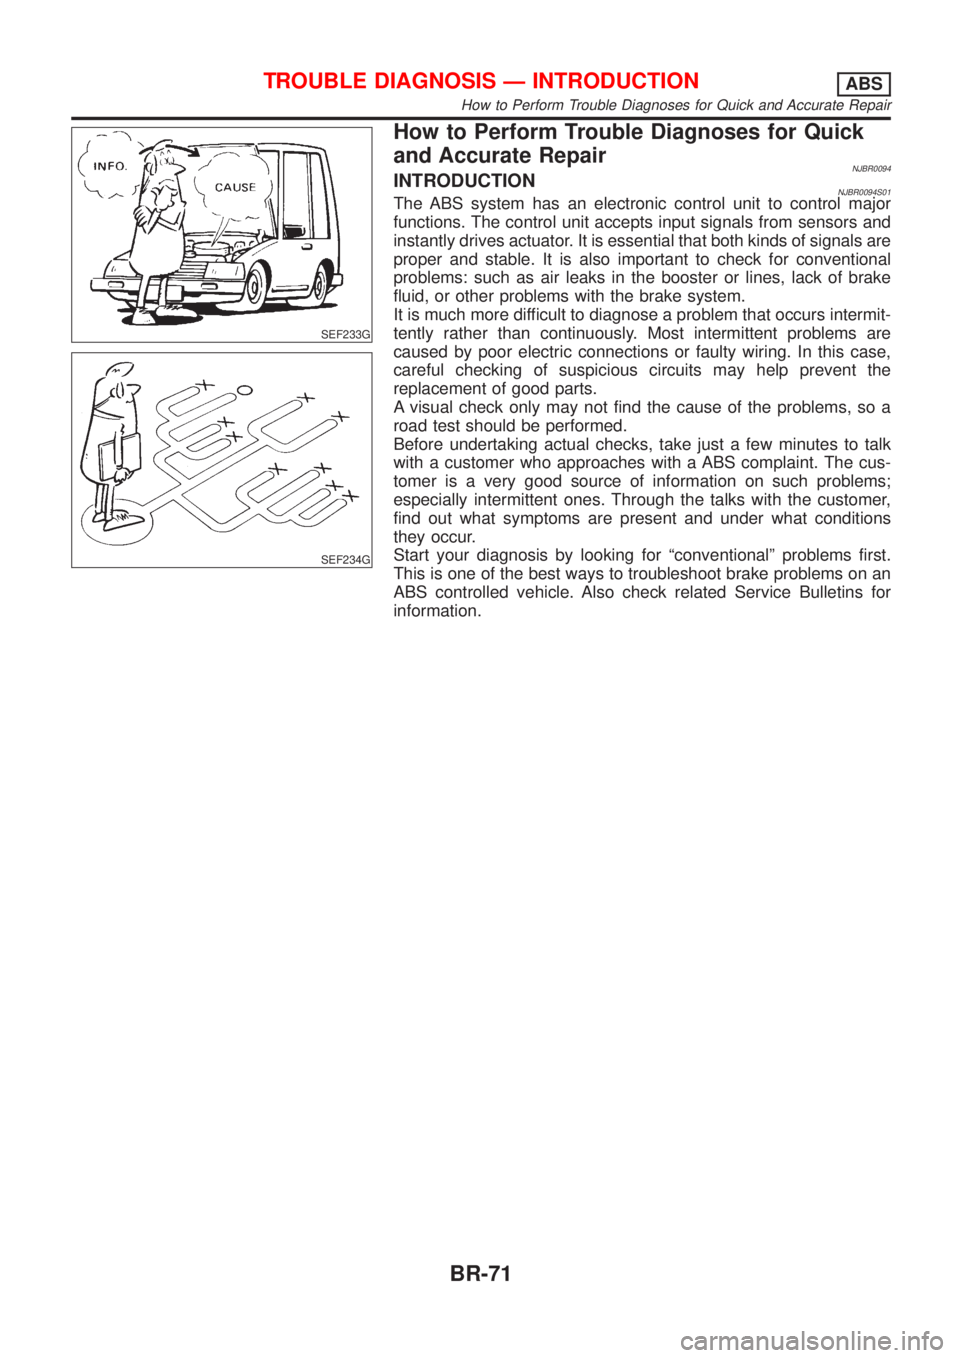
Before undertaking actual checks, take just a few minutes to talk
with a customer who approaches with a ABS complaint. The cus-
tomer is a very good source of information on such problems;
especially intermittent ones. Through the talks with the customer,
find out what symptoms are present and under what conditions
they occur.
Start your diagnosis by looking for ªconventionalº problems first.
This is one of the best ways to troubleshoot brake problems on an
ABS controlled vehicle. Also check related Service Bulletins for
information.
TROUBLE DIAGNOSIS Ð INTRODUCTIONABS
How to Perform Trouble Diagnoses for Quick and Accurate Repair
BR-71
Page 605 of 2898
1. ABS Works FrequentlyNJBR0104
1 CHECK BRAKE FLUID PRESSURE
Check brake fluid pressure distribution.
Is brake fluid pressure distribution normal?
Ye s©GO TO 2.
No©Perform Preliminary Check. Refer to BR-72.
2 CHECK WHEEL SENSOR
1. Check wheel sensor connector for terminal damage or loose connections.
2. Perform wheel sensor mechanical check.
Refer to ªWheel Sensor or Rotorº, BR-78.
Are wheel sensors functioning properly?
Ye s©GO TO 3.
No©Repair.
3 CHECK FRONT AXLE
Check front and rear axles for excessive looseness. Refer to AX section, ªFront Wheel Bearingº, ªON-VEHICLE SERVICEº
and ªRear Wheel Bearingº, ªON-VEHICLE SERVICEº.
Is front axle installed properly?
Ye s©Go to ª3. CHECK WARNING LAMP INDICATIONº in ª2. Unexpected Pedal Actionº,
BR-89.
No©Repair.
2. Unexpected Pedal ActionNJBR0105
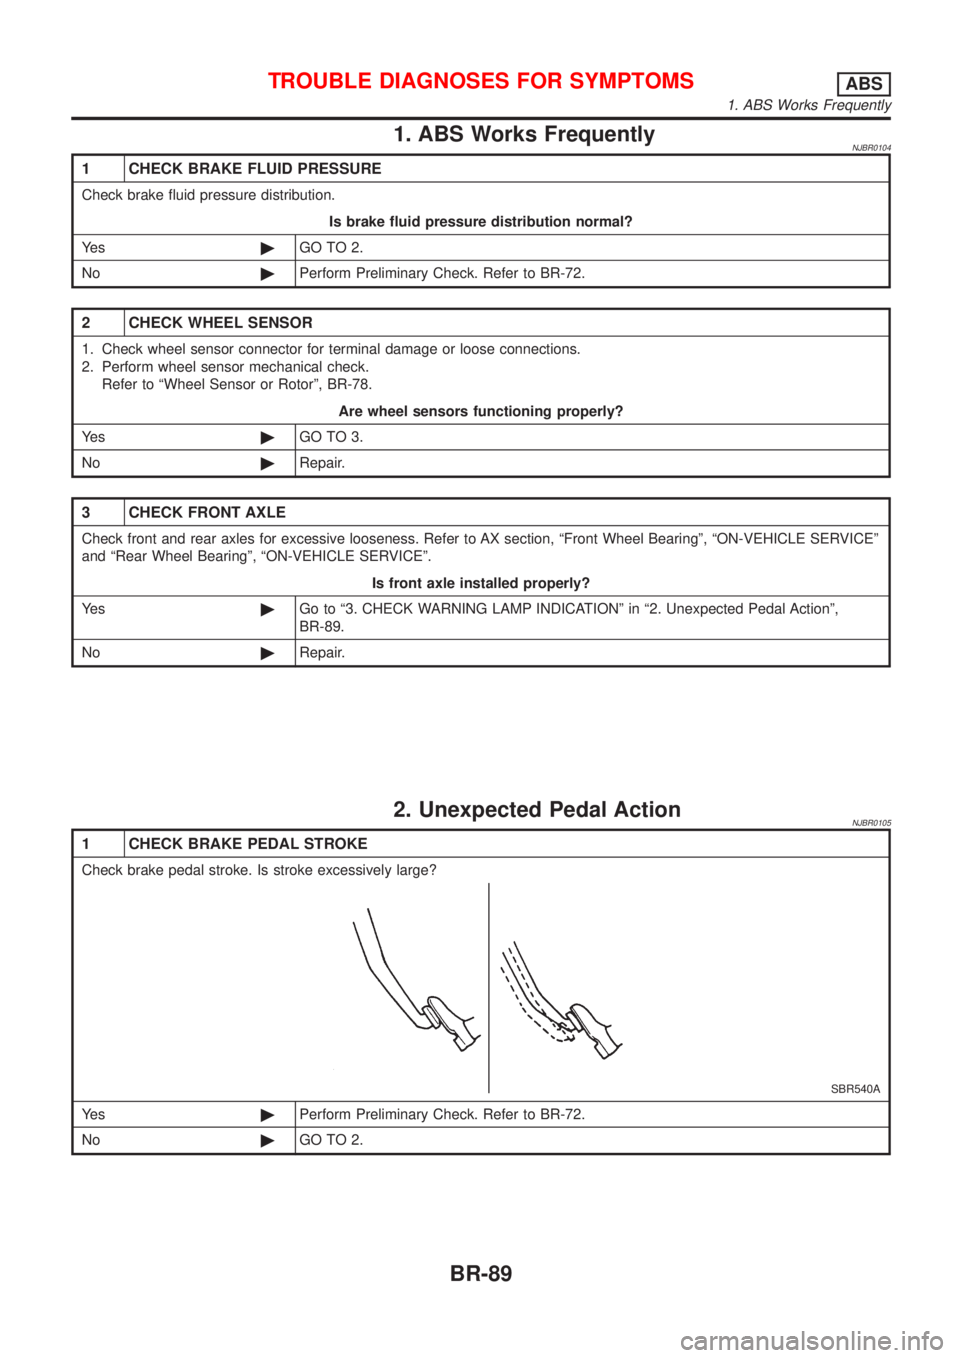
1 CHECK BRAKE PEDAL STROKE
Check brake pedal stroke. Is stroke excessively large?
SBR540A
Ye s©Perform Preliminary Check. Refer to BR-72.
No©GO TO 2.
TROUBLE DIAGNOSES FOR SYMPTOMSABS
1. ABS Works Frequently
BR-89
Page 616 of 2898
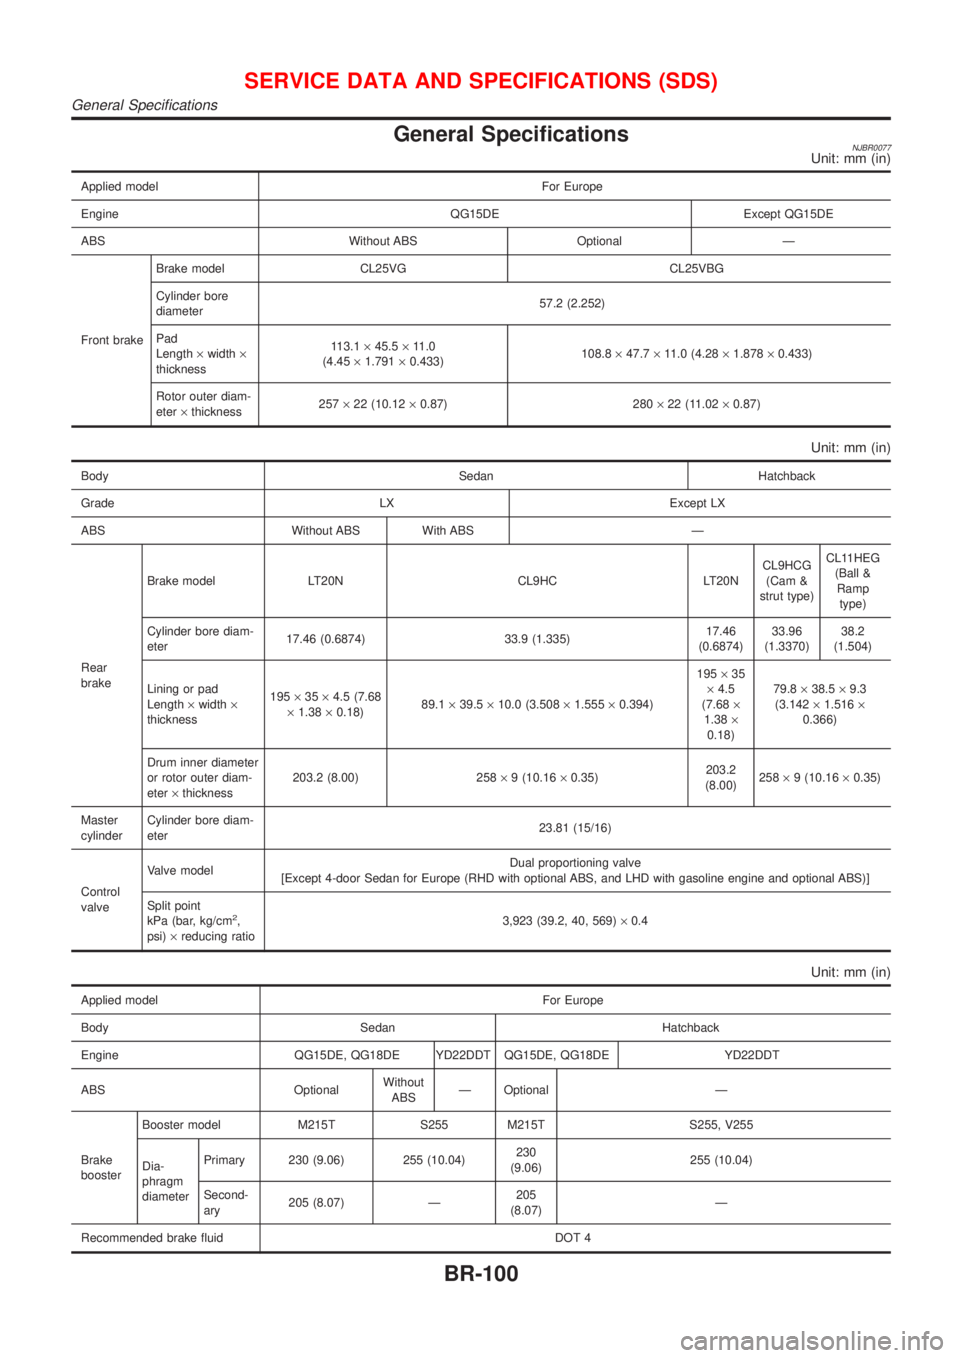
General SpecificationsNJBR0077Unit: mm (in)
Applied model For Europe
Engine QG15DE Except QG15DE
ABS Without ABS Optional Ð
Front brakeBrake model CL25VG CL25VBG
Cylinder bore
diameter57.2 (2.252)
Pad
Length´width´
thickness113.1´45.5´11.0
(4.45´1.791´0.433)108.8´47.7´11.0 (4.28´1.878´0.433)
Rotor outer diam-
eter´thickness257´22 (10.12´0.87) 280´22 (11.02´0.87)
Unit: mm (in)
Body Sedan Hatchback
Grade LX Except LX
ABS Without ABS With ABS Ð
Rear
brakeBrake model LT20N CL9HC LT20NCL9HCG
(Cam &
strut type)CL11HEG
(Ball &
Ramp
type)
Cylinder bore diam-
eter17.46 (0.6874) 33.9 (1.335)17.46
(0.6874)33.96
(1.3370)38.2
(1.504)
Lining or pad
Length´width´
thickness195´35´4.5 (7.68
´1.38´0.18)89.1´39.5´10.0 (3.508´1.555´0.394)195´35
´4.5
(7.68´
1.38´
0.18)79.8´38.5´9.3
(3.142´1.516´
0.366)
Drum inner diameter
or rotor outer diam-
eter´thickness203.2 (8.00) 258´9 (10.16´0.35)203.2
(8.00)258´9 (10.16´0.35)
Master
cylinderCylinder bore diam-
eter23.81 (15/16)
Control
valveValve modelDual proportioning valve
[Except 4-door Sedan for Europe (RHD with optional ABS, and LHD with gasoline engine and optional ABS)]
Split point
kPa (bar, kg/cm
2,
psi)´reducing ratio3,923 (39.2, 40, 569)´0.4
Unit: mm (in)
Applied model For Europe
Body Sedan Hatchback
Engine QG15DE, QG18DE YD22DDT QG15DE, QG18DE YD22DDT
ABS OptionalWithout
ABSÐ Optional Ð
Brake
boosterBooster model M215T S255 M215T S255, V255
Dia-
phragm
diameterPrimary 230 (9.06) 255 (10.04)230
(9.06)255 (10.04)
Second-
ary205 (8.07) Ð205
(8.07)Ð
Recommended brake fluid DOT 4
SERVICE DATA AND SPECIFICATIONS (SDS)
General Specifications
BR-100
Page 617 of 2898
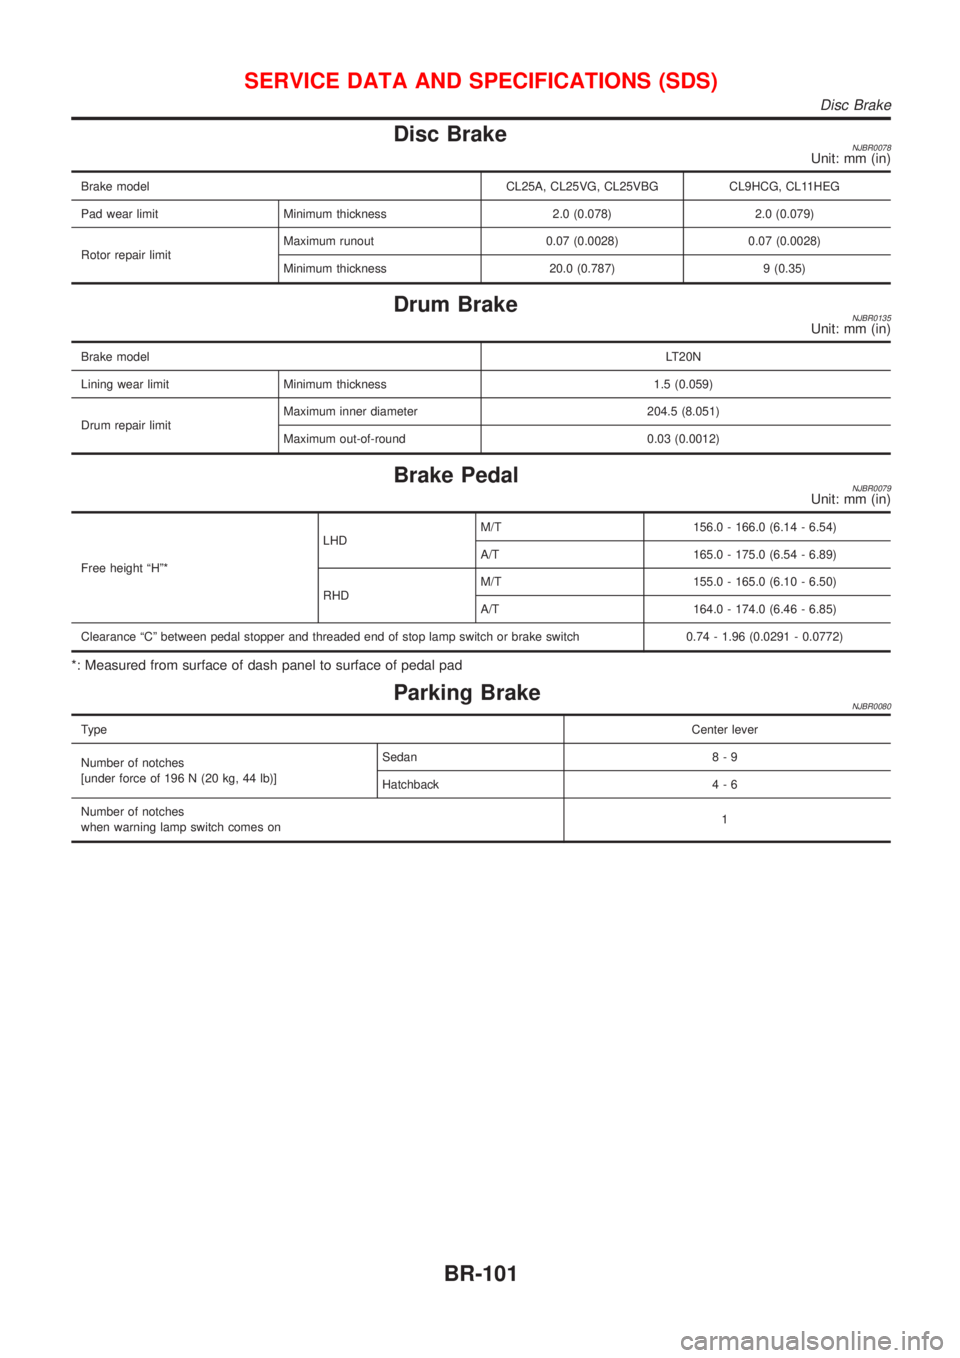
Disc BrakeNJBR0078Unit: mm (in)
Brake model CL25A, CL25VG, CL25VBG CL9HCG, CL11HEG
Pad wear limit Minimum thickness 2.0 (0.078) 2.0 (0.079)
Rotor repair limitMaximum runout 0.07 (0.0028) 0.07 (0.0028)
Minimum thickness 20.0 (0.787) 9 (0.35)
Drum BrakeNJBR0135Unit: mm (in)
Brake modelLT20N
Lining wear limit Minimum thickness 1.5 (0.059)
Drum repair limitMaximum inner diameter 204.5 (8.051)
Maximum out-of-round 0.03 (0.0012)
Brake PedalNJBR0079Unit: mm (in)
Free height ªHº*LHDM/T 156.0 - 166.0 (6.14 - 6.54)
A/T 165.0 - 175.0 (6.54 - 6.89)
RHDM/T 155.0 - 165.0 (6.10 - 6.50)
A/T 164.0 - 174.0 (6.46 - 6.85)
Clearance ªCº between pedal stopper and threaded end of stop lamp switch or brake switch 0.74 - 1.96 (0.0291 - 0.0772)
*: Measured from surface of dash panel to surface of pedal pad
Parking BrakeNJBR0080
TypeCenter lever
Number of notches
[under force of 196 N (20 kg, 44 lb)]Sedan 8 - 9
Hatchback 4 - 6
Number of notches
when warning lamp switch comes on1
SERVICE DATA AND SPECIFICATIONS (SDS)
Disc Brake
BR-101
Page 618 of 2898
SERVICE DATA AND SPECIFICATIONS (SDS)
Parking Brake (Cont'd)
BR-102
Page 619 of 2898
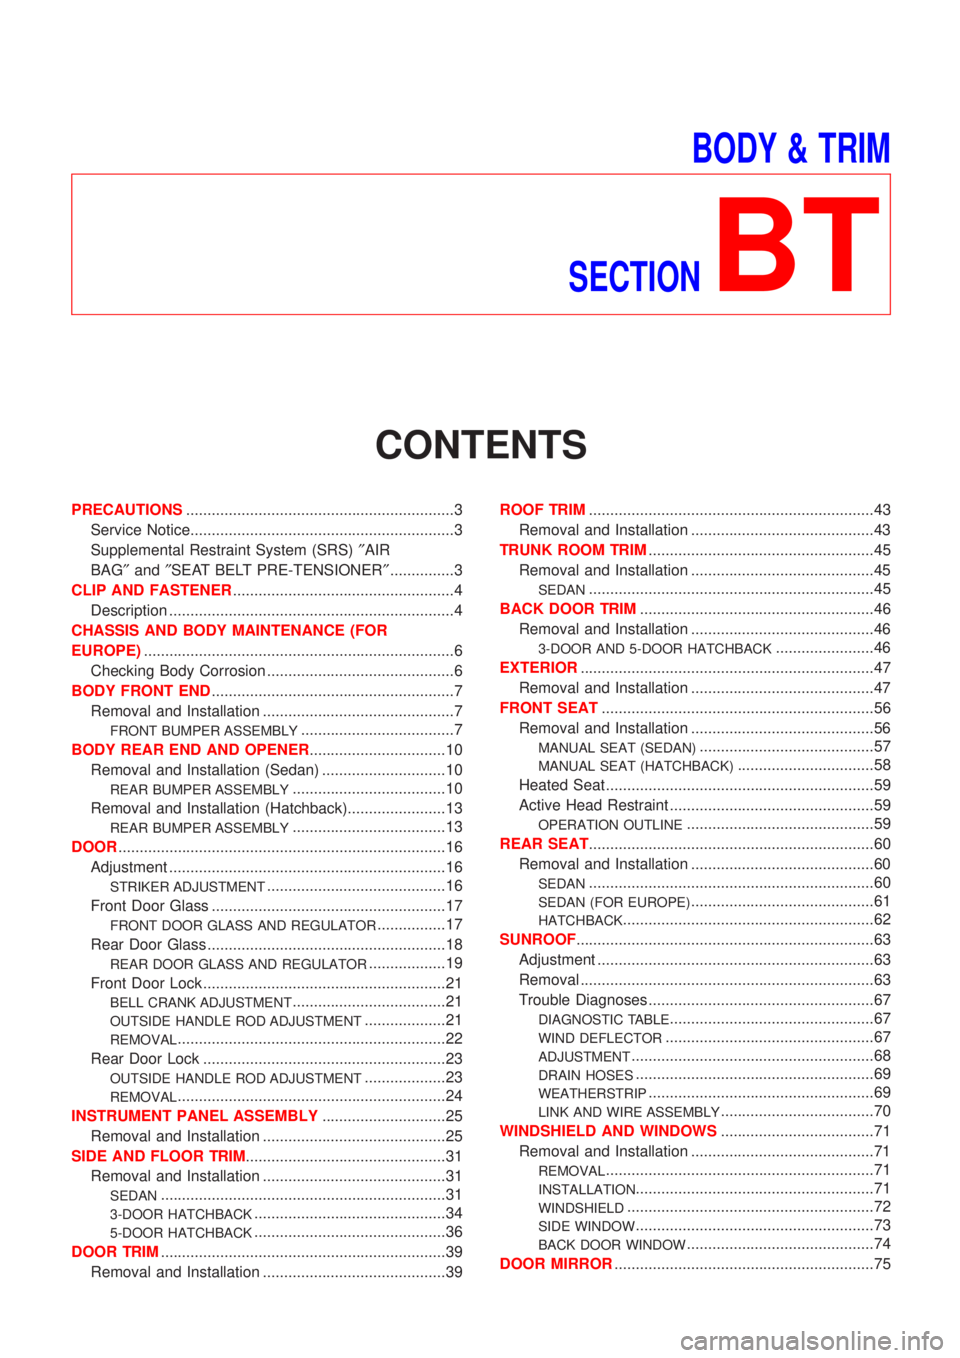
BODY & TRIM
SECTION
BT
CONTENTS
PRECAUTIONS...............................................................3
Service Notice..............................................................3
Supplemental Restraint System (SRS)²AIR
BAG²and²SEAT BELT PRE-TENSIONER²...............3
CLIP AND FASTENER....................................................4
Description ...................................................................4
CHASSIS AND BODY MAINTENANCE (FOR
EUROPE).........................................................................6
Checking Body Corrosion ............................................6
BODY FRONT END.........................................................7
Removal and Installation .............................................7
FRONT BUMPER ASSEMBLY....................................7
BODY REAR END AND OPENER................................10
Removal and Installation (Sedan) .............................10
REAR BUMPER ASSEMBLY....................................10
Removal and Installation (Hatchback).......................13
REAR BUMPER ASSEMBLY....................................13
DOOR.............................................................................16
Adjustment .................................................................16
STRIKER ADJUSTMENT..........................................16
Front Door Glass .......................................................17
FRONT DOOR GLASS AND REGULATOR................17
Rear Door Glass ........................................................18
REAR DOOR GLASS AND REGULATOR..................19
Front Door Lock .........................................................21
BELL CRANK ADJUSTMENT....................................21
OUTSIDE HANDLE ROD ADJUSTMENT...................21
REMOVAL...............................................................22
Rear Door Lock .........................................................23
OUTSIDE HANDLE ROD ADJUSTMENT...................23
REMOVAL...............................................................24
INSTRUMENT PANEL ASSEMBLY.............................25
Removal and Installation ...........................................25
SIDE AND FLOOR TRIM...............................................31
Removal and Installation ...........................................31
SEDAN...................................................................31
3-DOOR HATCHBACK.............................................34
5-DOOR HATCHBACK.............................................36
DOOR TRIM...................................................................39
Removal and Installation ...........................................39ROOF TRIM...................................................................43
Removal and Installation ...........................................43
TRUNK ROOM TRIM.....................................................45
Removal and Installation ...........................................45
SEDAN...................................................................45
BACK DOOR TRIM.......................................................46
Removal and Installation ...........................................46
3-DOOR AND 5-DOOR HATCHBACK.......................46
EXTERIOR.....................................................................47
Removal and Installation ...........................................47
FRONT SEAT................................................................56
Removal and Installation ...........................................56
MANUAL SEAT (SEDAN).........................................57
MANUAL SEAT (HATCHBACK)................................58
Heated Seat ...............................................................59
Active Head Restraint ................................................59
OPERATION OUTLINE............................................59
REAR SEAT...................................................................60
Removal and Installation ...........................................60
SEDAN...................................................................60
SEDAN (FOR EUROPE)...........................................61
HATCHBACK...........................................................62
SUNROOF......................................................................63
Adjustment .................................................................63
Removal .....................................................................63
Trouble Diagnoses.....................................................67
DIAGNOSTIC TABLE................................................67
WIND DEFLECTOR.................................................67
ADJUSTMENT.........................................................68
DRAIN HOSES........................................................69
WEATHERSTRIP.....................................................69
LINK AND WIRE ASSEMBLY....................................70
WINDSHIELD AND WINDOWS....................................71
Removal and Installation ...........................................71
REMOVAL...............................................................71
INSTALLATION........................................................71
WINDSHIELD..........................................................72
SIDE WINDOW........................................................73
BACK DOOR WINDOW............................................74
DOOR MIRROR.............................................................75