Page 29 of 243
Introduction
AudioTelephone
Navigation
Index Info Services and
system settings Radio operation
27 Station selection via direct frequency entry
It is possible to set a station by entering the station
frequency directly via the number keypad.
Press
(bottom left on the keypad). An input line
will appear in the main radio menu.
Use the number keys to enter the desired frequency,
e.g.
for 102.7 FM (FM waveband).
The display in the main radio menu will now indicate
the new frequency. The station will begin to play.Notes:
Frequencies can be entered only for FM and AM. If no
entry is completed within 8 seconds, the station last
tuned will resume play.
Enter in given frequency range.
Frequency ranges:
•
FM 87.9 – 107.9 FM
•
AM 530 – 1710 AM
If you enter a frequency that is outside the allowable
input range, you will see the display “Invalid input”.
Repeat entry with new frequency.
P82.85-2519-26
Page 31 of 243

Introduction
AudioTelephone
Navigation
Index Info Services and
system settings Radio operation
29
P82.85-2521-26
Memory functions
The following functions are available:
• Saving stations manually, FM, page 29
Saving stations manually, AM, page 31
• Saving stations automatically, FM/AM, page 32
• Selecting stations from the preset menu, FM/AM,
page 35
• Selecting channels from the WB preset menu,
page 36
• Selecting stations by entering the station frequency
in the presets, FM/AM, page 37
Note:
There are 2 memories for each of the FM and AM
waveband, standard FM/AM presets and the Auto
presets.
The standard FM/AM presets are not affected by the
automatic presets. This is a second possibility for
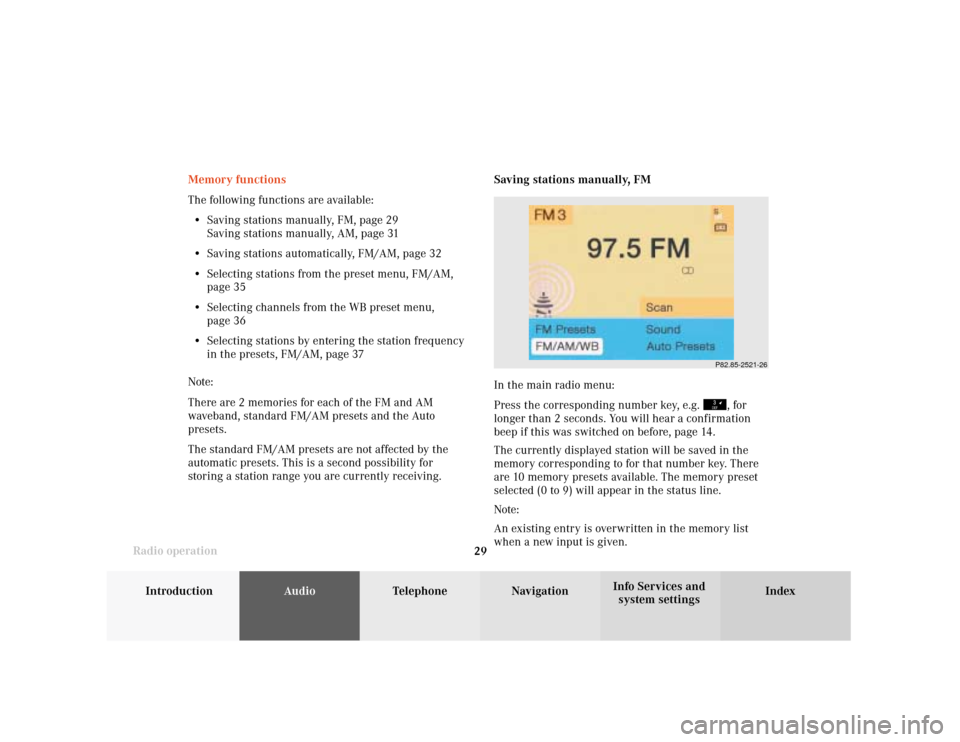
storing a station range you are currently receiving.Saving stations manually, FM
In the main radio menu:
Press the corresponding number key, e.g.
, for
longer than 2 seconds. You will hear a confirmation
beep if this was switched on before, page 14
.
The currently displayed station will be saved in the
memory corresponding to for that number key. There
are 10 memory presets available. The memory preset
selected (0 to 9) will appear in the status line.
Note:
An existing entry is overwritten in the memory list
when a new input is given.
Page 41 of 243
Introduction
AudioTelephone
Navigation
Index Info Services and
system settings Radio operation
39 Multifunction steering wheel, Multifunction
display1No audio function has been switched on.
2The radio is switched on.
3Frequency selected as well as the memory preset, if
applicable.
4Frequency of the station selected
5Appears only if “Memory” has been selected
instead of “Frequency” in the “Individual settings”
menu in the instrument cluster.
See your vehicle’s operating instructions of the
instrument cluster.
Press
on the COMAND and switch the radio on.
Press repeatedly, as necessary, until display (2)
appears.
Press or
until the desired station name or
frequency appears.
or
can also be used to select a station
frequency which has been saved. This depends on the
setting selected in the “Individual settings” menu.
See your vehicle’s operating instructions of the instru-
ment cluster.
Press to display the next system.
P82.85-6114-27
Page 46 of 243

44
AudioTelephone
Navigation
Index Info Services and
system settings Introduction
Tape operation
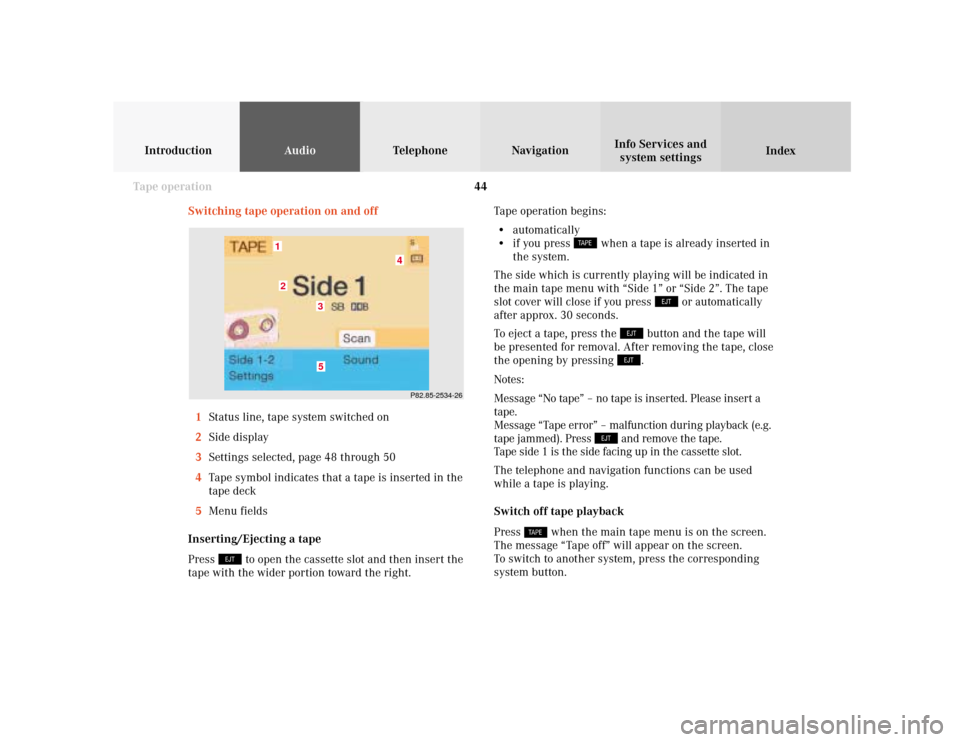
Switching tape operation on and off
1Status line, tape system switched on
2Side display
3Settings selected, page 48 through 50
4Tape symbol indicates that a tape is inserted in the
tape deck
5Menu fields
Inserting/Ejecting a tape
Press
to open the cassette slot and then insert the
tape with the wider portion toward the right.Tape operation begins:
• automatically
• if you press
when a tape is already inserted in
the system.
The side which is currently playing will be indicated in
the main tape menu with “Side 1” or “Side 2”. The tape
slot cover will close if you press
or automatically
after approx. 30 seconds.
To eject a tape, press the
button and the tape will
be presented for removal. After removing the tape, close
the opening by pressing .
Notes:
Message “No tape” – no tape is inserted. Please insert a
tape.
Message “Tape error” – malfunction during playback (e.g.
tape jammed). Press
and remove the tape.
Tape side 1 is the side facing up in the cassette slot.
The telephone and navigation functions can be used
while a tape is playing.
Switch off tape playback
Press
when the main tape menu is on the screen.
The message “Tape off” will appear on the screen.
To switch to another system, press the corresponding
system button.
P82.85-2534-26
5
4
3
21
Page 50 of 243

48
AudioTelephone
Navigation
Index Info Services and
system settings Introduction
Tape operation
P82.85-2539-26
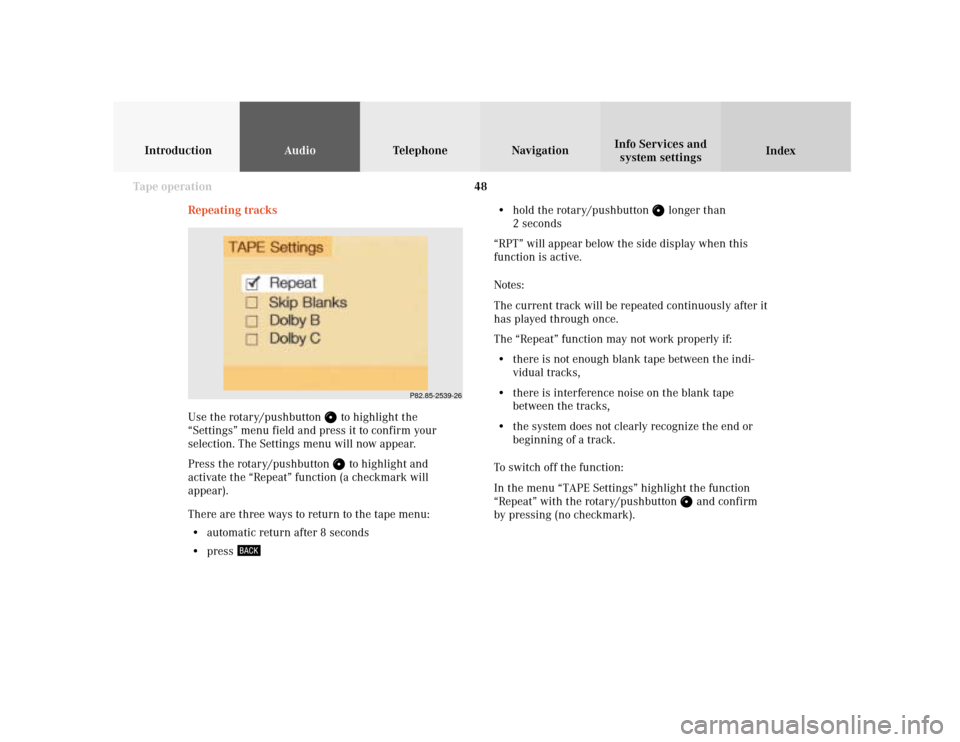
Repeating tracks
Use the rotary/pushbutton
to highlight the
“Settings” menu field and press it to confirm your
selection. The Settings menu will now appear.
Press the rotary/pushbutton to highlight and
activate the “Repeat” function (a checkmark will
appear).
There are three ways to return to the tape menu:
• automatic return after 8 seconds
• press
• hold the rotary/pushbutton
longer than
2 seconds
“RPT” will appear below the side display when this
function is active.
Notes:
The current track will be repeated continuously after it
has played through once.
The “Repeat” function may not work properly if:
• there is not enough blank tape between the indi-
vidual tracks,
• there is interference noise on the blank tape
between the tracks,
• the system does not clearly recognize the end or
beginning of a track.
To switch off the function:
In the menu “TAPE Settings” highlight the function
“Repeat” with the rotary/pushbutton
and confirm
by pressing (no checkmark).
Page 51 of 243
49
AudioTelephone
Navigation
Index
IntroductionInfo Services and
system settings Tape operationSkip blanks
Turn the rotary/pushbutton
to highlight the “Skip
blanks” function in the “Settings” menu field and press
it to confirm your selection (a checkmark will appear).
There are three ways to return to the tape menu:
• automatic return after 8 seconds
• press
• hold the rotary/pushbutton
longer than
2 secondsIf the function is activated “SB” is displayed below the
track information.
Note:
If the tape deck does not detect a sound signal for
longer than 15 seconds, it will fast forward to the next
track. This function will continue after the tape has
reached the end and switched to the opposite track.
To switch off the function:
In the menu “TAPE Settings” highlight the function
“Skip Blanks” with the rotary/pushbutton
and
confirm by pressing (no checkmark).
P82.85-2540-26
Page 52 of 243

50
AudioTelephone
Navigation
Index Info Services and
system settings Introduction
Tape operation
P82.85-2541-26
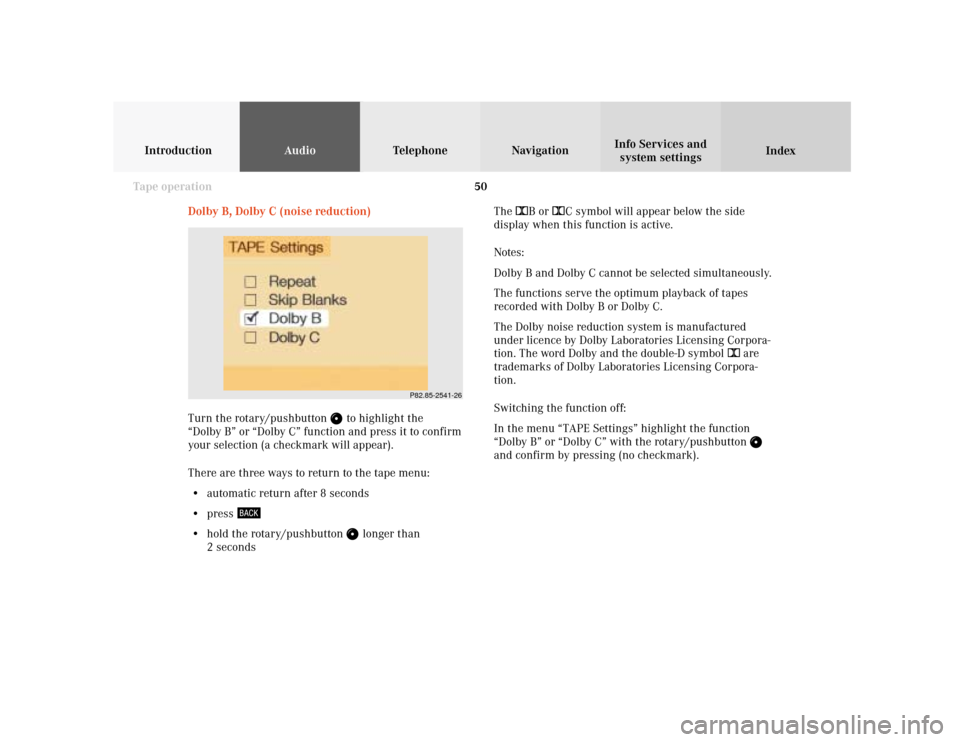
Dolby B, Dolby C (noise reduction)
Turn the rotary/pushbutton
to highlight the
“Dolby B” or “Dolby C” function and press it to confirm
your selection (a checkmark will appear).
There are three ways to return to the tape menu:
• automatic return after 8 seconds
• press
• hold the rotary/pushbutton
longer than
2 secondsThe DB or DC symbol will appear below the side
display when this function is active.
Notes:
Dolby B and Dolby C cannot be selected simultaneously.
The functions serve the optimum playback of tapes
recorded with Dolby B or Dolby C.
The Dolby noise reduction system is manufactured
under licence by Dolby Laboratories Licensing Corpora-
tion. The word Dolby and the double-D symbol D are
trademarks of Dolby Laboratories Licensing Corpora-
tion.
Switching the function off:
In the menu “TAPE Settings” highlight the function
“Dolby B” or “Dolby C” with the rotary/pushbutton
and confirm by pressing (no checkmark).
Page 56 of 243
54
AudioTelephone
Navigation
Index Info Services and
system settings Introduction
Tape operation
P82.85-2082-26
The message “Caution. Please clean sound head.” is
displayed after 50 hours of playback.
Clear the screen message by pressing the rotary/
pushbutton
. Insert a high quality cleaning tape.
Note:
For questions concerning the type of tape cleaner to
use, contact your Mercedes-Benz Center.
Do not touch the tape.
Note:
It is not possible to use tapes with a playing time of
longer than 120 minutes.