Page 934 of 2395
6 CLEAN EVAP PURGE LINE
Clean EVAP purge line (pipe and rubber tube) using air blower.
©GO TO 7.
7 CHECK EVAP CANISTER VENT CONTROL VALVE, O-RING AND CIRCUIT
Refer to ªDTC Confirmation Procedureº, EC-375.
OK or NG
OK©GO TO 8.
NG©Repair or replace EVAP canister vent control valve and O-ring or harness/connector.
8 INSTALL THE PRESSURE PUMP
To locate the EVAP leak, install EVAP service port adapter and pressure pump to EVAP service port securely.
SEF983Y
SEF916U
NOTE:
Improper installation of the EVAP service port adapter to the EVAP service port may cause leaking.
Models with CONSULT-II©GO TO 9.
Models without CON-
SULT-II©GO TO 10.
GI
MA
EM
LC
FE
AT
TF
PD
AX
SU
BR
ST
RS
BT
HA
SC
EL
IDX
DTC P0455 EVAP CONTROL SYSTEM (GROSS LEAK)
Diagnostic Procedure (Cont'd)
EC-399
Page 936 of 2395

10 CHECK FOR EVAP LEAK
Without CONSULT-II
1. Turn ignition switch ªOFFº.
2. Apply 12 volts DC to EVAP canister vent control valve. The valve will close. (Continue to apply 12 volts until the end of
test.)
SEF598U
3. Apply 12 volts DC to vacuum cut valve bypass valve. The valve will open. (Continue to apply 12V until the end of test.)
SEF599U
4. Pressurize the EVAP line using pressure pump with 1.3 to 2.7 kPa (10 to 20 mmHg, 0.39 to 0.79 inHg), then remove
pump and EVAP service port adapter.
NOTE:
INever use compressed air or a high pressure pump.
IDo not exceed 4.12 kPa (0.042 kg/cm
2, 0.6 psi) of pressure in the system.
5. Using EVAP leak detector, locate the EVAP leak. For the leak detector, refer to the instruction manual for more details.
Refer to ªEVAPORATIVE EMISSION LINE DRAWINGº, EC-36.
SEF200U
OK or NG
OK©GO TO 12.
NG©Repair or replace.
GI
MA
EM
LC
FE
AT
TF
PD
AX
SU
BR
ST
RS
BT
HA
SC
EL
IDX
DTC P0455 EVAP CONTROL SYSTEM (GROSS LEAK)
Diagnostic Procedure (Cont'd)
EC-401
Page 938 of 2395
14 CHECK EVAP CANISTER PURGE VOLUME CONTROL SOLENOID VALVE
With CONSULT-II
1. Start engine.
2. Perform ªPURG VOL CONT/Vº in ªACTIVE TESTº mode with CONSULT-II. Check that engine speed varies according
to the valve opening.
SEF985Y
OK or NG
OK©GO TO 16.
NG©GO TO 15.
GI
MA
EM
LC
FE
AT
TF
PD
AX
SU
BR
ST
RS
BT
HA
SC
EL
IDX
DTC P0455 EVAP CONTROL SYSTEM (GROSS LEAK)
Diagnostic Procedure (Cont'd)
EC-403
Page 940 of 2395

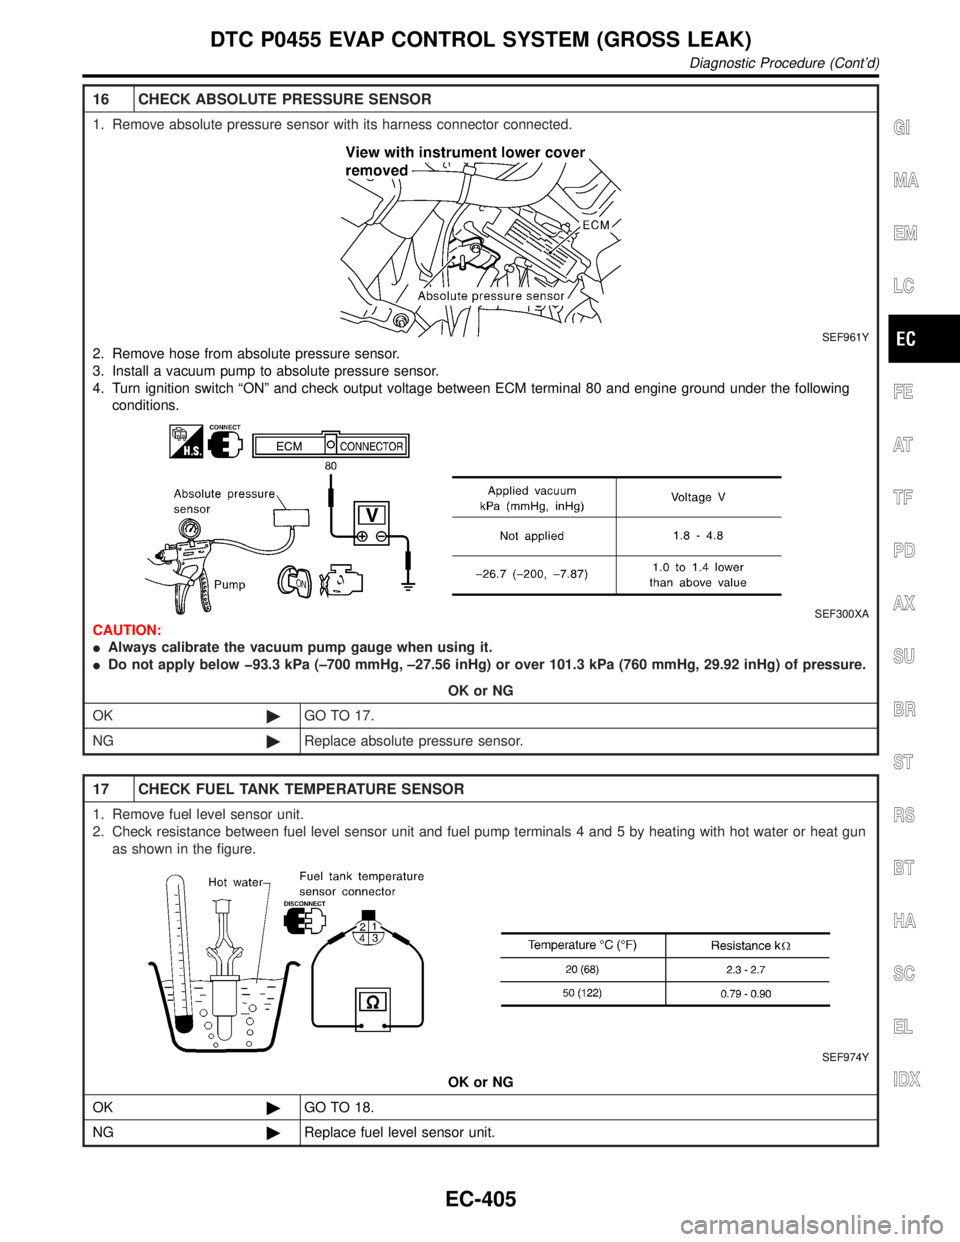
16 CHECK ABSOLUTE PRESSURE SENSOR
1. Remove absolute pressure sensor with its harness connector connected.
SEF961Y
2. Remove hose from absolute pressure sensor.
3. Install a vacuum pump to absolute pressure sensor.
4. Turn ignition switch ªONº and check output voltage between ECM terminal 80 and engine ground under the following
conditions.
SEF300XA
CAUTION:
IAlways calibrate the vacuum pump gauge when using it.
IDo not apply below þ93.3 kPa (±700 mmHg, ±27.56 inHg) or over 101.3 kPa (760 mmHg, 29.92 inHg) of pressure.
OK or NG
OK©GO TO 17.
NG©Replace absolute pressure sensor.
17 CHECK FUEL TANK TEMPERATURE SENSOR
1. Remove fuel level sensor unit.
2. Check resistance between fuel level sensor unit and fuel pump terminals 4 and 5 by heating with hot water or heat gun
as shown in the figure.
SEF974Y
OK or NG
OK©GO TO 18.
NG©Replace fuel level sensor unit.
GI
MA
EM
LC
FE
AT
TF
PD
AX
SU
BR
ST
RS
BT
HA
SC
EL
IDX
DTC P0455 EVAP CONTROL SYSTEM (GROSS LEAK)
Diagnostic Procedure (Cont'd)
EC-405
Page 942 of 2395

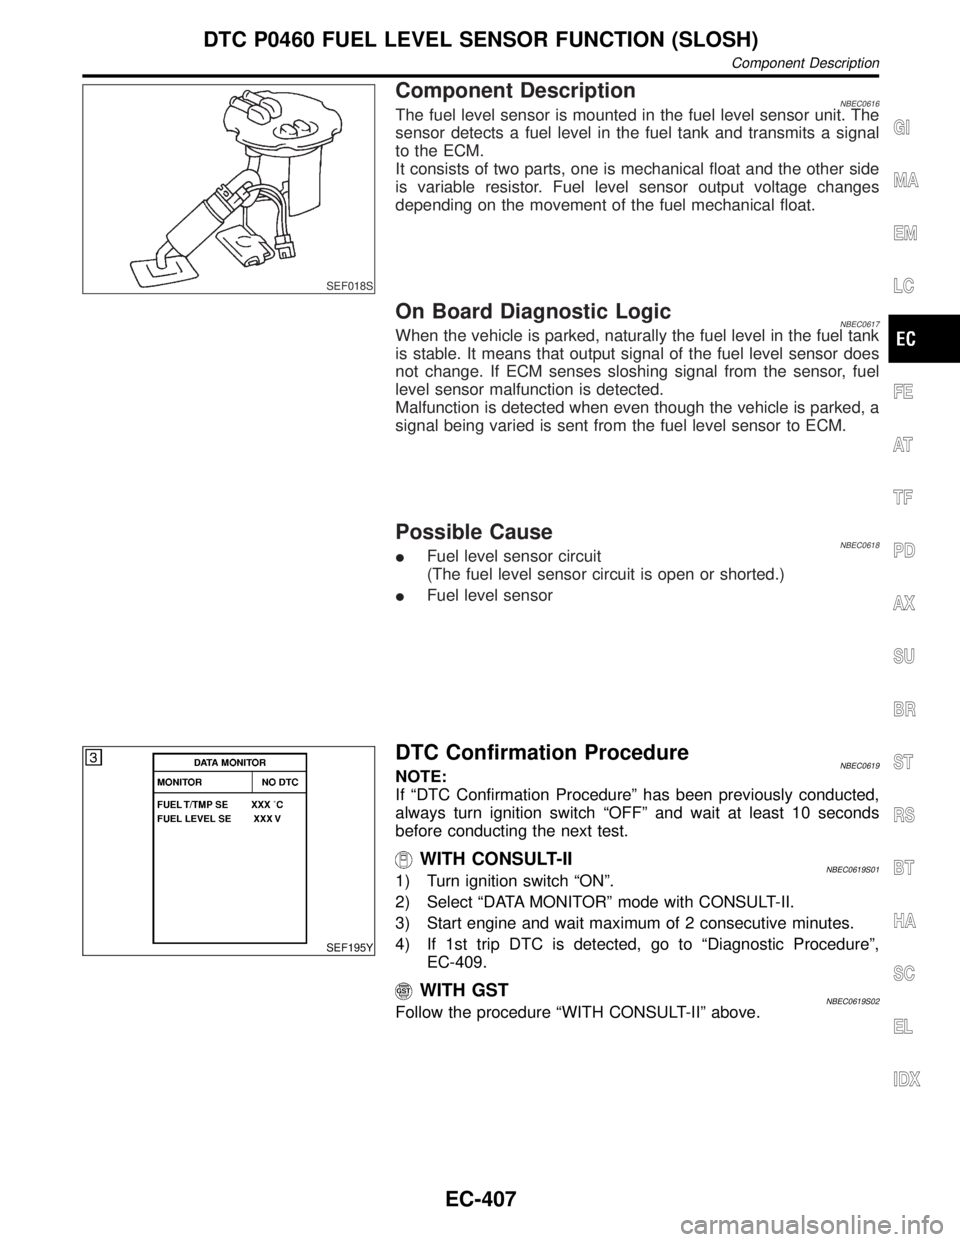
SEF018S
Component DescriptionNBEC0616The fuel level sensor is mounted in the fuel level sensor unit. The
sensor detects a fuel level in the fuel tank and transmits a signal
to the ECM.
It consists of two parts, one is mechanical float and the other side
is variable resistor. Fuel level sensor output voltage changes
depending on the movement of the fuel mechanical float.
On Board Diagnostic LogicNBEC0617When the vehicle is parked, naturally the fuel level in the fuel tank
is stable. It means that output signal of the fuel level sensor does
not change. If ECM senses sloshing signal from the sensor, fuel
level sensor malfunction is detected.
Malfunction is detected when even though the vehicle is parked, a
signal being varied is sent from the fuel level sensor to ECM.
Possible CauseNBEC0618IFuel level sensor circuit
(The fuel level sensor circuit is open or shorted.)
IFuel level sensor
SEF195Y
DTC Confirmation ProcedureNBEC0619NOTE:
If ªDTC Confirmation Procedureº has been previously conducted,
always turn ignition switch ªOFFº and wait at least 10 seconds
before conducting the next test.
WITH CONSULT-IINBEC0619S011) Turn ignition switch ªONº.
2) Select ªDATA MONITORº mode with CONSULT-II.
3) Start engine and wait maximum of 2 consecutive minutes.
4) If 1st trip DTC is detected, go to ªDiagnostic Procedureº,
EC-409.
WITH GSTNBEC0619S02Follow the procedure ªWITH CONSULT-IIº above.
GI
MA
EM
LC
FE
AT
TF
PD
AX
SU
BR
ST
RS
BT
HA
SC
EL
IDX
DTC P0460 FUEL LEVEL SENSOR FUNCTION (SLOSH)
Component Description
EC-407
Page 944 of 2395

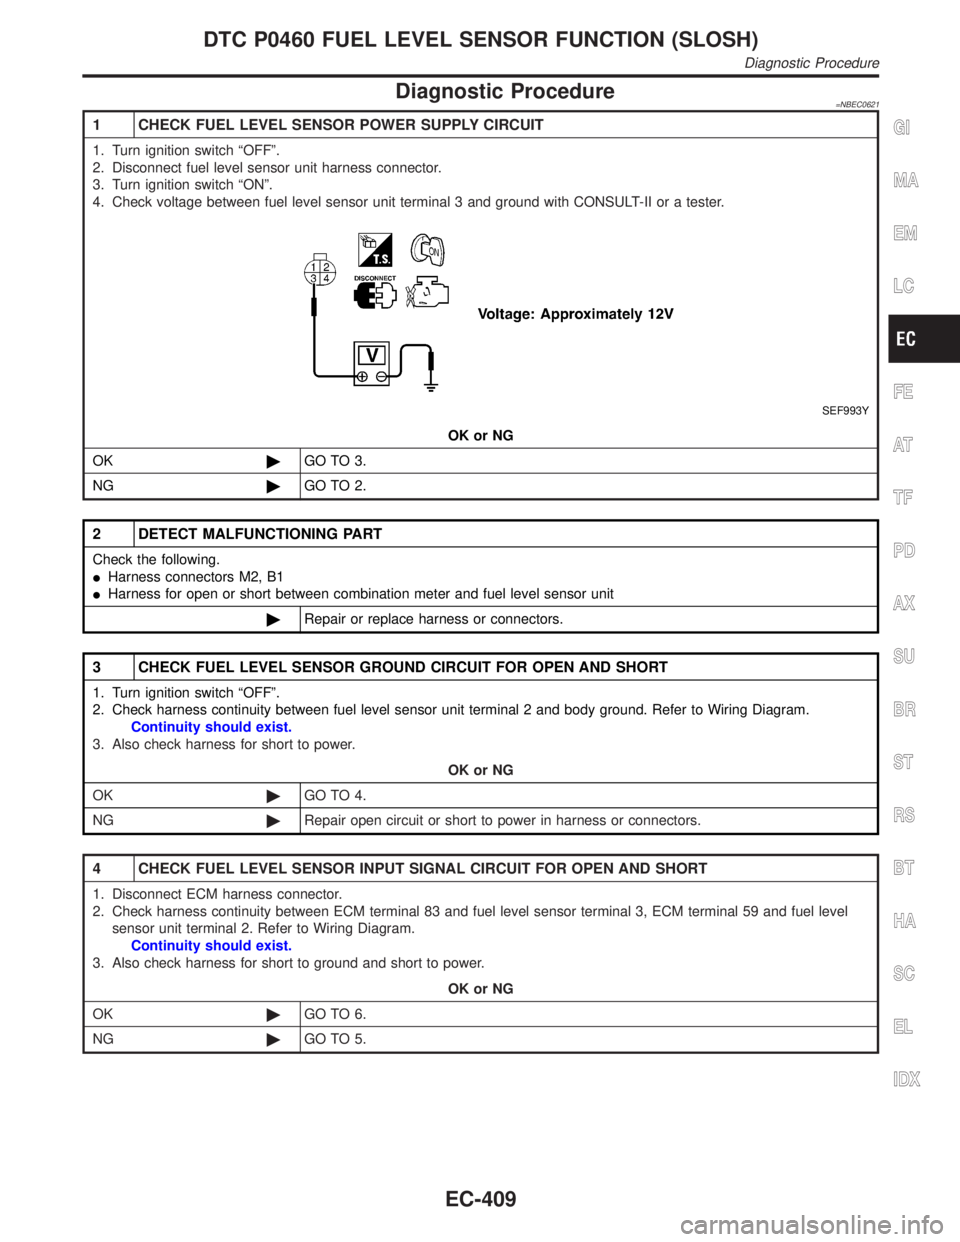
Diagnostic Procedure=NBEC0621
1 CHECK FUEL LEVEL SENSOR POWER SUPPLY CIRCUIT
1. Turn ignition switch ªOFFº.
2. Disconnect fuel level sensor unit harness connector.
3. Turn ignition switch ªONº.
4. Check voltage between fuel level sensor unit terminal 3 and ground with CONSULT-II or a tester.
SEF993Y
OK or NG
OK©GO TO 3.
NG©GO TO 2.
2 DETECT MALFUNCTIONING PART
Check the following.
IHarness connectors M2, B1
IHarness for open or short between combination meter and fuel level sensor unit
©Repair or replace harness or connectors.
3 CHECK FUEL LEVEL SENSOR GROUND CIRCUIT FOR OPEN AND SHORT
1. Turn ignition switch ªOFFº.
2. Check harness continuity between fuel level sensor unit terminal 2 and body ground. Refer to Wiring Diagram.
Continuity should exist.
3. Also check harness for short to power.
OK or NG
OK©GO TO 4.
NG©Repair open circuit or short to power in harness or connectors.
4 CHECK FUEL LEVEL SENSOR INPUT SIGNAL CIRCUIT FOR OPEN AND SHORT
1. Disconnect ECM harness connector.
2. Check harness continuity between ECM terminal 83 and fuel level sensor terminal 3, ECM terminal 59 and fuel level
sensor unit terminal 2. Refer to Wiring Diagram.
Continuity should exist.
3. Also check harness for short to ground and short to power.
OK or NG
OK©GO TO 6.
NG©GO TO 5.
GI
MA
EM
LC
FE
AT
TF
PD
AX
SU
BR
ST
RS
BT
HA
SC
EL
IDX
DTC P0460 FUEL LEVEL SENSOR FUNCTION (SLOSH)
Diagnostic Procedure
EC-409
Page 946 of 2395

SEF018S
Component Description=NBEC0622The fuel level sensor is mounted in the fuel level sensor unit. The
sensor detects a fuel level in the fuel tank and transmits a signal
to the ECM.
It consists of two parts, one is mechanical float and the other side
is variable resistor. Fuel level sensor output voltage changes
depending on the movement of the fuel mechanical float.
On Board Diagnostic LogicNBEC0623Driving long distances naturally affect fuel gauge level.
This diagnosis detects the fuel gauge malfunction of the gauge not
moving even after a long distance has been driven.
Malfunction is detected when the output signal of the fuel level
sensor does not change within the specified range even though the
vehicle has been driven a long distance.
Possible CauseNBEC0624IHarness or connectors
(The level sensor circuit is open or shorted.)
IFuel level sensor
Overall Function CheckNBEC0625Use this procedure to check the overall function of the fuel level
sensor function. During this check, a 1st trip DTC might not be
confirmed.
WARNING:
When performing following procedure, be sure to observe the
handling of the fuel. Refer to FE-5, ªFuel Tankº.
TESTING CONDITION:
Before starting overall function check, preparation of draining
fuel and refilling fuel is required.
SEF195Y
WITH CONSULT-IINBEC0625S01NOTE:
Start from step 11, if it is possible to confirm that the fuel
cannot be drained by 30(7-7/8 US gal, 6-5/8 Imp gal) in
advance.
1) Prepare a fuel container and a spare hose.
2) Release fuel pressure from fuel line, refer to ªFuel Pressure
Releaseº, EC-39.
3) Remove the fuel feed hose on the fuel level sensor unit.
4) Connect a spare fuel hose where the fuel feed hose was
removed.
GI
MA
EM
LC
FE
AT
TF
PD
AX
SU
BR
ST
RS
BT
HA
SC
EL
IDX
DTC P0461 FUEL LEVEL SENSOR FUNCTION
Component Description
EC-411
Page 948 of 2395

SEF018S
Component DescriptionNBEC0626The fuel level sensor is mounted in the fuel level sensor unit. The
sensor detects a fuel level in the fuel tank and transmits a signal
to the ECM.
It consists of two parts, one is mechanical float and the other side
is variable resistor. Fuel level sensor output voltage changes
depending on the movement of the fuel mechanical float.
On Board Diagnostic LogicNBEC0627ECM receives two signals from the fuel level sensor circuit.
One is fuel level sensor power supply circuit, and the other is fuel
level sensor ground circuit.
This diagnosis indicates the former, to detect open or short circuit
malfunction.
Malfunction is detected when an excessively low or high voltage is
sent from the sensor is sent to ECM.
Possible CauseNBEC0628IFuel level sensor circuit
(The fuel level sensor circuit is open or shorted.)
IFuel level sensor
DTC Confirmation ProcedureNBEC0629NOTE:
If ªDTC Confirmation Procedureº has been previously conducted,
always turn ignition switch ªOFFº and wait at least 10 seconds
before conducting the next test.
TESTING CONDITION:
Before performing the following procedure, confirm that bat-
tery voltage is more than 11V at ignition switch ªONº.
SEF195Y
WITH CONSULT-IINBEC0629S011) Turn ignition switch ªONº.
2) Select ªDATA MONITORº mode with CONSULT-II.
3) Wait at least 5 seconds.
4) If 1st trip DTC is detected, go to ªDiagnostic Procedureº,
EC-415.
WITH GSTNBEC0629S02Follow the procedure ªWITH CONSULT-IIº above.
GI
MA
EM
LC
FE
AT
TF
PD
AX
SU
BR
ST
RS
BT
HA
SC
EL
IDX
DTC P0464 FUEL LEVEL SENSOR CIRCUIT
Component Description
EC-413