Page 58 of 363

This section gives inf ormation about
the controls and displays that
contribute to the daily operation of
your Honda. All the essential
controls are within easy reach............................
Control Locations . 60
...............................
Indicator Lights . 61
.............................................
Gauges . 66
Controls Near the Steering
.......................................
Wheel . 69
...................................
Headlights . 70
Automatic Lighting Off
.....................................
Feature . 71
............
Daytime Running Lights . 71
....
Instrument Panel Brightness . 71
................................
Turn Signals . 72
.....................
Windshield Wipers . 72
..................
Windshield Washers . 74 Rear Window Wiper and
.....................................
Washer . 74
..........................
Hazard Warning . 75
.............
Rear Window Def ogger . 75
......
Steering Wheel Adjustment . 76
...............
Steering Wheel Controls . 77
.............................
Cruise Control . 77
.............
Remote Audio Controls . 80
...............................
Keys and Locks . 80
..............................................
Keys . 80
....................
Immobilizer System . 81
............................
Ignition Switch . 82
......................
Power Door Locks . 83
...................
Remote Transmitter . 85
..............
Childproof Door Locks . 89
........................................
Tailgate . 89
....................................
Glove Box . 91
.....................
Manual Sliding Doors . 92
.......................
Power Sliding Doors . 93
HomeLink Universal
.................................
Transmitter . 99
...............................................
Seats . 104
....................
Passenger Seating . 104
......................
Seat Adjustments . 105
Driver’s Seat Manual Height
............................
Adjustment . 107 Driver’s Seat Power
..........................
Adjustments . 108
....................................
Armrests . 109
........................
Head Restraints . 110
.....................
Third Seat Access . 111
Moving the Second Row
...........................
Bucket Seat . 112
Removing the Bucket Seats ................
in the Second Row . 114
.............
Folding the Third Seat . 115
............................
Power Windows . 118
...........................................
Mirrors . 121
...............................
Parking Brake . 122
..................................
Digital Clock . 123
..................................
Center Table . 123
...........................
Beverage Holder . 124
........................
Sunglasses Holder . 126
........................................
Sun Visor . 127
................................
Vanity Mirror . 127
.......................
Rear Compartment . 128
...............................
Center Pocket . 128
...................................
Coin Holder . 128
...................................
Storage Box . 129
......................................
Coat Hook . 129
............
Accessory Power Sockets . 130
...............................
Interior Lights . 131
Instruments and Controls
Inst rument s and Cont rols 59
Page 130 of 363

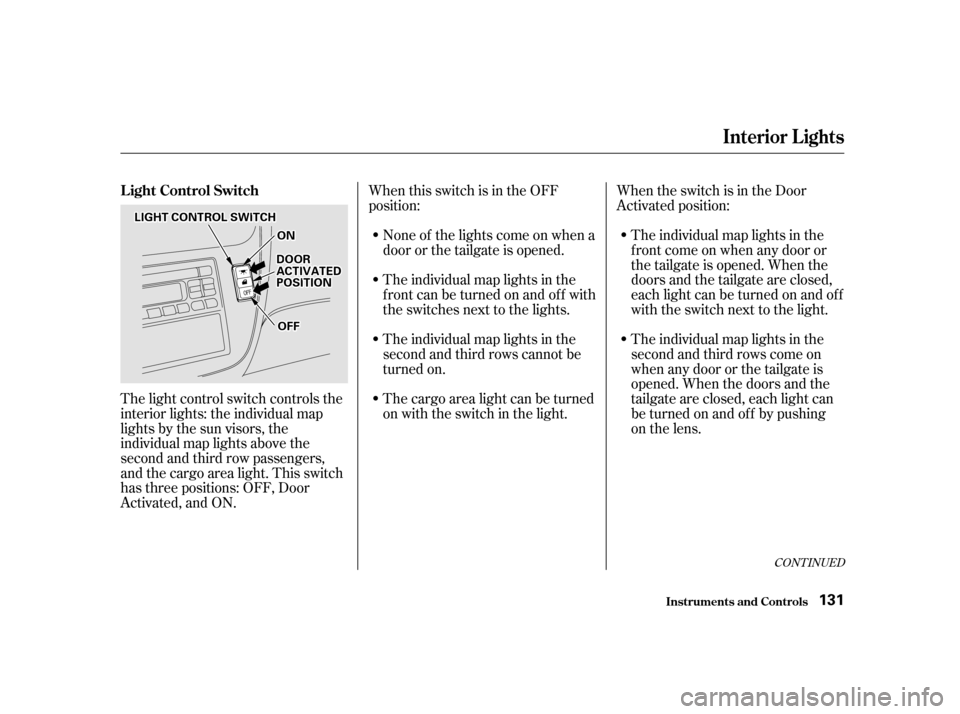
The light control switch controls the
interior lights: the individual map
lights by the sun visors, the
individual map lights above the
second and third row passengers,
and the cargo area light. This switch
has three positions: OFF, Door
Activated, and ON.When this switch is in the OFF
position:
None of the lights come on when a
door or the tailgate is opened.
The individual map lights in the
f ront can be turned on and of f with
the switches next to the lights.
The individual map lights in the
second and third rows cannot be
turned on.
The cargo area light can be turned
on with the switch in the light. The individual map lights in the
f ront come on when any door or
thetailgateisopened.Whenthe
doors and the tailgate are closed,
eachlightcanbeturnedonandoff
with the switch next to the light.
The individual map lights in the
second and third rows come on
whenanydoororthetailgateis
opened. When the doors and the
tailgate are closed, each light can
be turned on and of f by pushing
on the lens.
When the switch is in the Door
Activated position:
CONT INUED
Inst rument s and Cont rols
Interior Lights
L ight Control Switch
131
LLIIGGHHTTCCOONNTTRROOLLSSWWIITTCCHH
OONN
DDOOOORRAACCTTIIVVAATTEEDDPPOOSSIITTIIOONN
OOFFFF
Page 131 of 363
The cargo area light comes on
whenanydoororthetailgateis
opened if the switch in the light is
in the door activated (center)
position. When the doors and the
tailgate are closed, it can be turned
on with the switch in the light.When the switch is in the ON
position:
All the individual map lights come
onandstayonaslongasthe
switch remains in the ON position.
The cargo area light comes on and
stays on if the switch in the light is
in the door activated (center)
position. The lights go out about six seconds
after all the doors and the tailgate
are closed.
With the light control switch in the
Door Activated position, all the
individual map lights and the cargo
area light (with the switch in the
center position) come on when you
unlock the door with the remote
transmitter (see page ).
With any door or the tailgate left
open, the lights stay on about three
minutes, then go out.
85On EX model
Interior Lights
Inst rument s and Cont rols
132
Page 132 of 363
Turn on the f ront individual map
lights by pushing the button next to
each light. Push the button again to
turn it off. You can also operate
these lights with the light control
switch (see page ).Turn on each rear individual map
light by pushing the lens when the
ignition switch is in the
ACCESSORY (I) or ON (II) position.
Push the lens again to turn it off.
You can also operate these lights
with the light control switch (see
page ).The cargo area light has a three-
position switch. In the OFF position,
the light does not come on. In the
center position, it comes on when
you open the tailgate. In the ON
position, it stays on continuously.
This light also works with the light
control switch (see page ).
131
131 131
Inst rument s and Cont rols
Interior Lights
Individual Map L ights Cargo A rea L ight
133
FFRROONNTTRREEAARR
OONN
OOFFFF
Page 133 of 363
The ignition switch light comes on
when you open the driver’s door, and
stays on several seconds after you
close the door.
Interior Lights
Inst rument s and Cont rols
Ignition Switch L ight 134
Page 135 of 363

Proper use of the Heating and
Cooling system can make the
interior dry and comf ortable, and
keep the windows clear f or best
visibility.
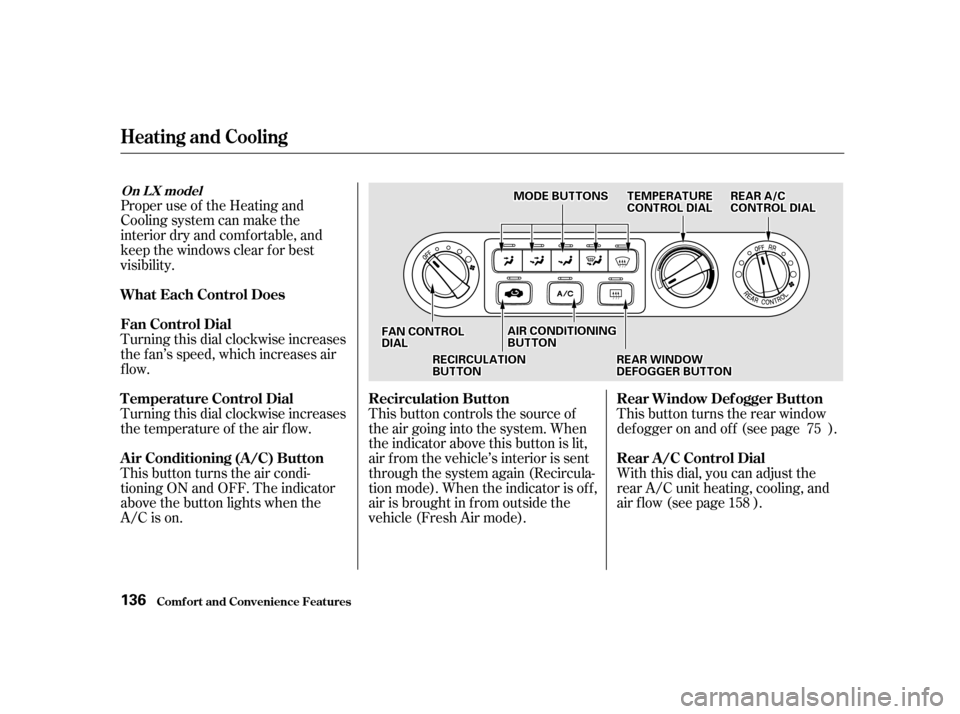
Turning this dial clockwise increases
the f an’s speed, which increases air
flow.
Turning this dial clockwise increases
the temperature of the air flow.
This button turns the air condi-
tioning ON and OFF. The indicator
above the button lights when the
A/C is on.This button controls the source of
the air going into the system. When
the indicator above this button is lit,
air f rom the vehicle’s interior is sent
through the system again (Recircula-
tion mode). When the indicator is off,
air is brought in f rom outside the
vehicle (Fresh Air mode).This button turns the rear window
def ogger on and of f (see page ).
With this dial, you can adjust the
rear A/C unit heating, cooling, and
air flow (see page ).
75
158
Comf ort and Convenience Feat ures
Heating and Cooling
What Each Control Does
Fan Control Dial
T emperature Control Dial
Air Conditioning (A/C) Button Recirculation Button Rear Window Def ogger Button
Rear A /C Control Dial
On L X model
136
FFAANNCCOONNTTRROOLLDDIIAALL
RREEAARRAA//CCCCOONNTTRROOLLDDIIAALL
RREECCIIRRCCUULLAATTIIOONNBBUUTTTTOONN
AAIIRRCCOONNDDIITTIIOONNIINNGGBBUUTTTTOONN
RREEAARRWWIINNDDOOWWDDEEFFOOGGGGEERRBBUUTTTTOONN
TTEEMMPPEERRAATTUURREECCOONNTTRROOLLDDIIAALLMMOODDEEBBUUTTTTOONNSS
Page 287 of 363
Turn on the parking lights and
check that the new bulb is
working.
Put the lens back on the bulb
holder and push it until it latches.
Slide the lef t side of the light
assembly into the hole. Push on
the right side to latch the
assembly into place.The individual map lights, cargo area
light, and the vanity mirror lights
come apart the same way. They do
not all use the same bulb.
Removethelensbycarefully
prying on the edge of the lens with
a f ingernail f ile or a small f lat-tip
screwdriver. Do not pry on the
edge of the housing around the
lens.
1.
4. 5. 6.
Lights
Maint enance Replacing Bulbs in the Interior
Lights
288
FFRROONNTTIINNDDIIVVIIDDUUAALLMMAAPPLLIIGGHHTT
Page 323 of 363
If something electrical in your
vehicle stops working, the first thing
youshouldcheckforisablownfuse.
Determine f rom the chart on pagesand , or the diagram on the
f use box lid (the diagram f or the
driver’s side interior f use box is on
the kick panel below the f use box),
which f use or f uses control that
component. Check those f uses f irst,
but check all the f uses bef ore
deciding that a blown f use is not the
cause. Replace any blown f uses and
check the component’s operation.
Turn the ignition switch to LOCK
(0). Make sure the headlights and
all other accessories are of f .
Remove the cover f rom the f use
box.
The secondary f use box is in the
engine compartment next to the
battery.
The primary under-hood f use box is
located in the back of the engine
compartment on the passenger’s side.
To open it, push the tabs as shown.
1.
2. 327 328
Fuses
T aking Care of t he Unexpect ed Checking and Replacing Fuses
324
UUNNDDEERR--HHOOOODDUUNNDDEERR--HHOOOODD