Page 61 of 363
. It
is a reminder to check the parking
brake. Driving with the parking
brake not f ully released can
da")
This light has two f unctions:This indicator comes on when you
turn the ignition switch ON (II). It
is a reminder to check the parking
brake. Driving with the parking
brake not f ully released can
damage the brakes and tires.
This indicator lights when you turn
the ignition switch ON (II). If it
comes on at any other time, it
indicates a problem in the
supplemental restraint system. For
complete inf ormation, see page .
If this light comes on when the
engine is running, the battery is not
being charged. For complete
inf ormation, see page .
The engine can be severely damaged
if this light f lashes or stays on when
the engine is running. For complete
inf ormation, see page .
See page .
The instrument panel has many
indicators to give you important
inf ormation about your vehicle.
This indicator lights when you turn
the ignition switch ON (II). It is a
reminder to you and your passengers
to protect yourselves by f astening
the seat belts. A beeper also sounds
if you have not fastened your seat
belt.
If you do not f asten your seat belt,
the beeper will stop af ter a f ew
seconds but the light stays on until
you do. Both the light and the beeper
stay of f if you f asten your seat belt
bef ore turning on the ignition. If the indicator remains lit af ter
you have fully released the
parking brake while the engine is
running, or if it comes on while
driving, it can indicate a problem
in the brake system. For complete
information, see page .
1. 2.
320
318
319
54 322
Indicator L ights
Inst rument s and Cont rols Parking Brake
and Brake
System
Indicator
Supplemental Restraint
System Indicator
Charging System
Indicator
L ow Oil Pressure
Indicator
Malf unction Indicator
Lamp
Seat Belt Reminder L ight
62 U.S. Canada
Page 86 of 363
�´�Ü �Õ
CONT INUED
Battery type: CR2025
To replace the battery, remove the
round cover on the back of the trans-
mitter by turning it counterclockwise
with a coin.
Remove the old battery and note the
polarity. Make sure the polarity of
the new battery is the same ( side
f acing up), then insert it in the
transmitter.Reinstall the O-ring. Align the
mark on the cover with the
mark on the transmitter,
thensetthecoverinplaceandturnit
clockwise.
When the remote transmitter’s
battery begins to get weak, it may
take several pushes on the button to
lock or unlock the doors and the
tailgate, and the LED will get dim.
Replace the battery as soon as
possible.
Keys and Locks
Inst rument s and Cont rols
Replacing the Battery
87
OOppeenn
CClloossee
RROOUUNNDDCCOOVVEERR
CCUUSSHHIIOONNRRIINNGG
BBAATTTTEERRYY
Page 96 of 363

If a person or object is in the way
af ter the door begins to close, the
door handles cannot be used to stop
the door. To stop the door, use the
dashboard switches or the remote
transmitter.
If a passenger needs to get out of the
vehicle while you are ref ueling,
instruct that person to exit on the
passenger’s side, not the driver’s
side.Make sure the power sliding doors
are latched in the f ully-open
position, then hold the door open
while allowing your passengers to
enter or exit the vehicle. Do not
pull the inside or outside door
handle, or the latch will release
and the door will close.
Make sure the MAIN switch is in
the ON position. This allows the
power assist to keep the doors
f rom slamming shut.
If the MAIN switch is off, the door
can slam shut and possibly injure
someone.
If your vehicle’s battery is
disconnected or goes dead while a
sliding door is open, the power
sliding door system needs to be reset.
After reconnecting the battery:
Close each sliding door completely
by hand; or
Move the MAIN switch on the
dashboard to the ON position.
Push and hold the top of each door
switch until each sliding door
closes completely.
If the power sliding doors are closed,
the system will reset itself
automatically once the battery has
been reconnected.
If the power sliding doors do not
operate properly af ter resetting,
have your vehicle checked by a
Honda dealer.
When parking f acing downhill on a
steep grade, the power sliding doors
may not open or close as they do
normally.
Bef ore ref ueling, make sure the
driver’s side sliding door is f ully
closed. When you release the f uel f ill
door, the driver’s side sliding door
automatically locks so it cannot open
and interfere with the fuel door. If a
passenger attempts to unlock the
door by cycling the lock knob several
times, the door may unlock and can
be opened. Af ter you close the f uel f ill door, the
sliding door does not automatically
unlock. You must unlock it manually.
CONT INUED
Inst rument s and Cont rols
A Not e A bout Ref ueling
Parking Facing DownhillHow t o Reset t he Power Sliding
Doors
Power Sliding Doors (EX Model)
97
Page 98 of 363

While training or using the
transmitter, make sure you have a
clear view of the garage door or gate,
and that no one will be injured by its
movement.
If you have problems with training
the HomeLink Universal
Transmitter, or would like
inf ormation on home products that
can be operated by the transmitter,
call (800) 355-3515. On the Internet,
go to www.homelink.jci.com. Always ref er to the operating
instructions and saf ety inf ormation
that came with your garage door
opener or other equipment you
intend to operate with the HomeLink
Universal Transmitter. If you do not
have this inf ormation, you should
contact the manuf acturer of the
equipment.
If you are training the transmitter to
operate a garage door or gate, it is
recommended that you unplug the
motor f or that device during training.
Repeatedly pressing the remote
control button could burn out the
motor.If your garage door opener was
manuf actured bef ore April 1982, you
may not be able to program the
HomeLink Universal Transmitter to
operate it. Garage door openers
manufactured before that date do
not have a safety feature that causes
them to stop and reverse if an
obstacle is detected during closing,
increasing the risk of injury. If you
have questions, call (800) 355-3515.
The HomeLink Universal Transmit-
ter built into your vehicle can be
programmed to operate remotely-
controlled devices around your home,
such as garage doors, lighting, or
home security systems. It can
replaceuptothreeremote
transmitters.
The HomeLink transmitter stores
the code in a permanent memory.
There should be no need to retrain
the transmitter if your vehicle’s
battery goes dead or is disconnected.
CONT INUED
Customer AssistanceImportant Saf ety Precautions
General Inf ormation
HomeL ink Universal T ransmitter
Inst rument s and Cont rols
99
Page 163 of 363
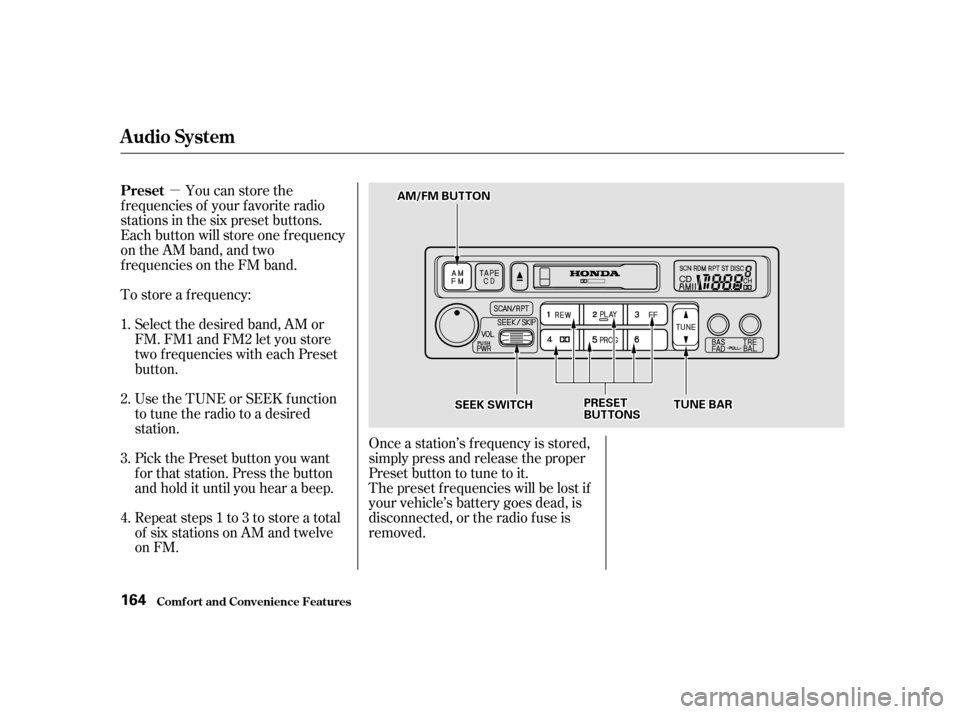
�µYou can store the
f requencies of your f avorite radio
stations in the six preset buttons.
Each button will store one f requency
on the AM band, and two
f requencies on the FM band.
To store a f requency:
Select the desired band, AM or
FM. FM1 and FM2 let you store
two f requencies with each Preset
button.
Use the TUNE or SEEK f unction
to tune the radio to a desired
station.
Pick the Preset button you want
for that station. Press the button
and hold it until you hear a beep.
Repeat steps 1 to 3 to store a total
of six stations on AM and twelve
on FM. Once a station’s frequency is stored,
simply press and release the proper
Preset button to tune to it.
The preset f requencies will be lost if
your vehicle’s battery goes dead, is
disconnected, or the radio f use is
removed.
1. 2. 3.4.
Preset
Audio System
Comf ort and Convenience Feat ures
164
AAMM//FFMMBBUUTTTTOONN
SSEEEEKKSSWWIITTCCHHTTUUNNEEBBAARRPPRREESSEETTBBUUTTTTOONNSS
Page 172 of 363
Your Honda’s audio system provides
clear reception on both AM and FM
bands, while the preset buttons allow
you to easily select your f avorite
stations.
The anti-thef t f eature will disable the
system if it is disconnected f rom the
vehicle’s battery. To get the system
working again, you must enter a
code number (see page ).192
On EX model
Audio System
Comf ort and Convenience Feat ures
AM/FM/CD Audio System
173
Page 175 of 363
To store a f requency:Select the desired band, AM or
FM. FM1 and FM2 let you store
two f requencies with each Preset
button.
Use the TUNE or SEEK f unction
to tune the radio to a desired
station.
Pick the Preset button you want
for that station. Press the button
and hold it until you hear a beep.
Repeat steps 1 to 3 to store a total
of six stations on AM and twelve
on FM.
Once a station’s f requency is stored,
simply press and release the proper
Preset button to tune to it.
The preset f requencies will be lost if
your vehicle’s battery goes dead, is
disconnected, or the radio f use is
removed.
1. 2. 3.4.
Audio System
Comf ort and Convenience Feat ures
176
AAMM//FFMMBBUUTTTTOONN
TTUUNNEEBBAARR
SSEEEEKKBBAARR
PPRREESSEETTBBUUTTTTOONNSS
Page 191 of 363

You will have to store your favorite
stations in the Preset buttons after
the system begins working. Your
original settings were lost when
power was disconnected.
Your vehicle’s audio system will
disable itself if it is disconnected
f rom electrical power f or any reason.
To make it work again, the user
must enter a specif ic f ive-digit code
in the Preset buttons. Because there
are hundreds of number
combinations possible f rom f ive
digits, making the system work
without knowing the exact code is
nearly impossible.
Youshouldhavereceivedacardthat
lists your audio system’s code
number and serial number. It is best
tostorethiscardinasafeplaceat
home. In addition, you should write
the audio system’s serial number in
this Owner’s Manual. If you should
happen to lose the card, you must
obtain the code number f rom your
Honda dealer. To do this, you will
need the system’s serial number. If your vehicle’s battery is discon-
nected or goes dead, or the radio
f use is removed, the audio system
will disable itself . If this happens,
youwillsee‘‘ ’’inthe
frequencydisplaythenexttimeyou
turn on the system. Use the Preset
buttons to enter the five-digit code. If
it is entered correctly, the radio will
start playing.
If you make a mistake entering the
code, do not start over or try to
correct your mistake. Complete the
f ive-digit sequence, then enter the
correct code. You have ten tries to
enter the correct code. If you are
unsuccessful in ten attempts, you
must then leave the system on for
one hour bef ore trying again.
On EX model
Comf ort and Convenience Feat ures
Audio System
Thef t Protection 192