Page 36 of 363

CONT INUED
A child who can sit up without
support, and who f its within the child
seat maker’s weight and height
limits, should be restrained in a
f orward-f acing, upright child seat.In this vehicle, the best place to
install a forward-facing child seat is
in one of the seating positions in a
back seat.
If the vehicle seat is too
farforward,orthechild’sheadis
thrown f orward during a collision, an
inf lating passenger’s airbag can
strike the child with enough force to
cause very serious or f atal injuries. If
a small child must be closely
watched, we recommend that
another adult sit in a back seat with
the child.
We also recommend that a small
child stay in the child seat as long as
possible, until the child reaches the
weight or height limit f or the seat.
Of the different seats available, we
recommend those that have a f ive-
point harness system as shown.
Driver and Passenger Saf ety
Protecting Children
Protecting Small Children
Child Seat T ype Child Seat Placement
Placing a f orward-f acing child seat int he f ront seat of a vehicle equippedwith a passenger’s airbag can behazardous.
37
Page 44 of 363
CONT INUED
Your vehicle has attachment points
for a tether-style child seat to be
installed on the second or third row
as shown.
Since a tether can provide additional
security, we recommend using a
tether whenever one is required or
available.Each second row bucket seat has a
tether attachment point on the
underside of the seat cushion.Lift the head restraint, then route
the tether strap over the seat-back
between the legs of the head
restraint.
Second Seat Installation:
Driver and Passenger Saf ety
Protecting Children
Using Child Seats with T ethers
45
TTEETTHHEERRAATTTTAACCHHMMEENNTTPPOOIINNTT
Page 46 of 363
CONT INUED
The exact location of each anchor is
marked with a small circle above the
lower anchor point.
To install a child seat designed to
attach to the lower anchorages:Move the seat belt buckle or seat
belt tongue away f rom the
anchorages.
Make sure there are no f oreign
objects around the anchorages.
Foreign objects could get in the
way of a secure connection
between the child seat and the
anchorage.
Your vehicle is equipped with lower
anchorages at the second row seats.
These anchorages are located
between the seat-back and seat
bottom and are only to be used with
a child seat designed to attach to the
lower anchorages. Put the child seat in a second row
vehicle seat and attach the child
seat to the lower anchorages
according to the child seat maker’s
instructions.
1. 2.
3.
Protecting Children
Driver and Passenger Saf ety
Using the L ower Anchorages
47
RRIIGGIIDDTTYYPPEELLOOWWEERRAANNCCHHOORRAAGGEESS
Page 49 of 363

The combination lap belt and
shoulder belt in the center position
of the third seat goes over your
shoulder, across your chest and over
your hips. The shoulder belt has an
emergency locking retractor that
works in combination with the lap
belt.
The seat belts in all positions except
the driver’s and the center position
of the third seat have an additional
locking mechanism that must be
activated to secure a child seat. (See
pages and f or instructions on
how to secure child seats with this
type of seat belt.)
If the shoulder part of the belt is
pulled all the way out, the locking
mechanism will activate. The belt
will retract, but it will not allow the
passenger to move f reely.
To deactivate the locking
mechanism, unlatch the buckle and
let the seat belt f ully retract. To
ref asten the belt, pull it out only as
f ar as needed.
See page f or instructions on how
to wear the lap/shoulder belt
properly.
To f asten the seat belt, unlatch the
metal plate of the shoulder belt from
the anchor on the ceiling and extend
the belt by pulling the metal plate.Attach the metal hook on the edge of
the shoulder belt to the metal loop
on the latch plate of the lap belt
marked CENTER, then tug on the
shoulder belt to make sure it is
securely attached.
Insert the latch plate of the lap belt
into the buckle marked CENTER,
then tug on the lap belt to make sure
the buckle is latched.
To unlock the belt, push the red
PRESS button on the buckle and
detach the shoulder belt from the lap
belt.
See page f or how to lengthen the
lap belt, and how to properly position
the lap and shoulder belts.
15 17
33 38
Additional Inf ormation About Your Seat Belts
Driver and Passenger Saf ety
50
Page 58 of 363

This section gives inf ormation about
the controls and displays that
contribute to the daily operation of
your Honda. All the essential
controls are within easy reach............................
Control Locations . 60
...............................
Indicator Lights . 61
.............................................
Gauges . 66
Controls Near the Steering
.......................................
Wheel . 69
...................................
Headlights . 70
Automatic Lighting Off
.....................................
Feature . 71
............
Daytime Running Lights . 71
....
Instrument Panel Brightness . 71
................................
Turn Signals . 72
.....................
Windshield Wipers . 72
..................
Windshield Washers . 74 Rear Window Wiper and
.....................................
Washer . 74
..........................
Hazard Warning . 75
.............
Rear Window Def ogger . 75
......
Steering Wheel Adjustment . 76
...............
Steering Wheel Controls . 77
.............................
Cruise Control . 77
.............
Remote Audio Controls . 80
...............................
Keys and Locks . 80
..............................................
Keys . 80
....................
Immobilizer System . 81
............................
Ignition Switch . 82
......................
Power Door Locks . 83
...................
Remote Transmitter . 85
..............
Childproof Door Locks . 89
........................................
Tailgate . 89
....................................
Glove Box . 91
.....................
Manual Sliding Doors . 92
.......................
Power Sliding Doors . 93
HomeLink Universal
.................................
Transmitter . 99
...............................................
Seats . 104
....................
Passenger Seating . 104
......................
Seat Adjustments . 105
Driver’s Seat Manual Height
............................
Adjustment . 107 Driver’s Seat Power
..........................
Adjustments . 108
....................................
Armrests . 109
........................
Head Restraints . 110
.....................
Third Seat Access . 111
Moving the Second Row
...........................
Bucket Seat . 112
Removing the Bucket Seats ................
in the Second Row . 114
.............
Folding the Third Seat . 115
............................
Power Windows . 118
...........................................
Mirrors . 121
...............................
Parking Brake . 122
..................................
Digital Clock . 123
..................................
Center Table . 123
...........................
Beverage Holder . 124
........................
Sunglasses Holder . 126
........................................
Sun Visor . 127
................................
Vanity Mirror . 127
.......................
Rear Compartment . 128
...............................
Center Pocket . 128
...................................
Coin Holder . 128
...................................
Storage Box . 129
......................................
Coat Hook . 129
............
Accessory Power Sockets . 130
...............................
Interior Lights . 131
Instruments and Controls
Inst rument s and Cont rols 59
Page 103 of 363
There are bucket seats with
armrests for two front passengers,
bucket seats with armrests for two
passengers in the second row, and a
bench seat f or three passengers in
the third row.
For greater cargo capacity, the seats
in the second row can be removed,
andthebenchseatinthethirdrow
can be f olded into the f loor.
Passenger Seating
Convert ible Second Row Bucket
Seat s
Seats
Inst rument s and Cont rols
104
Page 104 of 363
�µ
See pages f or important saf ety
inf ormation and warnings about how toproperly position seats and seat-backs. 12 13
The EX model has a power
adjustable driver’s seat. All other
models have manual driver’s seat
adjustments.
The f ront passenger’s seat, and the
seats in the second and third rows
adjust manually.
Make all seat adjustments bef ore
you start driving.
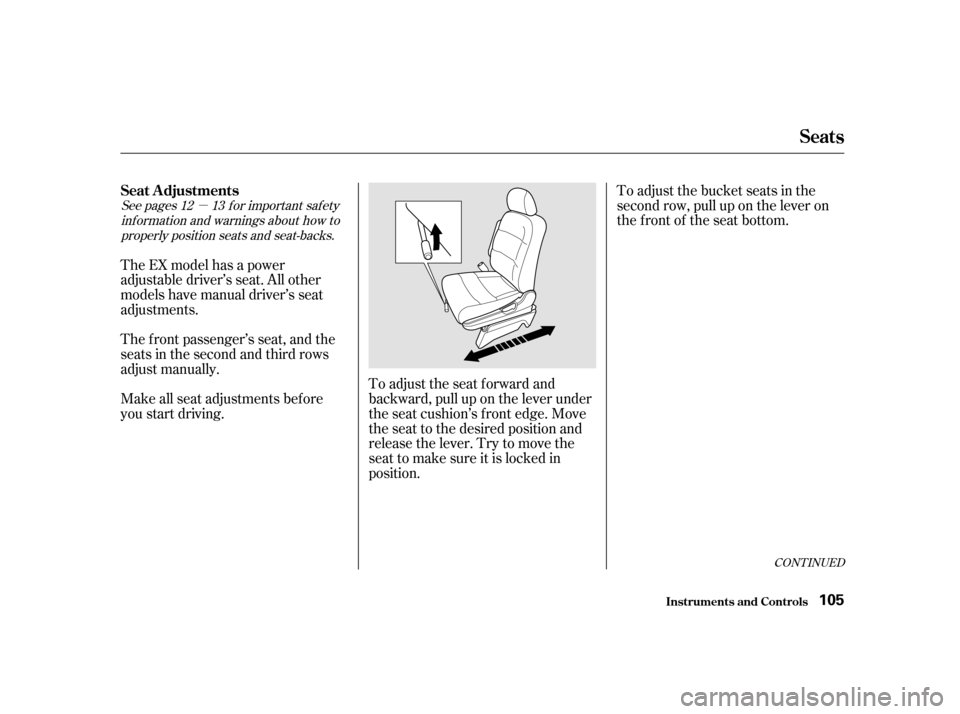
To adjust the seat forward and
backward, pull up on the lever under
the seat cushion’s f ront edge. Move
the seat to the desired position and
releasethelever.Trytomovethe
seat to make sure it is locked in
position.To adjust the bucket seats in the
second row, pull up on the lever on
the front of the seat bottom.
CONT INUED
Seat A djustments
Seats
Inst rument s and Cont rols
105
Page 105 of 363
To adjust the seat-back angle of the
third seat, open the tailgate. Pull on
thehandleonthebackof theseat-
back, move the seat-back to the
desired position, and release the
handle. Let the seat-back latch in the
new position.
To change the seat-back angle of the
f ront seats, pull up on the lever on
the outside of the seat bottom. To change the seat-back angle of the
bucket seats in the second row, pull
forwardontheleverontheoutside
of the seat-back.
Seats
Inst rument s and Cont rols
106
HHAANNDDLLEE