Page 254 of 363
CONT INUED
Loosen the drain plug on the
bottom of the radiator. The
coolant will drain through the
splash guard. Loosen the drain
bolt.
Turn the ignition ON (II). Turn
the heater temperature control
dial f ully clockwise. Turn the
ignition of f .
Openthehood.Makesurethe
engine and radiator are cool to the
touch.
Remove the radiator cap.
Thecoolingsystemshouldbe
completely drained and ref illed with
new coolant according to the time
and distance recommendations in
the maintenance schedule. Only use
Honda All Season Antif reeze/
Coolant Type 2.
This coolant is a mixture of 50
percent anti-f reeze and 50 percent
water. Premixing in not required.
Draining the coolant requires access
to the underside of the vehicle.
Unless you have the tools and
knowledge, you should have this
maintenance done by a skilled
mechanic.
1.
3.
2.
Replacing Engine Coolant
Cooling Syst em
Maint enance
255
DDRRAAIINNBBOOLLTT
DDRRAAIINNPPLLUUGG
Page 263 of 363
The spark plugs in your vehicle are a
special platinum-tipped design f or
longer lif e. The spark plugs should
be replaced according to the time
and distance recommendations in
the maintenance schedule.
Clean the hood latch assembly with a
mild cleaner, then lubricate it with a
multipurpose grease. Lubricate all
the moving parts (pointed by arrows),
including the pivot. Follow the time
and distance recommendations in
the Maintenance Schedule. If you
are not sure how to clean and grease
the latch, contact your Honda dealer. Loosen the two holding clips by
turning the heads one-quarter turn
counterclockwise with a f lat-tipped
screwdriver. Remove the cover on
the f ront cylinder bank by pulling
it straight up.
Clean up any dirt and oil that have
collected around the ignition coils.
1. 2.
Maint enance
Hood L atch Spark Plugs
Replacement
Hood L at ch, Spark Plugs
264
LLAATTCCHHAASSSSEEMMBBLLYY
HHOOLLDDIINNGGCCLLIIPP
Page 265 of 363
�´ �µ
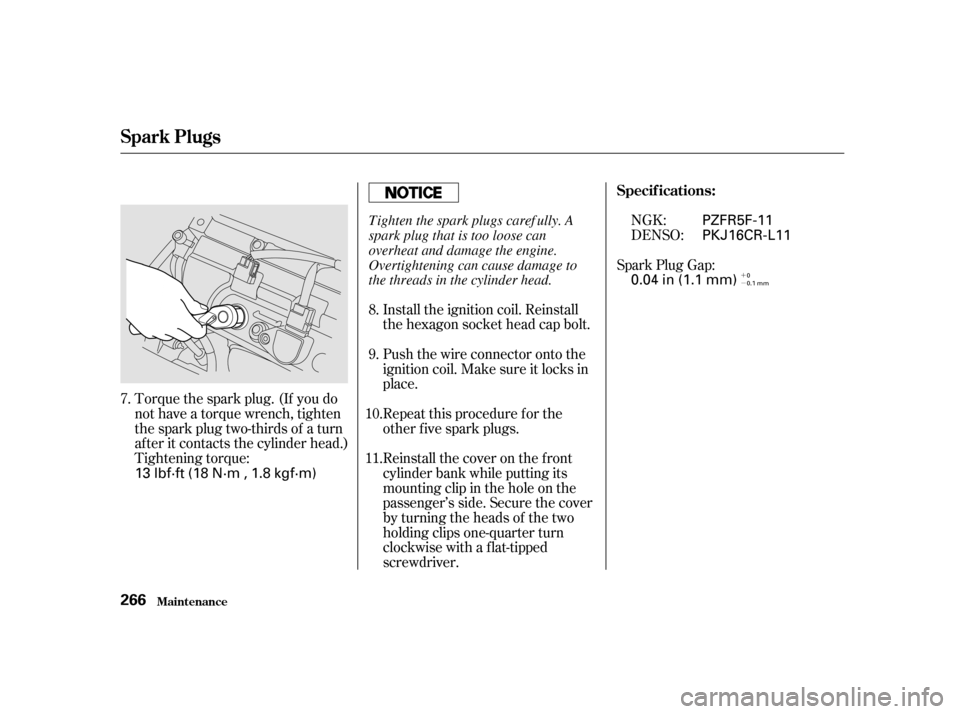
Torque the spark plug. (If you do
not have a torque wrench, tighten
the spark plug two-thirds of a turn
af ter it contacts the cylinder head.)
Tightening torque: Spark Plug Gap:
Install the ignition coil. Reinstall
the hexagon socket head cap bolt.
Push the wire connector onto the
ignition coil. Make sure it locks in
place.
Repeat this procedure f or the
other f ive spark plugs.
Reinstall the cover on the front
cylinder bank while putting its
mounting clip in the hole on the
passenger’s side. Secure the cover
by turning the heads of the two
holding clips one-quarter turn
clockwise with a f lat-tipped
screwdriver. NGK:
DENSO:
7. 8. 9.
10. 11. Specif ications:
Spark Plugs
Maint enance
266 13 lbf·ft (18 N·m , 1.8 kgf·m) 0.04 in (1.1 mm)
PKJ16CR-L11
PZFR5F-11
0
0.1 mm
Tighten the spark plugs caref ully. A
spark plug that is too loose can
overheat and damage the engine.
Overtightening can cause damage to
the threads in the cylinder head.
Page 283 of 363

Remove the socket from the
headlight assembly by turning it
one-quarter turn counterclockwise.
Remove the burned out bulb f rom
thesocketbypushingitinand
turning counterclockwise until it
unlocks.
Install the new bulb in the socket.
Turn it clockwise to lock it in place.
Insert the socket back into the
headlight assembly. Turn it
clockwise to lock it in place.
Testthelightstomakesurethe
new bulb is working.
Put the inner f ender in place.
Install the two holding clips. Lock
each clip in place by pushing on
the center.Determine which of the two bulbs
is burned out: stop/taillight/side
marker light or turn signal light.
Pull the taillight assembly out of
thebodybyslidingitbackward.
Use a Phillips-head screwdriver to
remove the taillight assembly
mounting screw under each cover.
Open the tailgate. Release the
covers by inserting a f lat-tip
screwdriver into the slot until the
cover bows slightly. Then pivot
the screwdriver 90° and pull it
straight out of the slot.
1. 2. 3. 4.
4. 5. 6. 7. 8. 9.
Lights
Maint enance Replacing Rear Bulbs
(in Fenders)
284
Page 284 of 363
Remove the socket by turning it
one-quarter turn counterclockwise.
Pull the bulb straight out of its
socket.
Push the new bulb straight into
the socket until it bottoms.
Reinstall the socket into the light
assembly by turning it clockwise
until it locks.
Testthelightstomakesurethe
new bulb is working.
When reinstalling the taillight
assembly, align and pop the snap
f asteners in place. Tighten the two
mounting screws and reinstall the
covers in place.Open the tailgate. Place a cloth on
the edge of the taillight cover.
Remove it by caref ully prying in
the notch on its edge with a small
f lat-tipped screwdriver.
Determine which of the two bulbs
is burned out: taillight or back-up
light.
Remove the socket by turning it
one-quarter turn counterclockwise.
2. 3.
5. 6. 7. 8. 9.
1.
CONT INUED
Lights
Maint enance
Replacing Rear Bulbs
(in Tailgate)
285
TTAAIILLLLIIGGHHTTCCOOVVEERR
Page 285 of 363
Pull the bulb straight out of its
socket.
Push the new bulb straight into
the socket until it bottoms.
Insert the socket back into the
light assembly. Turn it clockwise
to lock it in place.
Testthelightstomakesurethe
new bulb is working.
Reinstall the taillight cover.Place a cloth on the middle edge
of a part of the lens on the
passenger’s side. Remove a part of
the lens by caref ully prying on its
edge with a small f lat-tipped
screwdriver.
Use a Phillips-head screwdriver to
remove the screw under the lens.Pull the light assembly out of the
tailgate.
Remove the socket f rom the light
assembly by turning it one-quarter
turn counterclockwise.
Pull the bulb straight out of its
socket.
Push the new bulb straight into
the socket until it bottoms.
1. 2.
3.
4. 5. 6. 7.
4. 5.
Lights
Maint enanceReplacing a High-mount Brake
Light Bulb
286
SSCCRREEWW
Page 286 of 363
CONT INUED
Put the socket back into the light
assembly and turn it clockwise to
lock it in place.
Test the light to make sure the
new bulb is working.
Put the light assembly back into
the tailgate. Install the screw and
tighten it securely. Reinstall the
lens piece.Remove the license light assembly
by caref ully prying on the lef t
edge of the lens with a f lat-tip
screwdriver and pulling the
assembly out.Remove the lens f rom the bulb
holder by pulling the lens while
squeezing the tabs on both sides
of the holder.
Pull the bulb straight out of its
socket. Push the new bulb in until
it bottoms in the socket.
2. 3.
6. 7. 8.
1.
Lights
Maint enance
Replacing a Rear License Plate Bulb
287
Page 303 of 363
Open the tailgate. Take the tools out of the storagecompartment.The spare tire is stored under the
f loor between the f irst and second
row of seats. If the f ront seats are
adjusted to the rear-most position,
move the seats f orward slightly
and adjust the seat-backs to an
upright position (see page ).
Lift up the center table (see page
).
Turn the jack’s end bracket
counterclockwise to loosen it, then
remove the jack.
Remove the cargo net.
Thetoolsandjackarebehinda
cover in the cargo area on the
driver’s side. Remove the cover by
turning the handle
counterclockwise, then pulling out
the cover.
3. 4.
5.6.7.
105
123
Changing a Flat T ire
T aking Care of t he Unexpect ed
304
CCOOVVEERR
. Turn
the heater temperature control")