Page 142 of 240

GETTING ROADSIDE ASSISTANCE
To fully assist you should you have a vehicle concern, Ford offers a
complimentary roadside assistance program. This program is separate
from the New Vehicle Limited Warranty. The service is available:
²24±hours, seven days a week
²for the New Vehicle Limited Warranty period (U.S.) of two years
(unlimited miles)
Roadside assistance will cover:
²jump-starts
²lock-out assistance
²towing to the nearest Ford Motor Company dealership, or towing to
your selling dealership if within 56 km (35 miles). Even non-warranty
related tows, like accidents or getting stuck in the mud or snow, are
covered (some exclusions apply, such as impound towing or
repossession).
Using roadside assistance
Complete the roadside assistance identification card and place it in your
wallet for quick reference. This card is found in the Owner Guide
portfolio in the glove compartment.
To receive roadside assistance in the United States, call 1-800-241-3673.
In Canada call 1±800±665±2006.
Should you need to arrange roadside assistance for yourself, Ford will
reimburse a reasonable amount. To obtain information about
reimbursement, call 1-800-241-3673.
Roadside emergencies
142
Page 156 of 240
Jump starting
1. Start the booster vehicle and run the engine at moderately increased
speed.
2. After a few minutes, start the engine of the vehicle with the
discharged battery.
3. After starting, run the engine at about 1,000 RPM for 3±5 minutes.
Do not operate the starter longer than 30 seconds. Wait at least
two minutes between starting attempts to allow the starter to
cool. If the engine does not start after several attempts, call for
road service.
Removing the jumper cables
1. Remove the ground connection
from the disabled vehicle first,
followed by the cable on the
negative (-) battery terminal of the
booster vehicle.
2. Remove the cable from the
positive (+) terminal of the
discharged battery and then from
the positive (+) terminal of the
booster battery.
3. After the disabled vehicle has
been started, allow it to idle for a
while so the engine can ªrelearnº its
idle conditions.
42
3
1
Roadside emergencies
156
Page 160 of 240

Checking engine oil levelÐ7.3L Power Stroke engine
Refer to the Scheduled Maintenance Guide for the appropriate intervals
for checking the engine oil.
Check the engine oil level consistently and accurately. The following
procedure is recommended:
1. Start the engine and let it run until it reaches normal operating
temperature (the engine coolant temperature gauge indicator will be
near the center of the normal area between H and C).
2. Park the vehicle on level ground.
3. Set the parking brake and shift into N (Neutral) (automatic
transmission) or 1 (First) (manual transmission).
4. Turn off the engine and wait a few minutes for the oil to drain
completely into the oil pan.
5. Open the hood. Protect yourself from engine heat.
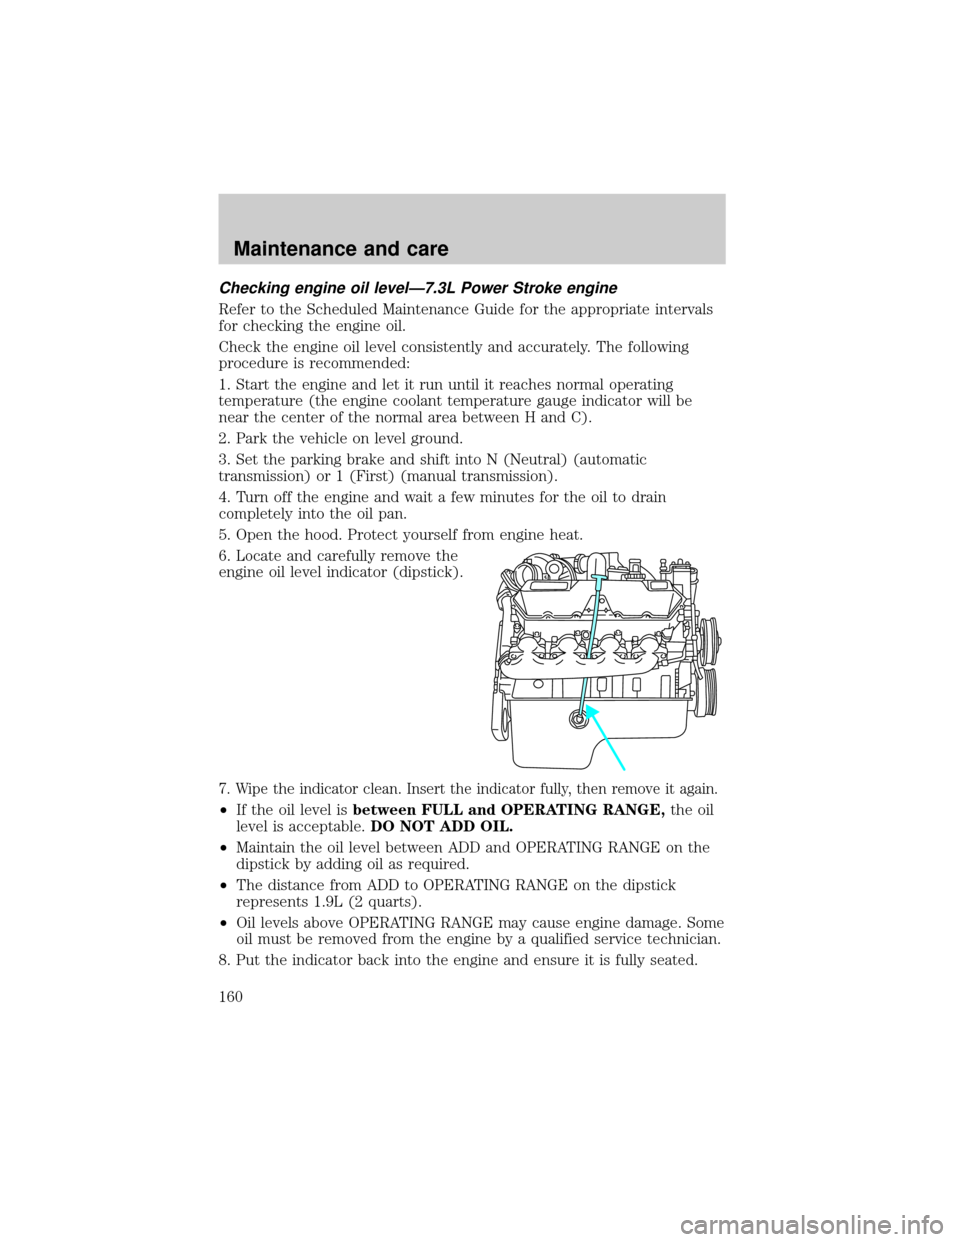
6. Locate and carefully remove the
engine oil level indicator (dipstick).
7. Wipe the indicator clean. Insert the indicator fully, then remove it again.
²If the oil level isbetween FULL and OPERATING RANGE,the oil
level is acceptable.DO NOT ADD OIL.
²Maintain the oil level between ADD and OPERATING RANGE on the
dipstick by adding oil as required.
²The distance from ADD to OPERATING RANGE on the dipstick
represents 1.9L (2 quarts).
²Oil levels above OPERATING RANGE may cause engine damage. Some
oil must be removed from the engine by a qualified service technician.
8. Put the indicator back into the engine and ensure it is fully seated.
Maintenance and care
160
Page 161 of 240

Engine oil and filter recommendationsÐCummins B and Caterpillar
3126 B engines
Refer to the appropriate engine operator's manual for information on the
engine oil.
Engine oil and filter recommendationsÐ7.3L Power Stroke engine
To help achieve proper engine performance and durability, it is important
that you:
²Use only engine lubricating oils and oil filters of the proper quality.
²Change the engine oil and filterno laterthan the recommended
service interval. Refer to the Scheduled Maintenance Guide for the
appropriate intervals for changing the engine oil and filter.
²Change your engine oil and filter more frequently if your vehicle
operation includes extended periods of idling or low-speed operation,
driving for a long time in cold temperatures or short driving distances.
Diesel engines require specially formulated oil to resist contamination.
Proper quality oils also provide maximum efficiency of the crankcase
ventilation system which reduces air pollution.
Use Motorcraft motor oil or an equivalent oil meeting Ford specification
WSS-M2C171±C or API service category designation CH-4/SJ. Do not use
oils labeled with only one of the category designations SG, SH, SJ, CE,
CF-4, CH-4 or CG-4, as they could cause engine damage.
Diesel engine oils with improved fuel economy properties (energy
conserving) are currently available. If you use an energy conserving oil,
be sure it meets Ford specification WSS-M2C171±C or API service
category designation CH-4/SJ and is of the proper viscosity grade for the
temperature range in which you expect to operate your vehicle. Some
energy conserving oils do not meet the requirements necessary for your
diesel engine.
Maintenance and care
161
Page 162 of 240

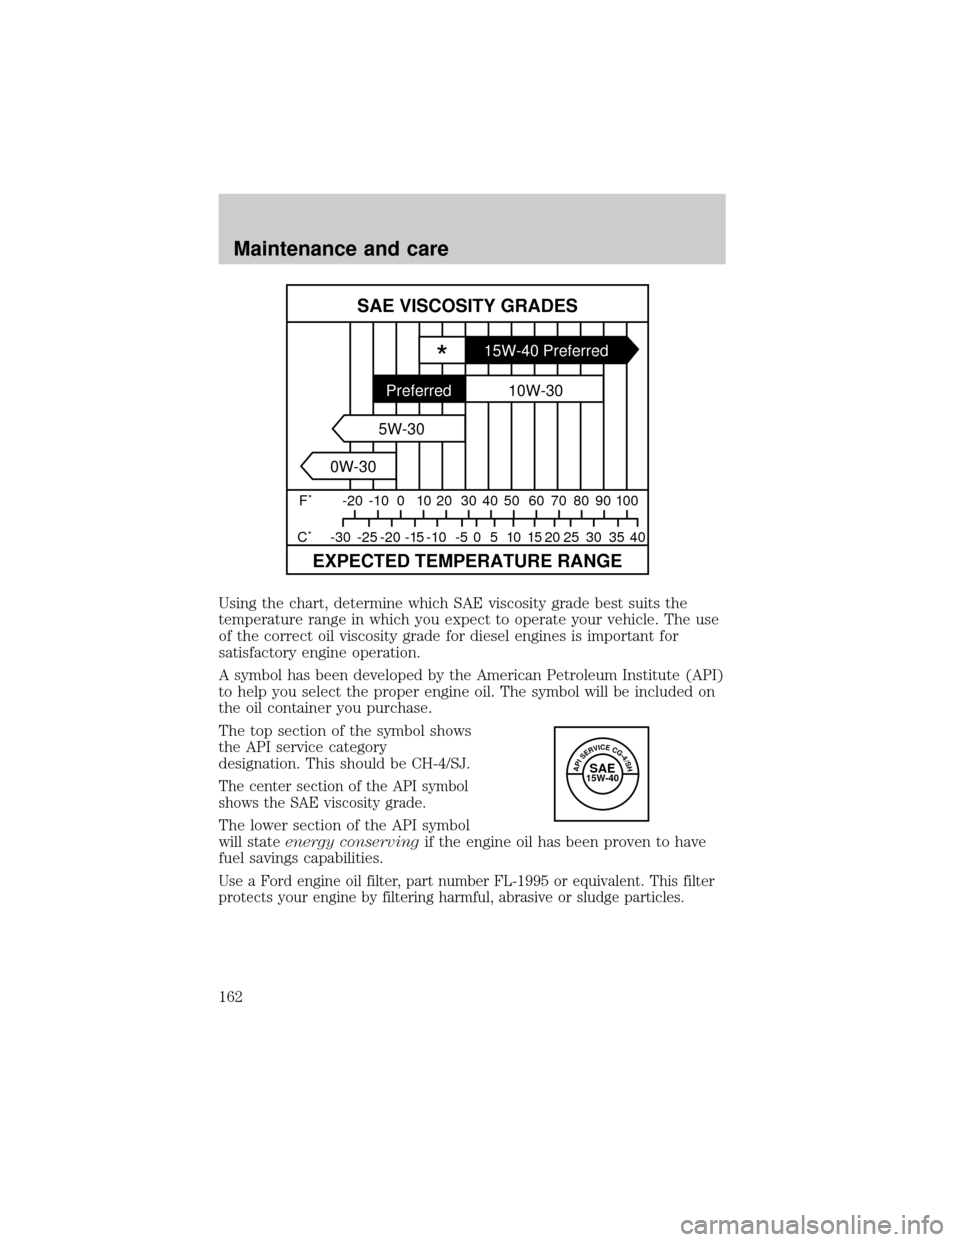
Using the chart, determine which SAE viscosity grade best suits the
temperature range in which you expect to operate your vehicle. The use
of the correct oil viscosity grade for diesel engines is important for
satisfactory engine operation.
A symbol has been developed by the American Petroleum Institute (API)
to help you select the proper engine oil. The symbol will be included on
the oil container you purchase.
The top section of the symbol shows
the API service category
designation. This should be CH-4/SJ.
The center section of the API symbol
shows the SAE viscosity grade.
The lower section of the API symbol
will stateenergy conservingif the engine oil has been proven to have
fuel savings capabilities.
Use a Ford engine oil filter, part number FL-1995 or equivalent. This filter
protects your engine by filtering harmful, abrasive or sludge particles.
SAE VISCOSITY GRADES
EXPECTED TEMPERATURE RANGE
F˚ -20 -10 0 10 20 30 40
40 35 30 25 20 15 10 5 0 -5 -10 -15 -20 -25 -30 C˚50 60 70 80 90 100
*15W-40 Preferred
10W-30
5W-30
0W-30Preferred
APISERVICECG-4/SHSAE15W-40
Maintenance and care
162
Page 163 of 240

BRAKE FLUID
Checking and adding brake fluid
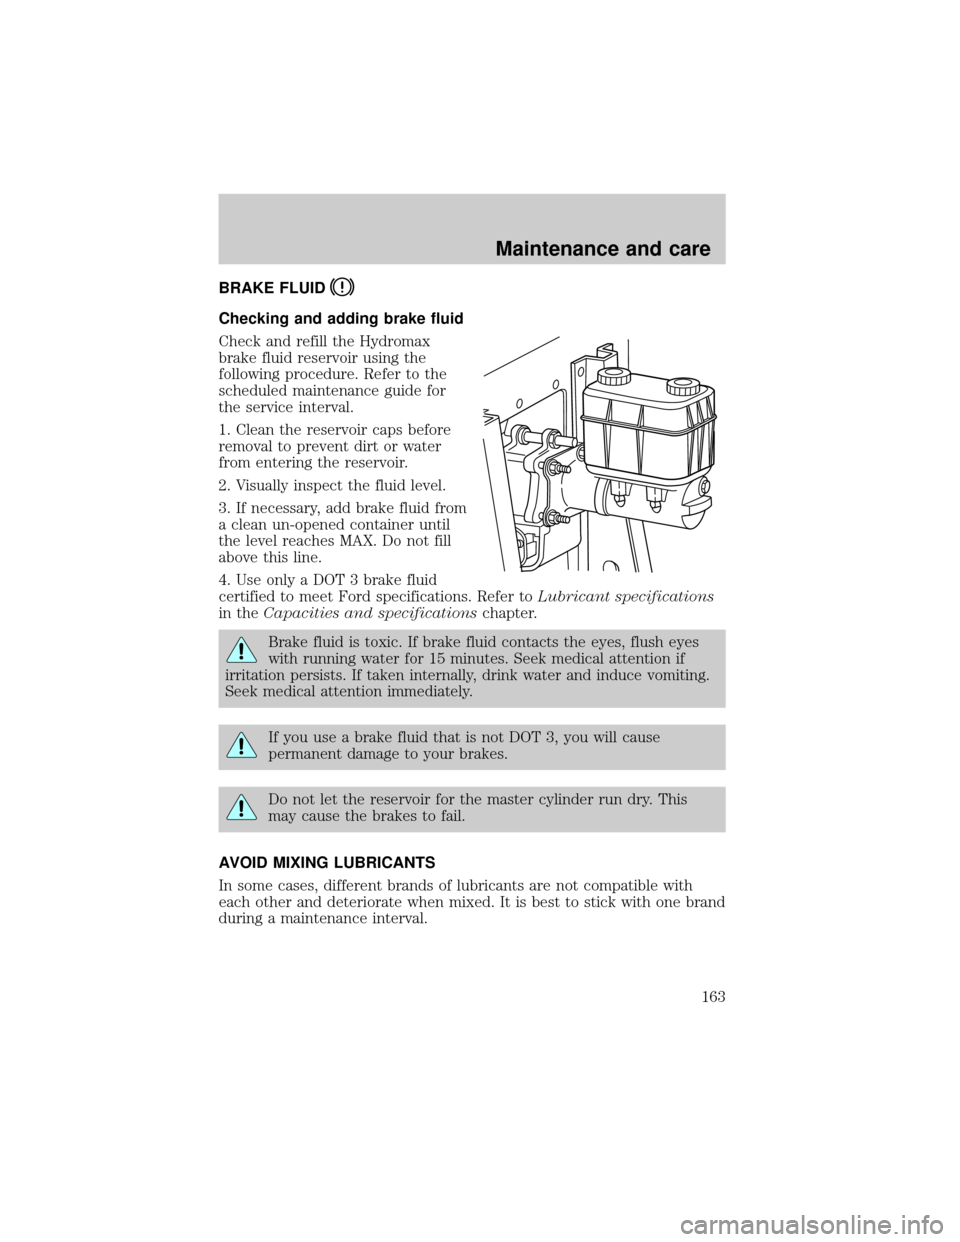
Check and refill the Hydromax
brake fluid reservoir using the
following procedure. Refer to the
scheduled maintenance guide for
the service interval.
1. Clean the reservoir caps before
removal to prevent dirt or water
from entering the reservoir.
2. Visually inspect the fluid level.
3. If necessary, add brake fluid from
a clean un-opened container until
the level reaches MAX. Do not fill
above this line.
4. Use only a DOT 3 brake fluid
certified to meet Ford specifications. Refer toLubricant specifications
in theCapacities and specificationschapter.
Brake fluid is toxic. If brake fluid contacts the eyes, flush eyes
with running water for 15 minutes. Seek medical attention if
irritation persists. If taken internally, drink water and induce vomiting.
Seek medical attention immediately.
If you use a brake fluid that is not DOT 3, you will cause
permanent damage to your brakes.
Do not let the reservoir for the master cylinder run dry. This
may cause the brakes to fail.
AVOID MIXING LUBRICANTS
In some cases, different brands of lubricants are not compatible with
each other and deteriorate when mixed. It is best to stick with one brand
during a maintenance interval.
Maintenance and care
163
Page 164 of 240

CLUTCH (IF EQUIPPED)ÐLINKAGE LUBRICATION
Lubricate the clutch linkage using the following procedure. Refer to the
Scheduled Maintenance Guide for the service interval schedules.
Use a grease which meets Ford specifications. Refer toCapacities and
specifications.
1. Set the parking brake, shift into 1 (First) and turn the engine off.
2. Remove the inspection cover from the clutch housing.
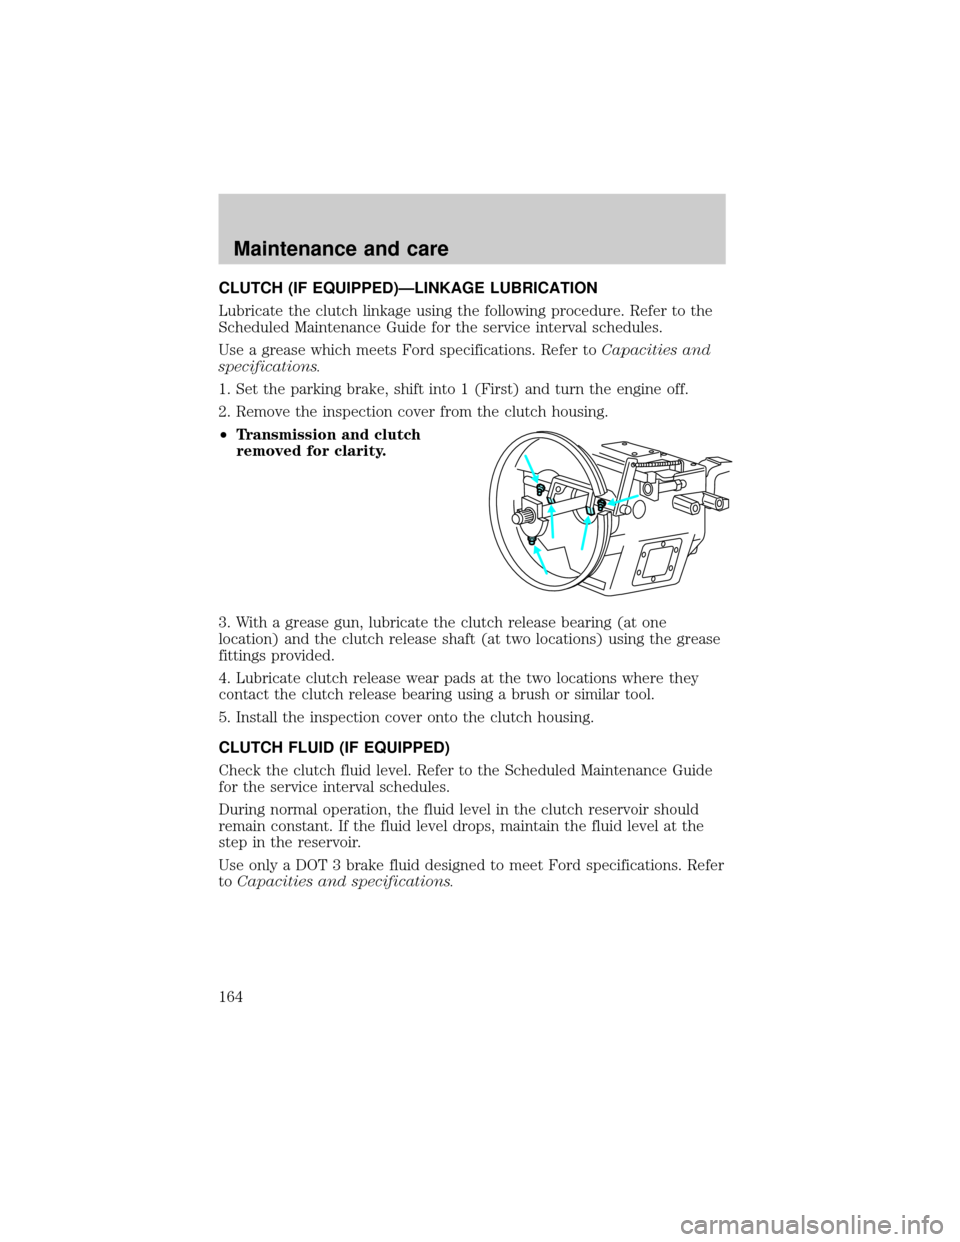
²Transmission and clutch
removed for clarity.
3. With a grease gun, lubricate the clutch release bearing (at one
location) and the clutch release shaft (at two locations) using the grease
fittings provided.
4. Lubricate clutch release wear pads at the two locations where they
contact the clutch release bearing using a brush or similar tool.
5. Install the inspection cover onto the clutch housing.
CLUTCH FLUID (IF EQUIPPED)
Check the clutch fluid level. Refer to the Scheduled Maintenance Guide
for the service interval schedules.
During normal operation, the fluid level in the clutch reservoir should
remain constant. If the fluid level drops, maintain the fluid level at the
step in the reservoir.
Use only a DOT 3 brake fluid designed to meet Ford specifications. Refer
toCapacities and specifications.
Maintenance and care
164
Page 167 of 240

Adding and replacing engine coolant-7.3L Power Stroke Cummins
B and Caterpillar 3126 B engines
Refer to the Scheduled Maintenance Guide for service intervals of the
engine cooling system.
Use Ford Premium Engine Coolant E2FZ-19549±AA (in Canada,
MotorcraftCXC-10 ) or a premium engine coolant that meets Ford
specification ESE-M97B44±A. Do not use alcohol or methanol antifreeze.
The use of an improper coolant may cause cooling system and/or engine
damage and may void the warranty of your vehicle's engine cooling
system.
A mixture of 50% engine coolant concentrate and 50% water (50/50
ratio) is recommended to maintain best overall cooling system
performance. A 60/40 antifreeze to water ratio is acceptable for
extremely cold climates, but the coolant and water mixture must be
returned to a 50/50 ratio at the end of the winter season. To avoid
damaging the cooling system and engine, the coolant and water mixture
should never exceed a 60/40 antifreeze to water ratio.
Operating the engine with insufficient coolant can cause severe
cooling system and engine damage.
When refilling the engine cooling system as part of regular maintenance
or due to service, adhere to the following instructions:
1. Drain and flush the cooling system to remove dirt deposits, oil and
rust particles. Always dispose of used automotive fluids following your
community's standards.
2. Fill the coolant reservoir with the specified coolant and water mixture
until the level stabilizes within the cold fill range.
3. Reinstall the coolant reservoir cap.
4. Start and idle the engine until the upper radiator hose is warm
(approximately 10±15 minutes). If the hose does not get warm, repeat
this step at a higher engine speed.
5. Once the hose is warm, shut the engine off.
6. Cautiously remove the coolant reservoir cap as previously described,
and add the specified coolant and water mixture until the level stabilizes
within the cold fill range of the coolant reservoir.
7. Reinstall the engine coolant reservoir cap.
Maintenance and care
167