2001 DODGE TOWN AND COUNTRY check engine
[x] Cancel search: check enginePage 2291 of 2321
LEAK DETECTION PUMP MONITOR
The leak detection assembly incorporates two pri-
mary functions: it must detect a leak in the evapora-
tive system and seal the evaporative system so the
leak detection test can be run.
The primary components within the assembly are:
A three port solenoid that activates both of the func-
tions listed above; a pump which contains a switch,
two check valves and a spring/diaphragm, a canister
vent valve (CVV) seal which contains a spring loaded
vent seal valve.
Immediately after a cold start, between predeter-
mined temperature thresholds limits, the three port
solenoid is briefly energized. This initializes the
pump by drawing air into the pump cavity and also
closes the vent seal. During non test conditions the
vent seal is held open by the pump diaphragm
assembly which pushes it open at the full travel posi-
tion. The vent seal will remain closed while the
pump is cycling due to the reed switch triggering of
the three port solenoid that prevents the diaphragm
assembly from reaching full travel. After the brief
initialization period, the solenoid is de-energized
allowing atmospheric pressure to enter the pump
cavity, thus permitting the spring to drive the dia-
phragm which forces air out of the pump cavity and
into the vent system. When the solenoid is energized
and de energized, the cycle is repeated creating flow
in typical diaphragm pump fashion. The pump is con-
trolled in 2 modes:
Pump Mode:The pump is cycled at a fixed rate to
achieve a rapid pressure build in order to shorten the
overall test length.
Test Mode:The solenoid is energized with a fixed
duration pulse. Subsequent fixed pulses occur when
the diaphragm reaches the Switch closure point.
The spring in the pump is set so that the system
will achieve an equalized pressure of about 7.5º H20.
The cycle rate of pump strokes is quite rapid as the
system begins to pump up to this pressure. As the
pressure increases, the cycle rate starts to drop off. If
there is no leak in the system, the pump would even-
tually stop pumping at the equalized pressure. If
there is a leak, it will continue to pump at a rate rep-
resentative of the flow characteristic of the size of the
leak. From this information we can determine if the
leak is larger than the required detection limit (cur-
rently set at .020º orifice by CARB). If a leak is
revealed during the leak test portion of the test, the
test is terminated at the end of the test mode and no
further system checks will be performed.
After passing the leak detection phase of the test,
system pressure is maintained by turning on the
LDP's solenoid until the purge system is activated.
Purge activation in effect creates a leak. The cycle
rate is again interrogated and when it increases dueto the flow through the purge system, the leak check
portion of the diagnostic is complete.
The canister vent valve will unseal the system
after completion of the test sequence as the pump
diaphragm assembly moves to the full travel position.
Evaporative system functionality will be verified by
using the stricter evap purge flow monitor. At an
appropriate warm idle the LDP will be energized to
seal the canister vent. The purge flow will be clocked
up from some small value in an attempt to see a
shift in the 02 control system. If fuel vapor, indicated
by a shift in the 02 control, is present the test is
passed. If not, it is assumed that the purge system is
not functioning in some respect. The LDP is again
turned off and the test is ended.
DESCRIPTION - HIGH AND LOW LIMITS
The PCM compares input signal voltages from each
input device with established high and low limits for
the device. If the input voltage is not within limits
and other criteria are met, the PCM stores a diagnos-
tic trouble code in memory. Other diagnostic trouble
code criteria might include engine RPM limits or
input voltages from other sensors or switches that
must be present before verifying a diagnostic trouble
code condition.
OPERATION - SYSTEM
The Powertrain Control Module (PCM) monitors
many different circuits in the fuel injection, ignition,
emission and engine systems. If the PCM senses a
problem with a monitored circuit often enough to
indicate an actual problem, it stores a Diagnostic
Trouble Code (DTC) in the PCM's memory. If the
code applies to a non-emissions related component or
system, and the problem is repaired or ceases to
exist, the PCM cancels the code after 40 warmup
cycles. Diagnostic trouble codes that affect vehicle
emissions illuminate the Malfunction Indicator Lamp
(MIL). Refer to Malfunction Indicator Lamp in this
section.
Certain criteria must be met before the PCM
stores a DTC in memory. The criteria may be a spe-
cific range of engine RPM, engine temperature,
and/or input voltage to the PCM.
The PCM might not store a DTC for a monitored
circuit even though a malfunction has occurred. This
may happen because one of the DTC criteria for the
circuit has not been met.For example, assume the
diagnostic trouble code criteria requires the PCM to
monitor the circuit only when the engine operates
between 750 and 2000 RPM. Suppose the sensor's
output circuit shorts to ground when engine operates
above 2400 RPM (resulting in 0 volt input to the
PCM). Because the condition happens at an engine
25 - 8 EMISSIONS CONTROLRS
EMISSIONS CONTROL (Continued)
ProCarManuals.com
Page 2296 of 2321
LEAK DETECTION PUMP
DESCRIPTION
The leak detection pump is a device used to detect
a leak in the evaporative system.
The primary components within the leak detection
pump assembly are: a three-port leak detection sole-
noid valve, a pump assembly that includes a spring
loaded diaphragm, a reed switch which is used to
monitor the pump diaphragm movement (position),
two check valves, and a spring loaded vent seal
valve.
OPERATION - LDP
Immediately after a cold start, when the engine
temperature is between 40ÉF and 86ÉF, the 3 port
solenoid is briefly energized. This initializes the
pump by drawing air into the pump cavity and also
closes the vent seal. During non-test test conditions,
the vent seal is held open by the pump diaphragm
assembly which pushes it open at the full travel posi-
tion. The vent seal will remain closed while the
pump is cycling. This is due to the operation of the 3
port solenoid which prevents the diaphragm assem-
bly from reaching full travel. After the brief initial-
ization period, the solenoid is de-energized, allowing
atmospheric pressure to enter the pump cavity. This
permits the spring to drive the diaphragm which
forces air out of the pump cavity and into the vent
system. When the solenoid is energized and de-ener-
gized, the cycle is repeated creating flow in typical
diaphragm pump fashion. The pump is controlled in
2 modes:
PUMP MODE:The pump is cycled at a fixed rate
to achieve a rapid pressure build in order to shorten
the overall test time.
TEST MODE:The solenoid is energized with a
fixed duration pulse. Subsequent fixed pulses occur
when the diaphragm reaches the switch closure
point.
The spring in the pump is set so that the system
will achieve an equalized pressure of about 7.5 inches
of water.
When the pump starts, the cycle rate is quite high.
As the system becomes pressurized, pump rate drops.
If there is no leak, the pump will quit. If there is a
leak, the test is terminated at the end of the test
mode.
If there is no leak, the purge monitor is run. If the
cycle rate increases due to the flow through the
purge system, the test is passed and the diagnostic is
complete.
The canister vent valve will unseal the system
after completion of the test sequence as the pump
diaphragm assembly moves to the full travel position.
OPERATION - LDP SWITCH
The leak detection pump LDP assembly incorpo-
rates two primary functions: it detects a leak in the
evaporative system, and it seals the evaporative sys-
tem so that the required leak detection monitor test
can be run.
The three-port LDP solenoid valve is used to
expose either engine vacuum or atmospheric pressure
to the top side of the leak detection pump diaphragm.
When the LDP solenoid valve is denergized its port
(opening) to engine vacuum is blocked off. This
allows ambient air (atmospheric pressure) to enter
the top of the pump diaphragm. The spring load on
the diaphragm will push the diaphragm down, as
long as there is no pressure present in the rest of the
evaporative system. If there is sufficient evaporative
system pressure present, then the pump diaphragm
will stay in the9up9position. If the evaporative sys-
tem pressure decays, then the pump diaphragm will
eventually fall. The rate of this decent is dependent
upon the size of the evaporative system leak (Large
or small).
When the LDP solenoid valve is energized the port
(opening) to atmosphere is blocked off. At the same
time, the port to engine vacuum is opened. Engine
vacuum replaces atmospheric pressure. When engine
vacuum is sufficient, it over comes the spring pres-
sure load on the pump diaphragm and causes the
diaphragm to rise to its9up9position. The reed
switch will change state depending upon the position
of the pump diaphragm.
If the diaphragm is in the9up9position the reed
switch will be in its9open9state. This means that the
12 volt signal sense to the PCM is interrupted. Zero
volts is detected by the PCM. If the pump diaphragm
is in the9down9position the reed switch will be in its
9closed9state. 12 volts is sent to the PCM via the
switch sense circuit.
The check valves are one-way valves. The first
check valve is used to draw outside air into the lower
chamber of the LDP (the space that is below the
pump diaphragm). The second check valve is used to
vent this outside air, which has become pressurized
from the fall of the pump diaphragm, into the evap-
orative system.
The spring loaded vent seal valve, inside the LDP
is used to seal off the evaporative system. When the
pump diaphragm is in the9up9position the spring
pushes the vent seal valve closed. The vent seal valve
opens only when the pump diaphragm is in its9full
down9position. When the pump assembly is in its
pump mode the pump diaphragm is not allowed to
descend (fall) so far as to allow the vent seal valve to
open. This allows the leak detection pump to develop
the required pressure within the evaporative system
for system leak testing.
RSEVAPORATIVE EMISSIONS25-13
ProCarManuals.com
Page 2298 of 2321
ORVR
OPERATION
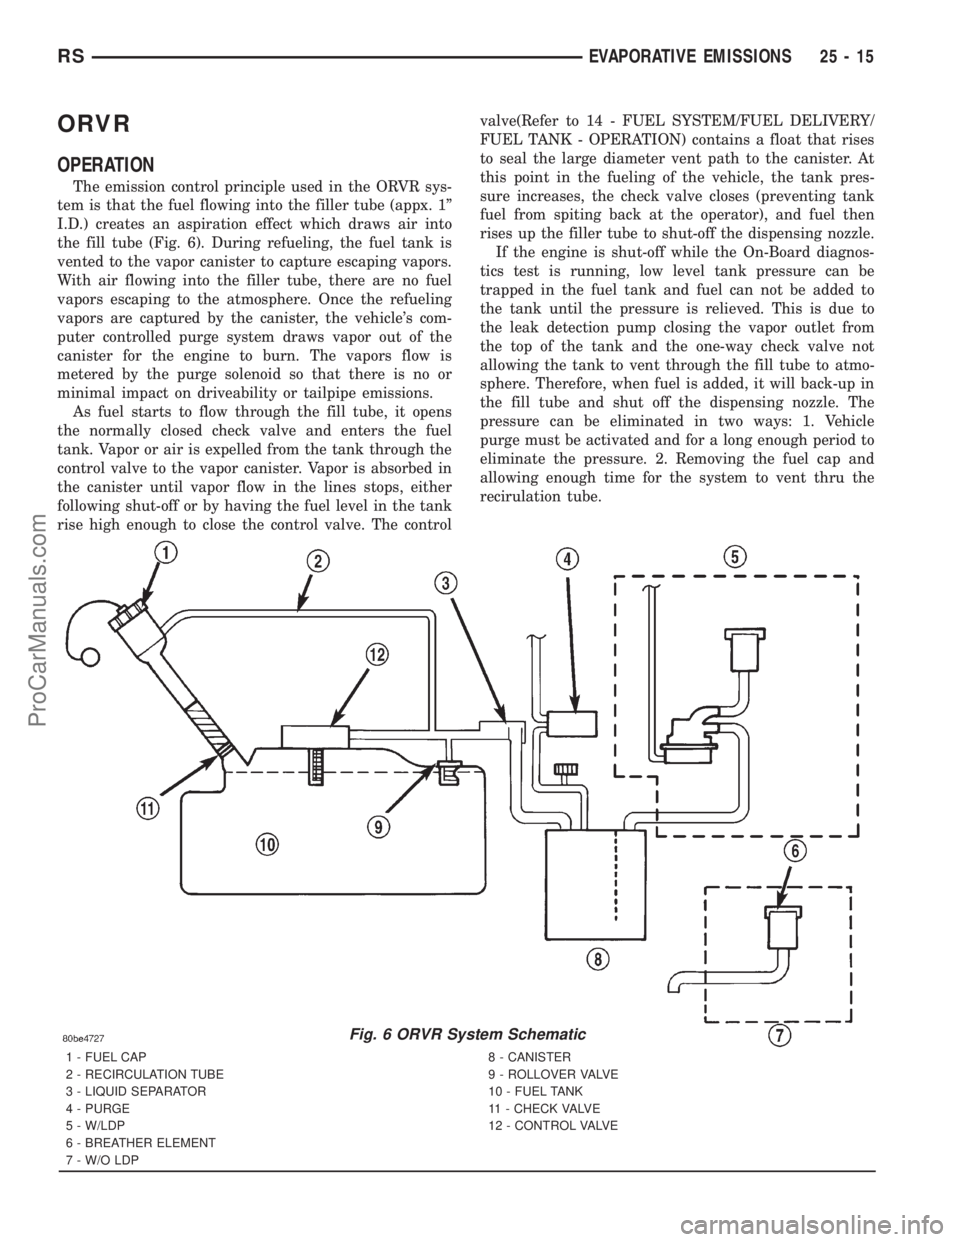
The emission control principle used in the ORVR sys-
tem is that the fuel flowing into the filler tube (appx. 1º
I.D.) creates an aspiration effect which draws air into
the fill tube (Fig. 6). During refueling, the fuel tank is
vented to the vapor canister to capture escaping vapors.
With air flowing into the filler tube, there are no fuel
vapors escaping to the atmosphere. Once the refueling
vapors are captured by the canister, the vehicle's com-
puter controlled purge system draws vapor out of the
canister for the engine to burn. The vapors flow is
metered by the purge solenoid so that there is no or
minimal impact on driveability or tailpipe emissions.
As fuel starts to flow through the fill tube, it opens
the normally closed check valve and enters the fuel
tank. Vapor or air is expelled from the tank through the
control valve to the vapor canister. Vapor is absorbed in
the canister until vapor flow in the lines stops, either
following shut-off or by having the fuel level in the tank
rise high enough to close the control valve. The controlvalve(Refer to 14 - FUEL SYSTEM/FUEL DELIVERY/
FUEL TANK - OPERATION) contains a float that rises
to seal the large diameter vent path to the canister. At
this point in the fueling of the vehicle, the tank pres-
sure increases, the check valve closes (preventing tank
fuel from spiting back at the operator), and fuel then
rises up the filler tube to shut-off the dispensing nozzle.
If the engine is shut-off while the On-Board diagnos-
tics test is running, low level tank pressure can be
trapped in the fuel tank and fuel can not be added to
the tank until the pressure is relieved. This is due to
the leak detection pump closing the vapor outlet from
the top of the tank and the one-way check valve not
allowing the tank to vent through the fill tube to atmo-
sphere. Therefore, when fuel is added, it will back-up in
the fill tube and shut off the dispensing nozzle. The
pressure can be eliminated in two ways: 1. Vehicle
purge must be activated and for a long enough period to
eliminate the pressure. 2. Removing the fuel cap and
allowing enough time for the system to vent thru the
recirulation tube.
Fig. 6 ORVR System Schematic
1 - FUEL CAP
2 - RECIRCULATION TUBE
3 - LIQUID SEPARATOR
4 - PURGE
5 - W/LDP
6 - BREATHER ELEMENT
7 - W/O LDP8 - CANISTER
9 - ROLLOVER VALVE
10 - FUEL TANK
11 - CHECK VALVE
12 - CONTROL VALVE
RSEVAPORATIVE EMISSIONS25-15
ProCarManuals.com
Page 2299 of 2321
DIAGNOSIS AND TESTING - VEHICLE DOES
NOT FILL
CONDITION POSSIBLE CAUSES CORRECTION
Pre-Mature Nozzle Shut-Off Defective fuel tank assembly
components.Fill tube improperly installed
(sump)
Fill tube hose pinched.
Check valve stuck shut.
Control valve stuck shut.
Defective vapor/vent components. Vent line from control valve to
canister pinched.
Vent line from canister to vent
filter pinched.
Canister vent valve failure
(requires double failure,
plugged to LDP and
atmosphere).
Leak detection pump failed
closed.
Leak detection pump filter
plugged.
On-Board diagnostics evaporative
system leak test just conducted.Canister vent valve vent
plugged to atmosphere.
engine still running when
attempting to fill (System
designed not to fill).
Defective fill nozzle. Try another nozzle.
Fuel Spits Out Of Filler
Tube.During fill. See Pre-Mature Shut-Off.
At conclusion of fill. Defective fuel handling
component. (Check valve stuck
open).
Defective vapor/vent handling
component.
Defective fill nozzle.
25 - 16 EVAPORATIVE EMISSIONSRS
ORVR (Continued)
ProCarManuals.com
Page 2305 of 2321
A failed or malfunctioning EGR system can cause
engine spark knock, sags or hesitation, rough idle,
engine stalling and increased emissions.
REMOVAL - 2.4L
The EGR valve and Electrical EGR Transducer are
serviced as an assembly (Fig. 1).(1) Disconnect vacuum tube from electric EGR
transducer. Inspect vacuum tube for damage.
(2) Remove electrical connector from solenoid.
(3) Remove EGR tube bolts from EGR valve.
(4) Remove EGR valve from cylinder head adaptor.
(5) Clean gasket surface and discard old gasket.
Check for any signs of leakage or cracked surfaces.
Repair or replace as necessary.
REMOVAL - 3.3/3.8L
The EGR valve and Electrical EGR Transducer are
serviced as an assembly (Fig. 2).
(1) Disconnect vacuum tube from electric EGR
transducer. Inspect vacuum tube for damage.
(2) Remove electrical connector from solenoid.
(3) Remove EGR tube bolts from EGR valve.
(4) Remove EGR valve from cylinder head adaptor.
(5) Clean gasket surface and discard old gasket.
Check for any signs of leakage or cracked surfaces.
Repair or replace as necessary.
INSTALLATION - 2.4L
The EGR valve and Electrical EGR Transducer are
serviced as an assembly (Fig. 1).
(1) Assemble EGR valve with new gasket onto the
cylinder head adaptor.
(2) Loose assemble the bolts from EGR valve to
EGR tube.
(3) Loose assemble the bolts from EGR valve to
cylinder head.
(4) Tighten bolts from EGR valve to cylinder head
to 22.8 N´m (200625 in. lbs.) torque.
(5) Tighten bolts from EGR valve to EGR tube to
11.9 N´m (105620 in. lbs.) torque.
(6) Reconnect vacuum hose and electrical connec-
tor to electrical EGR transducer.
INSTALLATION - 3.3/3.8L
The EGR valve and Electrical EGR Transducer are
serviced as an assembly (Fig. 2).
(1) Loose assemble the bolts from EGR valve to
EGR tube.
(2) Loose assemble the bolts from EGR valve to
cylinder head adaptor.
(3) Tighten bolts from EGR valve to EGR tube to
11.9 N´m (105620 in. lbs.) torque.
(4) Tighten bolts from EGR valve to cylinder head
to 22.9 N´m (200625 in. lbs.) torque.
(5) Reconnect vacuum hose and electrical connec-
tor to electrical EGR transducer.
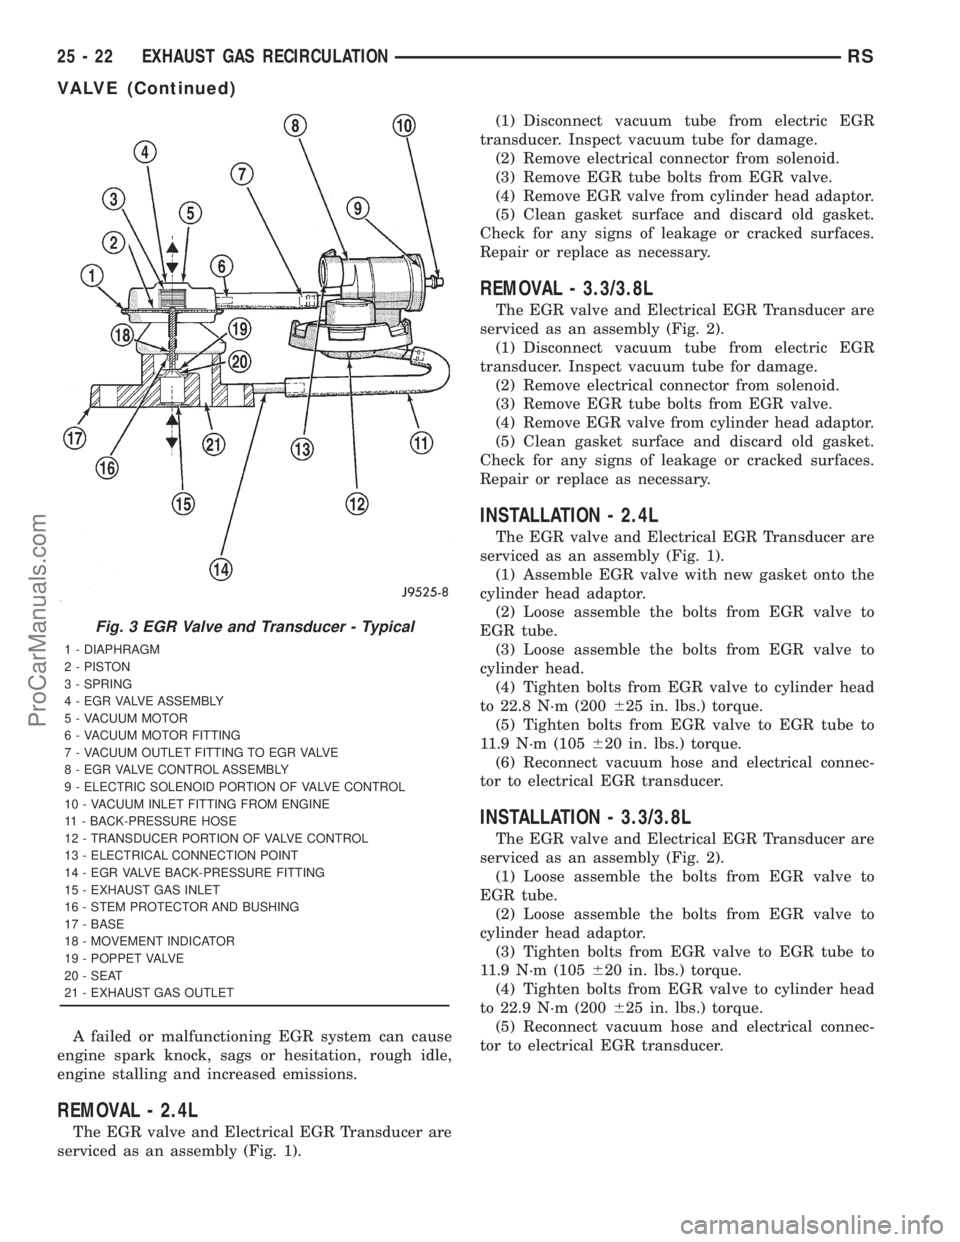
Fig. 3 EGR Valve and Transducer - Typical
1 - DIAPHRAGM
2 - PISTON
3 - SPRING
4 - EGR VALVE ASSEMBLY
5 - VACUUM MOTOR
6 - VACUUM MOTOR FITTING
7 - VACUUM OUTLET FITTING TO EGR VALVE
8 - EGR VALVE CONTROL ASSEMBLY
9 - ELECTRIC SOLENOID PORTION OF VALVE CONTROL
10 - VACUUM INLET FITTING FROM ENGINE
11 - BACK-PRESSURE HOSE
12 - TRANSDUCER PORTION OF VALVE CONTROL
13 - ELECTRICAL CONNECTION POINT
14 - EGR VALVE BACK-PRESSURE FITTING
15 - EXHAUST GAS INLET
16 - STEM PROTECTOR AND BUSHING
17 - BASE
18 - MOVEMENT INDICATOR
19 - POPPET VALVE
20 - SEAT
21 - EXHAUST GAS OUTLET
25 - 22 EXHAUST GAS RECIRCULATIONRS
VALVE (Continued)
ProCarManuals.com