2001 DODGE RAM check engine
[x] Cancel search: check enginePage 300 of 2889
(6) Position adjuster lever return spring on pivot.
(7) Install adjuster lever.
(8) Attach adjuster cable to adjuster lever. Be sure
cable is properly routed.
(9) Adjust brake shoes to drum with brake gauge.
MASTER CYLINDER
DESCRIPTION
A two-piece master cylinder is used on all models.
The cylinder body containing the primary and sec-
ondary pistons is made of aluminum. The removable
fluid reservoir is made of nylon reinforced with glass
fiber. The reservoir stores reserve brake fluid for the
hydraulic brake circuits. The reservoir is the only
serviceable component.
The fluid compartments of the nylon reservoir are
interconnected to permit fluid level equalization.
However, the equalization feature does not affect cir-
cuit separation in the event of a front or rear brake
malfunction. The reservoir compartments will retain
enough fluid to operate the functioning hydraulic cir-
cuit.
Care must be exercised when removing/installing
the master cylinder connecting lines. The threads in
the cylinder fluid ports can be damaged if care is not
exercised. Start all brake line fittings by hand to
avoid cross threading.
The cylinder reservoir can be replaced when neces-
sary. However, the aluminum body section of the
master cylinder is not a repairable component.
NOTE: If diagnosis indicates that an internal mal-
function has occurred, the aluminum body section
must be replaced as an assembly.
OPERATION
The master cylinder bore contains a primary and
secondary piston. The primary piston supplies
hydraulic pressure to the front brakes. The secondary
piston supplies hydraulic pressure to the rear brakes.
DIAGNOSIS AND TESTING - MASTER
CYLINDER/POWER BOOSTER
(1) Start engine and check booster vacuum hose
connections. A hissing noise indicates vacuum leak.
Correct any vacuum leak before proceeding.
(2) Stop engine and shift transmission into Neu-
tral.
(3) Pump brake pedal until all vacuum reserve in
booster is depleted.
(4) Press and hold brake pedal under light foot
pressure. The pedal should hold firm, if the pedal
falls away master cylinder is faulty (internal leak-
age).
(5) Start engine and note pedal action. It should
fall away slightly under light foot pressure then hold
firm. If no pedal action is discernible, power booster,
vacuum supply, or vacuum check valve is faulty. Pro-
ceed to the POWER BOOSTER VACUUM TEST.
(6) If the POWER BOOSTER VACUUM TEST
passes, rebuild booster vacuum reserve as follows:
Release brake pedal. Increase engine speed to 1500
rpm, close the throttle and immediately turn off igni-
tion to stop engine.
(7) Wait a minimum of 90 seconds and try brake
action again. Booster should provide two or more vac-
uum assisted pedal applications. If vacuum assist is
not provided, booster is faulty.
POWER BOOSTER VACUUM TEST
(1) Connect vacuum gauge to booster check valve
with short length of hose and T-fitting (Fig. 54).
(2) Start and run engine at curb idle speed for one
minute.
(3) Observe the vacuum supply. If vacuum supply
is not adequate, repair vacuum supply.
(4) Clamp hose shut between vacuum source and
check valve.
(5) Stop engine and observe vacuum gauge.
(6) If vacuum drops more than one inch HG (33
millibars) within 15 seconds, booster diaphragm or
check valve is faulty.
POWER BOOSTER CHECK VALVE TEST
(1) Disconnect vacuum hose from check valve.
(2) Remove check valve and valve seal from
booster.
(3) Use a hand operated vacuum pump for test.
(4) Apply 15-20 inches vacuum at large end of
check valve (Fig. 55).
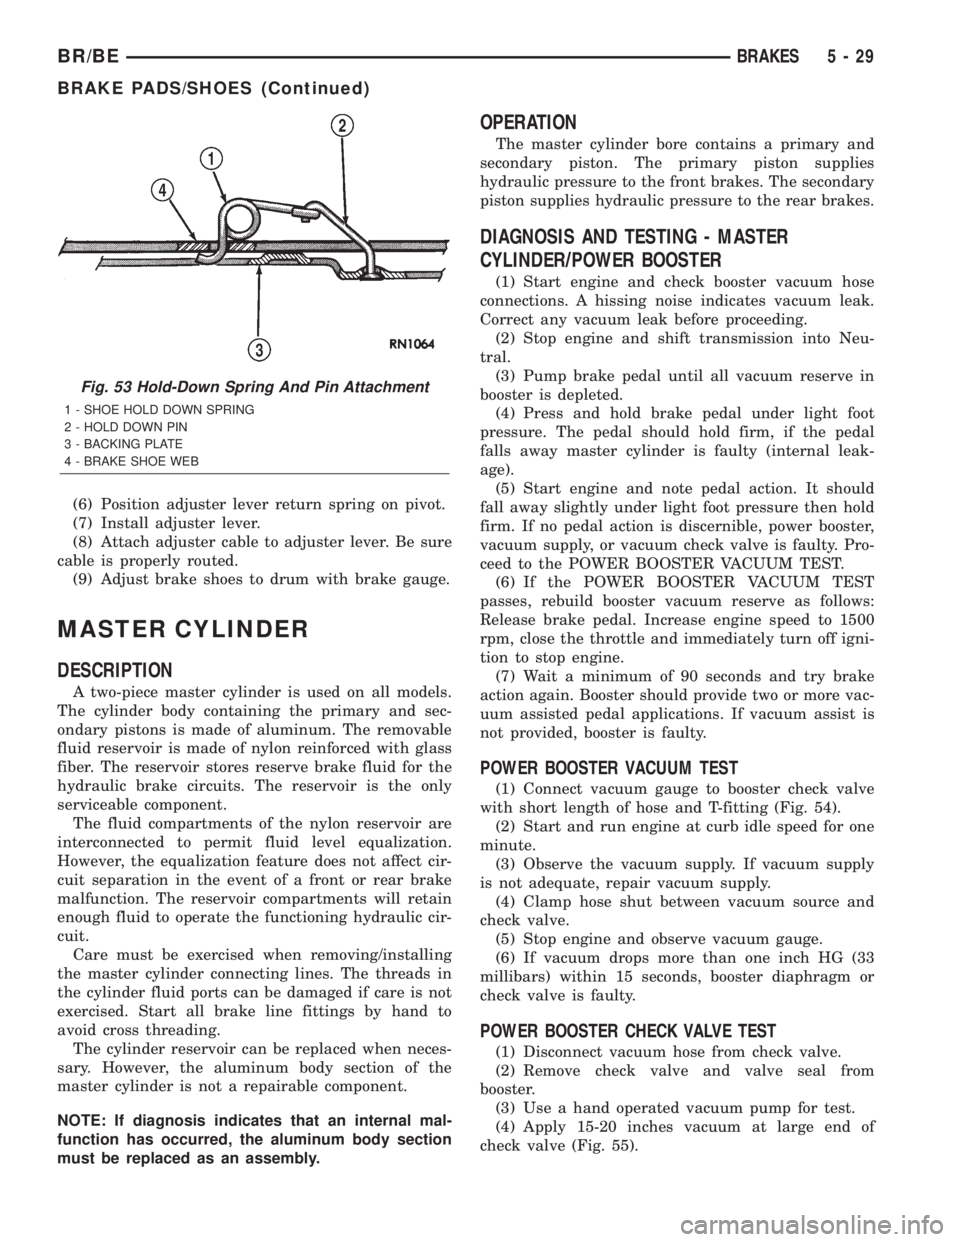
Fig. 53 Hold-Down Spring And Pin Attachment
1 - SHOE HOLD DOWN SPRING
2 - HOLD DOWN PIN
3 - BACKING PLATE
4 - BRAKE SHOE WEB
BR/BEBRAKES 5 - 29
BRAKE PADS/SHOES (Continued)
Page 317 of 2889
Oil contamination indicates a leak at either the
rear main seal or transmission input shaft. Oil leak-
age produces a residue of oil on the housing interior
and on the clutch cover and flywheel. Heat buildup
caused by slippage between the cover, disc and fly-
wheel, can sometimes bake the oil residue onto the
components. The glaze-like residue ranges in color
from amber to black.
Road splash contamination means dirt/water is
entering the clutch housing due to loose bolts, hous-
ing cracks or through hydraulic line openings. Driv-
ing through deep water puddles can force water/road
splash into the housing through such openings.
Clutch fluid leaks are usually from damaged slave
cylinder push rod seals.
IMPROPER RELEASE OR CLUTCH ENGAGEMENT
Clutch release or engagement problems are caused
by wear or damage to one or more clutch compo-
nents. A visual inspection of the release components
will usually reveal the problem part.
Release problems can result in hard shifting and
noise. Items to look for are: leaks at the clutch cylin-
ders and interconnecting line; loose slave cylinder
bolts; worn/loose release fork and pivot stud; dam-
aged release bearing; and a worn clutch disc, or pres-
sure plate.
Normal condensation in vehicles that are stored or
out of service for long periods of time can generate
enough corrosion to make the disc stick to the fly-
wheel, or pressure plate. If this condition is experi-
enced, correction only requires that the disc be
loosened manually through the inspection plate open-
ing.
Engagement problems usually result in slip, chat-
ter/shudder, and noisy operation. The primary causes
are clutch disc contamination; clutch disc wear; mis-
alignment, or distortion; flywheel damage; or a com-
bination of the foregoing. A visual inspection is
required to determine the part actually causing the
problem.
CLUTCH MISALIGNMENT
Clutch components must be in proper alignment
with the crankshaft and transmission input shaft.
Misalignment caused by excessive runout or warpage
of any clutch component will cause grab, chatter and
improper clutch release.
CLUTCH COVER AND DISC RUNOUT
Check the clutch disc before installation. Axial
(face) runout of anewdisc should not exceed 0.50
mm (0.020 in.). Measure runout about 6 mm (1/4 in.)
from the outer edge of the disc facing. Obtain
another disc if runout is excessive.Check condition of the clutch before installation. A
warped cover or diaphragm spring will cause grab
and incomplete release or engagement. Be careful
when handling the cover and disc. Impact can distort
the cover, diaphragm spring, release fingers and the
hub of the clutch disc.
Use an alignment tool when positioning the disc on
the flywheel. The tool prevents accidental misalign-
ment which could result in cover distortion and disc
damage.
A frequent cause of clutch cover distortion (and con-
sequent misalignment) is improper bolt tightening.
CLUTCH FLYWHEEL RUNOUT
Check flywheel runout whenever misalignment is
suspected. Flywheel runout should not exceed 0.08
mm (0.003 in.). Measure runout at the outer edge of
the flywheel face with a dial indicator. Mount the
indicator on the rear face of the engine block.
Common causes of runout are:
²heat warpage
²improper machining
²incorrect bolt tightening
²improper seating on crankshaft flange shoulder
²foreign material on crankshaft flange
Flywheel machining is not recommended. The fly-
wheel clutch surface is machined to a unique contour
and machining will negate this feature. However,
minor flywheel scoring can be cleaned up by hand with
180 grit emery, or with surface grinding equipment.
Remove only enough material to reduce scoring
(approximately 0.001 - 0.003 in.). Heavy stock removal
isnot recommended.
Replace the flywheel if scoring
is severe and deeper than 0.076 mm (0.003 in.).
Excessive stock removal can result in flywheel crack-
ing or warpage after installation; it can also weaken
the flywheel and interfere with proper clutch release.
Clean the crankshaft flange before mounting the
flywheel. Dirt and grease on the flange surface may
cock the flywheel causing excessive runout. Use new
bolts when remounting a flywheel and secure the
bolts with MopartLock And Seal. Tighten flywheel
bolts to specified torque only. Overtightening can dis-
tort the flywheel hub causing runout.
DIAGNOSIS CHART
The clutch inspection chart (Fig. 3) outlines items to
be checked before and during clutch installation. Use
the chart as a check list to help avoid overlooking
potential problem sources during service operations.
The diagnosis charts describe common clutch prob-
lems, causes and correction. Fault conditions are listed
at the top of each chart. Conditions, causes and correc-
tive action are outlined in the indicated columns.
The charts are provided as a convenient reference
when diagnosing faulty clutch operation.
6 - 4 CLUTCHBR/BE
CLUTCH (Continued)
Page 320 of 2889
CONDITION POSSIBLE CAUSES CORRECTION
Contact surface of release bearing
damaged.1. Clutch cover incorrect or release
fingers bent or distorted.1. Replace clutch cover and release
bearing.
2. Release bearing defective or
damaged.2. Replace the release bearing.
3. Release bearing misaligned. 3. Check and correct runout of
clutch components. Check front
bearing sleeve for damage/
alignment. Repair as necessary.
Partial engagement of clutch disc.
One side of disc is worn and the
other side is glazed and lightly
worn.1. Clutch pressure plate position
incorrect.1. Replace clutch disc and cover.
2. Clutch cover, spring, or release
fingers bent or distorted.2. Replace clutch disc and cover.
3. Clutch disc damaged or
distorted.2. Replace clutch disc.
4. Clutch misalignment. 4. Check alignment and runout of
flywheel, disc, pressure plate, andùr
clutch housing. Correct as
necessary.
SPECIFICATIONS
SPECIFICATIONS - CLUTCH
TORQUE SPECIFICATIONS
DESCRIPTION N´m Ft. Lbs. In. Lbs.
Nut, slave cylinder 19-26 14-19 170-230
Bolt, clutch cover-5/16 in. 23 17 -
Bolt, clutch cover-3/8 in. 41 30 -
Pivot, release bearing 23 17 -
Screw, fluid reservoir 5 - 40
CLUTCH DISC
DESCRIPTION
The clutch disc friction material is riveted to the
disc hub. The hub bore is splined for installation on
the transmission input shaft. The clutch disc has
cushion springs in the disc hub to dampen disc vibra-
tions during application and release of the clutch.
Various size and design of clutches are used for the
different engine transmission combinations. The cur-
rently used clutches and applications are listed
below.A 281 mm (11 in.) diameter clutch disc is used with
a 3.9L, 5.2L, or 5.9L gas engines (Fig. 4) and (Fig. 5).
A 312.5 mm (12.3 in.) diameter clutch disc is used
with diesel and V10 engines and (Fig. 6).
All the discs have damper springs in the hub. The
281 mm discs have four springs, the 312.5 mm diesel/
V10 disc has nine springs. The damper springs pro-
vide smoother torque transfer and disc engagement.
BR/BECLUTCH 6 - 7
CLUTCH (Continued)
Page 322 of 2889
INSTALLATION
(1) Check runout and free operation of new clutch
disc.
(2) Insert clutch alignment tool in clutch disc hub.
(3) Verify that disc hub is positioned correctly. The
raised side of hub is installed away from the fly-
wheel.
(4) Insert alignment tool in pilot bearing and posi-
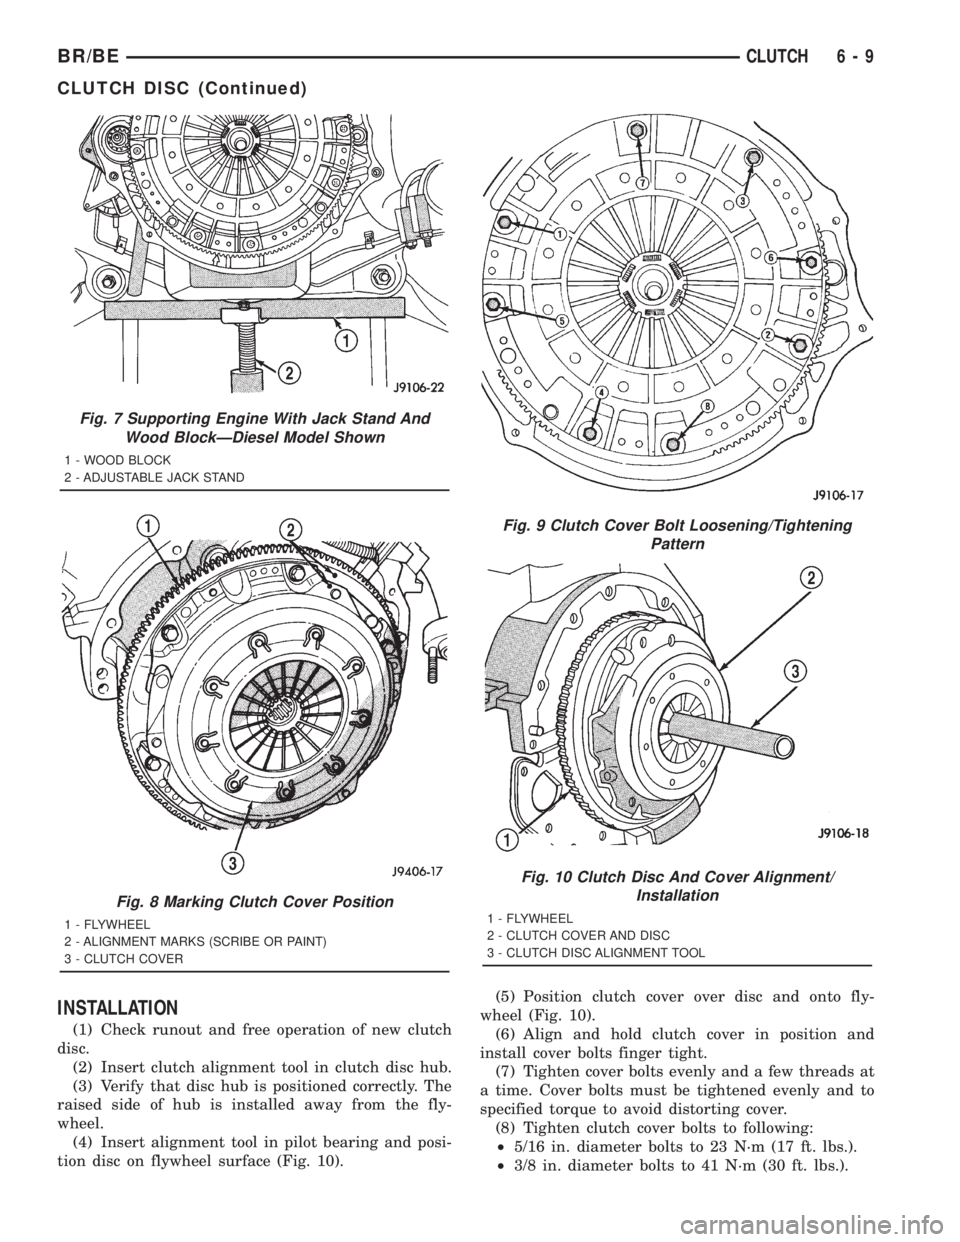
tion disc on flywheel surface (Fig. 10).(5) Position clutch cover over disc and onto fly-
wheel (Fig. 10).
(6) Align and hold clutch cover in position and
install cover bolts finger tight.
(7) Tighten cover bolts evenly and a few threads at
a time. Cover bolts must be tightened evenly and to
specified torque to avoid distorting cover.
(8) Tighten clutch cover bolts to following:
²5/16 in. diameter bolts to 23 N´m (17 ft. lbs.).
²3/8 in. diameter bolts to 41 N´m (30 ft. lbs.).
Fig. 7 Supporting Engine With Jack Stand And
Wood BlockÐDiesel Model Shown
1 - WOOD BLOCK
2 - ADJUSTABLE JACK STAND
Fig. 8 Marking Clutch Cover Position
1 - FLYWHEEL
2 - ALIGNMENT MARKS (SCRIBE OR PAINT)
3 - CLUTCH COVER
Fig. 9 Clutch Cover Bolt Loosening/Tightening
Pattern
Fig. 10 Clutch Disc And Cover Alignment/
Installation
1 - FLYWHEEL
2 - CLUTCH COVER AND DISC
3 - CLUTCH DISC ALIGNMENT TOOL
BR/BECLUTCH 6 - 9
CLUTCH DISC (Continued)
Page 324 of 2889
CLUTCH HOUSING
DIAGNOSIS AND TESTING - CLUTCH HOUSING
Clutch housing alignment is important to proper
clutch operation. The housing maintains alignment
between the crankshaft and transmission input
shaft. Misalignment can cause clutch noise, hard
shifting, incomplete release and chatter. It can also
result in premature wear of the pilot bearing, cover
release fingers and clutch disc. In severe cases, mis-
alignment can also cause premature wear of the
transmission input shaft and front bearing.
Housing misalignment is generally caused by
incorrect seating on the engine or transmission, loose
housing bolts, missing alignment dowels, or housing
damage. Infrequently, misalignment may also be
caused by housing mounting surfaces that are not
completely parallel. Misalignment can be corrected
with shims.
CHECKING RUNOUT
Only the NV4500 clutch housing can be
checked using the following bore and face
runout procedures. The NV3500 and NV5600
clutch housings are an integral part of the
transmission and can only be checked off the
vehicle.
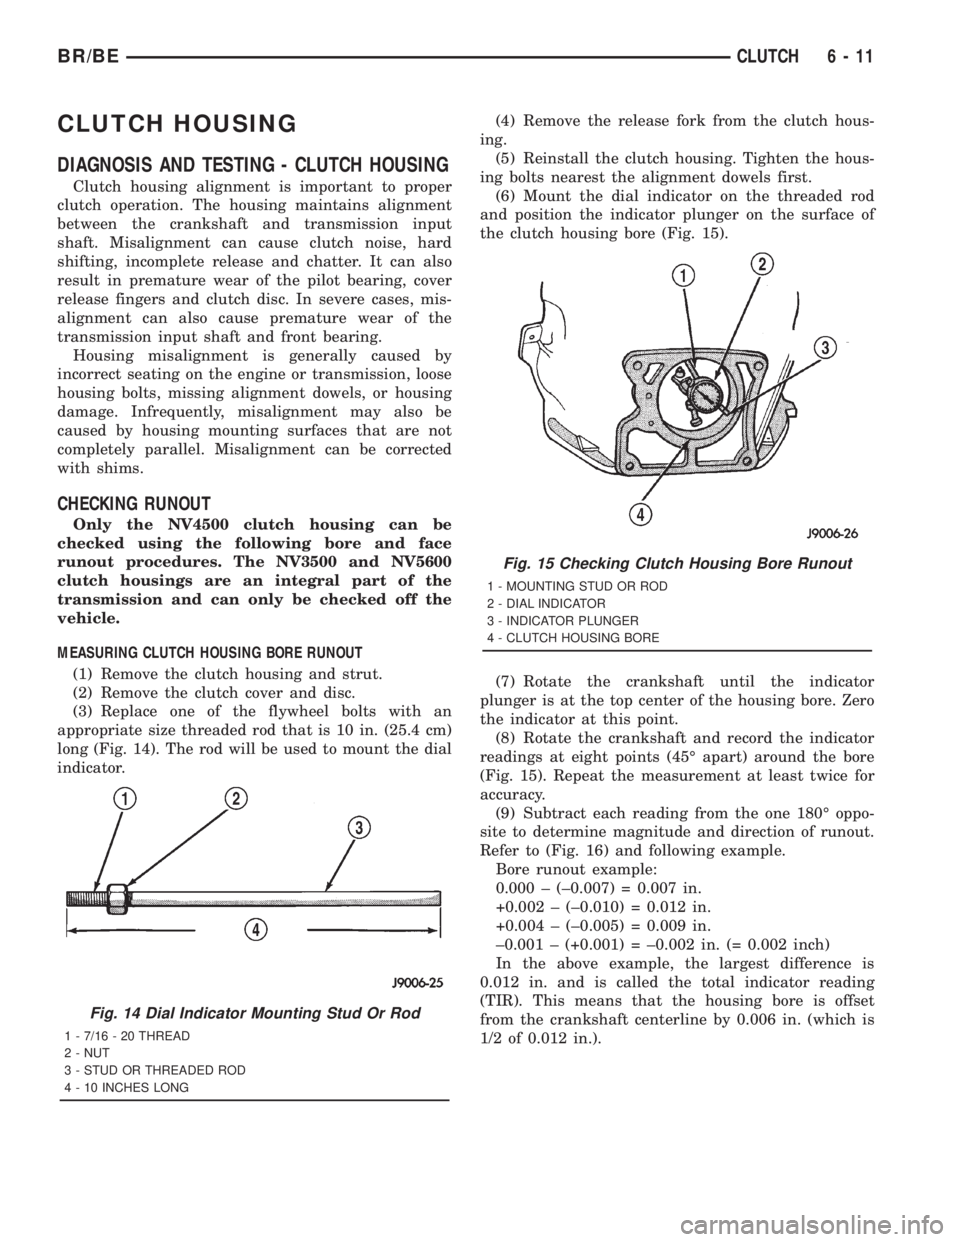
MEASURING CLUTCH HOUSING BORE RUNOUT
(1) Remove the clutch housing and strut.
(2) Remove the clutch cover and disc.
(3) Replace one of the flywheel bolts with an
appropriate size threaded rod that is 10 in. (25.4 cm)
long (Fig. 14). The rod will be used to mount the dial
indicator.(4) Remove the release fork from the clutch hous-
ing.
(5) Reinstall the clutch housing. Tighten the hous-
ing bolts nearest the alignment dowels first.
(6) Mount the dial indicator on the threaded rod
and position the indicator plunger on the surface of
the clutch housing bore (Fig. 15).
(7) Rotate the crankshaft until the indicator
plunger is at the top center of the housing bore. Zero
the indicator at this point.
(8) Rotate the crankshaft and record the indicator
readings at eight points (45É apart) around the bore
(Fig. 15). Repeat the measurement at least twice for
accuracy.
(9) Subtract each reading from the one 180É oppo-
site to determine magnitude and direction of runout.
Refer to (Fig. 16) and following example.
Bore runout example:
0.000 ± (±0.007) = 0.007 in.
+0.002 ± (±0.010) = 0.012 in.
+0.004 ± (±0.005) = 0.009 in.
±0.001 ± (+0.001) = ±0.002 in. (= 0.002 inch)
In the above example, the largest difference is
0.012 in. and is called the total indicator reading
(TIR). This means that the housing bore is offset
from the crankshaft centerline by 0.006 in. (which is
1/2 of 0.012 in.).
Fig. 14 Dial Indicator Mounting Stud Or Rod
1 - 7/16 - 20 THREAD
2 - NUT
3 - STUD OR THREADED ROD
4 - 10 INCHES LONG
Fig. 15 Checking Clutch Housing Bore Runout
1 - MOUNTING STUD OR ROD
2 - DIAL INDICATOR
3 - INDICATOR PLUNGER
4 - CLUTCH HOUSING BORE
BR/BECLUTCH 6 - 11
Page 325 of 2889
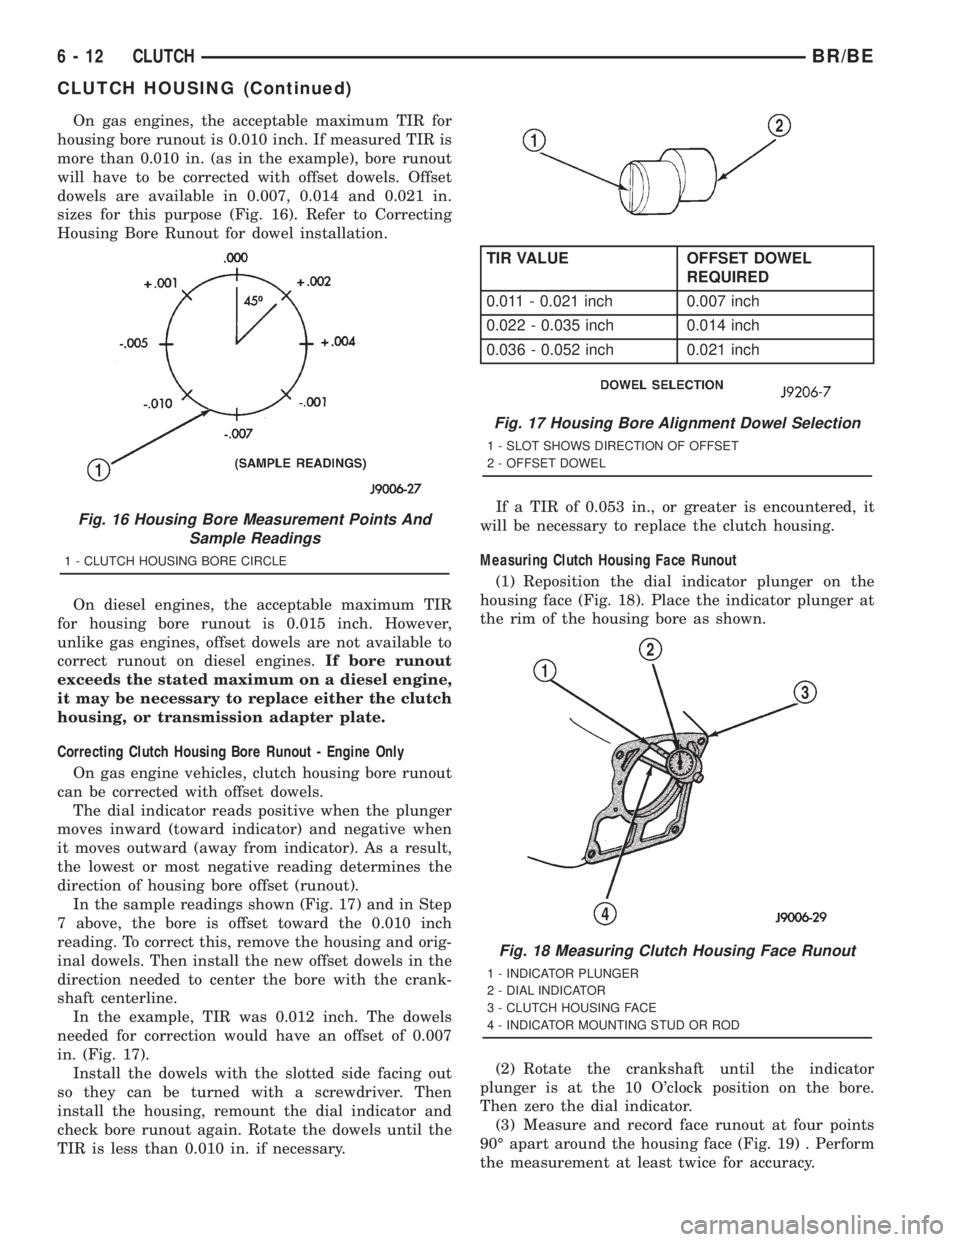
On gas engines, the acceptable maximum TIR for
housing bore runout is 0.010 inch. If measured TIR is
more than 0.010 in. (as in the example), bore runout
will have to be corrected with offset dowels. Offset
dowels are available in 0.007, 0.014 and 0.021 in.
sizes for this purpose (Fig. 16). Refer to Correcting
Housing Bore Runout for dowel installation.
On diesel engines, the acceptable maximum TIR
for housing bore runout is 0.015 inch. However,
unlike gas engines, offset dowels are not available to
correct runout on diesel engines.If bore runout
exceeds the stated maximum on a diesel engine,
it may be necessary to replace either the clutch
housing, or transmission adapter plate.
Correcting Clutch Housing Bore Runout - Engine Only
On gas engine vehicles, clutch housing bore runout
can be corrected with offset dowels.
The dial indicator reads positive when the plunger
moves inward (toward indicator) and negative when
it moves outward (away from indicator). As a result,
the lowest or most negative reading determines the
direction of housing bore offset (runout).
In the sample readings shown (Fig. 17) and in Step
7 above, the bore is offset toward the 0.010 inch
reading. To correct this, remove the housing and orig-
inal dowels. Then install the new offset dowels in the
direction needed to center the bore with the crank-
shaft centerline.
In the example, TIR was 0.012 inch. The dowels
needed for correction would have an offset of 0.007
in. (Fig. 17).
Install the dowels with the slotted side facing out
so they can be turned with a screwdriver. Then
install the housing, remount the dial indicator and
check bore runout again. Rotate the dowels until the
TIR is less than 0.010 in. if necessary.If a TIR of 0.053 in., or greater is encountered, it
will be necessary to replace the clutch housing.
Measuring Clutch Housing Face Runout
(1) Reposition the dial indicator plunger on the
housing face (Fig. 18). Place the indicator plunger at
the rim of the housing bore as shown.
(2) Rotate the crankshaft until the indicator
plunger is at the 10 O'clock position on the bore.
Then zero the dial indicator.
(3) Measure and record face runout at four points
90É apart around the housing face (Fig. 19) . Perform
the measurement at least twice for accuracy.
Fig. 16 Housing Bore Measurement Points And
Sample Readings
1 - CLUTCH HOUSING BORE CIRCLE
Fig. 17 Housing Bore Alignment Dowel Selection
1 - SLOT SHOWS DIRECTION OF OFFSET
2 - OFFSET DOWEL
TIR VALUE OFFSET DOWEL
REQUIRED
0.011 - 0.021 inch 0.007 inch
0.022 - 0.035 inch 0.014 inch
0.036 - 0.052 inch 0.021 inch
Fig. 18 Measuring Clutch Housing Face Runout
1 - INDICATOR PLUNGER
2 - DIAL INDICATOR
3 - CLUTCH HOUSING FACE
4 - INDICATOR MOUNTING STUD OR ROD
6 - 12 CLUTCHBR/BE
CLUTCH HOUSING (Continued)
Page 330 of 2889
shaft speeds and releasing the energy back into the
system when the crankshaft slows down.
DIAGNOSIS AND TESTING - FLYWHEEL
Check flywheel runout whenever misalignment is
suspected. Flywheel runout should not exceed 0.08
mm (0.003 in.). Measure runout at the outer edge of
the flywheel face with a dial indicator. Mount the
indicator on a stud installed in place of one of the fly-
wheel bolts.
Common causes of runout are:
²heat warpage
²improper machining
²incorrect bolt tightening
²improper seating on crankshaft flange shoulder
²foreign material on crankshaft flange
Flywheel machining is not recommended. The fly-
wheel clutch surface is machined to a unique contour
and machining will negate this feature. However,
minor flywheel scoring can be cleaned up by hand with
180 grit emery, or with surface grinding equipment.
Remove only enough material to reduce scoring
(approximately 0.001 - 0.003 in.). Heavy stock removal
isnot recommended.
Replace the flywheel if scoring
is severe and deeper than 0.076 mm (0.003 in.).
Excessive stock removal can result in flywheel crack-
ing or warpage after installation; it can also weaken
the flywheel and interfere with proper clutch release.
Clean the crankshaft flange before mounting the
flywheel. Dirt and grease on the flange surface may
cock the flywheel causing excessive runout. Use new
bolts when remounting a flywheel and secure the
bolts with MopartLock And Seal. Tighten flywheel
bolts to specified torque only. Overtightening can dis-
tort the flywheel hub causing runout.
DISASSEMBLY
NOTE: If the teeth are worn or damaged, the fly-
wheel should be replaced as an assembly. This is
the recommended and preferred method of repair.
In cases where a new flywheel is not readily avail-
able, (V10/Diesel Engine only) a replacement ring
gear can be installed. The following procedure must
be observed to avoid damaging the flywheel and
replacement gear.
WARNING: WEAR PROTECTIVE GOGGLES OR
SAFETY GLASSES WHILE CUTTING RING GEAR.
(1) Mark position of the old gear for alignment ref-
erence on the flywheel. Use a scriber for this pur-
pose.
(2) Remove the old gear by cutting most of the way
through it (at one point) with an abrasive cut-off
wheel. Then complete removal with a cold chisel or
punch.
ASSEMBLY
NOTE: The ring gear is a shrink fit on the flywheel.
This means the gear must be expanded by heating
in order to install it. The method of heating and
expanding the gear is extremely important. Every
surface of the gear must be heated at the same
time to produce uniform expansion. An oven or
similar enclosed heating device must be used. Tem-
perature required for uniform expansion is approxi-
mately 375É F.
CAUTION: Do not use an oxy/acetylene torch to
remove the old gear, or to heat and expand a new
gear. The high temperature of the torch flame can
cause localized heating that will damage the fly-
wheel. In addition, using the torch to heat a replace-
ment gear will cause uneven heating and
expansion. The torch flame can also anneal the
gear teeth resulting in rapid wear and damage after
installation.
WARNING: WEAR PROTECTIVE GOGGLES OR
SAFETY GLASSES AND HEAT RESISTENT GLOVES
WHEN HANDLING A HEATED RING GEAR.
(1) The heated gear must be installed evenly to
avoid misalignment or distortion.
(2) Position and install the heated ring gear on the
flywheel with a shop press and a suitable press
plates.
(3) Place flywheel on work bench and let it cool in
normal shop air. Allow the ring gear to cool down
completely before installation it on the engine.
CAUTION: Do not use water or compressed air to
cool the flywheel. The rapid cooling produced by
water or compressed air will distort or crack the
new gear.
PILOT BEARING
DESCRIPTION
Vehicles equipped with a manual transmission uti-
lize a pilot bearing. This bearing is located in the
back of the engine crankshaft. Depending on the type
of engine or application, the pilot bearing can be a
solid soft metallic bushing or a fully caged needle
bearing. The pilot bearing's main functions are to
support the transmission input shaft, maintain
proper alignment of the clutch assembly and allow
the transmission main shaft to rotate at a different
speed than the engine mounted crankshaft.
BR/BECLUTCH 6 - 17
FLYWHEEL (Continued)
Page 334 of 2889
should not be disconnected. The individual compo-
nents that form the linkage assembly cannot be over-
hauled or serviced separately.
(1) Tighten cap on clutch fluid reservoir to avoid
spillage during installation.
(2) Position cylinders, connecting lines and reser-
voir in vehicle engine compartment. Locate the clutch
hydraulic line against the dash panel and behind all
engine hoses and wiring.
(3) Insert clutch master cylinder in dash panel.
Install and tighten the nuts to hold the clutch master
cylinder to the dash panel.
(4) Apply a light coating of grease to the inside
and outside diameter of the master cylinder bushing.
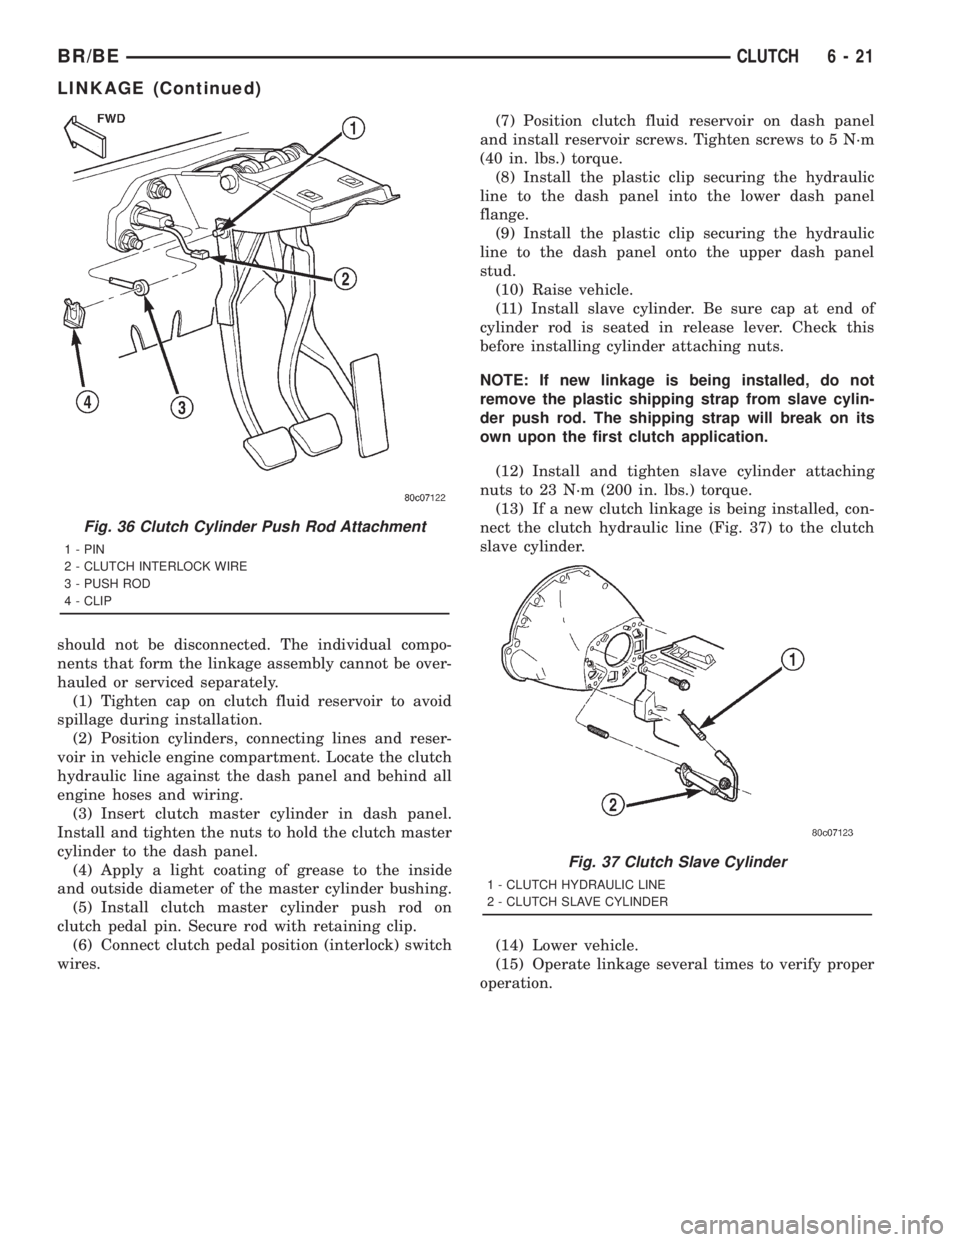
(5) Install clutch master cylinder push rod on
clutch pedal pin. Secure rod with retaining clip.
(6) Connect clutch pedal position (interlock) switch
wires.(7) Position clutch fluid reservoir on dash panel
and install reservoir screws. Tighten screws to 5 N´m
(40 in. lbs.) torque.
(8) Install the plastic clip securing the hydraulic
line to the dash panel into the lower dash panel
flange.
(9) Install the plastic clip securing the hydraulic
line to the dash panel onto the upper dash panel
stud.
(10) Raise vehicle.
(11) Install slave cylinder. Be sure cap at end of
cylinder rod is seated in release lever. Check this
before installing cylinder attaching nuts.
NOTE: If new linkage is being installed, do not
remove the plastic shipping strap from slave cylin-
der push rod. The shipping strap will break on its
own upon the first clutch application.
(12) Install and tighten slave cylinder attaching
nuts to 23 N´m (200 in. lbs.) torque.
(13) If a new clutch linkage is being installed, con-
nect the clutch hydraulic line (Fig. 37) to the clutch
slave cylinder.
(14) Lower vehicle.
(15) Operate linkage several times to verify proper
operation.
Fig. 36 Clutch Cylinder Push Rod Attachment
1 - PIN
2 - CLUTCH INTERLOCK WIRE
3 - PUSH ROD
4 - CLIP
Fig. 37 Clutch Slave Cylinder
1 - CLUTCH HYDRAULIC LINE
2 - CLUTCH SLAVE CYLINDER
BR/BECLUTCH 6 - 21
LINKAGE (Continued)