2001 DODGE RAM seats
[x] Cancel search: seatsPage 1148 of 2889
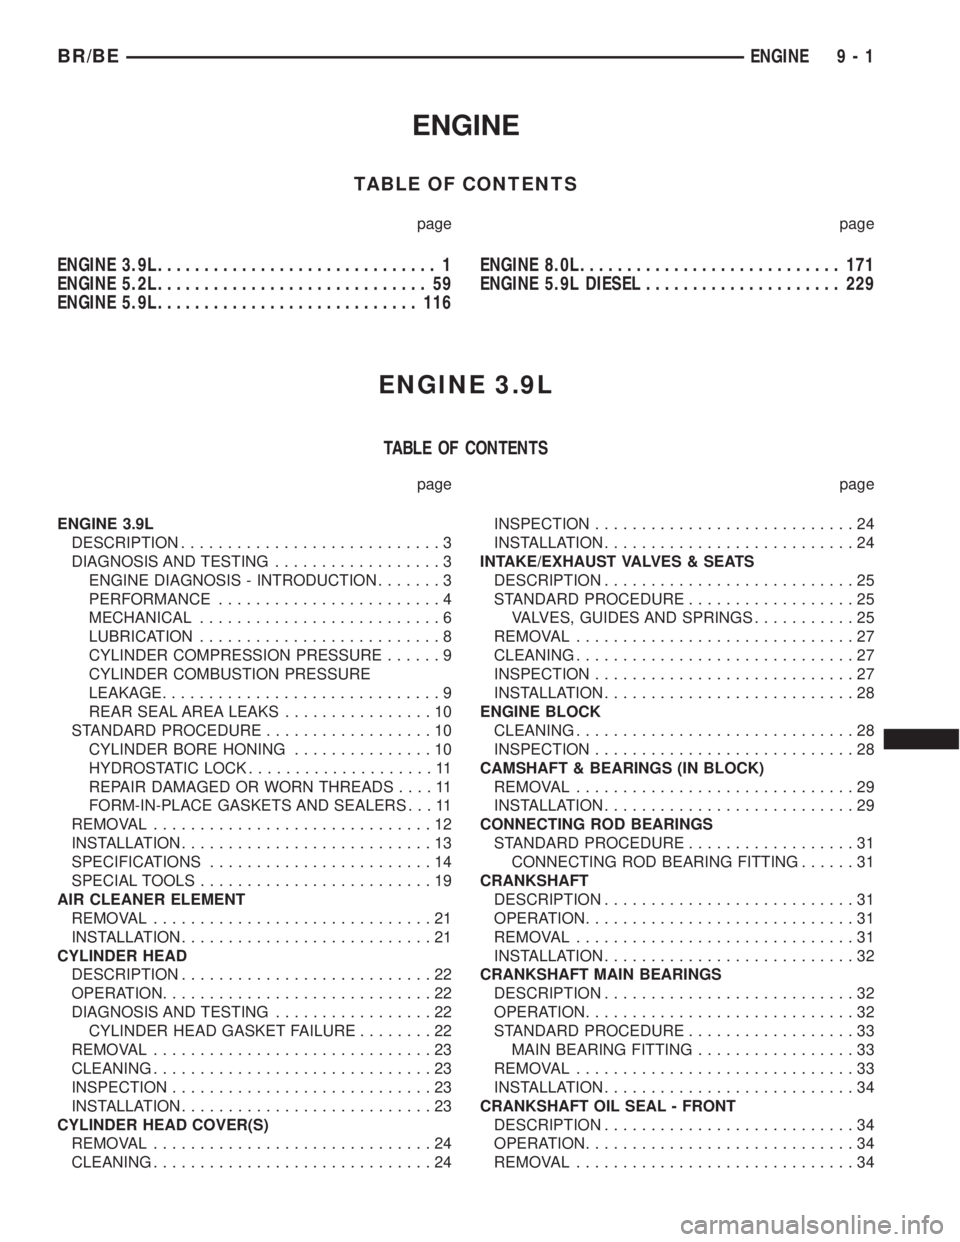
ENGINE
TABLE OF CONTENTS
page page
ENGINE 3.9L.............................. 1
ENGINE 5.2L............................. 59
ENGINE 5.9L............................ 116ENGINE 8.0L............................ 171
ENGINE 5.9L DIESEL..................... 229
ENGINE 3.9L
TABLE OF CONTENTS
page page
ENGINE 3.9L
DESCRIPTION............................3
DIAGNOSIS AND TESTING..................3
ENGINE DIAGNOSIS - INTRODUCTION.......3
PERFORMANCE........................4
MECHANICAL..........................6
LUBRICATION..........................8
CYLINDER COMPRESSION PRESSURE......9
CYLINDER COMBUSTION PRESSURE
LEAKAGE..............................9
REAR SEAL AREA LEAKS................10
STANDARD PROCEDURE..................10
CYLINDER BORE HONING...............10
HYDROSTATIC LOCK....................11
REPAIR DAMAGED OR WORN THREADS....11
FORM-IN-PLACE GASKETS AND SEALERS . . . 11
REMOVAL..............................12
INSTALLATION...........................13
SPECIFICATIONS........................14
SPECIAL TOOLS.........................19
AIR CLEANER ELEMENT
REMOVAL..............................21
INSTALLATION...........................21
CYLINDER HEAD
DESCRIPTION...........................22
OPERATION.............................22
DIAGNOSIS AND TESTING.................22
CYLINDER HEAD GASKET FAILURE........22
REMOVAL..............................23
CLEANING..............................23
INSPECTION............................23
INSTALLATION...........................23
CYLINDER HEAD COVER(S)
REMOVAL..............................24
CLEANING..............................24INSPECTION............................24
INSTALLATION...........................24
INTAKE/EXHAUST VALVES & SEATS
DESCRIPTION...........................25
STANDARD PROCEDURE..................25
VALVES, GUIDES AND SPRINGS...........25
REMOVAL..............................27
CLEANING..............................27
INSPECTION............................27
INSTALLATION...........................28
ENGINE BLOCK
CLEANING..............................28
INSPECTION............................28
CAMSHAFT & BEARINGS (IN BLOCK)
REMOVAL..............................29
INSTALLATION...........................29
CONNECTING ROD BEARINGS
STANDARD PROCEDURE..................31
CONNECTING ROD BEARING FITTING......31
CRANKSHAFT
DESCRIPTION...........................31
OPERATION.............................31
REMOVAL..............................31
INSTALLATION...........................32
CRANKSHAFT MAIN BEARINGS
DESCRIPTION...........................32
OPERATION.............................32
STANDARD PROCEDURE..................33
MAIN BEARING FITTING.................33
REMOVAL..............................33
INSTALLATION...........................34
CRANKSHAFT OIL SEAL - FRONT
DESCRIPTION...........................34
OPERATION.............................34
REMOVAL..............................34
BR/BEENGINE 9 - 1
Page 1153 of 2889
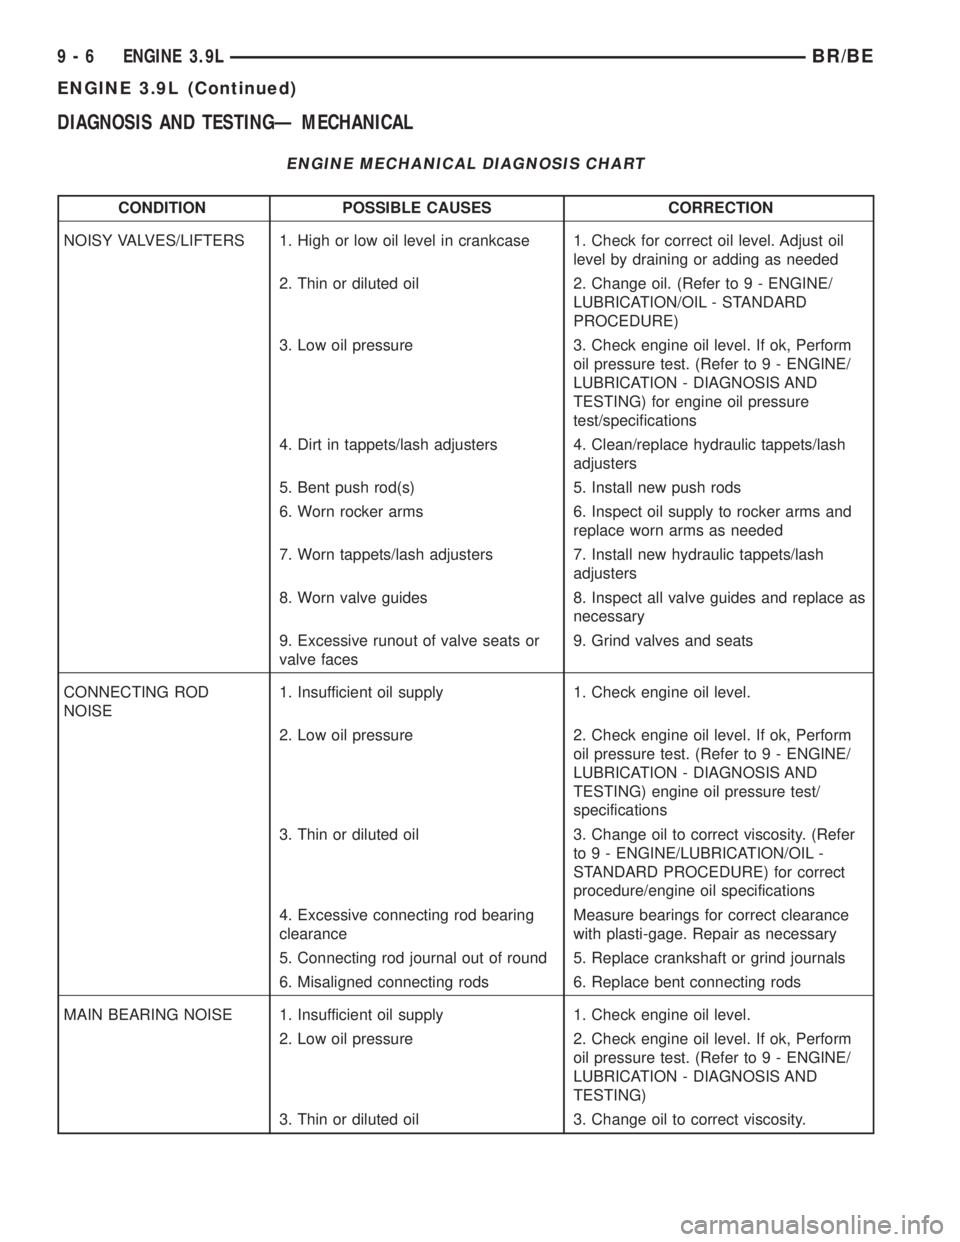
DIAGNOSIS AND TESTINGÐ MECHANICAL
ENGINE MECHANICAL DIAGNOSIS CHART
CONDITION POSSIBLE CAUSES CORRECTION
NOISY VALVES/LIFTERS 1. High or low oil level in crankcase 1. Check for correct oil level. Adjust oil
level by draining or adding as needed
2. Thin or diluted oil 2. Change oil. (Refer to 9 - ENGINE/
LUBRICATION/OIL - STANDARD
PROCEDURE)
3. Low oil pressure 3. Check engine oil level. If ok, Perform
oil pressure test. (Refer to 9 - ENGINE/
LUBRICATION - DIAGNOSIS AND
TESTING) for engine oil pressure
test/specifications
4. Dirt in tappets/lash adjusters 4. Clean/replace hydraulic tappets/lash
adjusters
5. Bent push rod(s) 5. Install new push rods
6. Worn rocker arms 6. Inspect oil supply to rocker arms and
replace worn arms as needed
7. Worn tappets/lash adjusters 7. Install new hydraulic tappets/lash
adjusters
8. Worn valve guides 8. Inspect all valve guides and replace as
necessary
9. Excessive runout of valve seats or
valve faces9. Grind valves and seats
CONNECTING ROD
NOISE1. Insufficient oil supply 1. Check engine oil level.
2. Low oil pressure 2. Check engine oil level. If ok, Perform
oil pressure test. (Refer to 9 - ENGINE/
LUBRICATION - DIAGNOSIS AND
TESTING) engine oil pressure test/
specifications
3. Thin or diluted oil 3. Change oil to correct viscosity. (Refer
to 9 - ENGINE/LUBRICATION/OIL -
STANDARD PROCEDURE) for correct
procedure/engine oil specifications
4. Excessive connecting rod bearing
clearanceMeasure bearings for correct clearance
with plasti-gage. Repair as necessary
5. Connecting rod journal out of round 5. Replace crankshaft or grind journals
6. Misaligned connecting rods 6. Replace bent connecting rods
MAIN BEARING NOISE 1. Insufficient oil supply 1. Check engine oil level.
2. Low oil pressure 2. Check engine oil level. If ok, Perform
oil pressure test. (Refer to 9 - ENGINE/
LUBRICATION - DIAGNOSIS AND
TESTING)
3. Thin or diluted oil 3. Change oil to correct viscosity.
9 - 6 ENGINE 3.9LBR/BE
ENGINE 3.9L (Continued)
Page 1172 of 2889
INTAKE/EXHAUST VALVES &
SEATS
DESCRIPTION
Both the intake and exhaust valves are made of
steel. The intake valve is 48.768 mm (1.92 inches) in
diameter and the exhaust valve is 41.148 mm (1.62
inches) in diameter and has a 2.032 mm (0.080 inch)
wafer interia welded to the tip for durability. These
valves are not splayed.
STANDARD PROCEDUREÐVALVES, GUIDES
AND SPRINGS
VALVE CLEANING
Clean valves thoroughly. Discard burned, warped,
or cracked valves.
Remove carbon and varnish deposits from inside of
valve guides with a reliable guide cleaner.
VALVE GUIDES
Measure valve stems for wear. If wear exceeds
0.051 mm (0.002 in.), replace the valve.
Measure valve stem guide clearance as follows:
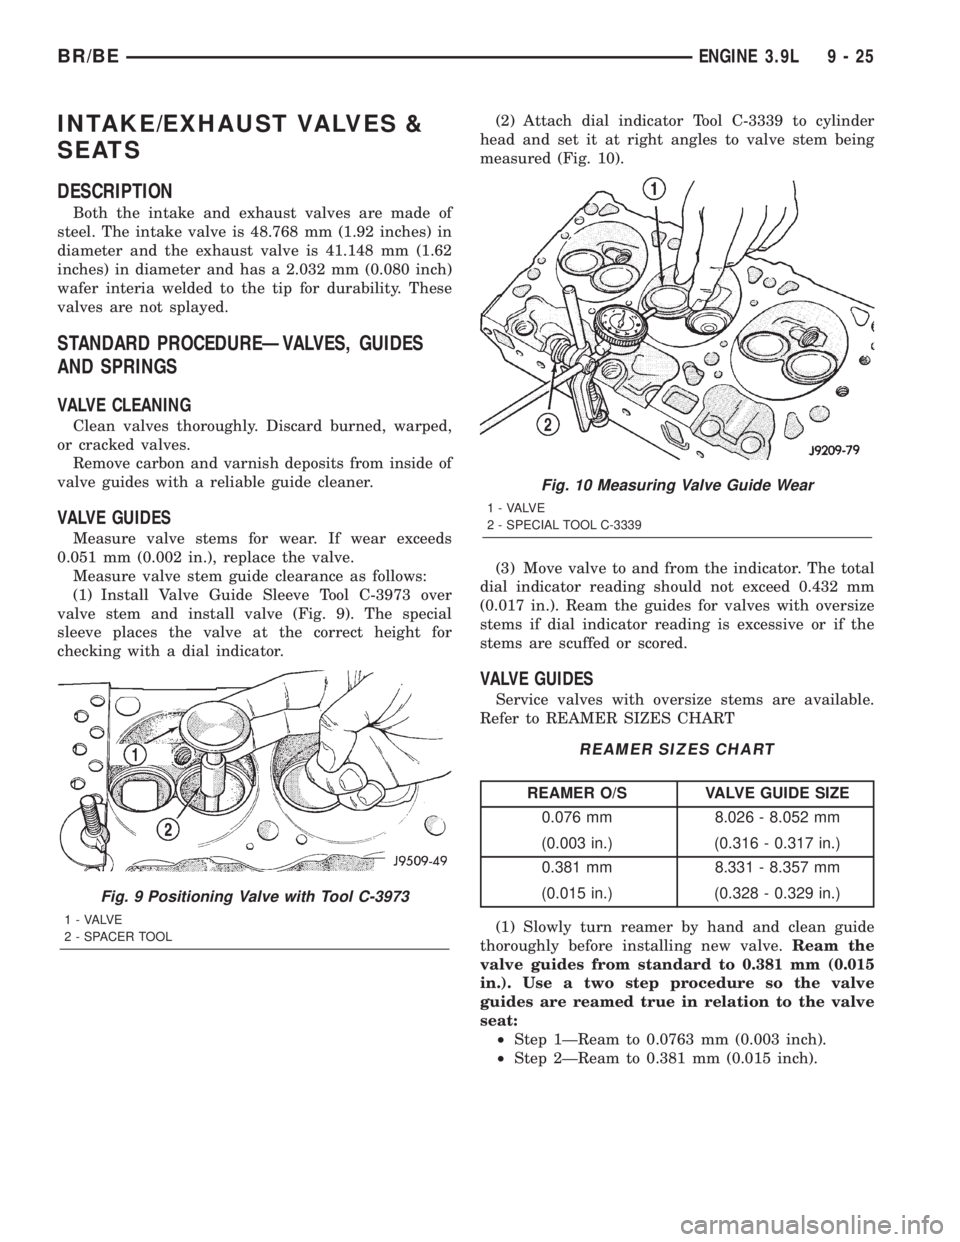
(1) Install Valve Guide Sleeve Tool C-3973 over
valve stem and install valve (Fig. 9). The special
sleeve places the valve at the correct height for
checking with a dial indicator.(2) Attach dial indicator Tool C-3339 to cylinder
head and set it at right angles to valve stem being
measured (Fig. 10).
(3) Move valve to and from the indicator. The total
dial indicator reading should not exceed 0.432 mm
(0.017 in.). Ream the guides for valves with oversize
stems if dial indicator reading is excessive or if the
stems are scuffed or scored.
VALVE GUIDES
Service valves with oversize stems are available.
Refer to REAMER SIZES CHART
REAMER SIZES CHART
REAMER O/S VALVE GUIDE SIZE
0.076 mm 8.026 - 8.052 mm
(0.003 in.) (0.316 - 0.317 in.)
0.381 mm 8.331 - 8.357 mm
(0.015 in.) (0.328 - 0.329 in.)
(1) Slowly turn reamer by hand and clean guide
thoroughly before installing new valve.Ream the
valve guides from standard to 0.381 mm (0.015
in.). Use a two step procedure so the valve
guides are reamed true in relation to the valve
seat:
²Step 1ÐReam to 0.0763 mm (0.003 inch).
²Step 2ÐReam to 0.381 mm (0.015 inch).
Fig. 9 Positioning Valve with Tool C-3973
1 - VALVE
2 - SPACER TOOL
Fig. 10 Measuring Valve Guide Wear
1 - VALVE
2 - SPECIAL TOOL C-3339
BR/BEENGINE 3.9L 9 - 25
Page 1173 of 2889
REFACING VALVES AND VALVE SEATS
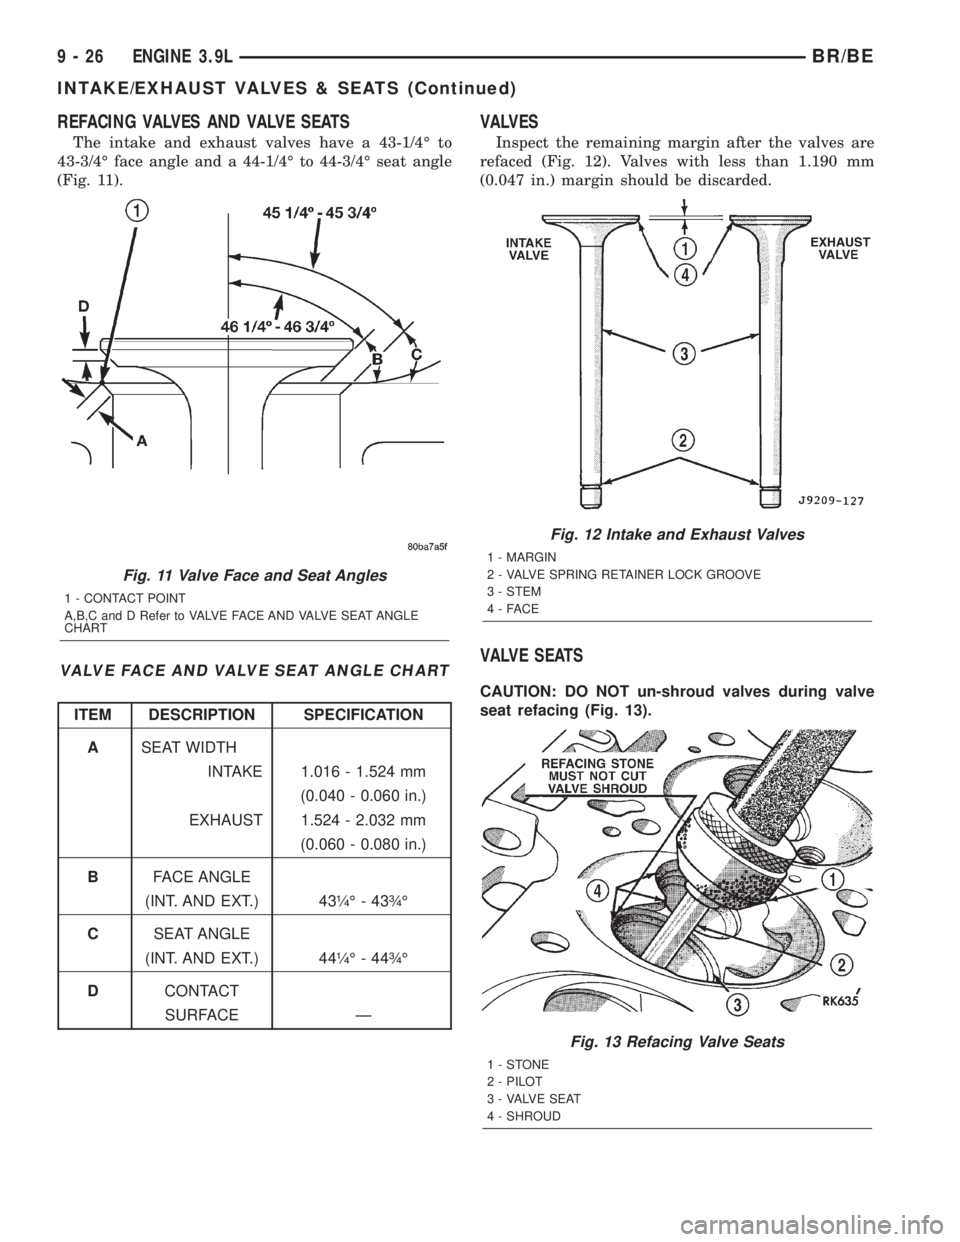
The intake and exhaust valves have a 43-1/4É to
43-3/4É face angle and a 44-1/4É to 44-3/4É seat angle
(Fig. 11).
VALVE FACE AND VALVE SEAT ANGLE CHART
ITEM DESCRIPTION SPECIFICATION
ASEAT WIDTH
INTAKE 1.016 - 1.524 mm
(0.040 - 0.060 in.)
EXHAUST 1.524 - 2.032 mm
(0.060 - 0.080 in.)
BFACE ANGLE
(INT. AND EXT.) 43òÉ - 43ôÉ
CSEAT ANGLE
(INT. AND EXT.) 44òÉ - 44ôÉ
DCONTACT
SURFACE Ð
VALVES
Inspect the remaining margin after the valves are
refaced (Fig. 12). Valves with less than 1.190 mm
(0.047 in.) margin should be discarded.
VALVE SEATS
CAUTION: DO NOT un-shroud valves during valve
seat refacing (Fig. 13).
Fig. 11 Valve Face and Seat Angles
1 - CONTACT POINT
A,B,C and D Refer to VALVE FACE AND VALVE SEAT ANGLE
CHART
Fig. 12 Intake and Exhaust Valves
1 - MARGIN
2 - VALVE SPRING RETAINER LOCK GROOVE
3 - STEM
4-FACE
Fig. 13 Refacing Valve Seats
1-STONE
2 - PILOT
3 - VALVE SEAT
4 - SHROUD
9 - 26 ENGINE 3.9LBR/BE
INTAKE/EXHAUST VALVES & SEATS (Continued)
Page 1174 of 2889
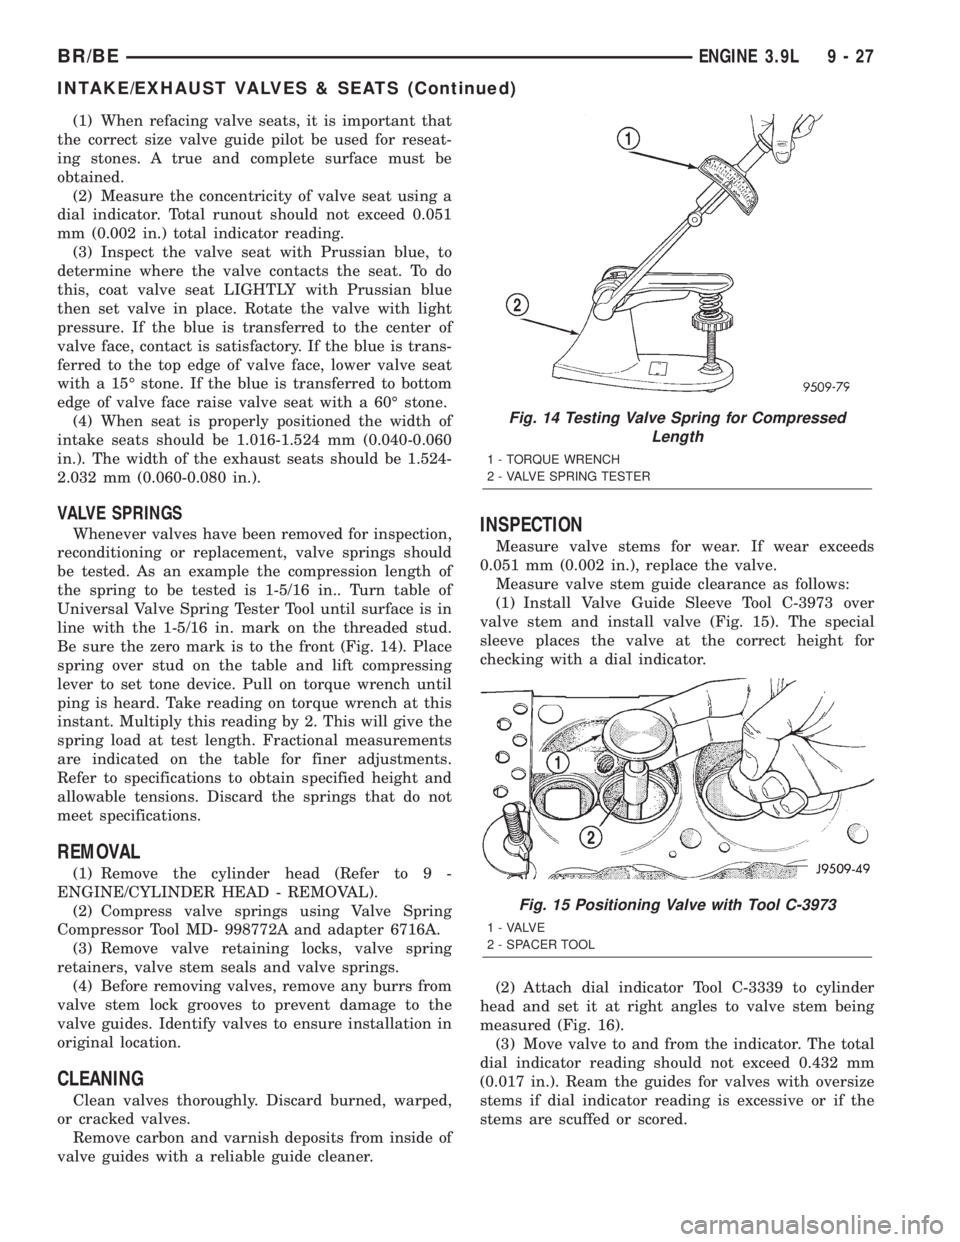
(1) When refacing valve seats, it is important that
the correct size valve guide pilot be used for reseat-
ing stones. A true and complete surface must be
obtained.
(2) Measure the concentricity of valve seat using a
dial indicator. Total runout should not exceed 0.051
mm (0.002 in.) total indicator reading.
(3) Inspect the valve seat with Prussian blue, to
determine where the valve contacts the seat. To do
this, coat valve seat LIGHTLY with Prussian blue
then set valve in place. Rotate the valve with light
pressure. If the blue is transferred to the center of
valve face, contact is satisfactory. If the blue is trans-
ferred to the top edge of valve face, lower valve seat
with a 15É stone. If the blue is transferred to bottom
edge of valve face raise valve seat with a 60É stone.
(4) When seat is properly positioned the width of
intake seats should be 1.016-1.524 mm (0.040-0.060
in.). The width of the exhaust seats should be 1.524-
2.032 mm (0.060-0.080 in.).
VALVE SPRINGS
Whenever valves have been removed for inspection,
reconditioning or replacement, valve springs should
be tested. As an example the compression length of
the spring to be tested is 1-5/16 in.. Turn table of
Universal Valve Spring Tester Tool until surface is in
line with the 1-5/16 in. mark on the threaded stud.
Be sure the zero mark is to the front (Fig. 14). Place
spring over stud on the table and lift compressing
lever to set tone device. Pull on torque wrench until
ping is heard. Take reading on torque wrench at this
instant. Multiply this reading by 2. This will give the
spring load at test length. Fractional measurements
are indicated on the table for finer adjustments.
Refer to specifications to obtain specified height and
allowable tensions. Discard the springs that do not
meet specifications.
REMOVAL
(1) Remove the cylinder head (Refer to 9 -
ENGINE/CYLINDER HEAD - REMOVAL).
(2) Compress valve springs using Valve Spring
Compressor Tool MD- 998772A and adapter 6716A.
(3) Remove valve retaining locks, valve spring
retainers, valve stem seals and valve springs.
(4) Before removing valves, remove any burrs from
valve stem lock grooves to prevent damage to the
valve guides. Identify valves to ensure installation in
original location.
CLEANING
Clean valves thoroughly. Discard burned, warped,
or cracked valves.
Remove carbon and varnish deposits from inside of
valve guides with a reliable guide cleaner.
INSPECTION
Measure valve stems for wear. If wear exceeds
0.051 mm (0.002 in.), replace the valve.
Measure valve stem guide clearance as follows:
(1) Install Valve Guide Sleeve Tool C-3973 over
valve stem and install valve (Fig. 15). The special
sleeve places the valve at the correct height for
checking with a dial indicator.
(2) Attach dial indicator Tool C-3339 to cylinder
head and set it at right angles to valve stem being
measured (Fig. 16).
(3) Move valve to and from the indicator. The total
dial indicator reading should not exceed 0.432 mm
(0.017 in.). Ream the guides for valves with oversize
stems if dial indicator reading is excessive or if the
stems are scuffed or scored.
Fig. 14 Testing Valve Spring for Compressed
Length
1 - TORQUE WRENCH
2 - VALVE SPRING TESTER
Fig. 15 Positioning Valve with Tool C-3973
1 - VALVE
2 - SPACER TOOL
BR/BEENGINE 3.9L 9 - 27
INTAKE/EXHAUST VALVES & SEATS (Continued)
Page 1175 of 2889
INSTALLATION
(1) Clean valves thoroughly. Discard burned,
warped and cracked valves.
(2) Remove carbon and varnish deposits from
inside of valve guides with a reliable guide cleaner.
(3) Measure valve stems for wear. If wear exceeds
0.051 mm (0.002 inch), replace the valve.
(4) Coat valve stems with lubrication oil and insert
them in cylinder head.
(5) If valves or seats are reground, check valve
stem height. If valve is too long, replace cylinder
head.
(6) Install new seals on all valve guides. Install
valve springs and valve retainers.
(7) Compress valve springs with Valve Spring
Compressor Tool MD-998772A and adapter 6716A,
install locks and release tool. If valves and/or seats
are ground, measure the installed height of springs.
Make sure the measurement is taken from bottom of
spring seat in cylinder head to the bottom surface of
spring retainer. If spacers are installed, measure
from the top of spacer. If height is greater than 42.86
mm (1-11/16 inches), install a 1.587 mm (1/16 inch)
spacer in head counterbore. This should bring spring
height back to normal 41.27 to 42.86 mm (1-5/8 to
1-11/16 inch).
(8) Install cylinder head (Refer to 9 - ENGINE/
CYLINDER HEAD - INSTALLATION).
ENGINE BLOCK
CLEANING
Clean cylinder block thoroughly and check all core
hole plugs for evidence of leakage.
INSPECTION
Examine block for cracks or fractures.
The cylinder walls should be checked for out-of-
round and taper. Refer to Honing Cylinder Bores in
the Service Procedures portion of this Section.
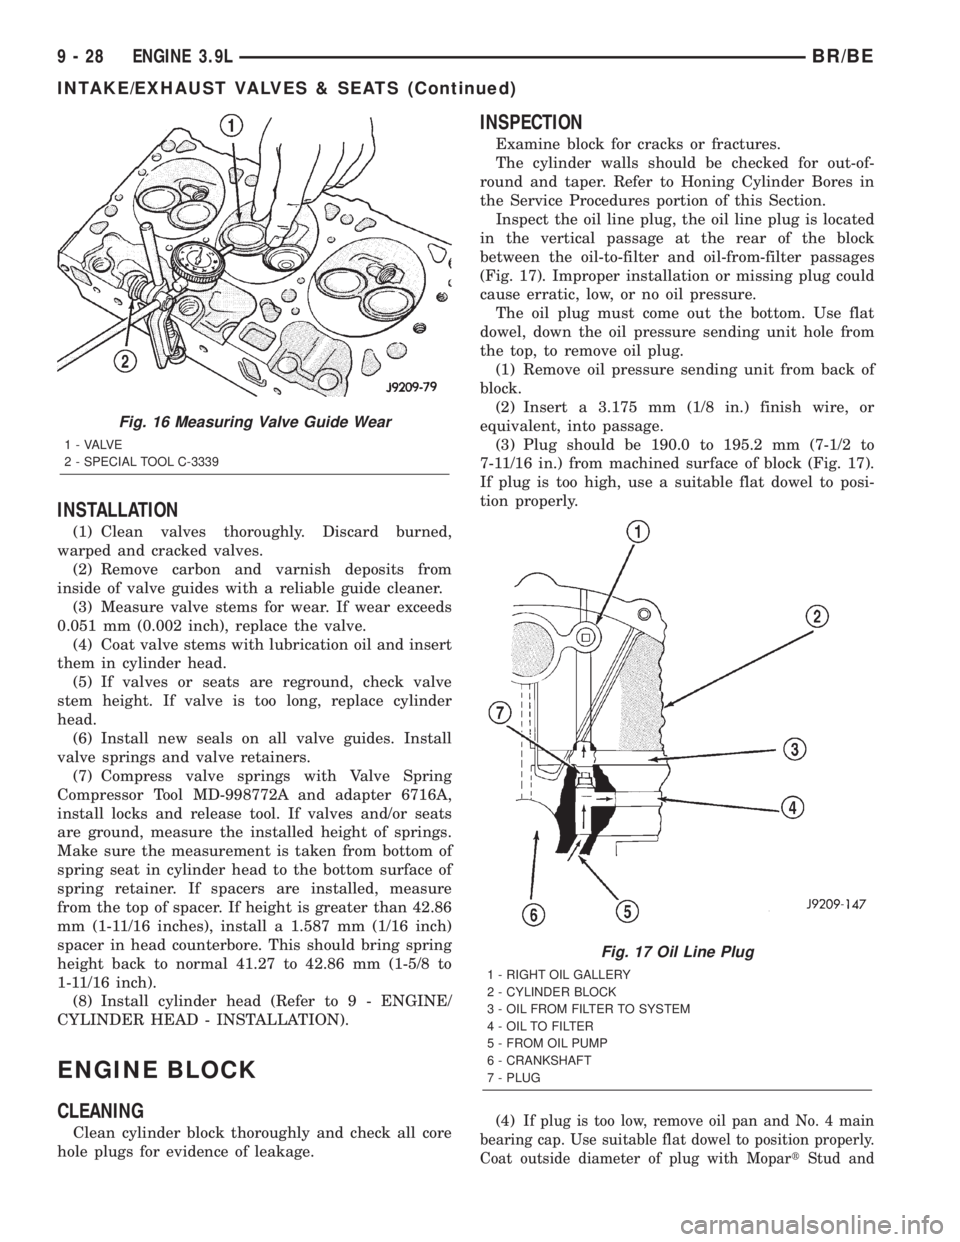
Inspect the oil line plug, the oil line plug is located
in the vertical passage at the rear of the block
between the oil-to-filter and oil-from-filter passages
(Fig. 17). Improper installation or missing plug could
cause erratic, low, or no oil pressure.
The oil plug must come out the bottom. Use flat
dowel, down the oil pressure sending unit hole from
the top, to remove oil plug.
(1) Remove oil pressure sending unit from back of
block.
(2) Insert a 3.175 mm (1/8 in.) finish wire, or
equivalent, into passage.
(3) Plug should be 190.0 to 195.2 mm (7-1/2 to
7-11/16 in.) from machined surface of block (Fig. 17).
If plug is too high, use a suitable flat dowel to posi-
tion properly.
(4)
If plug is too low, remove oil pan and No. 4 main
bearing cap. Use suitable flat dowel to position properly.
Coat outside diameter of plug with MopartStud and
Fig. 16 Measuring Valve Guide Wear
1 - VALVE
2 - SPECIAL TOOL C-3339
Fig. 17 Oil Line Plug
1 - RIGHT OIL GALLERY
2 - CYLINDER BLOCK
3 - OIL FROM FILTER TO SYSTEM
4 - OIL TO FILTER
5 - FROM OIL PUMP
6 - CRANKSHAFT
7 - PLUG
9 - 28 ENGINE 3.9LBR/BE
INTAKE/EXHAUST VALVES & SEATS (Continued)
Page 1206 of 2889
ENGINE 5.2L
TABLE OF CONTENTS
page page
ENGINE 5.2L
DESCRIPTION...........................60
DIAGNOSIS AND TESTING.................61
ENGINE DIAGNOSIS - INTRODUCTION......61
PERFORMANCE.......................61
MECHANICAL.........................63
LUBRICATION.........................66
CYLINDER COMPRESSION PRESSURE.....67
CYLINDER COMBUSTION PRESSURE
LEAKAGE.............................67
STANDARD PROCEDURE..................68
FORM-IN-PLACE GASKETS AND SEALERS. . . 68
REPAIR DAMAGED OR WORN THREADS....68
HYDROSTATIC LOCK....................68
CYLINDER BORE HONING...............69
REMOVAL..............................69
INSTALLATION...........................70
SPECIFICATIONS........................72
SPECIAL TOOLS.........................77
CYLINDER HEAD
DESCRIPTION...........................79
OPERATION.............................79
DIAGNOSIS AND TESTING.................79
CYLINDER HEAD GASKET FAILURE........79
REMOVAL..............................80
CLEANING..............................80
INSPECTION............................80
INSTALLATION...........................80
CYLINDER HEAD COVER(S)
REMOVAL..............................81
CLEANING..............................81
INSPECTION............................81
INSTALLATION...........................81
INTAKE/EXHAUST VALVES & SEATS
DESCRIPTION...........................81
STANDARD PROCEDURE..................82
VALVES, GUIDES AND SPRINGS...........82
REMOVAL..............................84
CLEANING..............................84
INSPECTION............................84
INSTALLATION...........................85
ROCKER ARM / ADJUSTER ASSEMBLY
REMOVAL..............................85
INSTALLATION...........................85
ENGINE BLOCK
CLEANING..............................86
INSPECTION............................86
CAMSHAFT & BEARINGS (IN BLOCK)
REMOVAL..............................86INSTALLATION...........................87
CONNECTING ROD BEARINGS
STANDARD PROCEDURE..................88
CONNECTING ROD BEARING FITTING......88
CRANKSHAFT
DESCRIPTION...........................88
OPERATION.............................88
REMOVAL..............................88
INSTALLATION...........................89
CRANKSHAFT MAIN BEARINGS
DESCRIPTION...........................90
OPERATION.............................90
STANDARD PROCEDURE..................90
CRANKSHAFT MAIN BEARING FITTING.....90
REMOVAL..............................90
INSTALLATION...........................90
CRANKSHAFT OIL SEAL - FRONT
DESCRIPTION...........................91
OPERATION.............................91
REMOVAL..............................91
INSTALLATION...........................91
CRANKSHAFT OIL SEAL - REAR
DESCRIPTION...........................91
OPERATION.............................92
REMOVAL..............................92
INSTALLATION...........................92
DISTRIBUTOR BUSHING
REMOVAL..............................94
INSTALLATION...........................94
HYDRAULIC LIFTERS (CAM IN BLOCK)
DIAGNOSIS AND TESTING.................95
HYDRAULIC TAPPETS...................95
REMOVAL..............................96
CLEANING..............................96
INSTALLATION...........................96
PISTON & CONNECTING ROD
DESCRIPTION...........................97
STANDARD PROCEDURE..................97
PISTON FITTING.......................97
REMOVAL..............................97
CLEANING..............................98
INSPECTION............................98
INSTALLATION...........................98
PISTON RINGS
STANDARD PROCEDURE..................98
PISTON RING FITTING..................98
VIBRATION DAMPER
REMOVAL..............................99
INSTALLATION...........................99
BR/BEENGINE 5.2L 9 - 59
Page 1210 of 2889
CONDITION POSSIBLE CAUSES CORRECTION
ENGINE MISSES ON
ACCELERATION1. Worn or incorrectly gapped spark
plugs1. Replace spark plugs or clean and
set gap. (Refer to 8 - ELECTRICAL/
IGNITION CONTROL/SPARK PLUG -
CLEANING)
2. Spark plug cables defective or
crossed2. Replace or rewire secondary ignition
cables. (Refer to 8 - ELECTRICAL/
IGNITION CONTROL/SPARK PLUG
CABLE - REMOVAL)
3. Dirt in fuel system 3. Clean fuel system
4. Burned, warped or pitted valves 4. Install new valves
5. Faulty coil 5. Test and replace as necessary
(Refer to 8 - ELECTRICAL/IGNITION
CONTROL/IGNITION COIL -
REMOVAL)
DIAGNOSIS AND TESTINGÐ MECHANICAL
ENGINE MECHANICAL DIAGNOSIS CHART
CONDITION POSSIBLE CAUSES CORRECTION
NOISY VALVES/LIFTERS 1. High or low oil level in crankcase 1. Check for correct oil level. Adjust
oil level by draining or adding as
needed
2. Thin or diluted oil 2. Change oil. (Refer to 9 -
ENGINE/LUBRICATION/OIL -
STANDARD PROCEDURE)
3. Low oil pressure 3. Check engine oil level. If ok,
Perform oil pressure test. (Refer to
9 - ENGINE/LUBRICATION -
DIAGNOSIS AND TESTING) for
engine oil pressure test/
specifications
4. Dirt in tappets/lash adjusters 4. Clean/replace hydraulic
tappets/lash adjusters
5. Bent push rod(s) 5. Install new push rods
6. Worn rocker arms 6. Inspect oil supply to rocker arms
and replace worn arms as needed
7. Worn tappets/lash adjusters 7. Install new hydraulic tappets/lash
adjusters
8. Worn valve guides 8. Inspect all valve guides and
replace as necessary
9. Excessive runout of valve seats
or valve faces9. Grind valves and seats
BR/BEENGINE 5.2L 9 - 63
ENGINE 5.2L (Continued)