2001 CHRYSLER VOYAGER engine
[x] Cancel search: enginePage 2694 of 4284
BALANCE SHAFT CARRIER
REMOVAL
(Refer to 9 - ENGINE/VALVE TIMING/BALANCE
SHAFT - REMOVAL)
INSTALLATION
(Refer to 9 - ENGINE/VALVE TIMING/BALANCE
SHAFT - INSTALLATION)
BALANCE SHAFT CHAIN
REMOVAL
(Refer to 9 - ENGINE/VALVE TIMING/BALANCE
SHAFT - REMOVAL)
INSTALLATION
(Refer to 9 - ENGINE/VALVE TIMING/BALANCE
SHAFT - INSTALLATION)
9 - 70 ENGINE 2.4LRS
Page 2695 of 4284
ENGINE 3.3/3.8L
TABLE OF CONTENTS
page page
ENGINE 3.3/3.8L
DESCRIPTION...........................73
DIAGNOSIS AND TESTING.................74
ENGINE..............................74
ENGINE DIAGNOSIS - PERFORMANCE......74
ENGINE DIAGNOSIS - MECHANICAL........76
ENGINE OIL LEAK INSPECTION...........77
CYLINDER COMPRESSION PRESSURE
TEST................................78
CYLINDER COMBUSTION PRESSURE
LEAKAGE TEST........................79
STANDARD PROCEDURE..................79
MEASURING WITH PLASTIGAGE..........79
FORM-IN-PLACE GASKETS AND SEALERS. . . 79
ENGINE GASKET SURFACE PREPARATION . . 80
HYDROSTATIC LOCKED ENGINE..........81
REPAIR OF DAMAGED OR WORN
THREADS.............................81
ENGINE CORE AND OIL GALLERY PLUGS . . . 81
REMOVAL..............................82
INSTALLATION...........................84
SPECIFICATIONS........................86
SPECIAL TOOLS.........................90
AIR CLEANER ELEMENT
REMOVAL..............................93
INSTALLATION...........................93
AIR CLEANER HOUSING
REMOVAL..............................93
INSTALLATION...........................93
CYLINDER HEAD
DESCRIPTION...........................94
OPERATION.............................94
DIAGNOSIS AND TESTING.................94
CYLINDER HEAD GASKET...............94
REMOVAL..............................95
CLEANING..............................95
INSPECTION............................96
INSTALLATION...........................96
CYLINDER HEAD COVER(S)
DESCRIPTION...........................97
CYLINDER HEAD COVER - RIGHT
REMOVAL..............................97
INSTALLATION...........................98
CYLINDER HEAD COVER - LEFT
REMOVAL..............................98
INSTALLATION...........................99
INTAKE/EXHAUST VALVES & SEATS
DESCRIPTION...........................99
OPERATION.............................99STANDARD PROCEDURE..................99
VALVE SERVICE.......................99
REMOVAL.............................100
CLEANING.............................100
INSPECTION...........................100
INSTALLATION..........................101
VALVE SPRINGS
DESCRIPTION..........................101
OPERATION............................101
REMOVAL.............................101
INSPECTION...........................103
INSTALLATION..........................103
ROCKER ARMS
DESCRIPTION..........................103
OPERATION............................104
REMOVAL.............................104
DISASSEMBLY..........................105
ASSEMBLY............................105
INSTALLATION..........................105
VALVE STEM SEALS
DESCRIPTION..........................106
REMOVAL.............................106
INSTALLATION..........................106
ENGINE BLOCK
DESCRIPTION..........................106
STANDARD PROCEDURE.................106
CYLINDER BORE HONING...............106
CLEANING.............................107
INSPECTION...........................107
CAMSHAFT & BEARINGS (IN BLOCK)
DESCRIPTION..........................107
OPERATION............................107
REMOVAL.............................107
INSPECTION...........................108
INSTALLATION..........................108
CONNECTING ROD BEARINGS
STANDARD PROCEDURE.................109
CONNECTING ROD BEARING - FITTING....109
CRANKSHAFT
DESCRIPTION..........................109
OPERATION............................110
STANDARD PROCEDURE.................110
CRANKSHAFT END PLAY................110
REMOVAL.............................110
INSPECTION...........................111
INSTALLATION..........................111
CRANKSHAFT MAIN BEARINGS
STANDARD PROCEDURE.................113
CRANKSHAFT MAIN BEARING - FITTING . . . 113
RSENGINE 3.3/3.8L9-71
Page 2696 of 4284
REMOVAL.............................114
INSTALLATION..........................115
CRANKSHAFT OIL SEAL - FRONT
REMOVAL.............................115
INSTALLATION..........................115
CRANKSHAFT OIL SEAL - REAR
REMOVAL.............................116
INSTALLATION..........................117
CRANKSHAFT REAR OIL SEAL RETAINER
REMOVAL.............................117
INSTALLATION..........................117
FLEX PLATE
REMOVAL.............................118
INSTALLATION..........................118
HYDRAULIC LIFTERS (CAM IN BLOCK)
DESCRIPTION..........................118
DIAGNOSIS AND TESTING................118
HYDRAULIC LIFTERS...................118
REMOVAL.............................119
INSTALLATION..........................119
PISTON & CONNECTING ROD
DESCRIPTION..........................119
OPERATION............................120
STANDARD PROCEDURE.................120
CONNECTING ROD AND BEARING -
FITTING.............................120
PISTON - FITTING.....................121
REMOVAL.............................121
INSTALLATION..........................122
PISTON RINGS
STANDARD PROCEDURE.................124
PISTON RING - FITTING................124
REMOVAL.............................124
INSTALLATION..........................125
VIBRATION DAMPER
REMOVAL.............................126
INSTALLATION..........................126
ENGINE MOUNTING
DESCRIPTION..........................127
FRONT MOUNT
REMOVAL.............................127
INSTALLATION..........................127
LEFT MOUNT
REMOVAL.............................128
INSTALLATION..........................128
REAR MOUNT
REMOVAL.............................129
INSTALLATION..........................130
RIGHT MOUNT
REMOVAL.............................130
INSTALLATION..........................131
LUBRICATION
DESCRIPTION..........................131
OPERATION............................131
DIAGNOSIS AND TESTING................131
ENGINE OIL PRESSURE................131OIL
STANDARD PROCEDURE.................132
ENGINE OIL CHANGE..................132
ENGINE OIL LEVEL CHECK..............133
OIL COOLER & LINES
DESCRIPTION..........................134
OPERATION............................134
REMOVAL.............................134
INSTALLATION..........................134
OIL FILTER
REMOVAL.............................135
INSTALLATION..........................135
OIL FILTER ADAPTER
REMOVAL.............................135
INSTALLATION..........................135
OIL PAN
REMOVAL.............................136
CLEANING.............................136
INSPECTION...........................136
INSTALLATION..........................136
OIL PRESSURE RELIEF VALVE
REMOVAL.............................137
INSTALLATION..........................137
OIL PRESSURE SENSOR/SWITCH
DESCRIPTION..........................137
OPERATION............................138
REMOVAL.............................138
INSTALLATION..........................138
OIL PUMP
DESCRIPTION..........................138
REMOVAL.............................138
DISASSEMBLY..........................138
CLEANING.............................138
INSPECTION...........................138
ASSEMBLY............................140
INSTALLATION..........................140
INTAKE MANIFOLD
DESCRIPTION..........................140
OPERATION............................141
DIAGNOSIS AND TESTING................141
INTAKE MANIFOLD LEAKS..............141
INTAKE MANIFOLD - UPPER 3.3L
STANDARD PROCEDURE.................141
MANIFOLD STRIPPED THREAD REPAIR....141
INTAKE MANIFOLD VACUUM PORT REPAIR . 142
REMOVAL.............................143
CLEANING.............................144
INSPECTION...........................144
INSTALLATION..........................144
INTAKE MANIFOLD - UPPER 3.8L
REMOVAL.............................145
CLEANING.............................146
INSPECTION...........................147
INSTALLATION..........................147
INTAKE MANIFOLD - LOWER
REMOVAL.............................148
CLEANING.............................148
9 - 72 ENGINE 3.3/3.8LRS
Page 2697 of 4284
INSPECTION...........................148
INSTALLATION..........................149
EXHAUST MANIFOLD
DESCRIPTION..........................150
OPERATION............................150
EXHAUST MANIFOLD - RIGHT
REMOVAL.............................150
CLEANING.............................151
INSPECTION...........................151
INSTALLATION..........................151
EXHAUST MANIFOLD - LEFT
REMOVAL.............................152
CLEANING.............................152INSPECTION...........................153
INSTALLATION..........................153
VALVE TIMING
STANDARD PROCEDURE.................153
VALVE TIMING VERIFICATION............153
TIMING CHAIN COVER
REMOVAL.............................153
INSTALLATION..........................154
TIMING CHAIN AND SPROCKETS
REMOVAL.............................156
INSPECTION...........................156
INSTALLATION..........................157
ENGINE 3.3/3.8L
DESCRIPTION
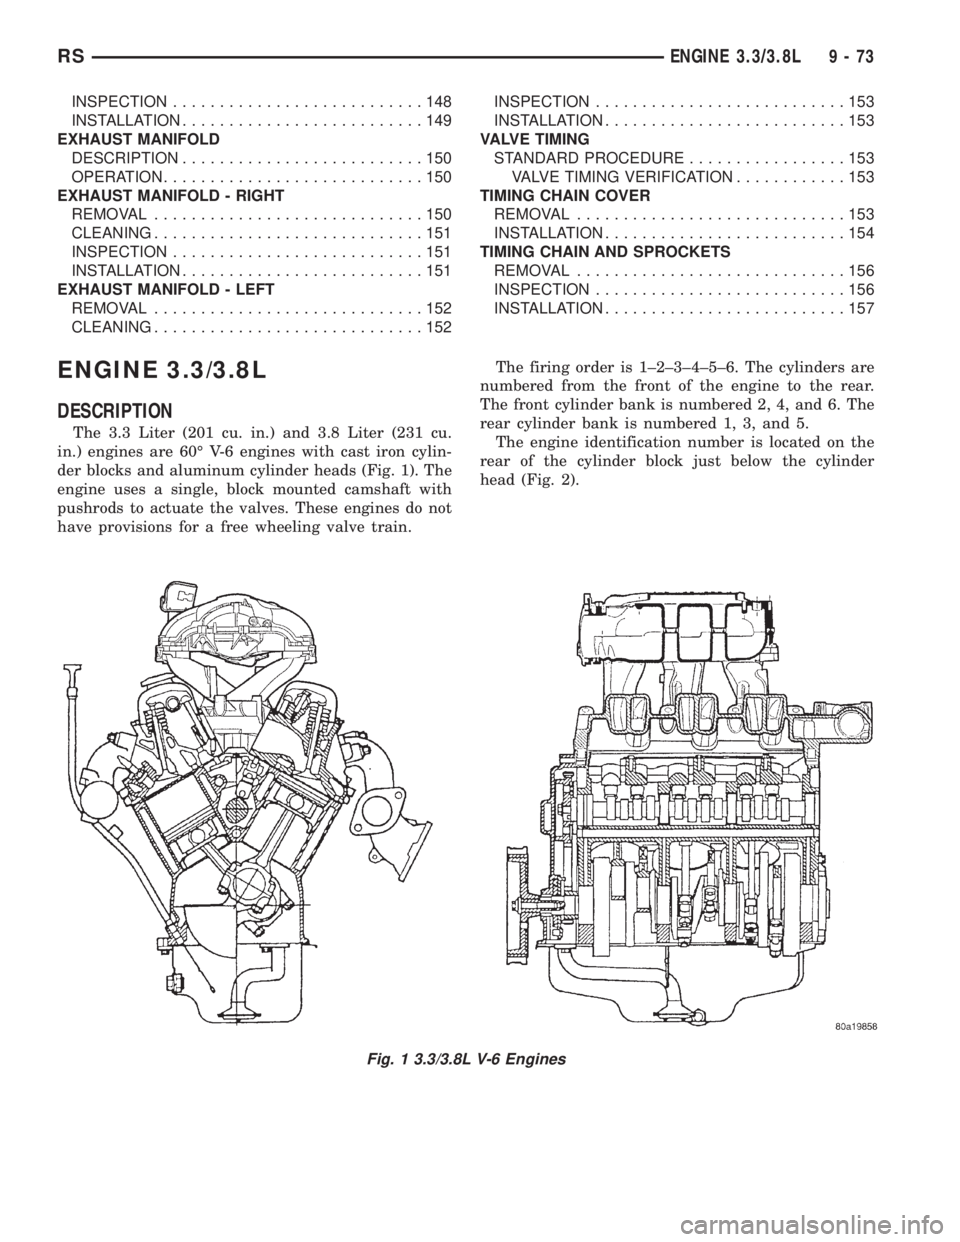
The 3.3 Liter (201 cu. in.) and 3.8 Liter (231 cu.
in.) engines are 60É V-6 engines with cast iron cylin-
der blocks and aluminum cylinder heads (Fig. 1). The
engine uses a single, block mounted camshaft with
pushrods to actuate the valves. These engines do not
have provisions for a free wheeling valve train.The firing order is 1±2±3±4±5±6. The cylinders are
numbered from the front of the engine to the rear.
The front cylinder bank is numbered 2, 4, and 6. The
rear cylinder bank is numbered 1, 3, and 5.
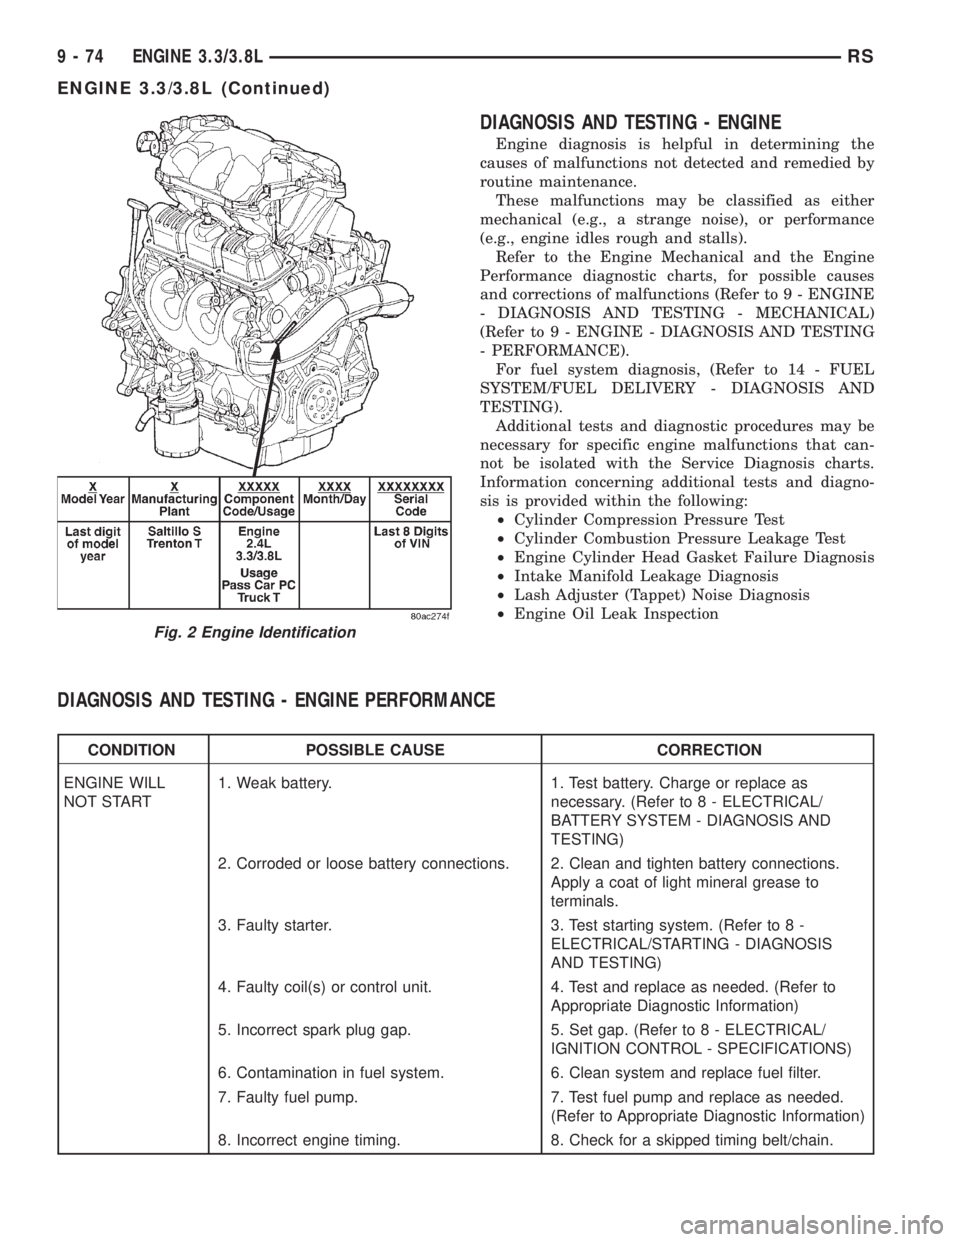
The engine identification number is located on the
rear of the cylinder block just below the cylinder
head (Fig. 2).
Fig. 1 3.3/3.8L V-6 Engines
RSENGINE 3.3/3.8L9-73
Page 2698 of 4284
DIAGNOSIS AND TESTING - ENGINE
Engine diagnosis is helpful in determining the
causes of malfunctions not detected and remedied by
routine maintenance.
These malfunctions may be classified as either
mechanical (e.g., a strange noise), or performance
(e.g., engine idles rough and stalls).
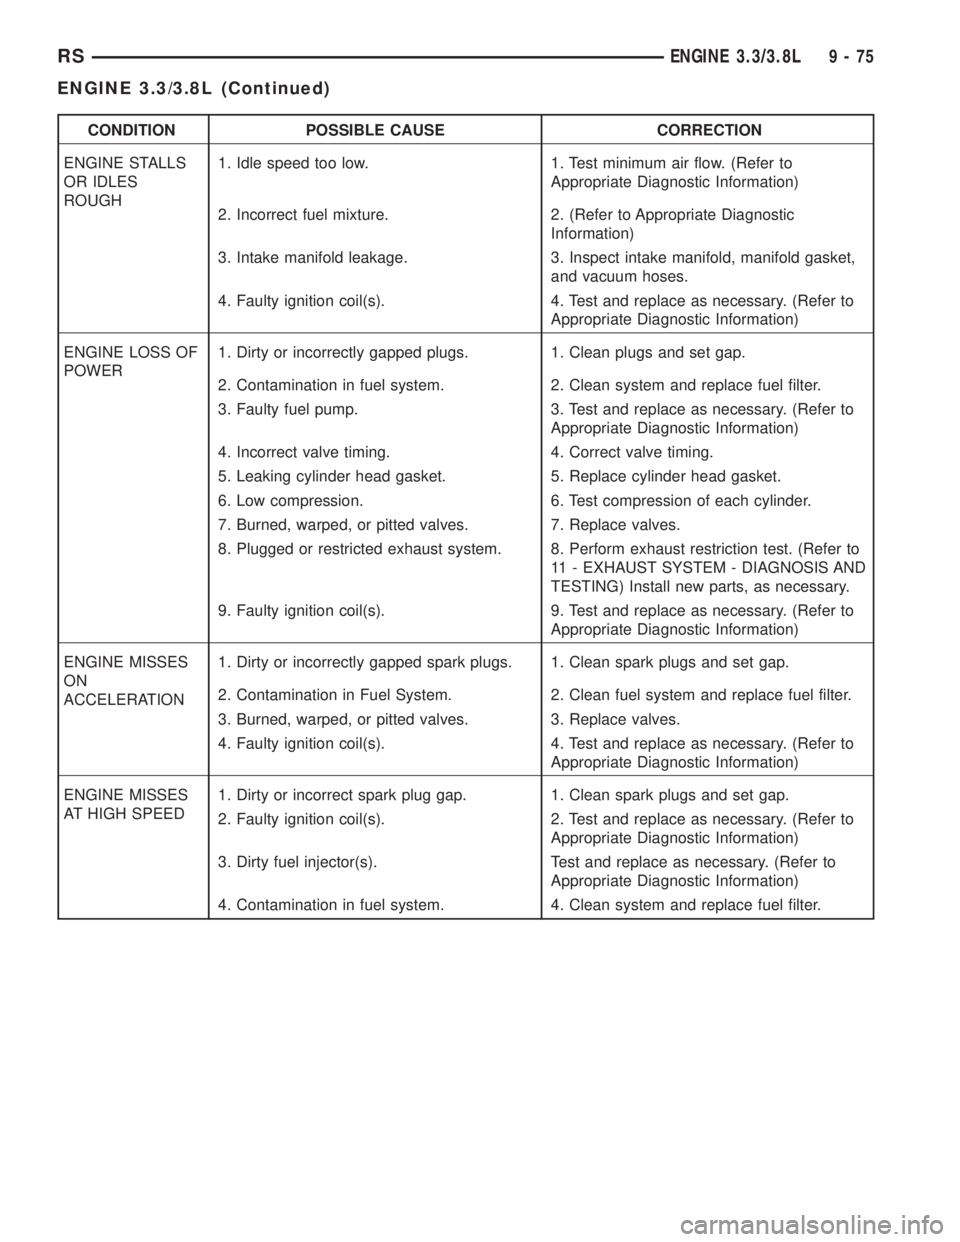
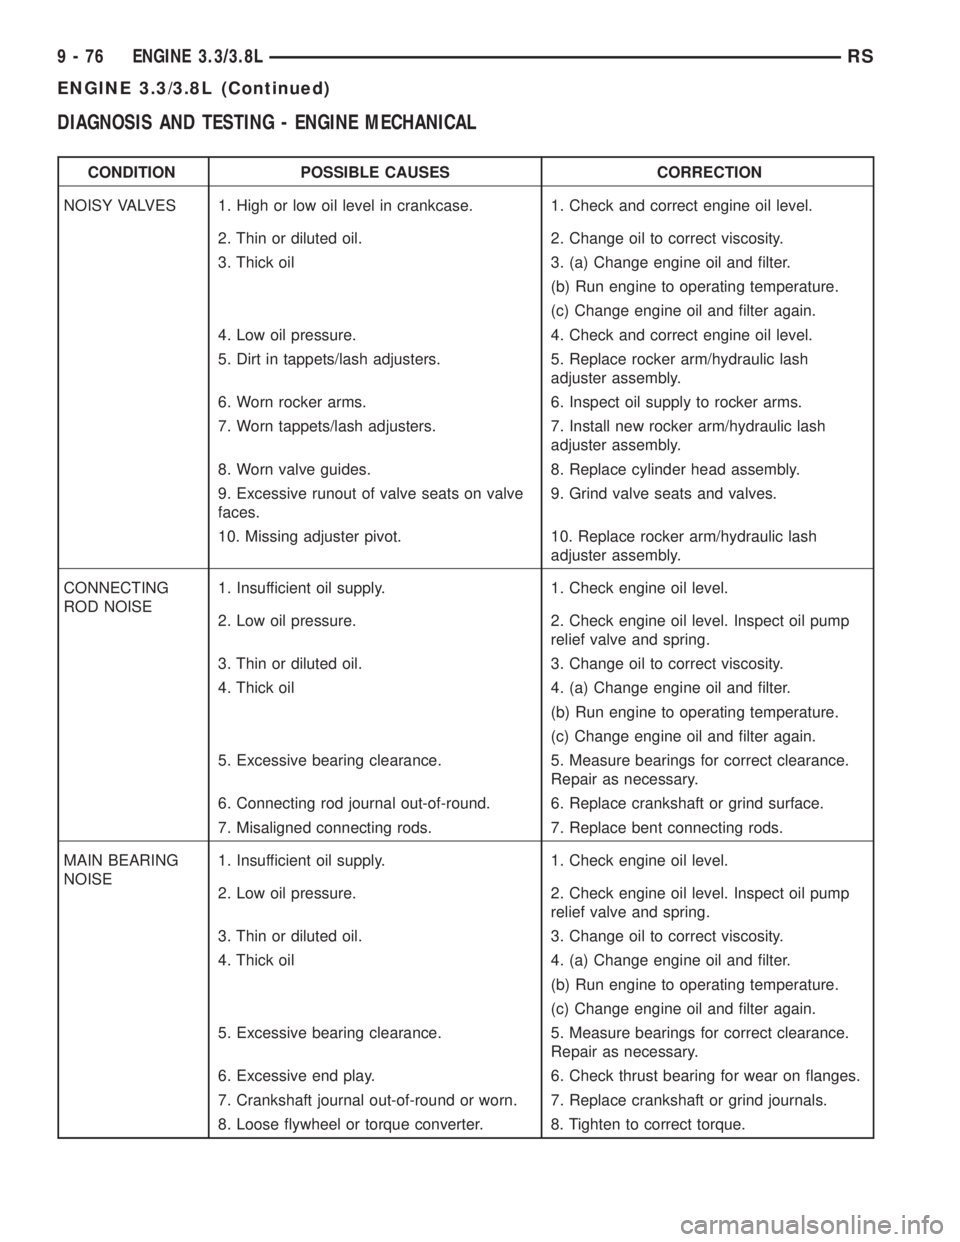
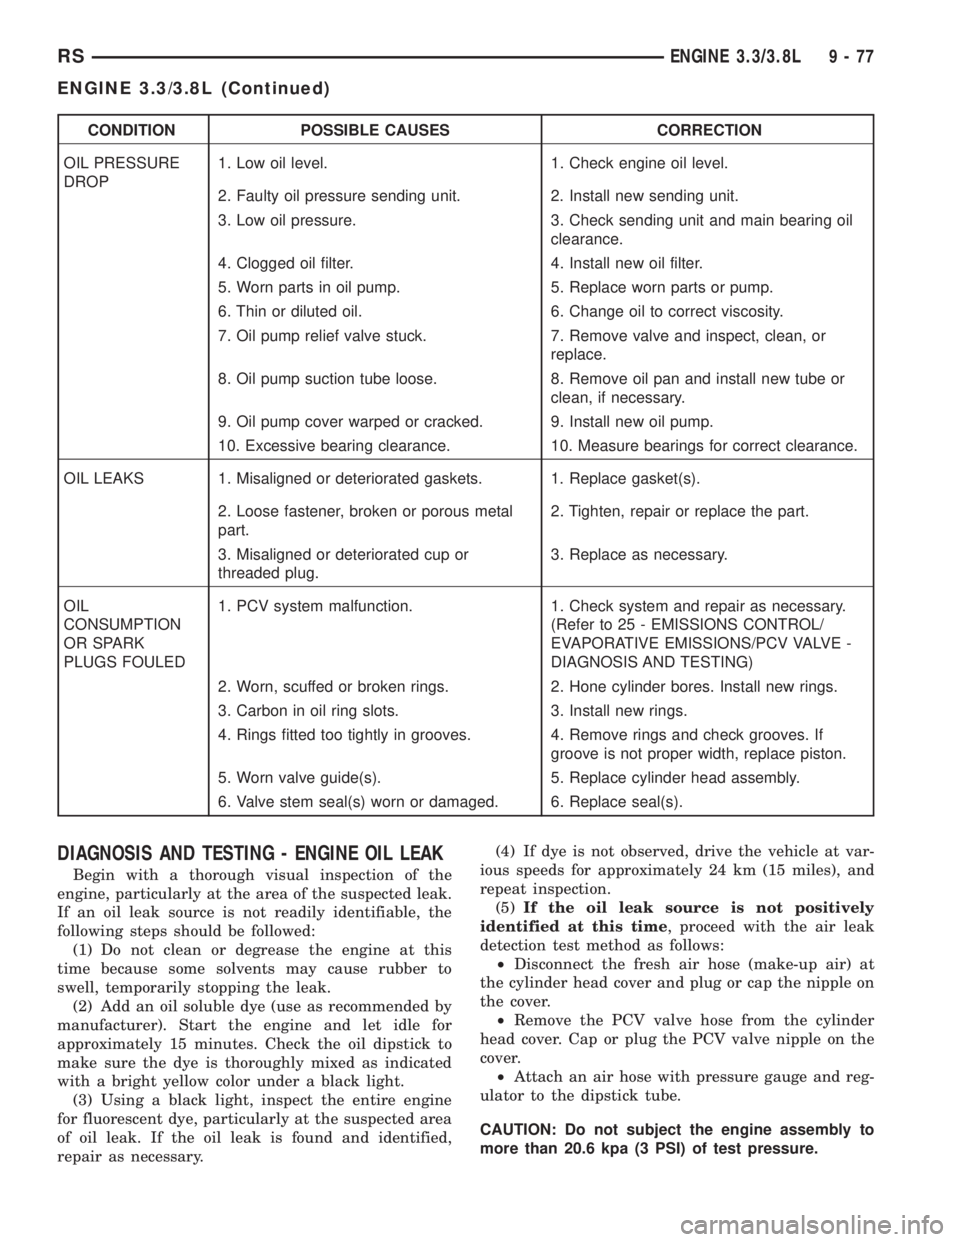
Refer to the Engine Mechanical and the Engine
Performance diagnostic charts, for possible causes
and corrections of malfunctions (Refer to 9 - ENGINE
- DIAGNOSIS AND TESTING - MECHANICAL)
(Refer to 9 - ENGINE - DIAGNOSIS AND TESTING
- PERFORMANCE).
For fuel system diagnosis, (Refer to 14 - FUEL
SYSTEM/FUEL DELIVERY - DIAGNOSIS AND
TESTING).
Additional tests and diagnostic procedures may be
necessary for specific engine malfunctions that can-
not be isolated with the Service Diagnosis charts.
Information concerning additional tests and diagno-
sis is provided within the following:
²Cylinder Compression Pressure Test
²Cylinder Combustion Pressure Leakage Test
²Engine Cylinder Head Gasket Failure Diagnosis
²Intake Manifold Leakage Diagnosis
²Lash Adjuster (Tappet) Noise Diagnosis
²Engine Oil Leak Inspection
DIAGNOSIS AND TESTING - ENGINE PERFORMANCE
CONDITION POSSIBLE CAUSE CORRECTION
ENGINE WILL
NOT START1. Weak battery. 1. Test battery. Charge or replace as
necessary. (Refer to 8 - ELECTRICAL/
BATTERY SYSTEM - DIAGNOSIS AND
TESTING)
2. Corroded or loose battery connections. 2. Clean and tighten battery connections.
Apply a coat of light mineral grease to
terminals.
3. Faulty starter. 3. Test starting system. (Refer to 8 -
ELECTRICAL/STARTING - DIAGNOSIS
AND TESTING)
4. Faulty coil(s) or control unit. 4. Test and replace as needed. (Refer to
Appropriate Diagnostic Information)
5. Incorrect spark plug gap. 5. Set gap. (Refer to 8 - ELECTRICAL/
IGNITION CONTROL - SPECIFICATIONS)
6. Contamination in fuel system. 6. Clean system and replace fuel filter.
7. Faulty fuel pump. 7. Test fuel pump and replace as needed.
(Refer to Appropriate Diagnostic Information)
8. Incorrect engine timing. 8. Check for a skipped timing belt/chain.
Fig. 2 Engine Identification
9 - 74 ENGINE 3.3/3.8LRS
ENGINE 3.3/3.8L (Continued)
Page 2699 of 4284
CONDITION POSSIBLE CAUSE CORRECTION
ENGINE STALLS
OR IDLES
ROUGH1. Idle speed too low. 1. Test minimum air flow. (Refer to
Appropriate Diagnostic Information)
2. Incorrect fuel mixture. 2. (Refer to Appropriate Diagnostic
Information)
3. Intake manifold leakage. 3. Inspect intake manifold, manifold gasket,
and vacuum hoses.
4. Faulty ignition coil(s). 4. Test and replace as necessary. (Refer to
Appropriate Diagnostic Information)
ENGINE LOSS OF
POWER1. Dirty or incorrectly gapped plugs. 1. Clean plugs and set gap.
2. Contamination in fuel system. 2. Clean system and replace fuel filter.
3. Faulty fuel pump. 3. Test and replace as necessary. (Refer to
Appropriate Diagnostic Information)
4. Incorrect valve timing. 4. Correct valve timing.
5. Leaking cylinder head gasket. 5. Replace cylinder head gasket.
6. Low compression. 6. Test compression of each cylinder.
7. Burned, warped, or pitted valves. 7. Replace valves.
8. Plugged or restricted exhaust system. 8. Perform exhaust restriction test. (Refer to
11 - EXHAUST SYSTEM - DIAGNOSIS AND
TESTING) Install new parts, as necessary.
9. Faulty ignition coil(s). 9. Test and replace as necessary. (Refer to
Appropriate Diagnostic Information)
ENGINE MISSES
ON
ACCELERATION1. Dirty or incorrectly gapped spark plugs. 1. Clean spark plugs and set gap.
2. Contamination in Fuel System. 2. Clean fuel system and replace fuel filter.
3. Burned, warped, or pitted valves. 3. Replace valves.
4. Faulty ignition coil(s). 4. Test and replace as necessary. (Refer to
Appropriate Diagnostic Information)
ENGINE MISSES
AT HIGH SPEED1. Dirty or incorrect spark plug gap. 1. Clean spark plugs and set gap.
2. Faulty ignition coil(s). 2. Test and replace as necessary. (Refer to
Appropriate Diagnostic Information)
3. Dirty fuel injector(s). Test and replace as necessary. (Refer to
Appropriate Diagnostic Information)
4. Contamination in fuel system. 4. Clean system and replace fuel filter.
RSENGINE 3.3/3.8L9-75
ENGINE 3.3/3.8L (Continued)
Page 2700 of 4284
DIAGNOSIS AND TESTING - ENGINE MECHANICAL
CONDITION POSSIBLE CAUSES CORRECTION
NOISY VALVES 1. High or low oil level in crankcase. 1. Check and correct engine oil level.
2. Thin or diluted oil. 2. Change oil to correct viscosity.
3. Thick oil 3. (a) Change engine oil and filter.
(b) Run engine to operating temperature.
(c) Change engine oil and filter again.
4. Low oil pressure. 4. Check and correct engine oil level.
5. Dirt in tappets/lash adjusters. 5. Replace rocker arm/hydraulic lash
adjuster assembly.
6. Worn rocker arms. 6. Inspect oil supply to rocker arms.
7. Worn tappets/lash adjusters. 7. Install new rocker arm/hydraulic lash
adjuster assembly.
8. Worn valve guides. 8. Replace cylinder head assembly.
9. Excessive runout of valve seats on valve
faces.9. Grind valve seats and valves.
10. Missing adjuster pivot. 10. Replace rocker arm/hydraulic lash
adjuster assembly.
CONNECTING
ROD NOISE1. Insufficient oil supply. 1. Check engine oil level.
2. Low oil pressure. 2. Check engine oil level. Inspect oil pump
relief valve and spring.
3. Thin or diluted oil. 3. Change oil to correct viscosity.
4. Thick oil 4. (a) Change engine oil and filter.
(b) Run engine to operating temperature.
(c) Change engine oil and filter again.
5. Excessive bearing clearance. 5. Measure bearings for correct clearance.
Repair as necessary.
6. Connecting rod journal out-of-round. 6. Replace crankshaft or grind surface.
7. Misaligned connecting rods. 7. Replace bent connecting rods.
MAIN BEARING
NOISE1. Insufficient oil supply. 1. Check engine oil level.
2. Low oil pressure. 2. Check engine oil level. Inspect oil pump
relief valve and spring.
3. Thin or diluted oil. 3. Change oil to correct viscosity.
4. Thick oil 4. (a) Change engine oil and filter.
(b) Run engine to operating temperature.
(c) Change engine oil and filter again.
5. Excessive bearing clearance. 5. Measure bearings for correct clearance.
Repair as necessary.
6. Excessive end play. 6. Check thrust bearing for wear on flanges.
7. Crankshaft journal out-of-round or worn. 7. Replace crankshaft or grind journals.
8. Loose flywheel or torque converter. 8. Tighten to correct torque.
9 - 76 ENGINE 3.3/3.8LRS
ENGINE 3.3/3.8L (Continued)
Page 2701 of 4284
CONDITION POSSIBLE CAUSES CORRECTION
OIL PRESSURE
DROP1. Low oil level. 1. Check engine oil level.
2. Faulty oil pressure sending unit. 2. Install new sending unit.
3. Low oil pressure. 3. Check sending unit and main bearing oil
clearance.
4. Clogged oil filter. 4. Install new oil filter.
5. Worn parts in oil pump. 5. Replace worn parts or pump.
6. Thin or diluted oil. 6. Change oil to correct viscosity.
7. Oil pump relief valve stuck. 7. Remove valve and inspect, clean, or
replace.
8. Oil pump suction tube loose. 8. Remove oil pan and install new tube or
clean, if necessary.
9. Oil pump cover warped or cracked. 9. Install new oil pump.
10. Excessive bearing clearance. 10. Measure bearings for correct clearance.
OIL LEAKS 1. Misaligned or deteriorated gaskets. 1. Replace gasket(s).
2. Loose fastener, broken or porous metal
part.2. Tighten, repair or replace the part.
3. Misaligned or deteriorated cup or
threaded plug.3. Replace as necessary.
OIL
CONSUMPTION
OR SPARK
PLUGS FOULED1. PCV system malfunction. 1. Check system and repair as necessary.
(Refer to 25 - EMISSIONS CONTROL/
EVAPORATIVE EMISSIONS/PCV VALVE -
DIAGNOSIS AND TESTING)
2. Worn, scuffed or broken rings. 2. Hone cylinder bores. Install new rings.
3. Carbon in oil ring slots. 3. Install new rings.
4. Rings fitted too tightly in grooves. 4. Remove rings and check grooves. If
groove is not proper width, replace piston.
5. Worn valve guide(s). 5. Replace cylinder head assembly.
6. Valve stem seal(s) worn or damaged. 6. Replace seal(s).
DIAGNOSIS AND TESTING - ENGINE OIL LEAK
Begin with a thorough visual inspection of the
engine, particularly at the area of the suspected leak.
If an oil leak source is not readily identifiable, the
following steps should be followed:
(1) Do not clean or degrease the engine at this
time because some solvents may cause rubber to
swell, temporarily stopping the leak.
(2) Add an oil soluble dye (use as recommended by
manufacturer). Start the engine and let idle for
approximately 15 minutes. Check the oil dipstick to
make sure the dye is thoroughly mixed as indicated
with a bright yellow color under a black light.
(3) Using a black light, inspect the entire engine
for fluorescent dye, particularly at the suspected area
of oil leak. If the oil leak is found and identified,
repair as necessary.(4) If dye is not observed, drive the vehicle at var-
ious speeds for approximately 24 km (15 miles), and
repeat inspection.
(5)If the oil leak source is not positively
identified at this time, proceed with the air leak
detection test method as follows:
²Disconnect the fresh air hose (make-up air) at
the cylinder head cover and plug or cap the nipple on
the cover.
²Remove the PCV valve hose from the cylinder
head cover. Cap or plug the PCV valve nipple on the
cover.
²Attach an air hose with pressure gauge and reg-
ulator to the dipstick tube.
CAUTION: Do not subject the engine assembly to
more than 20.6 kpa (3 PSI) of test pressure.
RSENGINE 3.3/3.8L9-77
ENGINE 3.3/3.8L (Continued)