Page 321 of 460

5-4
2. Get the vehicles close enough so the jumper cables
can reach, but be sure the vehicles aren't touching
each other. If they are, it could cause a ground
connection you don't want. You wouldn't be able
to start your vehicle, and the bad grounding could
damage the electrical systems.
To avoid the possibility of the vehicles rolling, set
the parking brake firmly on both vehicles involved in
the jump start procedure. Put an automatic transaxle
in PARK (P) or a manual transaxle in NEUTRAL
before setting the parking brake.
3. Turn off the ignition on both vehicles. Unplug
unnecessary accessories plugged into the cigarette
lighter or the accessory power outlet. Turn off
all lamps that aren't needed, as well as radios.
This will avoid sparks and help save both batteries.
In addition, it could save your radio!
NOTICE:
If you leave your radio on, it could be badly
damaged. The repairs wouldn't be covered by
your warranty.
4. Open the hoods and locate the batteries. Find the
positive (+) and negative (
-) terminals on each battery.
CAUTION:
An electric fan can start up even when the engine
is not running and can injure you. Keep hands,
clothing and tools away from any underhood
electric fan.
Page 337 of 460

5-20
9. Then fill the coolant recovery tank to the FULL
COLD mark.
10. Put the cap back on the coolant recovery tank.
If a Tire Goes Flat
It's unusual for a tire to ªblow outº while you're driving,
especially if you maintain your tires properly. If air goes
out of a tire, it's much more likely to leak out slowly.
But if you should ever have a ªblowout,º here are a few
tips about what to expect and what to do:
If a front tire fails, the flat tire will create a drag that
pulls the vehicle toward that side. Take your foot off
the accelerator pedal and grip the steering wheel firmly.
Steer to maintain lane position, and then gently brake
to a stop well out of the traffic lane.
A rear blowout, particularly on a curve, acts much like
a skid and may require the same correction you'd use
in a skid. In any rear blowout, remove your foot from
the accelerator pedal. Get the vehicle under control by
steering the way you want the vehicle to go. It may be
very bumpy and noisy, but you can still steer. Gently
brake to a stop
-- well off the road if possible.
If a tire goes flat, the next part shows how to use your
jacking equipment to change a flat tire safely.
Page 338 of 460
5-21
Changing a Flat Tire
If a tire goes flat, avoid further tire and wheel damage
by driving slowly to a level place. Turn on your hazard
warning flashers.
CAUTION:
Changing a tire can cause an injury. The vehicle
can slip off the jack and roll over you or other
people. You and they could be badly injured.
Find a level place to change your tire. To help
prevent the vehicle from moving:
1. Set the parking brake firmly.
2. Put the shift lever in PARK (P).
3. Turn off the engine.
To be even more certain the vehicle won't move,
you can put blocks at the front and rear of the
tire farthest away from the one being changed.
That would be the tire on the other side of the
vehicle, at the opposite end.
The following steps will tell you how to use the jack and
change a tire.
Page 347 of 460

5-30
10. Tighten the wheel nuts
firmly in a crisscross
sequence, as shown.
CAUTION:
Incorrect wheel nuts or improperly tightened
wheel nuts can cause the wheel to become loose
and even come off. This could lead to an accident.
Be sure to use the correct wheel nuts. If you have
to replace them, be sure to get new GM original
equipment wheel nuts.
Stop somewhere as soon as you can and have
the nuts tightened with a torque wrench to
100 lb
-ft (140 N´m).
NOTICE:
Improperly tightened wheel nuts can lead to
brake pulsation and rotor damage. To avoid
expensive brake repairs, evenly tighten the wheel
nuts in the proper sequence and to the proper
torque specification.
11. Don't try to put a wheel cover on the compact spare
tire. It won't fit. Store the wheel cover securely in
the rear of the vehicle until you have the flat tire
repaired or replaced.
NOTICE:
Wheel covers won't fit on your compact spare.
If you try to put a wheel cover on your compact
spare, you could damage the cover or the spare.
Page 352 of 460

6-
6-1
Section 6 Service and Appearance Care
Here you will find information about the care of your vehicle. This section begins with service and fuel information,
and then it shows how to check important fluid and lubricant levels. There is also technical information about your
vehicle, and a part devoted to its appearance care.
6
-2 Service
6
-3 Fuel
6
-5 Fuels in Foreign Countries
6
-6 Filling Your Tank
6
-8 Filling a Portable Fuel Container
6
-9 Checking Things Under the Hood
6
-12 Engine Oil
6
-16 Engine Air Cleaner/Filter
6
-18 Passenger Compartment
Air Filter Replacement
6
-20 Automatic Transaxle Fluid
6
-23 Engine Coolant
6
-26 Radiator Pressure Cap
6
-27 Power Steering Fluid
6
-28 Windshield Washer Fluid
6
-29 Brakes6
-32 Battery
6
-33 Bulb Replacement
6
-40 Windshield Wiper Blade Replacement
6
-42 Tires
6
-51 Appearance Care
6
-51 Cleaning the Inside of Your Vehicle
6
-55 Cleaning the Outside of Your Vehicle
6
-58 Underbody Maintenance
6
-58 Chemical Paint Spotting
6
-59 GM Vehicle Care/Appearance Materials
6
-60 Vehicle Identification Number (VIN)
6
-61 Electrical System
6
-69 Replacement Bulbs
6
-69 Capacities and Specifications
6
-70 Normal Maintenance Replacement Parts
Page 360 of 460
6-9
Checking Things Under the Hood
CAUTION:
An electric fan under the hood can start up and
injure you even when the engine is not running.
Keep hands, clothing and tools away from any
underhood electric fan.
CAUTION:
Things that burn can get on hot engine parts and
start a fire. These include liquids like fuel, oil,
coolant, brake fluid, windshield washer and other
fluids, and plastic or rubber. You or others could
be burned. Be careful not to drop or spill things
that will burn onto a hot engine.
Hood Release
To open the hood do the following:
1. Pull the hood release handle, located on the driver's
side under the instrument panel.
Page 362 of 460
6-11 Engine Compartment Overview
When you lift the hood, you'll see these items:
A. Underhood Fuse and
Relay Center
B. Remote Positive (+) Terminal
C. Windshield Washer
Fluid ReservoirD. Radiator Pressure Cap
E. Power Steering Fluid Reservoir
F. Engine Oil Fill Cap
G. Engine Oil DipstickH. Transaxle Fluid Dipstick
I. Brake Master Cylinder Reservoir
J. Engine Air Cleaner/Filter
K. Engine Coolant Reservoir
Page 372 of 460
6-21
Checking the Fluid Level
Prepare your vehicle as follows:
�Park your vehicle on a level place. Keep the
engine running.
�With the parking brake applied, place the shift lever
in PARK (P).
�With your foot on the brake pedal, move the shift
lever through each gear range, pausing for about
three seconds in each range. Then, position the shift
lever in PARK (P).
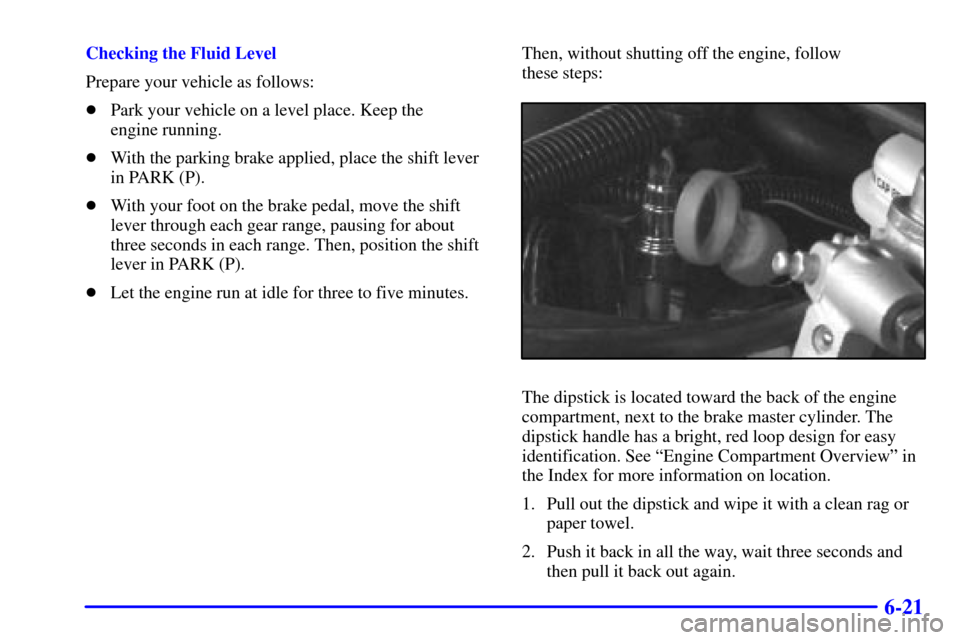
�Let the engine run at idle for three to five minutes.Then, without shutting off the engine, follow
these steps:
The dipstick is located toward the back of the engine
compartment, next to the brake master cylinder. The
dipstick handle has a bright, red loop design for easy
identification. See ªEngine Compartment Overviewº in
the Index for more information on location.
1. Pull out the dipstick and wipe it with a clean rag or
paper towel.
2. Push it back in all the way, wait three seconds and
then pull it back out again.


 Terminal
C. Windshield Washer
Fluid ReservoirD. Radiator Pr")