Page 300 of 468
4-78
The six-wire harness contains the following
trailer circuits:
�Yellow: Left Stop/Turn Signal
�Dark Green: Right Stop/Turn Signal
�Brown: Taillamps
�White: Ground
�Light Green: Back
-up Lamps
�Light Blue: Center High
-Mounted
Stoplamp (CHMSL)
If you need to upgrade your vehicle to heavy
-duty
trailering, a brake controller harness and an underbody
harness with a seven
-pin universal heavy-duty trailer
connector are available from your dealer.Heavy
-Duty Trailer Wiring Package (If Equipped)
Your pickup may be equipped with the eight-wire trailer
towing harness. This harness with a seven
-pin universal
heavy
-duty trailer connector is attached to a bracket on
the platform hitch.*
* The Center High
-Mounted Stoplamp (CHMSL) wire
is tied next to the trailer wiring harness for use with a
trailer, slide
-in camper or cap.
Page 301 of 468

4-79
The eight-wire harness contains the following
trailer circuits:
�Yellow: Left Stop/Turn Signal
�Dark Green: Right Stop/Turn Signal
�Brown: Taillamps
�White: Ground
�Light Green: Back
-up Lamps
�Light Blue: CHMSL
�Red: Battery Feed
�Dark Blue: Trailer Brake
A jumper harness for an electric trailer brake controller
and a trailer battery feed fuse are included with this
trailering package. (See ªInstrument Panel Jumper
Wiring Harnessº later in this section.)
If you need to tow a light
-duty trailer with a standard
four
-way round pin connector, an adapter connector is
available from your dealer.Camper/Fifth
-Wheel Trailer Wiring Package
(If Equipped)
The eight
-wire camper harness is located under the
front edge of the pickup box on the driver's side of the
vehicle, attached to the frame bracket. A connector will
have to be added to the wiring harness which connects
to the camper.
The eight
-wire harness contains the following
camper/trailer circuits:
�Yellow: Left Stop/Turn Signal
�Dark Green: Right Stop/Turn Signal
�Brown: Taillamps
�White: Ground
�Light Green: Back
-up Lamps
�Light Blue: Center High
-Mounted
Stoplamp (CHMSL)
�Red: Battery Feed
�Dark Blue: Trailer Brake
A jumper harness for an electric trailer brake controller
and a trailer battery feed fuse are included with this
trailering package. (See ªInstrument Panel Jumper
Wiring Harnessº later in this section.)
Page 309 of 468
5-3
Jump Starting
If your battery has run down, you may want to use
another vehicle and some jumper cables to start your
vehicle. But please use the following steps to do it safely.
CAUTION:
Batteries can hurt you. They can be
dangerous because:
�They contain acid that can burn you.
�They contain gas that can explode or ignite.
�They contain enough electricity to burn you.
If you don't follow these steps exactly, some or
all of these things can hurt you.
NOTICE:
Ignoring these steps could result in costly
damage to your vehicle that wouldn't be
covered by your warranty.
The ACDelco� battery in your vehicle has a
built
-in hydrometer. Do not charge, test or jump
start the battery if the hydrometer looks clear
or light yellow. Replace the battery when there
is a clear or light yellow hydrometer and a
cranking complaint.
Trying to start your vehicle by pushing or pulling
it won't work, and it could damage your vehicle.
1. Check the other vehicle. It must have a 12-volt
battery with a negative ground system.
NOTICE:
If the other system isn't a 12-volt system with a
negative ground, both vehicles can be damaged.
Page 310 of 468
5-4
2. Get the vehicles close enough so the jumper cables
can reach, but be sure the vehicles aren't touching
each other. If they are, it could cause a ground
connection you don't want. You wouldn't be able
to start your vehicle, and the bad grounding could
damage the electrical systems.
To avoid the possibility of the vehicles rolling, set the
parking brake firmly on both vehicles involved in the
jump start procedure. Put an automatic transmission in
PARK (P) or a manual transmission in NEUTRAL (N).
If you have a four
-wheel-drive vehicle, be sure the
transfer case is not in NEUTRAL (N).
3. Turn off the ignition on both vehicles. Unplug
unnecessary accessories plugged into the cigarette
lighter or accessory power outlets. Turn off all lamps
that aren't needed as well as radios. This will avoid
sparks and help save both batteries. In addition,
it could save your radio!
NOTICE:
If you leave your radio on, it could be badly
damaged. The repairs wouldn't be covered by
your warranty.
4. Open the hoods and locate the positive (+) and
negative (
-) terminal locations on the other vehicle.
Your vehicle has a remote positive (+) jump starting
terminal and a remote negative (
-) jump starting
terminal. The remote positive (+) terminal is located
behind a red plastic cover near the engine accessory
drive bracket. To uncover the remote positive (+)
terminal, open the red plastic cover.
On all V8 gasoline and diesel engines, the remote
negative (
-) terminal is located on the engine
accessory drive bracket. This is marked ªGNDº on
V8 engines. On V6 engines, the remote negative (
-)
terminal is located on a tab attached to the engine
accessory drive bracket where it is marked ªGNDº.
You should always use the remote positive (+)
and the remote negative (
-) terminals instead of
the positive (+) and negative (
-) terminals on
your battery.
Page 311 of 468
5-5
CAUTION:
Using a match near a battery can cause battery
gas to explode. People have been hurt doing this,
and some have been blinded. Use a flashlight if
you need more light.
Be sure the battery has enough water. You don't
need to add water to the ACDelco� battery
installed in every new GM vehicle. But if a
battery has filler caps, be sure the right amount
of fluid is there. If it is low, add water to take
care of that first. If you don't, explosive gas
could be present.
Battery fluid contains acid that can burn you.
Don't get it on you. If you accidentally get it in
your eyes or on your skin, flush the place with
water and get medical help immediately.
CAUTION:
Fans or other moving engine parts can injure you
badly. Keep your hands away from moving parts
once the engine is running.
5. Check that the jumper cables don't have loose or
missing insulation. If they do, you could get a shock.
The vehicles could be damaged too.
Before you connect the cables, here are some basic
things you should know. Positive (+) will go to
positive (+) or a remote positive terminal if the
vehicle has one. Negative (
-) will go to a heavy,
unpainted metal engine part or a remote negative
terminal if the vehicle has one. Don't connect
positive (+) to negative (
-) or you'll get a short that
would damage the battery and maybe other parts too.
On vehicles equipped with dual batteries, make all
battery connections to the remote positive (+) and
remote negative (
-) terminals.
Page 327 of 468
5-21
1. If there is a cover, move the seats forward and
turn the wing nut on the cover counterclockwise to
remove it. For Crew Cab models, pull up the second
row seat with the loop at the base of the seat cushion
to access the tools.
2. The wheel blocks and the wheel block retainer can be
removed by turning the wing nut counterclockwise.
3. To release the bottle jack from its holder, turn the
knob on the bottle jack counterclockwise to lower
the jack head slightly.
4. There is also a wing nut used to retain the
storage bag and tools. To remove it, turn the
wing nut counterclockwise.
You'll use the jack handle and the wheel wrench to
remove the underbody
-mounted spare tire.
A. Hoist Assembly
B. Wheel Wrench
C. Extensions
D. Hoist Shaft
E. Valve Stem,
Pointed Down
F. Spare TireG. Tire Retainer
H. Hoist Cable
I. Hoist Lock
J. Hoist Shaft
Access Hole
K. Hoist End
Page 341 of 468
5-35 Rocking Your Vehicle To Get It Out
First, turn your steering wheel left and right. That will
clear the area around your front wheels. If you have a
four
-wheel drive vehicle, shift into 4HI. If your vehicle
has the Traction Assist System, you should turn it off
by pressing the TAS on/off button. Then shift back
and forth between REVERSE (R) and a forward gear
(or with a manual transmission, between FIRST (1) or
SECOND (2) and REVERSE (R)), spinning the wheels
as little as possible. Release the accelerator pedal while
you shift, and press lightly on the accelerator pedal
when the transmission is in gear. By slowly spinning
your wheels in the forward and reverse directions, you
will cause a rocking motion that may free your vehicle.
If that doesn't get you out after a few tries, you may
need to be towed out. Or, you can use your recovery
hooks if your vehicle has them. If you do need to be
towed out, see ªTowing Your Vehicleº in the Index.
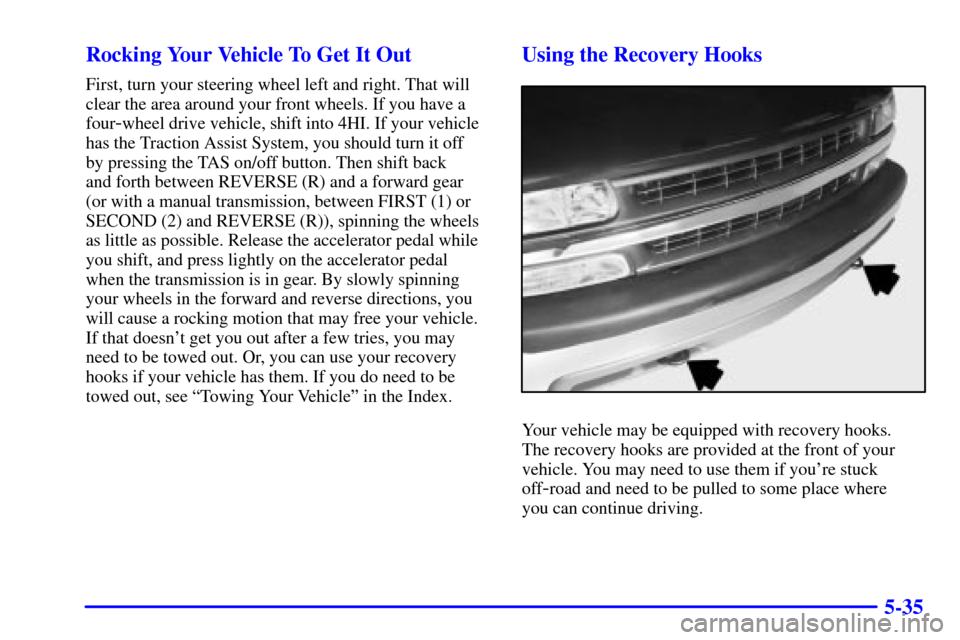
Using the Recovery Hooks
Your vehicle may be equipped with recovery hooks.
The recovery hooks are provided at the front of your
vehicle. You may need to use them if you're stuck
off
-road and need to be pulled to some place where
you can continue driving.
Page 349 of 468
6-7
CAUTION:
If you get gasoline on yourself and then
something ignites it, you could be badly burned.
Gasoline can spray out on you if you open the
fuel filler cap too quickly. This spray can happen
if your tank is nearly full, and is more likely in
hot weather. Open the fuel filler cap slowly and
wait for any ªhissº noise to stop. Then unscrew
the cap all the way.
Be careful not to spill gasoline. Clean gasoline from
painted surfaces as soon as possible. See ªCleaning the
Outside of Your Vehicleº in the Index.When you put the cap back on, turn it to the right
(clockwise) until you hear a clicking sound. Make sure
you fully install the cap. The diagnostic system can
determine if the fuel cap has been left off or improperly
installed. This would allow fuel to evaporate into the
atmosphere. See ªMalfunction Indicator Lampº in
the Index.
NOTICE:
If you need a new cap, be sure to get the right
type. Your dealer can get one for you. If you get
the wrong type, it may not fit properly. This may
cause your malfunction indicator lamp to light
and your fuel tank and emissions system may be
damaged. See ªMalfunction Indicator Lampº in
the Index.