Page 276 of 383
6-7
If your fuel filler door release won't operate, there is a
manual release tab. The tab is located against the upper
trim on the driver's side in the rear compartment. Pull
the tab to manually release the fuel filler door.While refueling, rest the tether across the tab on the fuel
filler door to prevent damage to your vehicle's finish.
To remove the cap, turn it slowly to the left
(counterclockwise). The cap has a spring in it; if you let
go of the cap too soon, it will spring back to the right.
Page 277 of 383

6-8
CAUTION:
If you get gasoline on yourself and then
something ignites it, you could be badly burned.
Gasoline can spray out on you if you open the
fuel filler cap too quickly. This spray can happen
if your tank is nearly full, and is more likely in
hot weather. Open the fuel filler cap slowly and
wait for any ªhissº noise to stop. Then unscrew
the cap all the way.
Be careful not to spill gasoline. Clean gasoline from
painted surfaces as soon as possible. See ªCleaning the
Outside of Your Vehicleº in the Index.When you put the cap back on, turn it to the
right (clockwise) until you hear a clicking sound. Make
sure you fully install the cap. The diagnostic system can
determine if the fuel cap has been left off or improperly
installed. This would allow fuel to evaporate into the
atmosphere. See ªMalfunction Indicator Lampº in
the Index.
NOTICE:
If you need a new cap, be sure to get the right
type. Your dealer can get one for you. If you get
the wrong type, it may not fit properly. This may
cause your malfunction indicator lamp to light
and your fuel tank and emissions system may be
damaged. See ªMalfunction Indicator Lampº in
the Index.
Page 303 of 383
6-34 Headlamps
1. The headlamp doors need to be halfway open. Turn
the headlamps on, then quickly back to the parking
lamps setting. You may have to do this a few times
to get the half
-open position.
You can also open the headlamp doors manually by
turning the adjuster counterclockwise.
2. Remove the screws using a screwdriver on each side
of the headlamp bezel.
3. Open the hood.
4. To remove the bezel, pull the sides slightly outward
and tilt the bezel forward. Pull the clip centered
above the lens outward. Be careful not to scratch
the paint.
Page 304 of 383
6-35
5. Reach behind the lamp and turn the bulb
counterclockwise to remove it. Don't touch the
halogen bulbs. The inner bulb is the high beam and
the outer bulb is the low beam.
6. Disconnect the desired bulb from the wiring harness.
7. Reverse the steps listed previously with a new bulb.
Rear Turn Signal and Taillamps
A. Back-up Lamp
B. Inboard Taillamp
C. Outboard Taillamp
Page 305 of 383
6-36
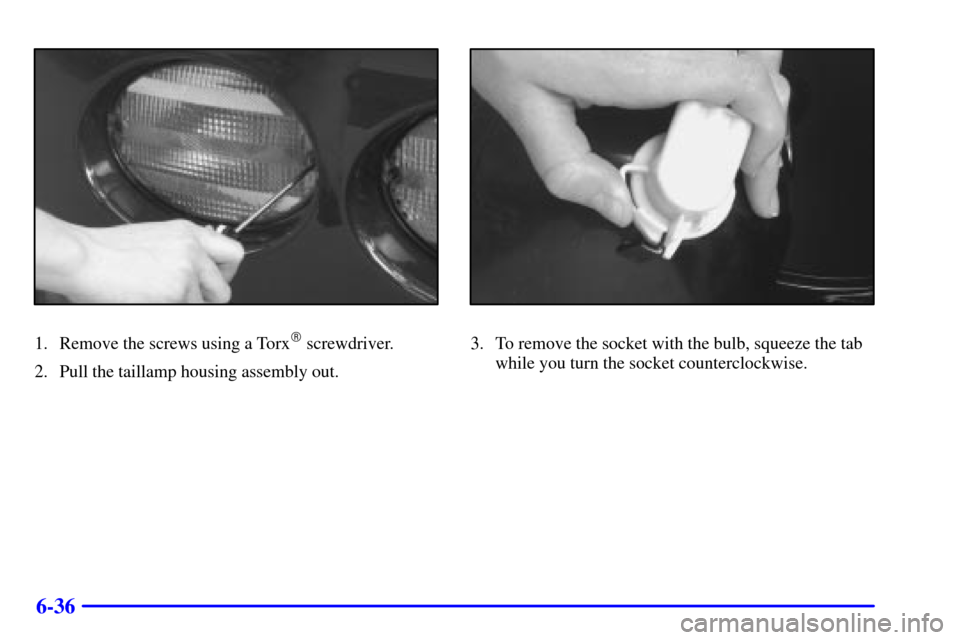
1. Remove the screws using a Torx� screwdriver.
2. Pull the taillamp housing assembly out.3. To remove the socket with the bulb, squeeze the tab
while you turn the socket counterclockwise.
Page 306 of 383
6-37
4. Remove the bulb from the socket.
5. Reverse the steps listed previously with a new bulb.
Back-Up Lamps
You can access the back-up lamps through the inboard
taillamp opening. See ªRear Turn Signal and Taillampsº
in the Index.
1. Squeeze the tab on the socket while turning it
counterclockwise to remove it from the assembly.
2. Remove the bulb from the socket.
3. Reverse the steps listed previously with a new bulb.
Page 307 of 383
6-38
Windshield Wiper
Blade Replacement
Windshield wiper blades should be inspected at least
twice a year for wear or cracking. See ªWiper Blade
Checkº in the index for more information.
Replacement blades come in different types and are
removed in different ways. For the proper type and
length, see ªNormal Maintenance Replacement Partsº in
the Index.
It's a good idea to clean or replace the wiper blade
assembly every six months.
NOTICE:
Use care when removing or installing a blade
assembly. Accidental bumping can cause the arm
to fall back and strike the windshield.
To remove the wiper blade assembly, do the following:
1. Open the hood to gain access to the windshield wipers.
2. Lift the wiper arm until it locks into a vertical position.
A. Blade Assembly
B. Arm Assembly
C. Locking TabD. Blade Pivot
E. Hook Slot
F. Arm Hook
Page 308 of 383
6-39
3. Press down on the blade assembly pivot locking
tab (C). Pull down on the blade assembly (A) to
release it from the wiper arm hook (F).
4. Remove the insert from the blade assembly (A). The
insert has two notches at one end that are locked by
the bottom claws of the blade assembly. At the
notched end, pull the insert from the blade assembly.
To install the new wiper insert, do the following:1. Slide the insert (D), notched end last, into the end
with two blade claws (A). Slide the insert all the way
through the blade claws at the opposite end (B).
Plastic caps (C) will be forced off as the insert is
fully installed.
2. Be sure the notches are locked by the bottom claws.
Make sure that all other claws are properly locked on
both sides of the insert slots.
3. Put the blade assembly pivot in the wiper arm
hook. Pull up until the pivot locking tab locks
in the hook slot.
4. Carefully lower the wiper arm and blade assembly
onto the windshield.


. Pull down on the blade assembly (A) to
release it from the wiper arm hook (F).
4. Remove the insert from the blade assembly (A). The
in")