Page 196 of 321
6-13
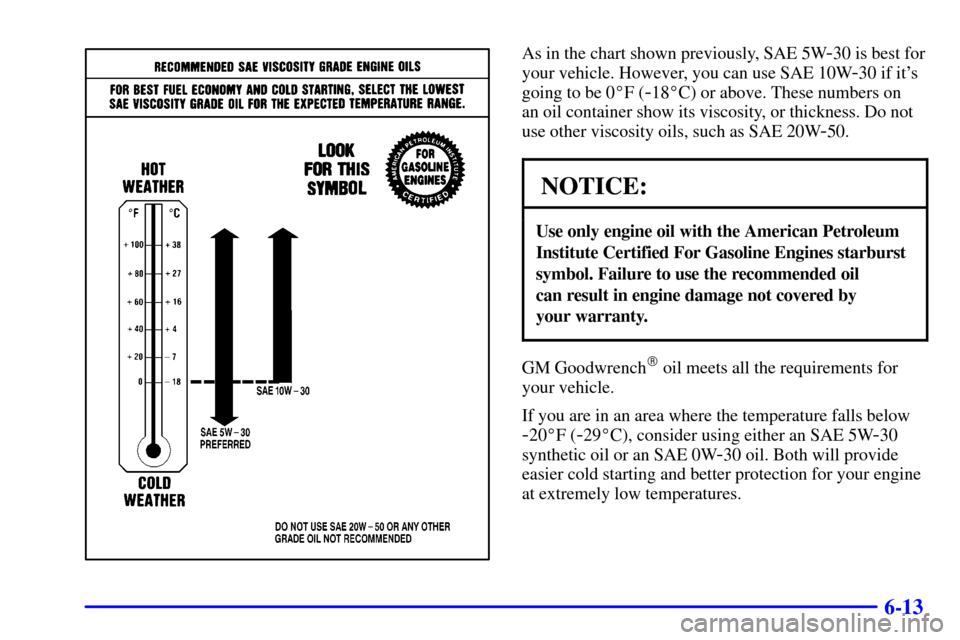
As in the chart shown previously, SAE 5W-30 is best for
your vehicle. However, you can use SAE 10W
-30 if it's
going to be 0�F (
-18�C) or above. These numbers on
an oil container show its viscosity, or thickness. Do not
use other viscosity oils, such as SAE 20W
-50.
NOTICE:
Use only engine oil with the American Petroleum
Institute Certified For Gasoline Engines starburst
symbol. Failure to use the recommended oil
can result in engine damage not covered by
your warranty.
GM Goodwrench� oil meets all the requirements for
your vehicle.
If you are in an area where the temperature falls below
-20�F (-29�C), consider using either an SAE 5W-30
synthetic oil or an SAE 0W
-30 oil. Both will provide
easier cold starting and better protection for your engine
at extremely low temperatures.
Page 197 of 321

6-14 Engine Oil Additives
Don't add anything to your oil. The recommended oils
with the starburst symbol are all you will need for good
performance and engine protection.
When to Change Engine Oil
If any one of these is true for you, use the short trip/city
maintenance schedule:
�Most trips are less than 5 to 10 miles (8 to 16 km).
This is particularly important when outside
temperatures are below freezing.
�Most trips include extensive idling (such as frequent
driving in stop
-and-go traffic).
�You operate your vehicle in dusty areas or
off
-road frequently.
�You frequently tow a trailer.
�The vehicle is used for delivery service, police, taxi
or other commercial application.
Driving under these conditions causes engine oil to
break down sooner. If any one of these is true for your
vehicle, then you need to change your oil and filter
every 3,000 miles (5 000 km) or 3 months
-- whichever
occurs first.If none of them is true, use the long trip/highway
maintenance schedule. Change the oil and filter every
7,500 miles (12 500 km) or 12 months
-- whichever
occurs first. Driving a vehicle with a fully warmed
engine under highway conditions causes engine oil to
break down slower.
What to Do with Used Oil
Did you know that used engine oil contains certain
elements that may be unhealthy for your skin and could
even cause cancer? Don't let used oil stay on your skin
for very long. Clean your skin and nails with soap and
water, or a good hand cleaner. Wash or properly throw
away clothing or rags containing used engine oil.
See the manufacturer's warnings about the use and
disposal of oil products.
Used oil can be a real threat to the environment. If you
change your own oil, be sure to drain all free
-flowing
oil from the filter before disposal. Don't ever dispose of
oil by putting it in the trash, pouring it on the ground,
into sewers, or into streams or bodies of water. Instead,
recycle it by taking it to a place that collects used oil.
If you have a problem properly disposing of your used
oil, ask your dealer, a service station or a local recycling
center for help.
Page 198 of 321
6-15
Engine Air Cleaner/Filter
(Gasoline Engines)
Your engine air cleaner/filter is located between the
battery and coolant recovery tank.
See ªEngine Compartment Overviewº in the Index for
more information on location.
The engine air cleaner/filter
assembly has an indicator
that lets you know when
the engine air cleaner/filter
is dirty and needs to be
serviced. The indicator
is located in the air intake
tube between the engine
air cleaner/filter and
the engine.
See ªOwner Checks and Servicesº in the Index to
determine when to check the indicator.
If the area inside the clear section of the indicator is
green, no engine air cleaner/filter service is required.
When the area inside the indicator is orange and
CHANGE AIR FILTER appears, the filter should
be replaced.
Page 199 of 321

6-16
To remove the engine air cleaner/filter:
1. Unhook the retaining clips and remove the cover.
2. Lift the filter and the connected duct out of the air
cleaner/filter housing. Hold the duct and remove the
filter by both pulling and twisting the filter away
from the duct. Care should be taken to dislodge
as little dirt as possible.
3. Clean the filter sealing surface of the duct and the
filter housing.
4. Install the new filter by pushing it all the way to the
stop on the duct.5. Install the duct and the filter into the engine air
cleaner/filter housing. Make sure that the duct fits
properly into the housing.
6. Install the cover and fasten the two retaining clips.
7. After the engine air cleaner/filter is properly
serviced, the indicator should be reset. Push the
button on top of the indicator to reset it to the
green (clean) filter zone.
Refer to the Maintenance Schedule to determine when to
replace the engine air cleaner/filter. See ªOwner Checks
and Servicesº in the Index.
Page 200 of 321

6-17
CAUTION:
Operating the engine with the air cleaner/filter
off can cause you or others to be burned. The air
cleaner not only cleans the air, it stops flame if
the engine backfires. If it isn't there, and the
engine backfires, you could be burned. Don't
drive with it off, and be careful working on the
engine with the air cleaner/filter off.
NOTICE:
If the air cleaner/filter is off, a backfire can
cause a damaging engine fire. And, dirt can
easily get into your engine, which will damage it.
Always have the air cleaner/filter in place when
you're driving.
Automatic Transmission Fluid
If your vehicle has a diesel engine, see ªAutomatic
Transmission Fluidº in the Diesel Supplement.
When to Check and Change
A good time to check your automatic transmission fluid
level is when the engine oil is changed.
Change both the fluid and filter every
50,000 miles (83 000 km).
See ªScheduled Maintenance Servicesº in the Index.
How to Check
Because this operation can be a little difficult, you
may choose to have this done at the dealership
service department.
If you do it yourself, be sure to follow all the instructions
here, or you could get a false reading on the dipstick.
Page 201 of 321

6-18
NOTICE:
Too much or too little fluid can damage your
transmission. Too much can mean that some of
the fluid could come out and fall on hot engine
parts or exhaust system parts, starting a fire.
Be sure to get an accurate reading if you check
your transmission fluid.
Wait at least 30 minutes before checking the
transmission fluid level if you have been driving:
�When outside temperatures are above 90�F (32�C).
�At high speed for quite a while.
�In heavy traffic
-- especially in hot weather.
�While pulling a trailer.
To get the right reading, the fluid should be at normal
operating temperature, which is 180�F to 200�F
(82�C to 93�C).
Get the vehicle warmed up by driving about 15 miles
(24 km) when outside temperatures are above 50�F
(10�C). If it's colder than 50�F (10�C), drive the
vehicle in THIRD (3) until the engine temperature gage
moves and then remains steady for 10 minutes.A cold fluid check can be made after the vehicle has
been sitting for eight hours or more with the engine off,
but this is used only as a reference. Let the engine run at
idle for five minutes if outside temperatures are 50�F
(10�C) or more. If it's colder than 50�F (10�C),
you may have to idle the engine longer. Should the fluid
level be low during this cold check, you must check the
fluid hot before adding fluid. Checking the fluid hot will
give you a more accurate reading of the fluid level.
Checking the Fluid Level
Prepare your vehicle as follows:
�Park your vehicle on a level place. Keep the
engine running.
�With the parking brake applied, place the shift lever
in PARK (P).
�With your foot on the brake pedal, move the shift
lever through each gear range, pausing for about
three seconds in each range. Then, position the
shift lever in PARK (P).
�Let the engine run at idle for three minutes or more.
Page 202 of 321
6-19
Then, without shutting off the engine, follow these steps:
1. The red transmission dipstick handle is located at the
rear of the engine compartment, on the passenger's
side. See ªEngine Compartment Overviewº in the
Index for more information on location. Flip the
handle up and then pull out the dipstick and wipe
it with a clean rag or paper towel.2. Push it back in all the way, wait three seconds and
then pull it back out again.
3. Check both sides of the dipstick, and read the lower
level. The fluid level must be in the COLD area,
below the cross
-hatched area, for a cold check or in
the HOT area or cross
-hatched area for a hot check.
4. If the fluid level is in the acceptable range, push the
dipstick back in all the way; then flip the handle
down to lock the dipstick in place.
Page 203 of 321

6-20 How to Add Fluid
Refer to the Maintenance Schedule to determine what
kind of transmission fluid to use. See ªRecommended
Fluids and Lubricantsº in the Index.
Add fluid only after checking the transmission fluid
while it is hot. (A cold check is used only as a
reference.) If the fluid level is low, add only enough
of the proper fluid to bring the level up to the HOT
area for a hot check. It doesn't take much fluid,
generally less than one pint (0.5 L). Don't overfill.
NOTICE:
We recommend you use only fluid labeled
DEXRON�-III, because fluid with that label is
made especially for your automatic transmission.
Damage caused by fluid other than DEXRON
�-III
is not covered by your new vehicle warranty.
�After adding fluid, recheck the fluid level as
described under ªHow to Check.º
�When the correct fluid level is obtained, push the
dipstick back in all the way; then flip the handle
down to lock the dipstick in place.
Manual Transmission Fluid
When to Check
A good time to have it checked is when the engine oil is
changed. However, the fluid in your manual transmission
doesn't require changing.
How to Check
Because this operation can be a little difficult, you
may choose to have this done at your GM dealership
service department.
If you do it yourself, be sure to follow all the
instructions here, or you could get a false reading.
NOTICE:
Too much or too little fluid can damage your
transmission. Too much can mean that some of
the fluid could come out and fall on hot engine
parts or exhaust system parts, starting a fire.
Be sure to get an accurate reading if you check
your transmission fluid.

Your engine air cleaner/filter is located between the
battery and coolant recovery tank.
See ªEngine Compartment Overviewº in the Index for
more in")
