Page 6 of 392
Table of Contents (cont'd)
Maintenance Schedule Service and Appearance Care
Section
7
Section
6
Scheduled Maintenance
Owner Checks and Services
Periodic Maintenance InspectionsRecommended Fluids and Lubricants
Maintenance Records
Fuel
Checking Fluids and Lubricants
GM Oil Life System™ (If Equipped)
Engine Air Cleaner/Filter
Passenger Compartment Air Filter
Brakes
Bulb ReplacementWindshield Wiper Blade Replacement
Tires and Wheels
Appearance Care
Electrical System/Fuses and Circuit Breakers
Capacities and Specifications
Normal Maintenance Replacement Parts
iv
Page 157 of 392

2-89 DIC Warnings and Messages
Other messages or warnings may appear in the
DIC display. For Canadian drivers, in addition to the
DIC message your DIC will display EXP with a number
after it which reflects the following messages:
EXP (Export ID) Warning Message
23 DOOR AJAR. . . . . . . . . . . . . . . . . . . . . . . . . . . . .
24 TRUNK AJAR. . . . . . . . . . . . . . . . . . . . . . . . . . . .
25 WINDSHIELD WASHER FLUID LOW. . . . . . . .
36 ENGINE OIL LOW
- CHECK LEVEL . . . . . . . . .
54 SERVICE STABILITY SYSTEM. . . . . . . . . . . . .
55 STABILITY SYSTEM ACTIVE. . . . . . . . . . . . . .
82 CHANGE ENGINE OIL SOON. . . . . . . . . . . . . .
91 TRACTION CONTROL SYSTEM ACTIVE. . . .
140 TIRE PRESSURE LOW. . . . . . . . . . . . . . . . . . .
The EXP codes are used to make translation from
English to other languages easier.
Pressing any of the DIC control buttons will remove the
messages or warnings from the DIC display.SERVICE STABILITY SYSTEM
- 54: If you ever
see the SERVICE STABILITY SYSTEM message, it
means there may be a problem with your stability
enhancement system. If you see this message, try to
reset the system (stop; turn off the engine; then start the
engine again). If the SERVICE STABILITY SYSTEM
message still comes on, it means there is a problem. You
should see your dealer for service. Reduce your speed
and drive accordingly.
STABILITY SYSTEM ACTIVE
- 55: You may see
the STABILITY SYSTEM ACTIVE message on the
Driver Information Center. It means that an advanced,
computer
-controlled system has come on to help your
vehicle continue to go in the direction in which you're
steering. This stability enhancement system activates
when the computer senses that your vehicle is just
starting to spin, as it might if you hit a patch of ice or
other slippery spot on the road. When the system is on,
you may hear a noise or feel a vibration in the brake
pedal. This is normal.
Page 221 of 392

4-25
If you drive regularly in steep country, or if you're
planning to visit there, here are some tips that can make
your trips safer and more enjoyable.
�Keep your vehicle in good shape. Check all fluid levels
and also the brakes, tires, cooling system and transaxle.
These parts can work hard on mountain roads.
�Know how to go down hills. The most important
thing to know is this: let your engine do some of the
slowing down. Shift to a lower gear when you go
down a steep or long hill.
CAUTION:
If you don't shift down, your brakes could
get so hot that they wouldn't work well. You
would then have poor braking or even none going
down a hill. You could crash. Shift down to let
your engine assist your brakes on a steep
downhill slope.
CAUTION:
Coasting downhill in NEUTRAL (N) or with the
ignition off is dangerous. Your brakes will have to
do all the work of slowing down. They could get so
hot that they wouldn't work well. You would then
have poor braking or even none going down a hill.
You could crash. Always have your engine running
and your vehicle in gear when you go downhill.
�Know how to go uphill. Drive in the highest
gear possible.
�Stay in your own lane when driving on two
-lane
roads in hills or mountains. Don't swing wide or cut
across the center of the road. Drive at speeds that let
you stay in your own lane.
�As you go over the top of a hill, be alert. There could be
something in your lane, like a stalled car or an accident.
�You may see highway signs on mountains that warn of
special problems. Examples are long grades, passing or
no
-passing zones, a falling rocks area or winding
roads. Be alert to these and take appropriate action.
Page 236 of 392

4-40 When You Are Ready to Leave After
Parking on a Hill
1. Apply your regular brakes and hold the pedal down
while you:
�Start your engine;
�Shift into a gear; and
�Release the parking brake.
2. Let up on the brake pedal.
3. Drive slowly until the trailer is clear of the chocks.
4. Stop and have someone pick up and store the chocks.
Maintenance When Trailer Towing
Your vehicle will need service more often when you're
pulling a trailer. See the Maintenance Schedule for more
on this. Things that are especially important in trailer
operation are automatic transaxle fluid (don't overfill),
engine oil, drive belt, cooling system and brake system.
Each of these is covered in this manual, and the Index will
help you find them quickly. If you're trailering, it's a good
idea to review this information before you start your trip.
Check periodically to see that all hitch nuts and bolts
are tight.
Engine Cooling When Trailer Towing
Your cooling system may temporarily overheat during
severe operating conditions. See ªEngine Overheatingº
in the Index.
Page 264 of 392

6-
6-1
Section 6 Service and Appearance Care
Here you will find information about the care of your vehicle. This section begins with service and fuel information,
and then it shows how to check important fluid and lubricant levels. There is also technical information about your
vehicle, and a part devoted to its appearance care.
6
-2 Service
6
-3 Fuel
6
-5 Fuels in Foreign Countries
6
-5 Filling Your Tank
6
-8 Filling a Portable Fuel Container
6
-9 Checking Things Under the Hood
6
-12 Engine Oil
6
-17 Engine Air Cleaner/Filter
6
-19 Passenger Compartment Air Filter
6
-20 Supercharger Oil
6
-21 Automatic Transaxle Fluid
6
-24 Engine Coolant
6
-27 Radiator Pressure Cap
6
-27 Power Steering Fluid
6
-28 Windshield Washer Fluid
6
-30 Brakes6
-33 Battery
6
-34 Bulb Replacement
6
-45 Windshield Wiper Blade Replacement
6
-46 Tires
6
-56 Appearance Care
6
-57 Cleaning the Inside of Your Vehicle
6
-60 Cleaning the Outside of Your Vehicle
6
-63 Underbody Maintenance
6
-63 Chemical Paint Spotting
6
-64 GM Vehicle Care/Appearance Materials
6
-65 Vehicle Identification Number (VIN)
6
-65 Service Parts Identification Label
6
-66 Electrical System
6
-72 Removing the Rear Seat Cushion
6
-75 Replacement Bulbs
6
-76 Capacities and Specifications
6
-77 Normal Maintenance Replacement Parts
Page 272 of 392
6-9
Checking Things Under the Hood
CAUTION:
An electric fan under the hood can start up and
injure you even when the engine is not running.
Keep hands, clothing and tools away from any
underhood electric fan.
CAUTION:
Things that burn can get on hot engine parts and
start a fire. These include liquids like gasoline,
oil, coolant, brake fluid, windshield washer and
other fluids, and plastic or rubber. You or others
could be burned. Be careful not to drop or spill
things that will burn onto a hot engine.
Hood Release
1. To open the hood, pull
the handle inside the
vehicle. It is located on
the lower left side of the
instrument panel.
Page 274 of 392
6-11 Engine Compartment Overview
When you open the hood on the 3800 (L36) engine (3800 Supercharged (L67) engine similar), here's what you will see:
A. Battery
B. Radiator Pressure Cap
C. Engine Oil Dipstick
D. Engine Oil Fill CapE. Automatic Transaxle
Fluid Dipstick
F. Brake Master Cylinder
G. Windshield Washer
Fluid ReservoirH. Engine Coolant Recovery Tank
I. Engine Air Cleaner/Filter
Page 285 of 392
6-22
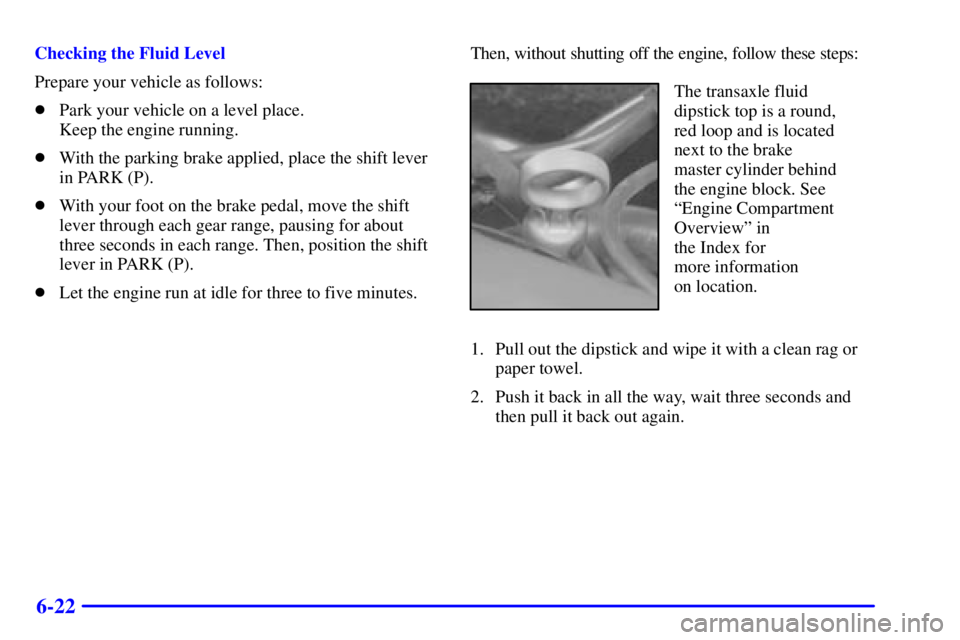
Checking the Fluid Level
Prepare your vehicle as follows:
�Park your vehicle on a level place.
Keep the engine running.
�With the parking brake applied, place the shift lever
in PARK (P).
�With your foot on the brake pedal, move the shift
lever through each gear range, pausing for about
three seconds in each range. Then, position the shift
lever in PARK (P).
�Let the engine run at idle for three to five minutes.Then, without shutting off the engine, follow these steps:
The transaxle fluid
dipstick top is a round,
red loop and is located
next to the brake
master cylinder behind
the engine block. See
ªEngine Compartment
Overviewº in
the Index for
more information
on location.
1. Pull out the dipstick and wipe it with a clean rag or
paper towel.
2. Push it back in all the way, wait three seconds and
then pull it back out again.

Maintenance Schedule Service and Appearance Care
Section
7
Section
6
Scheduled Maintenance
Owner Checks and Services
Periodic Maintenance InspectionsRecommended Fluids a")

 engine (3800 Supercharged (L67) engine similar), heres what you will see:
A. Battery
B. Radiator Pressure Cap
C. Engine Oil D")