2001 BMW M ROADSTER COUPE check engine
[x] Cancel search: check enginePage 112 of 171
112n
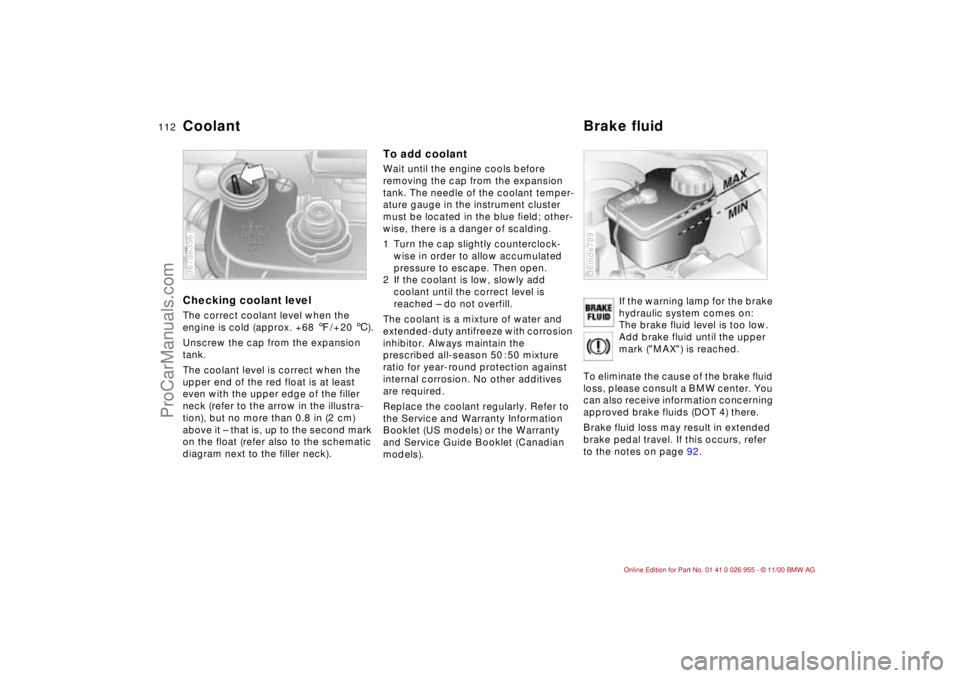
Coolant Brake fluid Checking coolant levelThe correct coolant level when the
engine is cold (approx. +68 7/+20 6).
Unscrew the cap from the expansion
tank.
The coolant level is correct when the
upper end of the red float is at least
even with the upper edge of the filler
neck (refer to the arrow in the illustra-
tion), but no more than 0.8 in (2 cm)
above it – that is, up to the second mark
on the float (refer also to the schematic
diagram next to the filler neck).367de356
To add coolantWait until the engine cools before
removing the cap from the expansion
tank. The needle of the coolant temper-
ature gauge in the instrument cluster
must be located in the blue field; other-
wise, there is a danger of scalding.
1 Turn the cap slightly counterclock-
wise in order to allow accumulated
pressure to escape. Then open.
2 If the coolant is low, slowly add
coolant until the correct level is
reached – do not overfill.
The coolant is a mixture of water and
extended-duty antifreeze with corrosion
inhibitor. Always maintain the
prescribed all-season 50 : 50 mixture
ratio for year-round protection against
internal corrosion. No other additives
are required.
Replace the coolant regularly. Refer to
the Service and Warranty Information
Booklet (US models) or the Warranty
and Service Guide Booklet (Canadian
models).If the warning lamp for the brake
hydraulic system comes on:
The brake fluid level is too low.
Add brake fluid until the upper
mark ("MAX") is reached.
To eliminate the cause of the brake fluid
loss, please consult a BMW center. You
can also receive information concerning
approved brake fluids (DOT 4) there.
Brake fluid loss may result in extended
brake pedal travel. If this occurs, refer
to the notes on page 92.
36mde789
ProCarManuals.com
Page 123 of 171
123n
IndexDataTechnologyRepairsCar careControlsOverview
Storing your vehicle
If you intend to store the vehicle
for longer than three months, have
the maintenance operations described
on this page performed.<
Preparation for storageHave the following operations
performed by your BMW center:
1 Clean and apply a rustproofing agent
or other treatment to the engine,
engine compartment, undercarriage,
axles and major components in
accordance with approved repair
procedures. Wash the vehicle, clean
the interior and treat painted and
chromed parts. Clean the rubber
seals around the hood, luggage
compartment and doors.
2 Change the engine oil and oil filter
with the engine at operating tempera-
ture. As an additional corrosion
protection measure, a corrosion
inhibitor can be added to the engine
in accordance with the manufac-
turer's instructions.
3 Check the coolant level and concen-
tration and top up if necessary.
4 Check the fluid level of the wind-
shield washer fluid reservoir; top up if
necessary.
5 Fill the fuel tank completely to
prevent the formation of condensa-
tion.
6 Increase the tire inflation pressure to
51 psi (350 kPa).Before parking the vehicle for
storage1 Dry the parking brake and footbrake
by brake applications to prevent the
brake discs and drums from
corroding.
2 Park the vehicle in a covered, dry,
and well-ventilated room. Place the
transmission in 1st gear. Chock the
wheels to prevent the vehicle from
rolling if necessary. Do not apply the
parking brake.
3 Remove the battery, charge it
completely and store it in a cool (but
frost-free) room.
M roadster:
4 Remove the hardtop
* and store it
separately. Refer to page 97.
5 Close the convertible top.
During storageRecharge the battery every six months.
If it is not recharged, it will not be
serviceable. Every time the battery is
discharged, especially over extended
periods, its service life is reduced.Removing the vehicle from
storageRecharge the battery if the "Magic Eye"
turns black. Refer to page 141.
Then have Inspection I performed by
your BMW center, including a brake
fluid replacement if necessary. Refer to
the Service Manual.
ProCarManuals.com
Page 125 of 171
125n
IndexDataTechnologyRepairsCar careControlsOverview
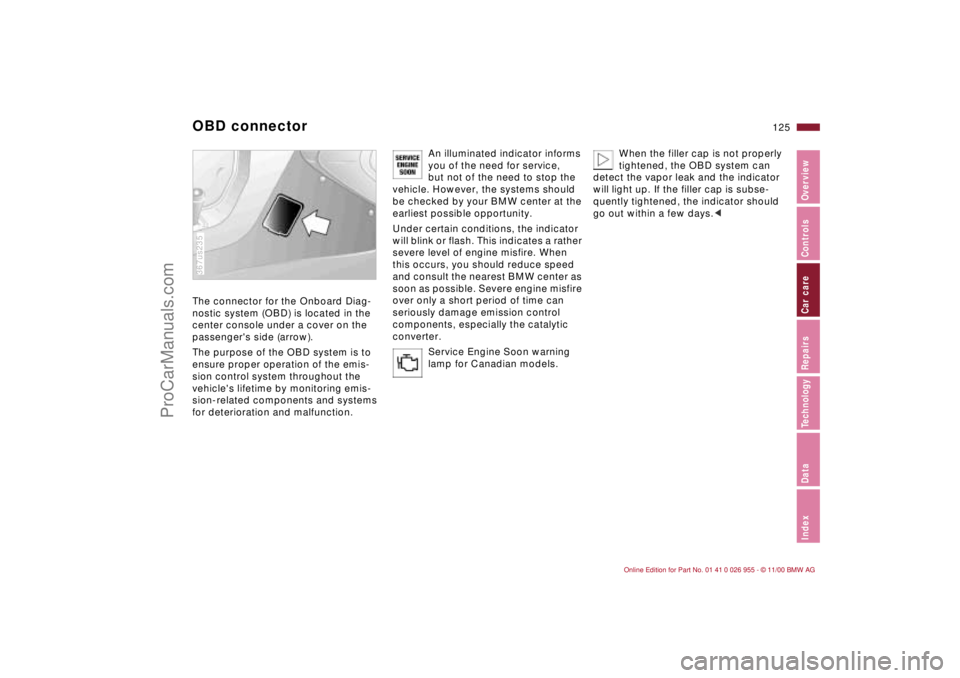
OBD connectorThe connector for the Onboard Diag-
nostic system (OBD) is located in the
center console under a cover on the
passenger's side (arrow).
The purpose of the OBD system is to
ensure proper operation of the emis-
sion control system throughout the
vehicle's lifetime by monitoring emis-
sion-related components and systems
for deterioration and malfunction.367us235
An illuminated indicator informs
you of the need for service,
but not of the need to stop the
vehicle. However, the systems should
be checked by your BMW center at the
earliest possible opportunity.
Under certain conditions, the indicator
will blink or flash. This indicates a rather
severe level of engine misfire. When
this occurs, you should reduce speed
and consult the nearest BMW center as
soon as possible. Severe engine misfire
over only a short period of time can
seriously damage emission control
components, especially the catalytic
converter.
Service Engine Soon warning
lamp for Canadian models.
When the filler cap is not properly
tightened, the OBD system can
detect the vapor leak and the indicator
will light up. If the filler cap is subse-
quently tightened, the indicator should
go out within a few days.<
ProCarManuals.com
Page 141 of 171
141n
IndexDataTechnologyRepairsCar careControlsOverview
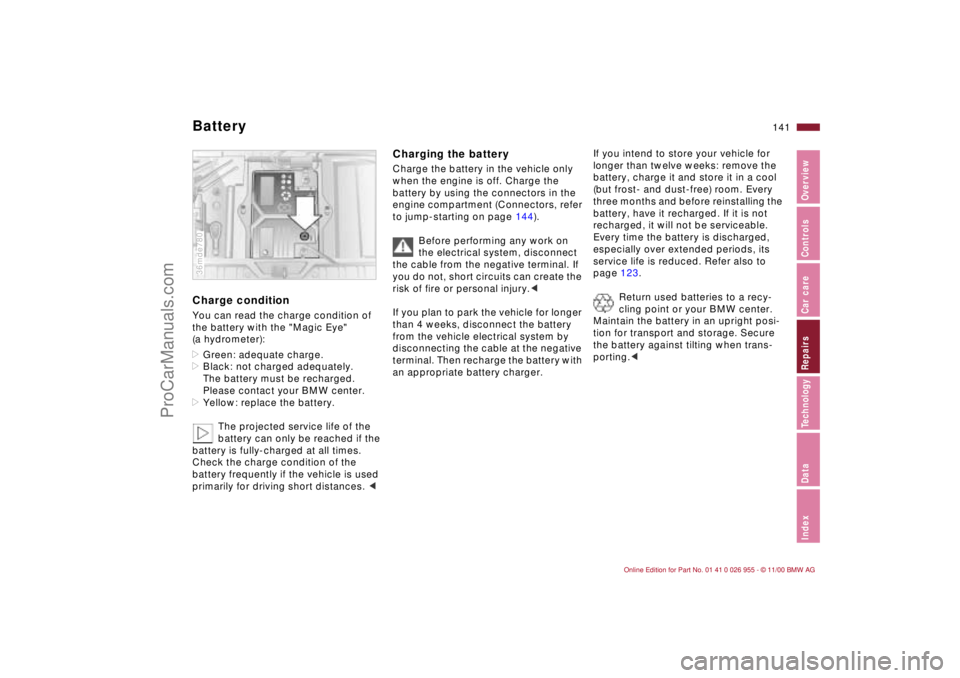
BatteryCharge condition You can read the charge condition of
the battery with the "Magic Eye"
(a hydrometer):
>Green: adequate charge.
>Black: not charged adequately.
The battery must be recharged.
Please contact your BMW center.
>Yellow: replace the battery.
The projected service life of the
battery can only be reached if the
battery is fully-charged at all times.
Check the charge condition of the
battery frequently if the vehicle is used
primarily for driving short distances. < 36mde780
Charging the batteryCharge the battery in the vehicle only
when the engine is off. Charge the
battery by using the connectors in the
engine compartment (Connectors, refer
to jump-starting on page 144).
Before performing any work on
the electrical system, disconnect
the cable from the negative terminal. If
you do not, short circuits can create the
risk of fire or personal injury.<
If you plan to park the vehicle for longer
than 4 weeks, disconnect the battery
from the vehicle electrical system by
disconnecting the cable at the negative
terminal. Then recharge the battery with
an appropriate battery charger.
If you intend to store your vehicle for
longer than twelve weeks: remove the
battery, charge it and store it in a cool
(but frost- and dust-free) room. Every
three months and before reinstalling the
battery, have it recharged. If it is not
recharged, it will not be serviceable.
Every time the battery is discharged,
especially over extended periods, its
service life is reduced. Refer also to
page 123.
Return used batteries to a recy-
cling point or your BMW center.
Maintain the battery in an upright posi-
tion for transport and storage. Secure
the battery against tilting when trans-
porting.<
ProCarManuals.com
Page 142 of 171
142n
Battery FusesRemoval and installation
Do not disconnect the battery
cables when the engine is running.
If you do so, the ensuing voltage surge
will damage the vehicle's onboard elec-
tronics.
Do not make any modifications in the
wires leading to the positive terminal. If
you do so, the battery safety terminal's
safety function will no longer be guaran-
teed. Repair and disposal must be
performed by trained technicians only.<
When removing the battery, disconnect
the cable on the negative terminal first,
then the cable on the positive terminal.
Unscrew the battery retaining clamp.
When installing the battery, connect the
positive terminal first, then connect the
negative terminal.
When installing a battery and
cover, be sure that they are
mounted properly. If this is not done,
the battery will not be adequately
secured in case of an accident.<
If an electrical accessory fails, switch it
off and check the fuse.
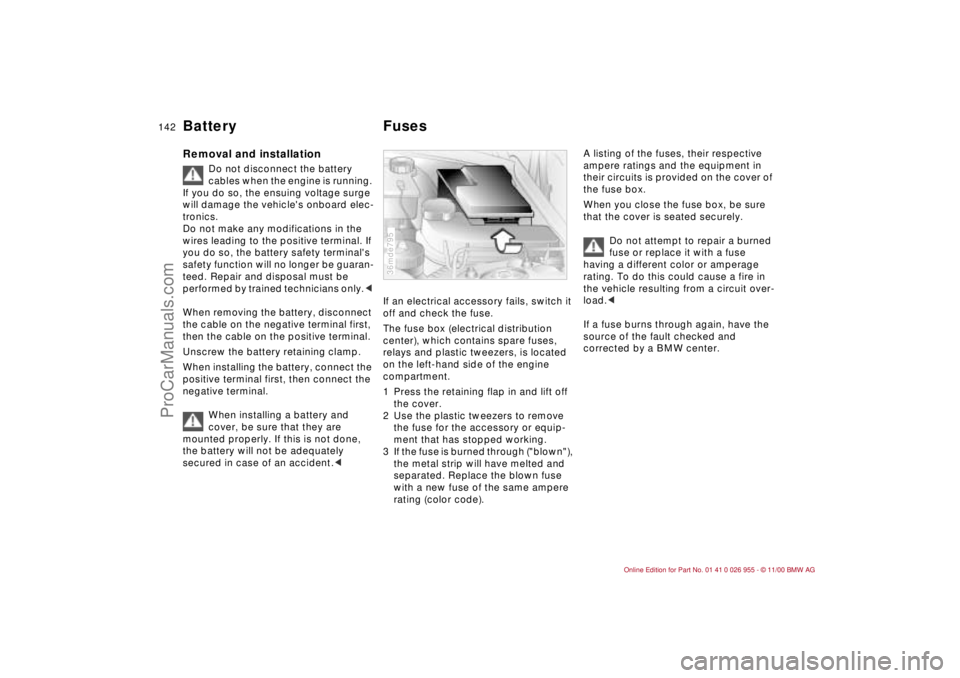
The fuse box (electrical distribution
center), which contains spare fuses,
relays and plastic tweezers, is located
on the left-hand side of the engine
compartment.
1 Press the retaining flap in and lift off
the cover.
2 Use the plastic tweezers to remove
the fuse for the accessory or equip-
ment that has stopped working.
3 If the fuse is burned through ("blown"),
the metal strip will have melted and
separated. Replace the blown fuse
with a new fuse of the same ampere
rating (color code).36mde795
A listing of the fuses, their respective
ampere ratings and the equipment in
their circuits is provided on the cover of
the fuse box.
When you close the fuse box, be sure
that the cover is seated securely.
Do not attempt to repair a burned
fuse or replace it with a fuse
having a different color or amperage
rating. To do this could cause a fire in
the vehicle resulting from a circuit over-
load.<
If a fuse burns through again, have the
source of the fault checked and
corrected by a BMW center.
ProCarManuals.com
Page 164 of 171
Everything from A to ZAABS (Antilock Brake
System)89
Accessories6
Adding
brake fluid112t
engine coolant112t
engine oil109
washer fluid108t
Additional storage areas78
Adjusting
backrest47
mirrors47
seat46
washer nozzles108t
Air conditioner74
Air distribution74
Air outlets72
ventilation73
Air pressure26, 98
checking26t
Air vents72
Airbags21, 51, 122, 150
Airflow rate74
Antenna95
Antifreeze112
Antifreeze protection,
radiator93, 112, 112t
Antilock Brake System
(ABS)89
Anti-theft protection32Approved gross vehicle
weight158
Aquaplaning87, 98
Ashtray79
Automatic car washes115
Automatic cruise control61
Automatic dimming, interior
rearview mirror48
Automatic rear window
washer59
Automatic windshield
washer108
Axle weights158
BBackrest, adjusting47
Backup lamps58
bulb replacement131t
Battery140, 160
capacity160
charge condition141
charging141
discharged144
disposal141t
removal and
installation142
Battery change, keys134t
Battery safety terminal142
Beverage holder79
BMW High Performance
Synthetic Oil110
Body-cavity protectant118Brake fluid112
adding112t
disposal113t
Brake hydraulic system20
Brake lamps, bulb replace-
ment131t
Brake pads22, 92
Brake system92
add brake fluid112t
brake fluid112
fluid level92
Brakes
malfunctions92
winter road conditions93
Break-in procedure86
Bulb replacement129t
Bulbs and lamps129
CCalifornia Proposition
65 Warning124
Capacities159
Car care
exterior115
interior120
Car keys30
Car radio
reception95, 150
refer also to the separate
Owner's Manual
Car wash systems115, 117Care
exterior119
interior120
leather121
paint119
upholstery materials121
windows and glass120
Cargo loading82
Caring for the vehicle
finish119
Cassette mode, refer to the
Radio Owner's Manual
Catalytic converter88
CBC (Cornering Brake
Control)90
Cellular phone95
refer also to the separate
Owner's Manual
Central locking system32
Charge condition of the
battery141t
Charge indicator lamp20
Charging the battery141t
Chassis number113
Checking oil level109t
Checking tire
pressure26t, 98
Child restraint system53
installation54
M coupe with tether
strap54
Child seat53
ProCarManuals.com
Page 167 of 171
Everything from A to Z
167n
IndexDataTechnologyRepairsCar careControlsOverview
NNet81
Non-smoker's equipment
package80
Notes on driving87OOBD data link
connector125
Odometer62
Oil, adding109t
Oil additives109
Oil change intervals, refer to
the Service and Warranty
Information Booklet (US
models) or the Warranty
and Service Guide Booklet
(Canadian models)
Oil consumption109
Oil dipstick109
Oil grades110
Oil level
checking109t
indicator lamp22
Oil pressure, indicator
lamp20
OILSERVICE64
Old batteries141
Onboard Diagnostics, data
link connector125
Onboard tool kit128tOpening and closing
from the inside33
from the outside32
Original parts6
Output156
Outside mirrors47
PPaint damage119
Paint protection119
Parking brake21, 57
Parking lamps69
Parking, winter94
Partition net81
Phone, mobile95
refer also to the separate
Owner's Manual
Please wear your safety belt
warning lamp21
Position lamp, bulb
replacement130t
Power seat adjustment46
Power steering94
Pressure, tires26t, 98
Protection, paint119QQuality Grades99
RRadiator, frost protection93
Radio reception150
Radio, refer to the separate
Owner's Manual
Reading lamps71
Rear lamps131t
Rear window defroster60
Rear window washer,
automatic59
Rear window wiper59
blade replacement128t
Rearview mirrors47
Recirculated air mode74
Refueling25
Releasing the hood104t
Replacement key30
Replacement, tires99, 100
Replacing fuses142t
Replacing windshield wiper
blades128t
Reporting safety defects7
Reservoir, washer
system108t
Reverse gear58
Roll-up cover81
Roof load capacity158
Roof rack83
Rubber seals and
components93, 120
SSafety belt tensioner151
Safety belts49
Safety defects, reporting7
Seals and
components93, 120
Seat adjustment46
Seat heaters77
Securing cargo82
Service and Warranty
Information Booklet
(US models)115
Service Interval
Display64, 114
Set temperature74
Side airbags51, 122
Side marker lamps, bulb
replacement131t
Skid control94
Slippery roads93
Snow chains93t, 102
Socket80
electrical appliances80
flashlight80
vacuum cleaner80
Spare keys30
Spark plugs160
Special oils110
Specifications, engine156
Speed control61
Starting assistance144t
ProCarManuals.com