2001 BMW M ROADSTER COUPE lock
[x] Cancel search: lockPage 10 of 171

Contents
Overview
Controls and features
Cockpit16
Instrument cluster18
Indicator and warning lamps20
Hazard warning flashers24
Warning triangle24
First-aid kit25
Refueling25
Fuel specifications26
Tire inflation pressure26
Tire inflation pressure (table)27
Opening and closing:
Keys30
Electronic vehicle
immobilizer31
Central locking system32
Opening and closing from the
outside32
Opening and closing from the
inside33
Luggage compartment lid34
Electric power windows35
Sunroof – coupe36
Convertible top – roadster37
Adjustments:
Seats46
Mirrors47
Safety systems:
Safety belts49
Airbags51
Transporting children safely53
Driving:
Steering/Ignition lock55
Starting the engine56
Switching off the engine57
Parking brake57
Manual transmission58
Turn signal indicators/High
beams58
Wiper/Washer system59
Rear window defroster60
Cruise control61
Everything under control:
Odometer62
Tachometer62
Fuel gauge62
Coolant temperature gauge63
Engine oil temperature gauge63
Service Interval Display64
Outside temperature64
Clock64
Technology for safety and
driving convenience:
Dynamic Stability Control
(DSC)65
Tire Pressure Warning (RDW)67
Lamps:
Parking lamps/Low beams69
Interior lamps70
Reading lamps71
Controlling the climate
for pleasant driving:
Heating and ventilation/
Air conditioner72
Seat heating77
Contents
ProCarManuals.com
Page 11 of 171
11n
Controls and features
Operation, care and maintenance
Cabin convenience:
Glove compartment78
Storage compartments78
Storage boxes78
Beverage holder79
Ashtray79
Cigarette lighter80
Loading and transporting:
coupe:
Roll-up cover81
Partition net81
Cargo loading82
Roof-mounted luggage
rack83
Special operating instructions:
Break-in procedure86
Driving notes87
Catalytic converter88
Antilock Brake System (ABS)89
Disc brakes91
Brake system92
Winter operation93
Power steering94
Cellular phone95
Radio reception95
Hardtop – roadster96
Wheels and tires:
Notes on tire inflation
pressure98
Tire condition98
Tire replacement99
Tire rotation100
Wheel and tire
combinations101
Special features of winter
tires102
Snow chains102
Approved wheel and tire
specifications103
Under the hood:
Hood104
Engine compartment106
Fluids for the washer
systems108
Washer nozzles108
Engine oil109
Coolant111
Brake fluid112
Vehicle Identification
Number113
Care and maintenance:
The BMW Maintenance
System114
Caring for your vehicle115
Airbags122
Storing your vehicle123
Laws and regulations:
Technical modifications124
California Proposition
65 Warning124
OBD connector125
ProCarManuals.com
Page 19 of 171
19n
IndexDataTechnologyRepairsCar careControlsOverview
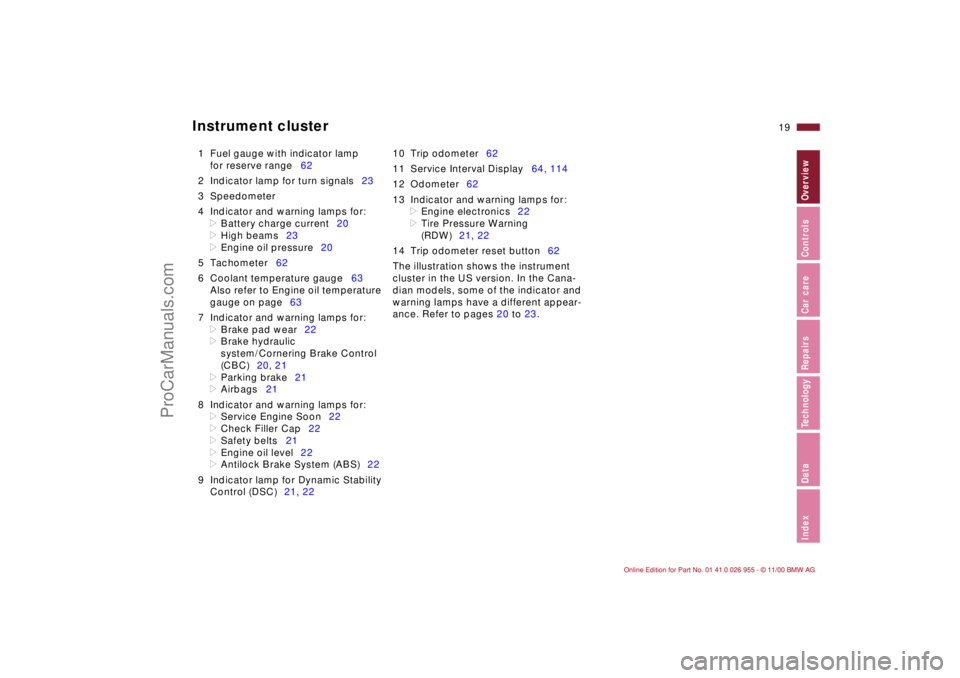
Instrument cluster
1 Fuel gauge with indicator lamp
for reserve range62
2 Indicator lamp for turn signals23
3 Speedometer
4 Indicator and warning lamps for:
>
Battery charge current20
>
High beams23
>
Engine oil pressure20
5 Tachometer62
6 Coolant temperature gauge63
Also refer to Engine oil temperature
gauge on page63
7 Indicator and warning lamps for:
>
Brake pad wear22
>
Brake hydraulic
system/Cornering Brake Control
(CBC)20, 21
>
Parking brake21
>
Airbags21
8 Indicator and warning lamps for:
>
Service Engine Soon22
>
Check Filler Cap22
>
Safety belts21
>
Engine oil level22
>
Antilock Brake System (ABS)22
9 Indicator lamp for Dynamic Stability
Control (DSC)21, 2210 Trip odometer62
11 Service Interval Display64, 114
12 Odometer62
13 Indicator and warning lamps for:
>
Engine electronics22
>
Tire Pressure Warning
(RDW)21, 22
14 Trip odometer reset button62
The illustration shows the instrument
cluster in the US version. In the Cana-
dian models, some of the indicator and
warning lamps have a different appear-
ance. Refer to pages 20 to 23.
ProCarManuals.com
Page 22 of 171
22n
Indicator and warning lamps
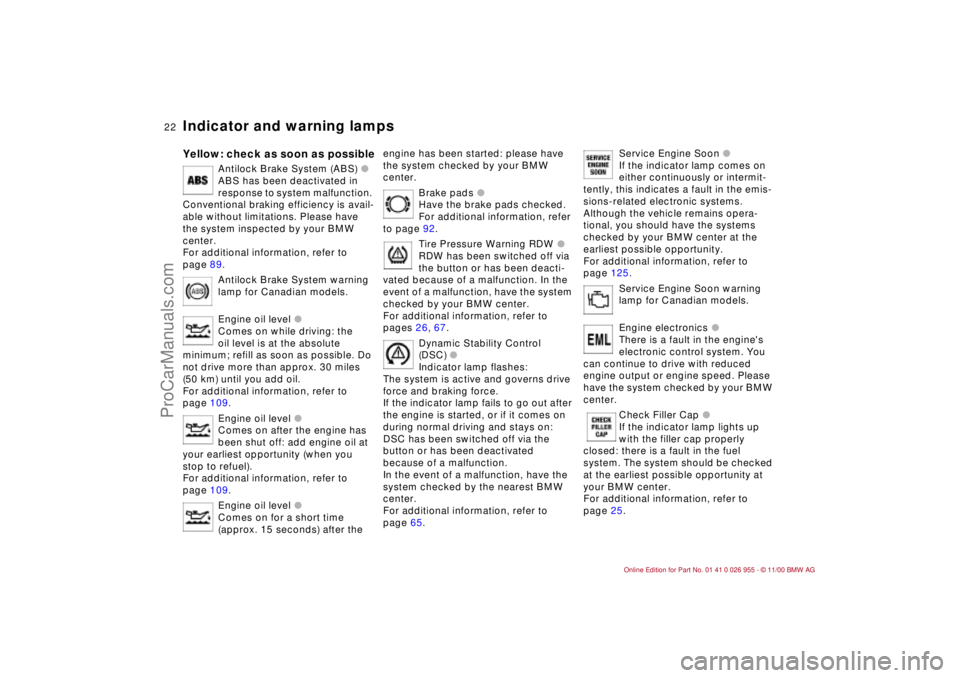
Yellow: check as soon as possible
Antilock Brake System (ABS)
l
ABS has been deactivated in
response to system malfunction.
Conventional braking efficiency is avail-
able without limitations. Please have
the system inspected by your BMW
center.
For additional information, refer to
page 89.
Antilock Brake System warning
lamp for Canadian models.
Engine oil level
l
Comes on while driving: the
oil level is at the absolute
minimum; refill as soon as possible. Do
not drive more than approx. 30 miles
(50 km) until you add oil.
For additional information, refer to
page 109.
Engine oil level
l
Comes on after the engine has
been shut off: add engine oil at
your earliest opportunity (when you
stop to refuel).
For additional information, refer to
page 109.
Engine oil level
l
Comes on for a short time
(approx. 15 seconds) after the
engine has been started: please have
the system checked by your BMW
center.
Brake pads
l
Have the brake pads checked.
For additional information, refer
to page 92.
Tire Pressure Warning RDW
l
RDW has been switched off via
the button or has been deacti-
vated because of a malfunction. In the
event of a malfunction, have the system
checked by your BMW center.
For additional information, refer to
pages 26, 67.
Dynamic Stability Control
(DSC)
l
Indicator lamp flashes:
The system is active and governs drive
force and braking force.
If the indicator lamp fails to go out after
the engine is started, or if it comes on
during normal driving and stays on:
DSC has been switched off via the
button or has been deactivated
because of a malfunction.
In the event of a malfunction, have the
system checked by the nearest BMW
center.
For additional information, refer to
page 65.
Service Engine Soon
l
If the indicator lamp comes on
either continuously or intermit-
tently, this indicates a fault in the emis-
sions-related electronic systems.
Although the vehicle remains opera-
tional, you should have the systems
checked by your BMW center at the
earliest possible opportunity.
For additional information, refer to
page 125.
Service Engine Soon warning
lamp for Canadian models.
Engine electronics
l
There is a fault in the engine's
electronic control system. You
can continue to drive with reduced
engine output or engine speed. Please
have the system checked by your BMW
center.
Check Filler Cap
l
If the indicator lamp lights up
with the filler cap properly
closed: there is a fault in the fuel
system. The system should be checked
at the earliest possible opportunity at
your BMW center.
For additional information, refer to
page 25.
ProCarManuals.com
Page 25 of 171
25n
IndexDataTechnologyRepairsCar careControlsOverview
First-aid kit
*
Refueling
M coupeIn the luggage compartment at the left
rear. Release the Velcro
® fasteners.
M roadsterIn the luggage compartment on the left
in a storage area; swing retaining strap
upward.
Some of the articles in the first-aid
kit may be used within a limited
time only. For this reason, check the
expiration dates of each of the items
regularly, and replace any whose expi-
ration dates have passed. You can
acquire replacements in any drugstore
or pharmacy.
Comply with legal requirements which
cover availability of a first-aid kit in the
vehicle.<
Before filling the tank, shut off the
engine, as otherwise fuel cannot
flow into the tank and the Service
Engine Soon warning lamp may come
on. Refer to page 22.<
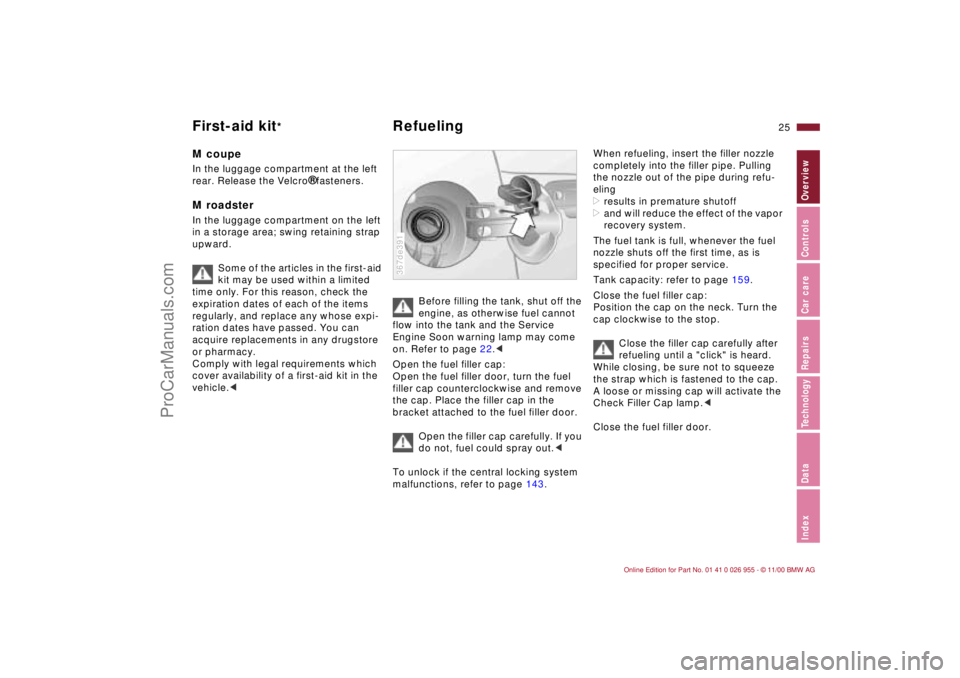
Open the fuel filler cap:
Open the fuel filler door, turn the fuel
filler cap counterclockwise and remove
the cap. Place the filler cap in the
bracket attached to the fuel filler door.
Open the filler cap carefully. If you
do not, fuel could spray out.<
To unlock if the central locking system
malfunctions, refer to page 143.
367de391
When refueling, insert the filler nozzle
completely into the filler pipe. Pulling
the nozzle out of the pipe during refu-
eling
>results in premature shutoff
>and will reduce the effect of the vapor
recovery system.
The fuel tank is full, whenever the fuel
nozzle shuts off the first time, as is
specified for proper service.
Tank capacity: refer to page 159.
Close the fuel filler cap:
Position the cap on the neck. Turn the
cap clockwise to the stop.
Close the filler cap carefully after
refueling until a "click" is heard.
While closing, be sure not to squeeze
the strap which is fastened to the cap.
A loose or missing cap will activate the
Check Filler Cap lamp.<
Close the fuel filler door.
ProCarManuals.com
Page 28 of 171
28n
Opening and closing:
Keys30
Electronic vehicle
immobilizer31
Central locking system32
Opening and closing from the
outside32
Opening and closing from the
inside33
Luggage compartment lid34
Electric power windows35
Sunroof – coupe36
Convertible top – roadster37
Adjustments:
Seats46
Mirrors47
Safety systems:
Safety belts49
Airbags51
Transporting children safely53
Driving:
Steering/Ignition lock55
Starting the engine56
Switching off the engine57
Parking brake57
Manual transmission58
Turn signal indicators/High
beams58
Wiper/Washer system59
Rear window defroster60
Cruise control61
Controls
ProCarManuals.com
Page 29 of 171
Overview
Controls and features
Operation, care
and maintenance
Owner service procedures
Technical data
Index Advanced technology
29n
IndexDataTechnologyRepairsCar careControlsOverview
Everything under control:
Odometer62
Tachometer62
Fuel gauge62
Coolant temperature gauge63
Engine oil temperature gauge63
Service Interval Display64
Outside temperature64
Clock64
Technology for safety and
driving convenience:
Dynamic Stability Control
(DSC)65
Tire Pressure Warning (RDW)67
Lamps:
Parking lamps/Low beams69
Interior lamps70
Reading lamps71Controlling the climate
for pleasant driving:
Heating and ventilation/
Air conditioner72
Seat heating77
Cabin convenience:
Glove compartment78
Storage compartments78
Storage boxes78
Beverage holder79
Ashtray79
Cigarette lighter80
Loading and transporting
cargo:
coupe:
Roll-up cover81
Partition net81
Cargo loading82
Roof-mounted luggage
rack83
ProCarManuals.com
Page 30 of 171
30n
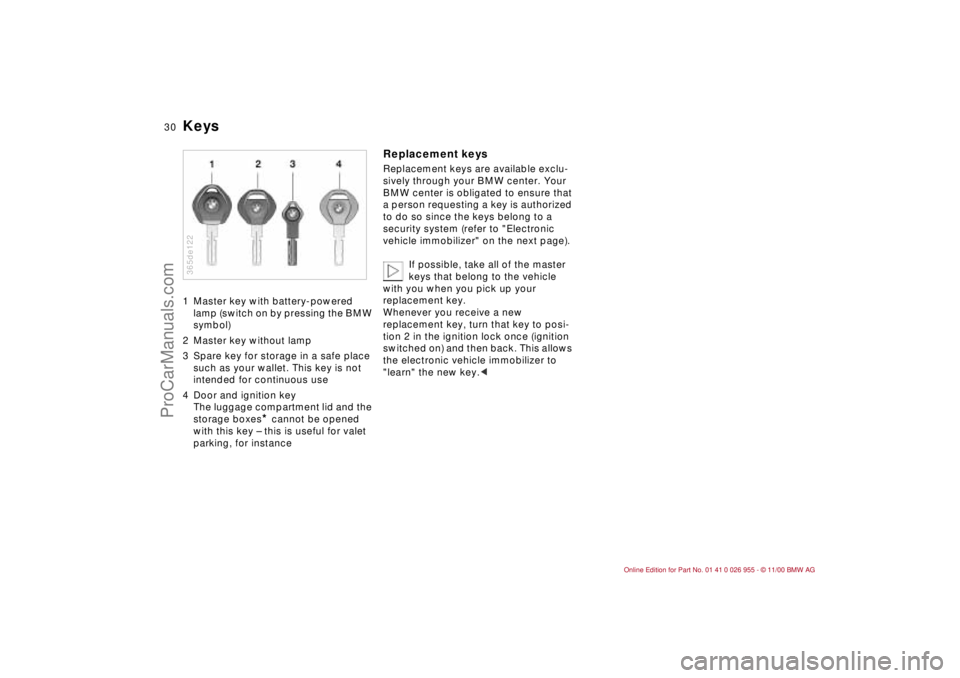
Keys1 Master key with battery-powered
lamp (switch on by pressing the BMW
symbol)
2 Master key without lamp
3 Spare key for storage in a safe place
such as your wallet. This key is not
intended for continuous use
4 Door and ignition key
The luggage compartment lid and the
storage boxes
* cannot be opened
with this key – this is useful for valet
parking, for instance
365de122
Replacement keysReplacement keys are available exclu-
sively through your BMW center. Your
BMW center is obligated to ensure that
a person requesting a key is authorized
to do so since the keys belong to a
security system (refer to "Electronic
vehicle immobilizer" on the next page).
If possible, take all of the master
keys that belong to the vehicle
with you when you pick up your
replacement key.
Whenever you receive a new
replacement key, turn that key to posi-
tion 2 in the ignition lock once (ignition
switched on) and then back. This allows
the electronic vehicle immobilizer to
"learn" the new key.<
ProCarManuals.com