Page 81 of 109
PERIODIC MAINTENANCE AND MINOR REPAIR
6-31
6
EAU00794
Steering inspectionPeriodically inspect the condition of the
steering. Worn out or loose steering
bearings may be dangerous. Place a
stand under the engine to raise the
front wheel off the ground. Hold the
lower end of the front forks and try to
move them forward and backward. If
any free play can be felt, ask a Yamaha
dealer to inspect and adjust the steer-
ing. Inspection is easier if the front
wheel is removed.
EW000115
WARNING
@ Securely support the motorcycle so
there is no danger of it falling over. @
EAU01144
Wheel bearingsIf there is play in the front or rear wheel
hub or if the wheel does not turn
smoothly, have a Yamaha dealer in-
spect the wheel bearings.
E_4tv_Periodic.fm Page 31 Wednesday, September 1, 1999 11:12 AM
Page 85 of 109
PERIODIC MAINTENANCE AND MINOR REPAIR
6-35
6
EAU01623*
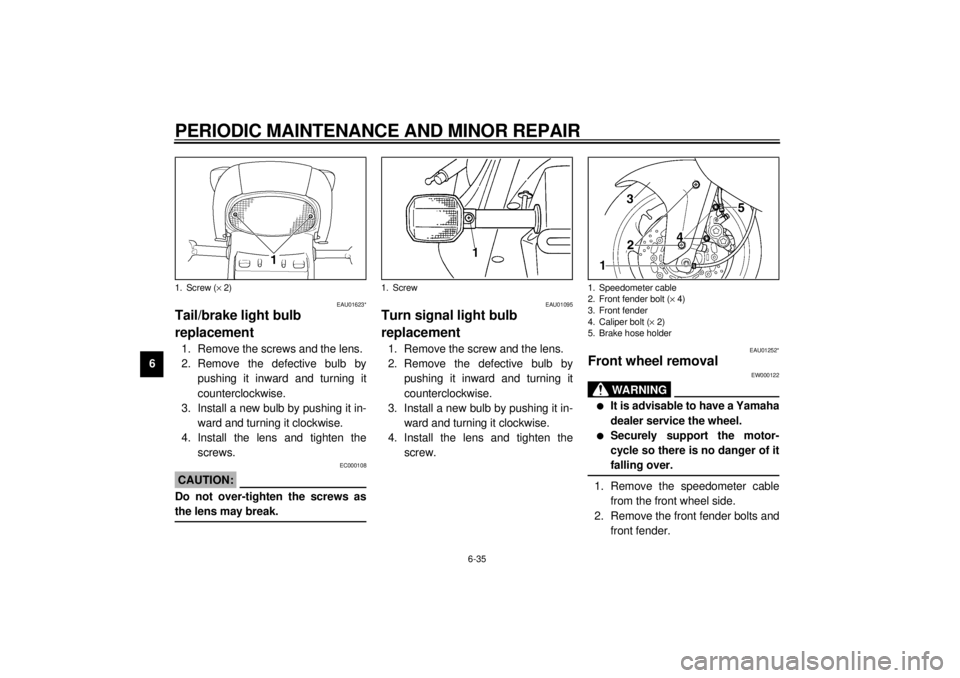
Tail/brake light bulb
replacement1. Remove the screws and the lens.
2. Remove the defective bulb by
pushing it inward and turning it
counterclockwise.
3. Install a new bulb by pushing it in-
ward and turning it clockwise.
4. Install the lens and tighten the
screws.
EC000108
CAUTION:@ Do not over-tighten the screws as
the lens may break. @
EAU01095
Turn signal light bulb
replacement1. Remove the screw and the lens.
2. Remove the defective bulb by
pushing it inward and turning it
counterclockwise.
3. Install a new bulb by pushing it in-
ward and turning it clockwise.
4. Install the lens and tighten the
screw.
EAU01252*
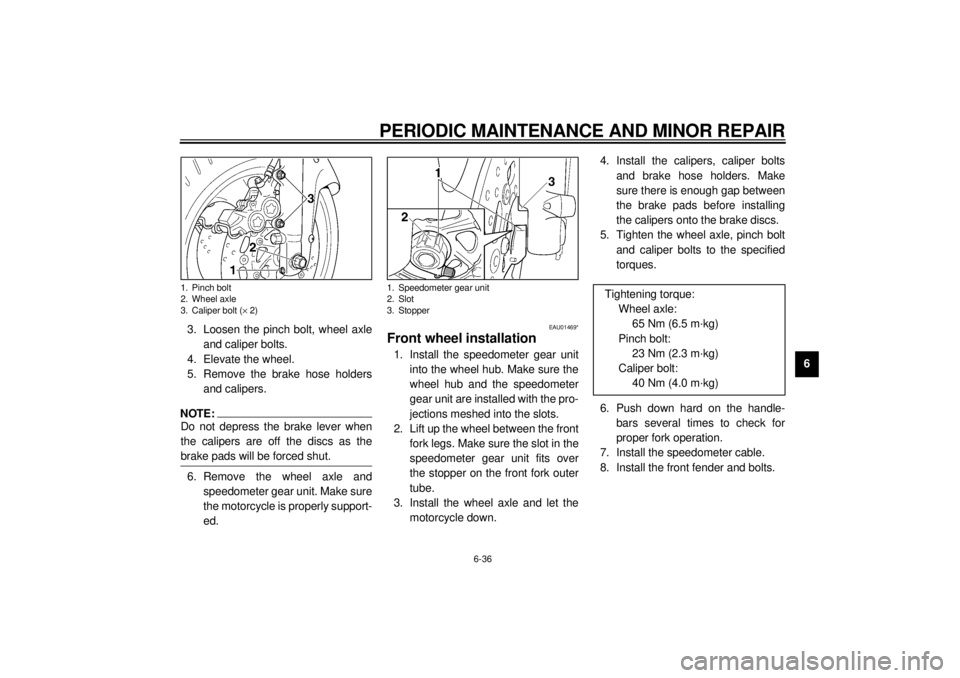
Front wheel removal
EW000122
WA R N I N G
@ l
It is advisable to have a Yamaha
dealer service the wheel.
l
Securely support the motor-
cycle so there is no danger of it
falling over.
@1. Remove the speedometer cable
from the front wheel side.
2. Remove the front fender bolts and
front fender.
1. Screw (´ 2)
1. Screw
1. Speedometer cable
2. Front fender bolt (´ 4)
3. Front fender
4. Caliper bolt (´ 2)
5. Brake hose holder
E_4tv_Periodic.fm Page 35 Wednesday, September 1, 1999 11:12 AM
Page 86 of 109
PERIODIC MAINTENANCE AND MINOR REPAIR
6-36
6 3. Loosen the pinch bolt, wheel axle
and caliper bolts.
4. Elevate the wheel.
5. Remove the brake hose holders
and calipers.
NOTE:@ Do not depress the brake lever when
the calipers are off the discs as the
brake pads will be forced shut. @6. Remove the wheel axle and
speedometer gear unit. Make sure
the motorcycle is properly support-
ed.
EAU01469*
Front wheel installation1. Install the speedometer gear unit
into the wheel hub. Make sure the
wheel hub and the speedometer
gear unit are installed with the pro-
jections meshed into the slots.
2. Lift up the wheel between the front
fork legs. Make sure the slot in the
speedometer gear unit fits over
the stopper on the front fork outer
tube.
3. Install the wheel axle and let the
motorcycle down.4. Install the calipers, caliper bolts
and brake hose holders. Make
sure there is enough gap between
the brake pads before installing
the calipers onto the brake discs.
5. Tighten the wheel axle, pinch bolt
and caliper bolts to the specified
torques.
6. Push down hard on the handle-
bars several times to check for
proper fork operation.
7. Install the speedometer cable.
8. Install the front fender and bolts.
1. Pinch bolt
2. Wheel axle
3. Caliper bolt (´ 2)
1. Speedometer gear unit
2. Slot
3. Stopper
Tightening torque:
Wheel axle:
65 Nm (6.5 m·kg)
Pinch bolt:
23 Nm (2.3 m·kg)
Caliper bolt:
40 Nm (4.0 m·kg)
E_4tv_Periodic.fm Page 36 Wednesday, September 1, 1999 11:12 AM
Page 87 of 109
PERIODIC MAINTENANCE AND MINOR REPAIR
6-37
6
EAU01247*
Rear wheel removal
EW000122
WARNING
@ l
It is advisable to have a Yamaha
dealer service the wheel.
l
Securely support the motor-
cycle so there is no danger of it
falling over.
@
1. Loosen the wheel axle nut, brake
torque rod bolt and caliper bolts.
2. Elevate the wheel.
3. Remove the wheel axle nut, left
wheel axle guide and caliper bolts,
and then remove the caliper.4. Loosen the locknuts and drive
chain adjusting nuts.
5. Push the wheel forward and re-
move the drive chain.
1. Wheel axle nut
2. Left wheel axle guide
3. Locknut (´ 2)
4. Drive chain adjusting nut (´ 2)
5. Wheel axle
1. Brake torque rod bolt
1. Caliper bolt (´ 2)
2. Right wheel axle guide
E_4tv_Periodic.fm Page 37 Wednesday, September 1, 1999 11:12 AM
Page 88 of 109
PERIODIC MAINTENANCE AND MINOR REPAIR
6-38
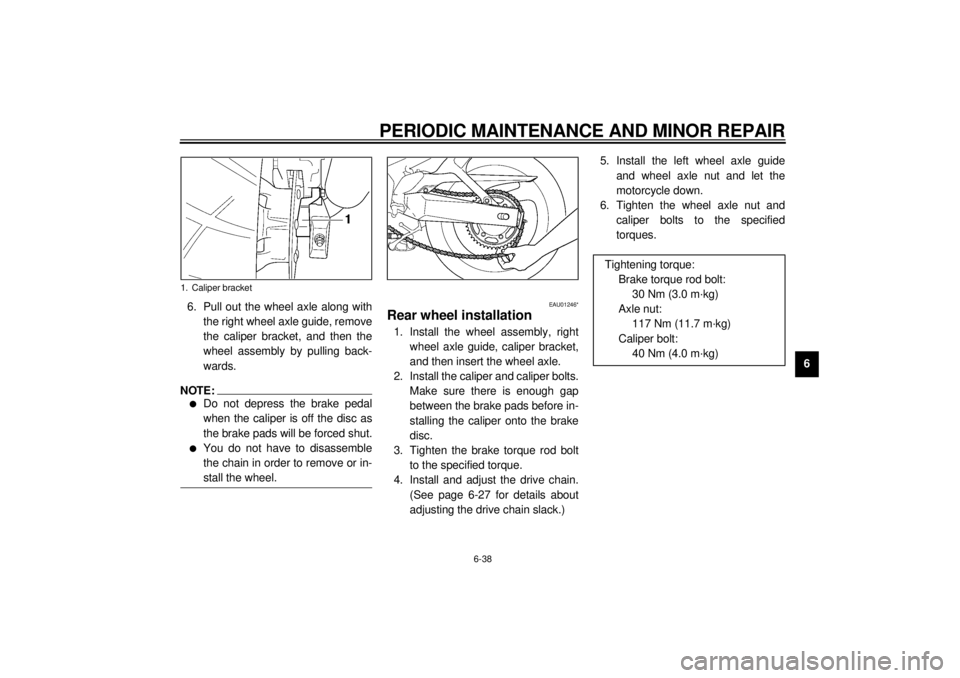
6 6. Pull out the wheel axle along with
the right wheel axle guide, remove
the caliper bracket, and then the
wheel assembly by pulling back-
wards.
NOTE:@ l
Do not depress the brake pedal
when the caliper is off the disc as
the brake pads will be forced shut.
l
You do not have to disassemble
the chain in order to remove or in-
stall the wheel.
@
EAU01246*
Rear wheel installation1. Install the wheel assembly, right
wheel axle guide, caliper bracket,
and then insert the wheel axle.
2. Install the caliper and caliper bolts.
Make sure there is enough gap
between the brake pads before in-
stalling the caliper onto the brake
disc.
3. Tighten the brake torque rod bolt
to the specified torque.
4. Install and adjust the drive chain.
(See page 6-27 for details about
adjusting the drive chain slack.)5. Install the left wheel axle guide
and wheel axle nut and let the
motorcycle down.
6. Tighten the wheel axle nut and
caliper bolts to the specified
torques.
1. Caliper bracket
Tightening torque:
Brake torque rod bolt:
30 Nm (3.0 m·kg)
Axle nut:
117 Nm (11.7 m·kg)
Caliper bolt:
40 Nm (4.0 m·kg)
E_4tv_Periodic.fm Page 38 Wednesday, September 1, 1999 11:12 AM
Page 93 of 109

7-1
7
EAU01516
7-MOTORCYCLE CARE AND STORAGECareThe exposure of its technology makes
a motorcycle charming but also vulner-
able. Although high-quality compo-
nents are used, they are not all rust-
resistant. While a rusty exhaust pipe
may remain unnoticed on a car, it does
look unattractive on a motorcycle. Fre-
quent and proper care, however, will
keep your motorcycle looking good, ex-
tend its life and maintain its perfor-
mance. Moreover, the warranty states
that the vehicle must be properly taken
care of. For all these reasons, it is rec-
ommended that you observe the fol-
lowing cleaning and storing
precautions.Before cleaning
1. Cover up the muffler outlet with a
plastic bag.
2. Make sure that all caps and covers
as well as all electrical couplers
and connectors, including the
spark plug caps, are tightly in-
stalled.
3. Remove extremely stubborn dirt,
like oil burnt onto the crankcase,
with a degreasing agent and a
brush, but never apply such prod-
ucts onto seals, gaskets, sprock-
ets, the drive chain and wheel
axles. Always rinse the dirt and
degreaser off with water.Cleaning
After normal use
Remove dirt with warm water, a neutral
detergent and a soft clean sponge,
then rinse with plenty of clean water.
Use a tooth or bottle brush for hard-to-
reach parts. Tougher dirt and insects
will come off more easily if the area is
covered with a wet cloth for a few min-
utes before cleaning.
E_4tv_Cleaning.fm Page 1 Wednesday, September 1, 1999 11:13 AM
Page 94 of 109
MOTORCYCLE CARE AND STORAGE
7-2
7
ECA00010
CAUTION:@ l
Avoid using strong acidic wheel
cleaners, especially on spoked
wheels. If you do use such
products for hard-to-remove
dirt, do not leave it on any long-
er than instructed, then thor-
oughly rinse it off with water,
immediately dry the area and
apply a corrosion protection
spray.
l
Improper cleaning can damage
windshields, cowlings, panels
and other plastic parts. Use
only a soft, clean cloth or
sponge with mild detergent and
water to clean plastic.
l
Do not use any harsh chemical
products on plastic parts. Be
sure to avoid using cloths or
sponges which have been in
contact with strong or abrasive
cleaning products, solvent or
thinner, fuel (gasoline), rust re-
movers or inhibitors, brake flu-
id, antifreeze or electrolyte.
l
Do not use high-pressure wash-
ers or steam-jet cleaners since
they cause water seepage and
deterioration in the following ar-
eas: seals (of wheel bearings,
swingarm bearings, forks and
brakes), electric components
(couplers, connectors, instru-
ments, switches and lights),
breather hoses and vents.
l
For motorcycles equipped with
a windshield: Do not use strong
cleaners or hard sponges as
they will cause dulling or
scratching. Some cleaning
compounds for plastic may
leave scratches on the wind-
shield. Test the product on a
small hidden part of the wind-
shield to make sure they do not
leave any marks. If the wind-
shield is scratched, use a quali-
ty plastic polishing compound
after washing.
@After riding in the rain, near the sea oron salt-sprayed roadsSince sea salt or salt sprayed on the
roads in the winter are extremely corro-
sive in combination with water, carry
out the following steps after each ride
in the rain, near the sea or on salt-
sprayed roads. (Salt sprayed in the
winter may remain on the roads well
into spring.)
E_4tv_Cleaning.fm Page 2 Wednesday, September 1, 1999 11:13 AM
Page 97 of 109
MOTORCYCLE CARE AND STORAGE
7-5
7a. Remove the spark plug caps and
spark plugs.
b. Pour a teaspoonful of engine oil
into each spark plug bore.
c. Install the spark plug caps onto the
spark plugs and place the spark
plugs on the cylinder head so that
the electrodes are grounded. (This
will limit sparking during the next
step.)
d. Turn the engine over several times
with the starter. (This will coat the
cylinder walls with oil.)
e. Remove the spark plug caps from
the spark plugs, install the spark
plugs and then the spark plug
caps.
EWA00003
WARNING
@ When turning the engine over, be
sure to ground the spark plug elec-
trodes to prevent damage or injury
from sparking. @
6. Lubricate all control cables and
the pivoting points of all levers and
pedals as well as of the sidestand/
centerstand.
7. Check and, if necessary, correct
the tire air pressure, then raise the
motorcycle so that both of its
wheels are off the ground. Alterna-
tively, turn the wheels a little every
month in order to prevent the tires
from becoming degraded in one
spot.
8. Cover up the muffler outlet with a
plastic bag to prevent moisture
from entering.9. Remove the battery and fully
charge it. Store it in a cool, dry
place and recharge it once a
month. Do not store the battery in
an excessively cold or warm place
(less than 0 °C or more than
30 °C). For more information, see
“Battery storage” in the chapter
“PERIODIC MAINTENANCE AND
MINOR REPAIRS”.
NOTE:@ Make any necessary repairs before
storing the motorcycle. @
E_4tv_Cleaning.fm Page 5 Wednesday, September 1, 1999 11:13 AM