Page 13 of 109
DESCRIPTION
2-3
2
Controls/Instruments18. Clutch lever (page 3-9)
19. Left handlebar switches (page 3-8)
20. Starter (choke) “ ” (page 3-13)
21. Speedometer (page 3-6)
22. Tachometer (page 3-6)23. Coolant temperature gauge (page 3-8)
24. Right handlebar switches (page 3-9)
25. Front brake lever (page 3-10)
26. Throttle grip (page 6-18)
27. Main switch/steering lock (page 3-1)E_4tv_Description.fm Page 3 Wednesday, September 1, 1999 11:09 AM
Page 14 of 109

3
INSTRUMENT AND CONTROL FUNCTIONS
Main switch/steering lock ...................................... 3-1
Indicator lights ...................................................... 3-2
Oil level indicator circuit check .............................. 3-4
Fuel indicator circuit check ................................... 3-5
Speedometer ........................................................ 3-6
Tachometer ........................................................... 3-6
Diagnosis device................................................... 3-7
Antitheft alarm (optional) ...................................... 3-7
Coolant temperature gauge .................................. 3-8
Handlebar switches .............................................. 3-8
Clutch lever ........................................................... 3-9
Shift pedal ........................................................... 3-10
Front brake lever ................................................. 3-10
Rear brake pedal ................................................ 3-10Fuel tank cap ..................................................... 3-11
Fuel .................................................................... 3-11
Fuel tank breather hose (for Germany only) ...... 3-13
Starter (choke) “ ” .......................................... 3-13
Seat.................................................................... 3-14
Helmet holder..................................................... 3-15
Storage compartment ........................................ 3-15
Front fork adjustment ......................................... 3-16
Rear shock absorber adjustment ....................... 3-18
Recommended combinations of
the front fork and the rear shock absorber
settings............................................................. 3-20
Luggage strap holders ....................................... 3-21
Sidestand ........................................................... 3-21
Sidestand/clutch switch operation check............ 3-22
E_4tv_FunctionsTOC.fm Page 1 Wednesday, September 1, 1999 11:09 AM
Page 18 of 109
INSTRUMENT AND CONTROL FUNCTIONS
3-4
3
EAU00071
Oil level indicator circuit check
CB-48E
Turn the main switch to “ON” and
the engine stop switch to “ ”.
Oil level indicator light
does not come on.
Oil level indicator light
comes on.Check engine oil level.
Oil level indicator light
comes on.
Oil level indicator light
does not come on.
Engine oil level and
electrical circuit are OK.
Go ahead with riding.
Put the transmission in neutral or
apply the clutch lever, then push
the start switch.
Oil level
is OK.
Supply
engine oil.Oil level
is low.
Ask a Yamaha dealer to
inspect electrical circuit.
E_4tv_Functions.fm Page 4 Wednesday, September 1, 1999 11:10 AM
Page 19 of 109
INSTRUMENT AND CONTROL FUNCTIONS
3-5
3
EAU00085
Fuel indicator circuit check
CB-46E
Turn the main switch to “ON” and the
engine stop switch to “ ”.
Fuel indicator light does
not come on.
Fuel indicator light
comes on.Check the fuel level.
Fuel indicator light
comes on.
Fuel indicator light
does not come on.
Fuel level and electrical
circuit are OK.
Go ahead with riding.
Put the transmission in neutral or
apply the clutch lever, then push
the start switch.
Fuel level
is OK.
Supply fuel.Fuel level
is low.
Ask a Yamaha dealer to
inspect electrical circuit.
E_4tv_Functions.fm Page 5 Wednesday, September 1, 1999 11:10 AM
Page 23 of 109

INSTRUMENT AND CONTROL FUNCTIONS
3-9
3
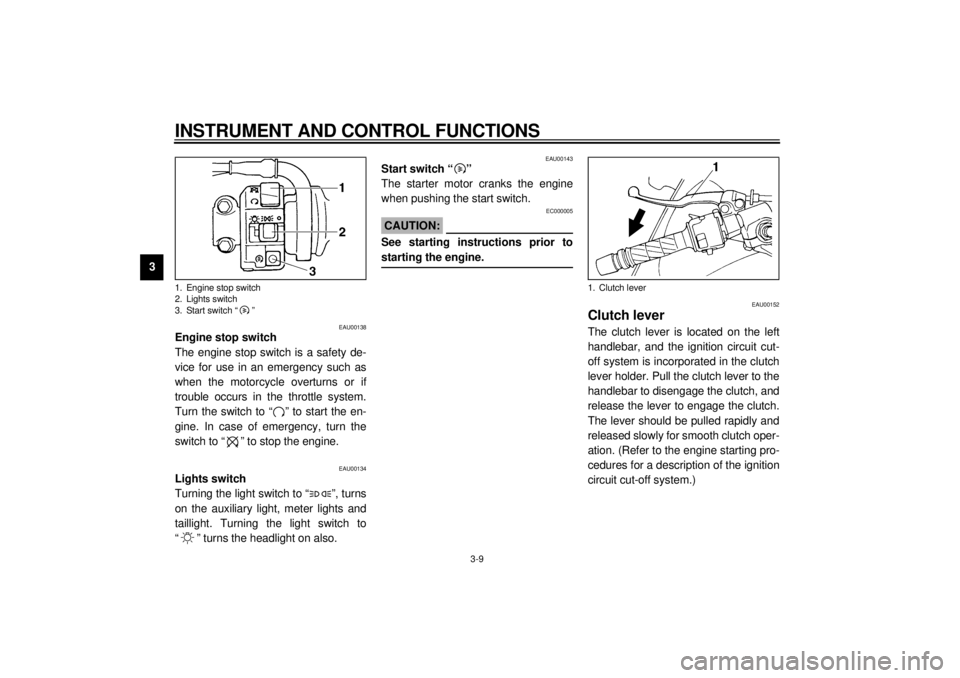
EAU00138
Engine stop switch
The engine stop switch is a safety de-
vice for use in an emergency such as
when the motorcycle overturns or if
trouble occurs in the throttle system.
Turn the switch to “ ” to start the en-
gine. In case of emergency, turn the
switch to “ ” to stop the engine.
EAU00134
Lights switch
Turning the light switch to “ ”, turns
on the auxiliary light, meter lights and
taillight. Turning the light switch to
“ ” turns the headlight on also.
EAU00143
Start switch “ ”
The starter motor cranks the engine
when pushing the start switch.
EC000005
CAUTION:@ See starting instructions prior to
starting the engine. @
EAU00152
Clutch leverThe clutch lever is located on the left
handlebar, and the ignition circuit cut-
off system is incorporated in the clutch
lever holder. Pull the clutch lever to the
handlebar to disengage the clutch, and
release the lever to engage the clutch.
The lever should be pulled rapidly and
released slowly for smooth clutch oper-
ation. (Refer to the engine starting pro-
cedures for a description of the ignition
circuit cut-off system.)
1. Engine stop switch
2. Lights switch
3. Start switch “ ”
1. Clutch lever
E_4tv_Functions.fm Page 9 Wednesday, September 1, 1999 11:10 AM
Page 24 of 109
INSTRUMENT AND CONTROL FUNCTIONS
3-10
3
EAU00157
Shift pedalThis motorcycle is equipped with a con-
stant-mesh 6-speed transmission.
The shift pedal is located on the left
side of the engine and is used in com-
bination with the clutch when shifting.
EAU00161
Front brake leverThe front brake lever is located on the
right handlebar and is equipped with a
brake lever adjusting dial. To activate
the front brake, pull the lever toward
the handlebar.
To adjust the front brake lever position,
turn the brake lever adjusting dial while
pulling the lever forward. Make sure the
setting on the brake lever adjusting dial
is aligned with the arrow mark.
EAU00162
Rear brake pedalThe rear brake pedal is on the right
side of the motorcycle. Press down on
the brake pedal to apply the rear brake.
1. Shift pedal
1. Arrow mark
2. Brake lever adjusting dial
3. Front brake lever
a. Lever distance
1. Rear brake pedal
E_4tv_Functions.fm Page 10 Wednesday, September 1, 1999 11:10 AM
Page 36 of 109
INSTRUMENT AND CONTROL FUNCTIONS
3-22
3
EAU00331
Sidestand/clutch switch
operation checkCheck the operation of the sidestand
switch and clutch switch against the in-
formation below.CD-11EEW000045
WA R N I N G
@ If improper operation is noted, con-
sult a Yamaha dealer immediately. @
TURN THE MAIN SWITCH TO “ON”
AND THE ENGINE STOP SWITCH TO
“”.TRANSMISSION IS IN GEAR AND
SIDESTAND IS UP.PULL IN CLUTCH LEVER AND
PUSH THE START SWITCH.ENGINE WILL START.SIDESTAND IS DOWN.CLUTCH SWITCH IS OK.
ENGINE WILL STALL.SIDESTAND SWITCH IS OK.
E_4tv_Functions.fm Page 22 Wednesday, September 1, 1999 11:10 AM
Page 39 of 109

4-1
4
EAU01114
4-PRE-OPERATION CHECKSOwners are personally responsible for their vehicle’s condition. Your motorcycle’s vital functions can start to deteriorate
quickly and unexpectedly, even if it remains unused (for instance, if it is exposed to the elements). Any damage, fluid leak or
loss of tire pressure could have serious consequences. Therefore, it is very important that, in addition to a thorough visual in-
spection, you check the following points before each ride.
EAU00340
PRE-OPERATION CHECK LIST
ITEM CHECKS PAGE
Front brake
• Check operation, free play, fluid level and fluid leakage.
• Fill with DOT 4 brake fluid if necessary.6-23 ~ 6-26
Rear brake
6-23 ~ 6-26
Clutch• Check operation condition and free play.
• Adjust if necessary.6-23
Throttle grip and housing• Check for smooth operation.
• Lubricate if necessary.6-18, 6-28
Engine oil• Check oil level.
• Fill with oil if necessary.6-9 ~ 6-11
Coolant reservoir tank• Check coolant level.
• Fill with coolant as required.6-12
Drive chain• Check chain slack and condition.
• Adjust if necessary.6-27 ~ 6-28
Wheels and tires
• Check tire pressure, wear and damage. 6-19 ~ 6-22
Control and meter cable• Check for smooth operation.
• Lubricate if necessary.6-28
Brake and shift pedal
shafts• Check for smooth operation.
• Lubricate if necessary.6-29
Brake and clutch lever
pivots• Check for smooth operation.
• Lubricate if necessary.6-29
Sidestand pivot• Check for smooth operation.
• Lubricate if necessary.6-29
E_4tv_Preop.fm Page 1 Wednesday, September 1, 1999 11:11 AM