Page 11 of 121
2-1
2
EAU00026
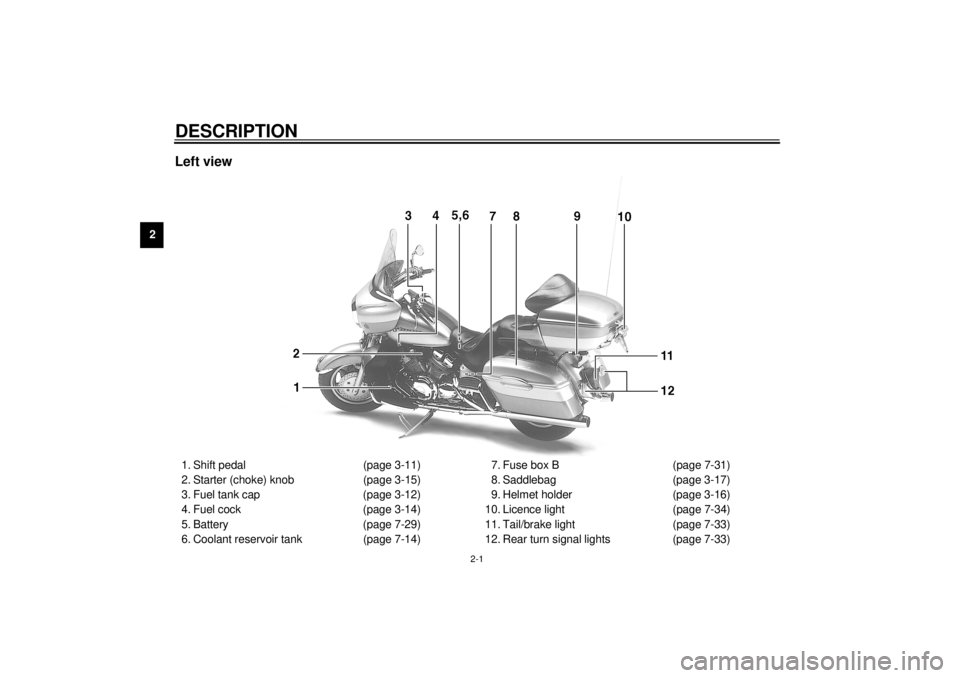
2-DESCRIPTIONLeft view1. Shift pedal (page 3-11)
2. Starter (choke) knob (page 3-15)
3. Fuel tank cap (page 3-12)
4. Fuel cock (page 3-14)
5. Battery (page 7-29)
6. Coolant reservoir tank (page 7-14)7. Fuse box B (page 7-31)
8. Saddlebag (page 3-17)
9. Helmet holder (page 3-16)
10. Licence light (page 7-34)
11. Tail/brake light (page 7-33)
12. Rear turn signal lights (page 7-33)
E_5jc_Description.fm Page 1 Saturday, October 16, 1999 1:07 PM
Page 12 of 121
DESCRIPTION
2-2
2
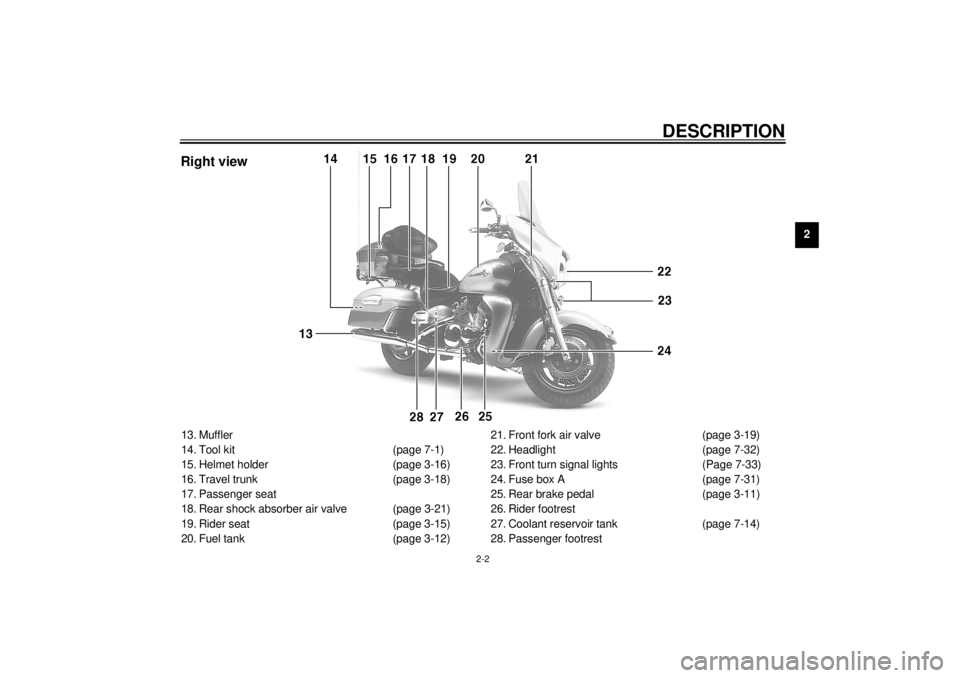
13. Muffler
14. Tool kit (page 7-1)
15. Helmet holder (page 3-16)
16. Travel trunk (page 3-18)
17. Passenger seat
18. Rear shock absorber air valve (page 3-21)
19. Rider seat (page 3-15)
20. Fuel tank (page 3-12)21. Front fork air valve (page 3-19)
22. Headlight (page 7-32)
23. Front turn signal lights (Page 7-33)
24. Fuse box A (page 7-31)
25. Rear brake pedal (page 3-11)
26. Rider footrest
27. Coolant reservoir tank (page 7-14)
28. Passenger footrestRight view
E_5jc_Description.fm Page 2 Saturday, October 16, 1999 1:07 PM
Page 57 of 121

5-1
5
EAU01114
5-PRE-OPERATION CHECKSOwners are personally responsible for their vehicle’s condition. Your motorcycle’s vital functions can start to deteriorate
quickly and unexpectedly, even if it remains unused (for instance, if it is exposed to the elements). Any damage, fluid leak or
loss of tire pressure could have serious consequences. Therefore, it is very important that, in addition to a thorough visual in-
spection, you check the following points before each ride.
EAU00340
PRE-OPERATION CHECK LIST
ITEM CHECKS PAGE
Front brake• Check operation, fluid level and vehicle for fluid leakage.
• Fill with DOT 4 brake fluid if necessary.
7-23 ~ 7-26
Rear brake• Check operation, fluid level and vehicle for fluid leakage.
• Fill with DOT 4 brake fluid if necessary.
Clutch• Check operation, fluid level and vehicle for fluid leakage.
• Fill with DOT 4 brake fluid if necessary.7-22
Throttle grip and housing• Check for smooth operation.
• Lubricate if necessary.7-18
Engine oil• Check oil level.
• Fill with oil if necessary.7-11 ~ 7-13
Coolant reservoir tank• Check coolant level.
• Fill with coolant if necessary.7-14
Final gear oil• Check vehicle for leakage. 7-13
Wheels and tires• Check tire pressure, wear and for damage. 7-19 ~ 7-22
Brake and shift pedal
shafts• Check for smooth operation.
• Lubricate if necessary.7-27
Brake and clutch lever
pivots• Check for smooth operation.
• Lubricate if necessary.7-27
Sidestand pivot• Check for smooth operation.
• Lubricate if necessary.7-28
E_5jc_Preop.fm Page 1 Saturday, October 16, 1999 1:10 PM
Page 80 of 121
PERIODIC MAINTENANCE AND MINOR REPAIR
7-14
7
EAU01797
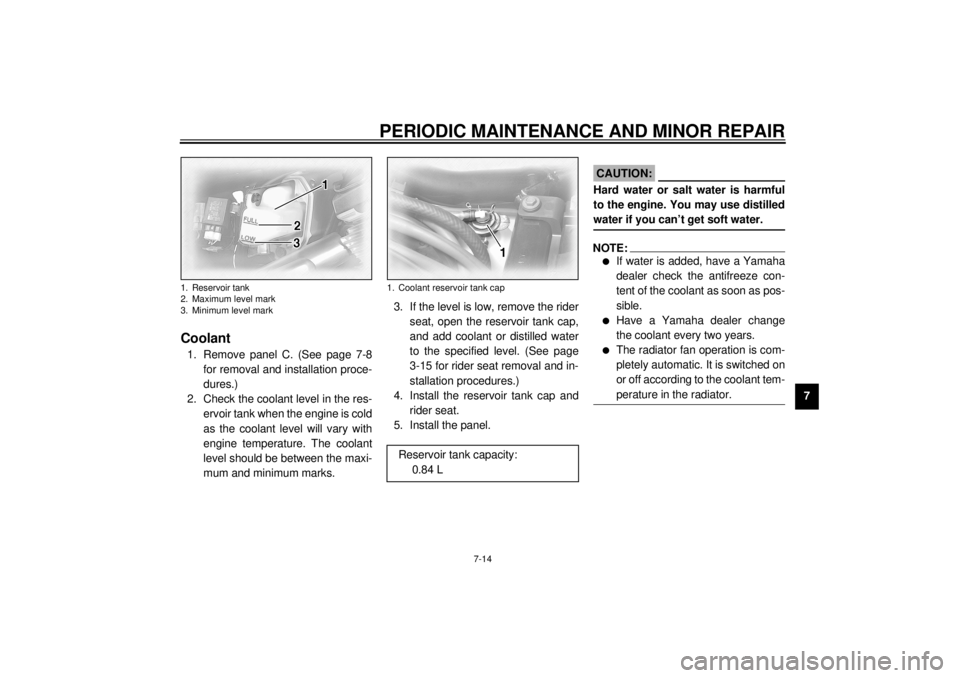
Coolant1. Remove panel C. (See page 7-8
for removal and installation proce-
dures.)
2. Check the coolant level in the res-
ervoir tank when the engine is cold
as the coolant level will vary with
engine temperature. The coolant
level should be between the maxi-
mum and minimum marks.3. If the level is low, remove the rider
seat, open the reservoir tank cap,
and add coolant or distilled water
to the specified level. (See page
3-15 for rider seat removal and in-
stallation procedures.)
4. Install the reservoir tank cap and
rider seat.
5. Install the panel.
EC000080
CAUTION:@ Hard water or salt water is harmful
to the engine. You may use distilled
water if you can’t get soft water. @NOTE:@ l
If water is added, have a Yamaha
dealer check the antifreeze con-
tent of the coolant as soon as pos-
sible.
l
Have a Yamaha dealer change
the coolant every two years.
l
The radiator fan operation is com-
pletely automatic. It is switched on
or off according to the coolant tem-
perature in the radiator.
@
1. Reservoir tank
2. Maximum level mark
3. Minimum level mark
1. Coolant reservoir tank capReservoir tank capacity:
0.84 L
E_5jc_Periodic.fm Page 14 Saturday, October 16, 1999 1:10 PM
Page 102 of 121
PERIODIC MAINTENANCE AND MINOR REPAIR
7-36
7
Engine overheating
EW000070
WARNING
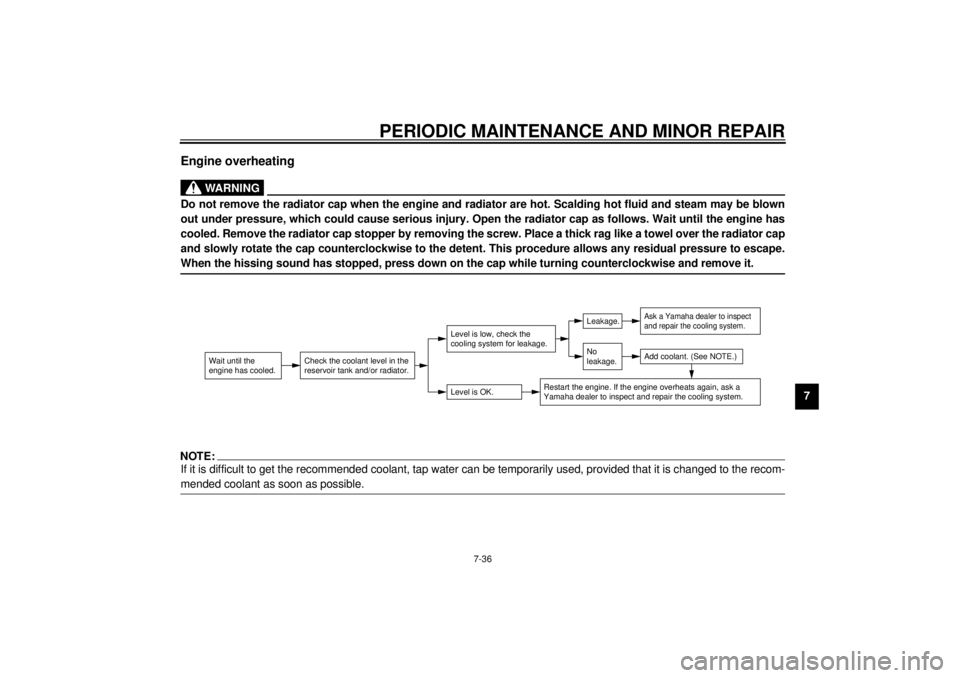
@ Do not remove the radiator cap when the engine and radiator are hot. Scalding hot fluid and steam may be blown
out under pressure, which could cause serious injury. Open the radiator cap as follows. Wait until the engine has
cooled. Remove the radiator cap stopper by removing the screw. Place a thick rag like a towel over the radiator cap
and slowly rotate the cap counterclockwise to the detent. This procedure allows any residual pressure to escape.
When the hissing sound has stopped, press down on the cap while turning counterclockwise and remove it. @NOTE:@ If it is difficult to get the recommended coolant, tap water can be temporarily used, provided that it is changed to the recom-
mended coolant as soon as possible. @
Wait until the
engine has cooled.
Check the coolant level in the
reservoir tank and/or radiator.
Level is OK.Level is low, check the
cooling system for leakage.
No
leakage.Leakage.
Ask a Yamaha dealer to inspect
and repair the cooling system.Add coolant. (See NOTE.)
Restart the engine. If the engine overheats again, ask a
Yamaha dealer to inspect and repair the cooling system.
E_5jc_Periodic.fm Page 36 Saturday, October 16, 1999 1:10 PM