2000 YAMAHA XVZ1300TF light
[x] Cancel search: lightPage 64 of 121
OPERATION AND IMPORTANT RIDING POINTS
6-4
6
EAU02941
Recommended shift points
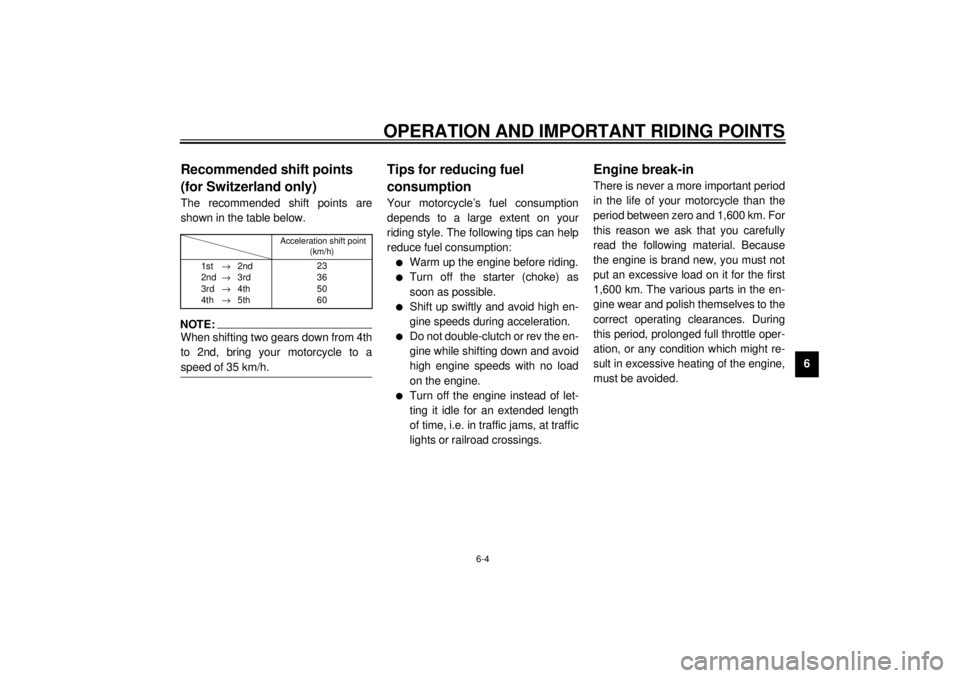
(for Switzerland only)The recommended shift points are
shown in the table below.CF-25ENOTE:@ When shifting two gears down from 4th
to 2nd, bring your motorcycle to a
speed of 35 km/h. @
EAU00424
Tips for reducing fuel
consumptionYour motorcycle’s fuel consumption
depends to a large extent on your
riding style. The following tips can help
reduce fuel consumption:l
Warm up the engine before riding.
l
Turn off the starter (choke) as
soon as possible.
l
Shift up swiftly and avoid high en-
gine speeds during acceleration.
l
Do not double-clutch or rev the en-
gine while shifting down and avoid
high engine speeds with no load
on the engine.
l
Turn off the engine instead of let-
ting it idle for an extended length
of time, i.e. in traffic jams, at traffic
lights or railroad crossings.
EAU01128
Engine break-inThere is never a more important period
in the life of your motorcycle than the
period between zero and 1,600 km. For
this reason we ask that you carefully
read the following material. Because
the engine is brand new, you must not
put an excessive load on it for the first
1,600 km. The various parts in the en-
gine wear and polish themselves to the
correct operating clearances. During
this period, prolonged full throttle oper-
ation, or any condition which might re-
sult in excessive heating of the engine,
must be avoided.
Acceleration shift point
(km/h)
1st®2nd
2nd®3rd
3rd®4th
4th®5th23
36
50
60
E_5jc_Operation.fm Page 4 Saturday, October 16, 1999 1:10 PM
Page 66 of 121

7
PERIODIC MAINTENANCE AND MINOR REPAIR
Tool kit................................................................... 7-1
Periodic maintenance and lubrication ................... 7-3
Cowling and panel removal and installation.......... 7-6
Cowling A.............................................................. 7-6
Cowling B.............................................................. 7-7
Panel C ................................................................. 7-8
Panel D ................................................................. 7-8
Panel E ................................................................. 7-9
Spark plug inspection ......................................... 7-10
Engine oil ............................................................ 7-11
Final gear oil ....................................................... 7-13
Coolant ............................................................... 7-14
Air filters .............................................................. 7-15
Carburetor adjustment ........................................ 7-17
Idle speed adjustment ........................................ 7-17
Throttle cable free play inspection ...................... 7-18
Valve clearance adjustment ................................ 7-18
Tires .................................................................... 7-19
Wheels ................................................................ 7-21
Clutch lever free play adjustment........................ 7-22Front brake lever free play adjustment ............... 7-23
Rear brake pedal height adjustment .................. 7-23
Brake light switch adjustment ............................. 7-24
Checking the front and rear brake pads ............. 7-25
Inspecting the brake fluid level ........................... 7-25
Brake fluid replacement ..................................... 7-26
Brake and shift pedal lubrication ........................ 7-27
Brake and clutch lever lubrication ...................... 7-27
Sidestand lubrication.......................................... 7-28
Front fork inspection ........................................... 7-28
Steering inspection ............................................ 7-29
Battery................................................................ 7-29
Fuse replacement .............................................. 7-31
Headlight bulb replacement ............................... 7-32
Turn signal and tail/brake light bulb
replacement ..................................................... 7-33
License light bulb replacement........................... 7-34
Troubleshooting .................................................. 7-34
Troubleshooting charts ....................................... 7-35
E_5jc_PeriodicTOC.fm Page 1 Saturday, October 16, 1999 1:10 PM
Page 76 of 121

PERIODIC MAINTENANCE AND MINOR REPAIR
7-10
7
EAU01880
Spark plug inspectionThe spark plug is an important engine
component and should be inspected
periodically, preferably by a Yamaha
dealer. The condition of the spark plug
can indicate the condition of the en-
gine.
Normally, all spark plugs from the
same engine should have the same
color on the white insulator around the
center electrode. The ideal color at this
point is a medium-to-light tan color for a
motorcycle that is being ridden normal-
ly. If one spark plug shows a distinctly
different color, there could be some-
thing wrong with the engine.Do not attempt to diagnose such prob-
lems yourself. Instead, take the motor-
cycle to a Yamaha dealer. The spark
plugs should be periodically removed
and inspected because heat and de-
posits will cause any spark plug to
slowly break down and erode. If elec-
trode erosion becomes excessive, or if
carbon and other deposits are exces-
sive, the spark plug should be replaced
with the specified plug.
Before installing any spark plug, mea-
sure the electrode gap with a wire
thickness gauge and adjust it to specifi-
cation.When installing a spark plug, the gas-
ket surface should always be cleaned
and a new gasket used. Any grime
should be wiped off from the threads
and the spark plug tightened to the
specified torque.
NOTE:@ If a torque wrench is not available when
installing a spark plug, a good estimate
of the correct torque is 1/4 to 1/2 turn
past finger tight. The spark plug should
be tightened to the specified torque as
soon as possible. @
a. Spark plug gap
Specified spark plug:
DPR8EA-9 (NGK) or
X24EPR-U9 (DENSO)
Spark plug gap:
0.8 ~ 0.9 mm
Tightening torque:
Spark plug:
17.5 Nm (1.75 m·kg)
E_5jc_Periodic.fm Page 10 Saturday, October 16, 1999 1:10 PM
Page 77 of 121
PERIODIC MAINTENANCE AND MINOR REPAIR
7-11
7
EAU01703
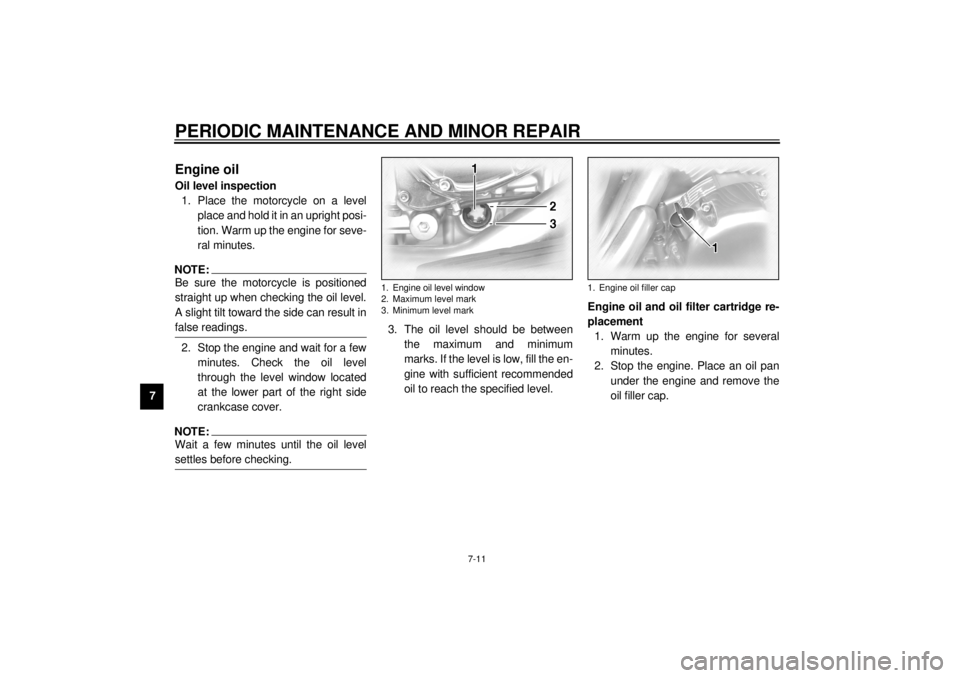
Engine oilOil level inspection
1. Place the motorcycle on a level
place and hold it in an upright posi-
tion. Warm up the engine for seve-
ral minutes.NOTE:@ Be sure the motorcycle is positioned
straight up when checking the oil level.
A slight tilt toward the side can result in
false readings. @2. Stop the engine and wait for a few
minutes. Check the oil level
through the level window located
at the lower part of the right side
crankcase cover.NOTE:@ Wait a few minutes until the oil level
settles before checking. @
3. The oil level should be between
the maximum and minimum
marks. If the level is low, fill the en-
gine with sufficient recommended
oil to reach the specified level.Engine oil and oil filter cartridge re-
placement
1. Warm up the engine for several
minutes.
2. Stop the engine. Place an oil pan
under the engine and remove the
oil filler cap.1. Engine oil level window
2. Maximum level mark
3. Minimum level mark
1. Engine oil filler cap
E_5jc_Periodic.fm Page 11 Saturday, October 16, 1999 1:10 PM
Page 78 of 121
PERIODIC MAINTENANCE AND MINOR REPAIR
7-12
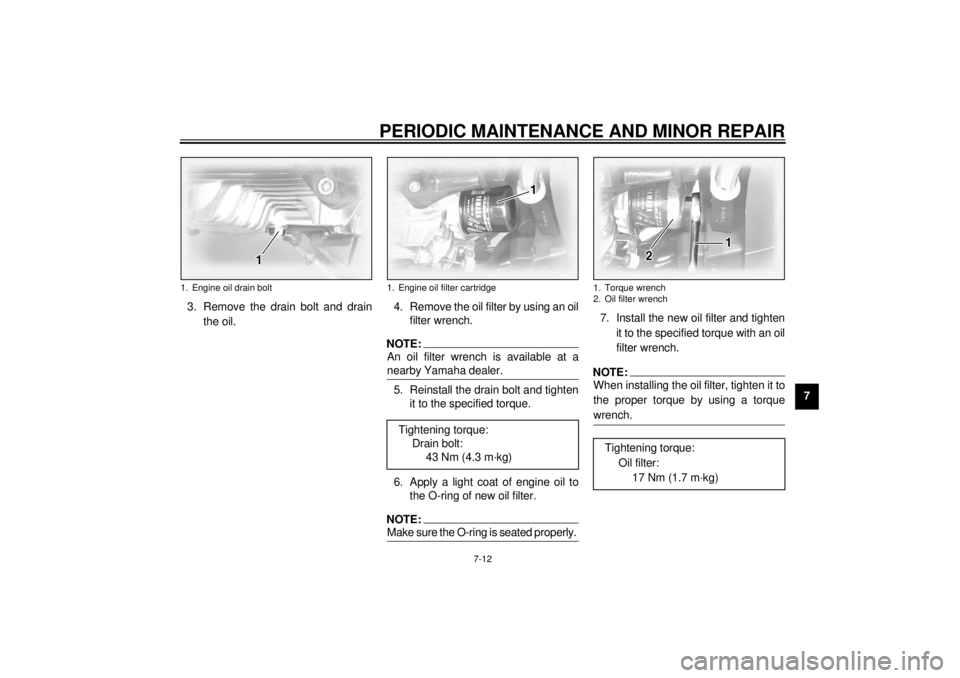
7 3. Remove the drain bolt and drain
the oil.4. Remove the oil filter by using an oil
filter wrench.
NOTE:@ An oil filter wrench is available at a
nearby Yamaha dealer. @5. Reinstall the drain bolt and tighten
it to the specified torque.
6. Apply a light coat of engine oil to
the O-ring of new oil filter.NOTE:@ Make sure the O-ring is seated properly. @
7. Install the new oil filter and tighten
it to the specified torque with an oil
filter wrench.NOTE:@ When installing the oil filter, tighten it to
the proper torque by using a torque
wrench. @
1. Engine oil drain bolt
1. Engine oil filter cartridgeTightening torque:
Drain bolt:
43 Nm (4.3 m·kg)
1. Torque wrench
2. Oil filter wrenchTightening torque:
Oil filter:
17 Nm (1.7 m·kg)
E_5jc_Periodic.fm Page 12 Saturday, October 16, 1999 1:10 PM
Page 79 of 121
PERIODIC MAINTENANCE AND MINOR REPAIR
7-13
78. Fill the engine with sufficient rec-
ommended oil. Install the oil filler
cap and tighten it.
EC000066
CAUTION:@ l
Do not put in any chemical addi-
tives. Engine oil also lubricates
the clutch and additives could
cause clutch slippage.
l
Be sure no foreign material en-
ters the crankcase.
@
9. Start the engine and warm it up for
several minutes. While warming
up, check for oil leakage. If oil
leakage is found, stop the engine
immediately and check for the
cause.NOTE:@ After the engine is started, the oil level
indicator light should go off if the oil is at
the specified level. @
EC000067
CAUTION:@ If the indicator light flickers or re-
mains on, immediately stop the en-
gine and consult with a Yamaha
dealer. @
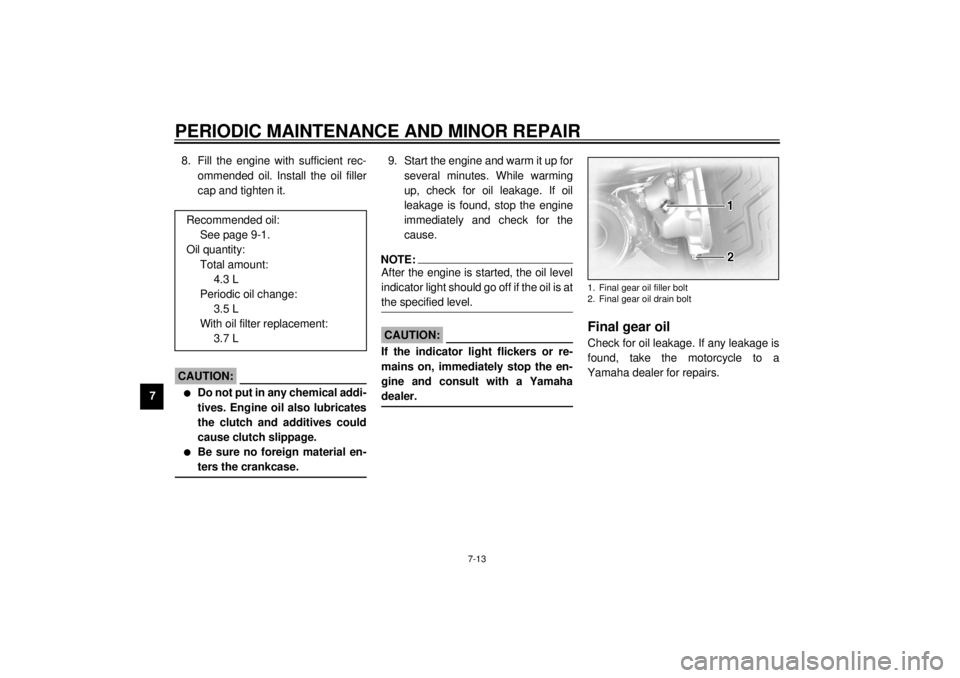
EAU01220
Final gear oilCheck for oil leakage. If any leakage is
found, take the motorcycle to a
Yamaha dealer for repairs. Recommended oil:
See page 9-1.
Oil quantity:
Total amount:
4.3 L
Periodic oil change:
3.5 L
With oil filter replacement:
3.7 L1. Final gear oil filler bolt
2. Final gear oil drain bolt
E_5jc_Periodic.fm Page 13 Saturday, October 16, 1999 1:10 PM
Page 82 of 121
PERIODIC MAINTENANCE AND MINOR REPAIR
7-16
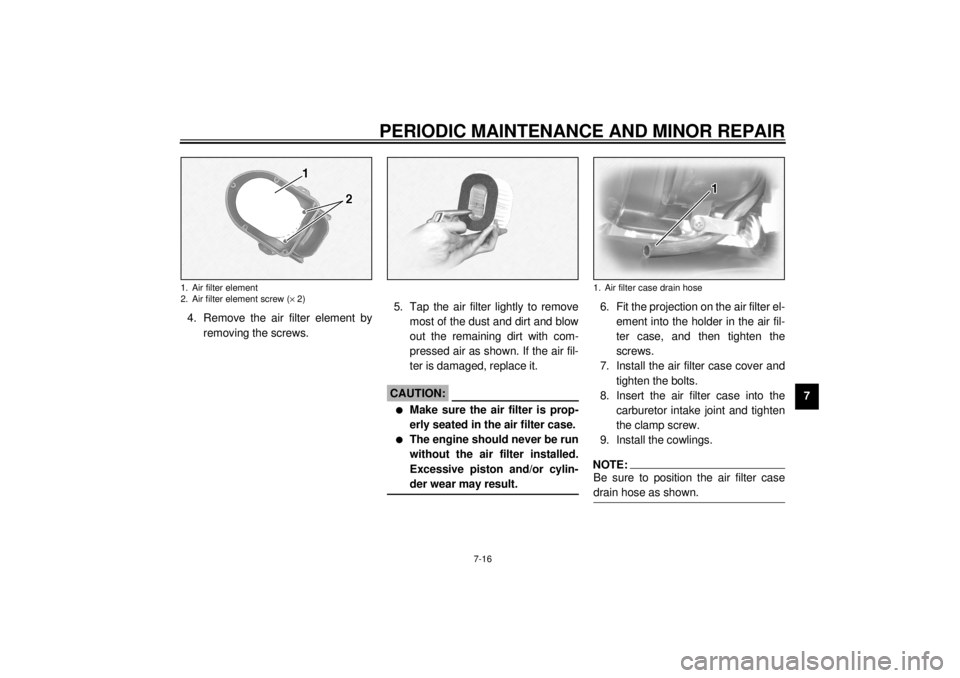
7 4. Remove the air filter element by
removing the screws.5. Tap the air filter lightly to remove
most of the dust and dirt and blow
out the remaining dirt with com-
pressed air as shown. If the air fil-
ter is damaged, replace it.
EC000082
CAUTION:@ l
Make sure the air filter is prop-
erly seated in the air filter case.
l
The engine should never be run
without the air filter installed.
Excessive piston and/or cylin-
der wear may result.
@
6. Fit the projection on the air filter el-
ement into the holder in the air fil-
ter case, and then tighten the
screws.
7. Install the air filter case cover and
tighten the bolts.
8. Insert the air filter case into the
carburetor intake joint and tighten
the clamp screw.
9. Install the cowlings.NOTE:@ Be sure to position the air filter case
drain hose as shown. @
1. Air filter element
2. Air filter element screw (´ 2)
1. Air filter case drain hose
E_5jc_Periodic.fm Page 16 Saturday, October 16, 1999 1:10 PM
Page 90 of 121
PERIODIC MAINTENANCE AND MINOR REPAIR
7-24
7
EW000109
WARNING
@ A soft or spongy feeling in the brake
pedal can indicate the presence of
air in the brake system. This air
must be removed by bleeding the
brake system before the motorcycle
is operated. Air in the system will
cause greatly diminished braking
capability and can result in loss of
control and an accident. Have a
Yamaha dealer inspect and bleed
the system if necessary. @
EAU01799
Brake light switch adjustmentThe rear brake light switch is activated
by the brake pedal and is properly ad-
justed when the brake light comes on
just before braking takes effect. Since
the brake light switch is a component of
the cruise control system, adjustment
should be made by a Yamaha dealer.
E_5jc_Periodic.fm Page 24 Saturday, October 16, 1999 1:10 PM