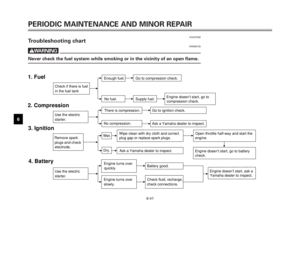
Page 65 of 88

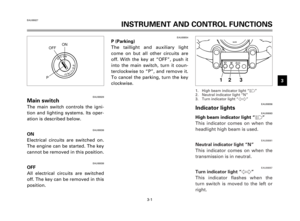
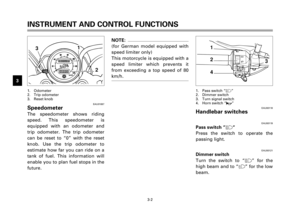
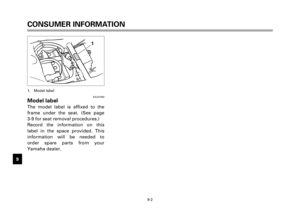
1
2
3
4
5
6
7
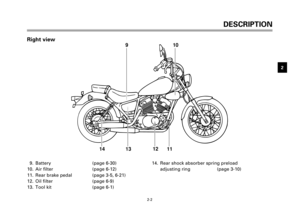
8
9
6-32
PERIODIC MAINTENANCE AND MINOR REPAIR
EC000100
cC
Normal tap water contains miner-
als which are harmful to a battery;
therefore, refill only with distilled
water.
EW000117
w
Take care not to spill battery fluid
on the chain. Battery fluid may
weaken the chain causing shorter
chain life and possibly result in an
accident.
Battery storage
8When the motorcycle will not
be used for a month or longer,
remove the battery, fully
charge it and store it in a cool,
dry place. Completely recharge
the battery before reinstalla-
tion.
8If the battery will be stored for
longer than two months, check
the specific gravity of the fluid
at least once a month and fully
recharge the battery when it is
too low.
8Always make sure the connec-
tions are correct when putting
the battery back in the motor-
cycle. Make sure the breather
hose is properly connected
and is not damaged or
obstructed.
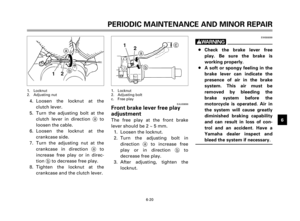
EAU01073Fuse replacement
The fuse cases are located under
the rider seat.
If a fuse is blown, turn off the main
switch and the switch of the circuit
in question. Install a new fuse of
specified amperage. Turn on the
switches and see if the electrical
device operates. If the fuse imme-
diately blows again, consult a
Yamaha dealer.
1. Main fuse
2. Signaling system fuse
1
2
5AJ-9-E3 (XV125S)<3.1E> 4/5/0 5:01 PM Page 63
Page 66 of 88
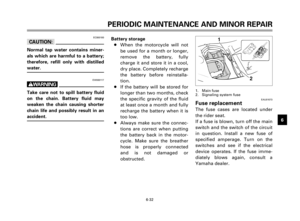
6-33
1
2
3
4
5
6
7
8
92. Remove the connectors, the
headlight unit and then the
bulb cover.
1. Bulb cover
2. Connector (´2)
1
2
PERIODIC MAINTENANCE AND MINOR REPAIR
EAU00833Headlight bulb replacement
This motorcycle is equipped with a
quartz bulb headlight.
If the headlight bulb burns out,
replace the bulb as follows:
1. Remove the headlight unit
screws.
1. Screw (´2)
EC000103
cC
Do not use fuses of higher amper-
age rating than those recommend-
ed. Substitution of a fuse of
improper rating can cause exten-
sive electrical system damage and
possibly a fire.
1
Specified fuses:
Main fuse: 20A
Signaling system fuse: 10A
5AJ-9-E3 (XV125S)<3.1E> 4/5/0 5:01 PM Page 64
Page 67 of 88
1
2
3
4
5
6
7
8
9
6-34
PERIODIC MAINTENANCE AND MINOR REPAIR
3. Turn the bulb holder counter-
clockwise to remove it and
remove the defective bulb.
EW000119
w
Keep flammable products and your
hands away from a bulb while it is
on, as it is hot. Do not touch a bulb
until it cools down.
4. Put a new bulb into position
and secure it in place with the
bulb holder.
1. Bulb holder
EC000105
cC
Avoid touching the glass part of a
bulb. Keep it free from oil; other-
wise, the transparency of the
glass, life of the bulb, and lumi-
nous flux will be adversely affect-
ed. If oil gets on a bulb, thoroughly
clean it with a cloth moistened
with alcohol or lacquer thinner.
5. Install the bulb cover, connec-
tors and headlight unit.
Ask a Yamaha dealer to adjust
the headlight beam if neces-
sary.
1. Don’t touch
1
1
1
EAU03010Turn signal light bulb
replacement
1. Remove the screws and the
lens.
1. Screw (´2)
5AJ-9-E3 (XV125S)<3.1E> 4/5/0 5:01 PM Page 65
Page 68 of 88
6-35
1
2
3
4
5
6
7
8
9
1
2. Remove the defective bulb by
pushing it inward and turning
it counterclockwise.
3. Install a new bulb by pushing
it inward and turning it clock-
wise.
4. Install the lense and tighten
the screws.
EC000108
cC
Do not over-tighten the screws as
the lens may break.
1. Bulb
PERIODIC MAINTENANCE AND MINOR REPAIR
1
2. Remove the defective bulb by
pushing it inward and turning
it counterclockwise.
3. Install a new bulb by pushing
it inward and turning it clock-
wise.
4. Install the lens and tighten the
screws.
1. Bulb
1
EAU01623Taillight bulb replacement
1. Remove the screws and the
lense.
1. Screw (´2)
5AJ-9-E3 (XV125S)<3.1E> 4/5/0 5:01 PM Page 66
Page 69 of 88

1
2
3
4
5
6
7
8
9
6-36
PERIODIC MAINTENANCE AND MINOR REPAIR
EAU00862Supporting the motorcycle
Since the Yamaha XV125S has no
centerstand, follow these precau-
tions when removing the front and
rear wheel or performing other
maintenance requiring the motor-
cycle to stand upright.
Front wheel service
To stabilize the rear of the motor-
cycle, either use a motorcycle
stand or place a motorcycle jack
under the frame in front of the rear
wheel to prevent it from moving
from side to side. Then use a
motorcycle stand to elevate the
front wheel off of the ground.Rear wheel service
Use a motorcycle stand or motor-
cycle jack to elevate the motorcycle
so the rear wheel is off the ground.
Alternatively, two jacks can be
placed under the frame or
swingarm.
Check that the motorcycle is in a
stable and level position before
starting any maintenance. A strong
wooden box can be placed under
the engine for added stability.
1
EAU00894Front wheel removalEW000122
w
8It is advisable to have a
Yamaha dealer service the
wheel.
8Securely support the motorcy-
cle so there is no danger of it
falling over.
1. Remove the speedometer
cable from the front wheel
side.
1. Speedometer cable
5AJ-9-E3 (XV125S)<3.1E> 4/5/0 5:01 PM Page 67
Page 70 of 88
6-37
1
2
3
4
5
6
7
8
9
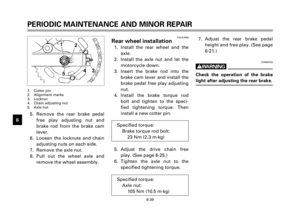
3. Make sure the slot in the
speedometer gear unit fits
over the stopper on the front
fork outer tube.
4. Install the wheel axle and let
the motorcycle down.
PERIODIC MAINTENANCE AND MINOR REPAIR
2. Loosen the pinch bolt and
wheel axle.
3. Elevate the front wheel by
placing a suitable stand under
the engine.
4. Remove the wheel axle and
the front wheel.
NOTE:
Do not depress the brake lever
when the disc and caliper are sepa-
rated.
1. Pinch bolt
2. Wheel axle
EAU01547Front wheel installation
1. Install the speedometer gear
unit into the wheel hub. Make
sure the wheel hub and the
speedometer gear unit hous-
ing are installed with the pro-
jections meshed into the slots.
2. Lift up the wheel between the
front fork legs and guide the
brake disc between the brake
pads. Make sure there is
enough gap between the brake
pads before inserting the brake
disc.
2
1
5AJ-9-E3 (XV125S)<3.1E> 4/5/0 5:01 PM Page 68
Page 71 of 88

1
2
3
4
5
6
7
8
9
6-38
PERIODIC MAINTENANCE AND MINOR REPAIR
5. Push down hard on the han-
dlebars several times to check
for proper fork operation.
6. Tightening the wheel axle to
the specified torque.
7. Install the pinch bolts and
tighten them to the specified
torque.
8. Install the speedometer cable.EAU01550Rear wheel removalEW000122
w
8It is advisable to have a
Yamaha dealer service the
wheel.
8Securely support the motorcy-
cle so there is no danger of it
falling over.
1. Remove the axle nut cotter pin
and brake torque rod cotter
pin. Tightening torque:
Wheel axle:
59 Nm (5.9 m·kg)
Pinch bolt:
20 Nm (2.0 m·kg)
1
3 4
2
5
2. Loosen the axle nut and brake
torque nut.
3. Elevate the rear wheel by plac-
ing a suitable stand under the
engine.
4. Remove the brake torque rod
nut and bolt from the brake
shoe plate.
1. Brake torque rod
2. Brake torque rod cotter pin
3. Brake torque rod nut
4. Brake rod
5. Rear brake pedal free play adjusting nut
5AJ-9-E3 (XV125S)<3.1E> 4/5/0 5:01 PM Page 69
Page 72 of 88

EW000103
w
Check the operation of the brake
light after adjusting the rear brake.
PERIODIC MAINTENANCE AND M")
6-39
1
2
3
4
5
6
7
8
97. Adjust the rear brake pedal
height and free play. (See page
6-21.)
EW000103
w
Check the operation of the brake
light after adjusting the rear brake.
PERIODIC MAINTENANCE AND MINOR REPAIR
EAU01696Rear wheel installation
1. Install the rear wheel and the
axle.
2. Install the axle nut and let the
motorcycle down.
3. Insert the brake rod into the
brake cam lever and install the
brake pedal free play adjusting
nut.
4. Install the brake torque rod
bolt and tighten to the speci-
fied tightening torque. Then
install a new cotter pin.
5. Adjust the drive chain free
play. (See page 6-25.)
6. Tighten the axle nut to the
specified tightening torque. Specified torque:
Brake torque rod bolt:
23 Nm (2.3 m·kg)
Specified torque:
Axle nut:
105 Nm (10.5 m·kg)
435
12
5. Remove the rear brake pedal
free play adjusting nut and
brake rod from the brake cam
lever.
6. Loosen the locknuts and chain
adjusting nuts on each side.
7. Remove the axle nut.
8. Pull out the wheel axle and
remove the wheel assembly.
1. Cotter pin
2. Alignment marks
3. Locknut
4. Chain adjusting nut
5. Axle nut
5AJ-9-E3 (XV125S)<3.1E> 4/5/0 5:01 PM Page 70


1
2
PERIODIC MAINTENANCE AND MINOR REPAIR
EAU00833Headlight bulb replacemen")


