2000 TOYOTA TUNDRA ECU
[x] Cancel search: ECUPage 206 of 283
TUNDRA (34413U)
206
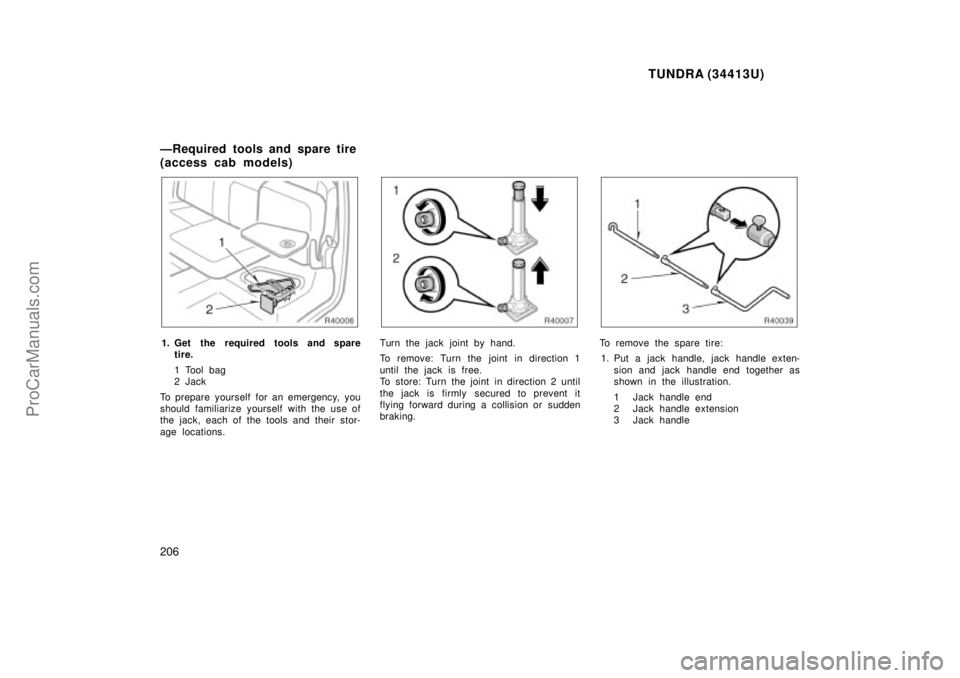
1. Get the required tools and sparetire.
1 Tool bag
2Jack
To prepare yourself for an emergency, you
should fam iliarize yourself with the use of
the jack, each of the tools and their stor-
age locations.Turn the jack joint by hand.
To remove: Turn the joint in direction 1
until the jack is free.
To store: Turn the joint in direction 2 until
the jack is firmly secured to prevent it
flying forward during a collision or s udden
braking.To remove the spare tire:
1. Put a jack handle, jack handle exten- sion and jack handle end together as
shown in the illustration.
1 Jack handle end
2 Jack handle extension
3 Jack handle
ÐRequired tools and spare tire
(access cab models)
ProCarManuals.com
Page 207 of 283
TUNDRA (34413U)
207
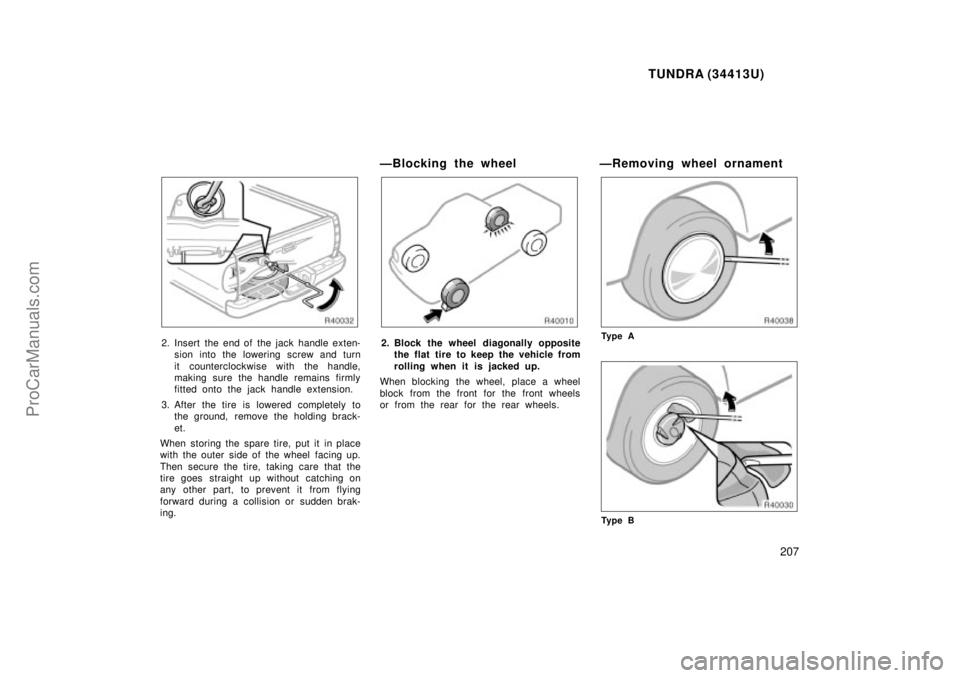
2. Insert the end of the jack handle exten-sion into the lowering screw and turn
it counterclockwise with the handle,
making sure the handle remains firmly
fitted onto the jack handle extension.
3. After the tire is lowered completely to the ground, remove the holding brack-
et.
When storing the spare tire, put it in place
with the outer side of the wheel facing up.
Then secure the tire, taking care that the
tire goes straight up without catching on
any other part, to prevent it from flying
forward during a collision or s udden brak-
ing.
ÐBlocking the wheel
2. Block the wheel diagonally opposite the flat tire to keep the vehicle from
rolling when it is j acked up.
When blocking the wheel, place a wheel
block from the front for the front wheels
or from the rear for the rear wheels.
ÐRemoving wheel ornament
Ty p e A
Ty p e B
ProCarManuals.com
Page 211 of 283
TUNDRA (34413U)
211
ÐLowering your vehicle
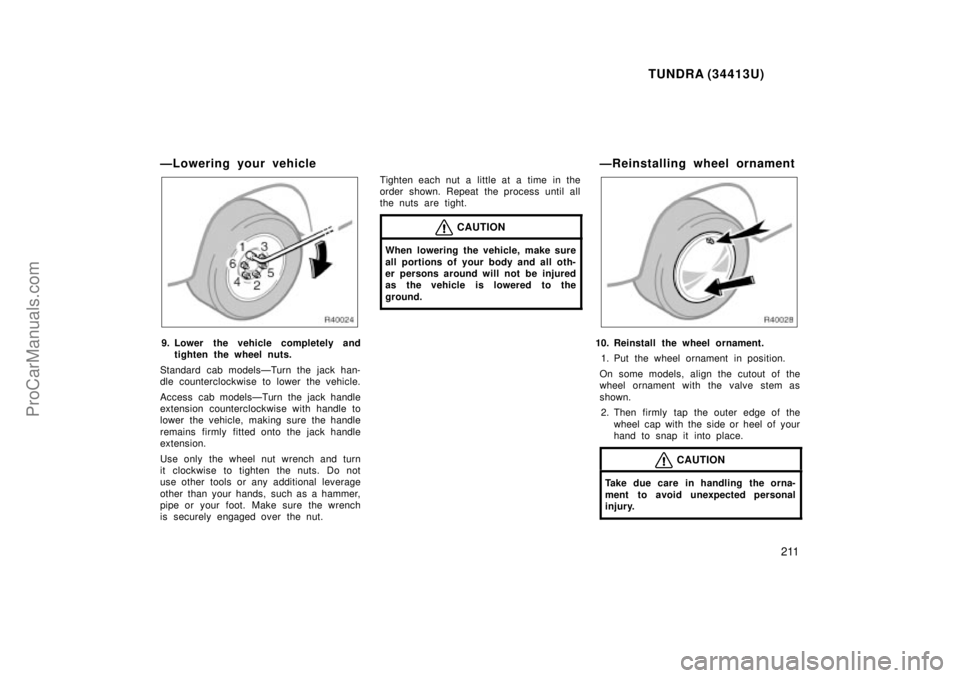
9. Lower the vehicle completely andtighten the wheel nuts.
Standard cab modelsÐTurn the jack han-
dle counterclockwise to lower the vehicle.
Access cab modelsÐTurn the jack handle
extension counterclockwise with handle to
lower the vehicle, making sure the handle
remains firmly fitted onto the jack handle
extension.
Use only the wheel nut wrench and turn
it clockwise to tighten the nuts. Do not
use other tools or any additional leverage
other than your hands, such as a hammer,
pipe or your foot. Make sure the wrench
is securely engaged over the nut. Tighten each nut a little at a time in the
order shown. Repeat the process until all
the nuts are tight.
CAUTION
When lowering the vehicle, make sure
all portions of your body and all oth-
er persons around will not be injured
as the vehicle is lowered to the
ground.
ÐReinstalling wheel ornament
10. Reinstall the wheel ornament.
1. Put the wheel ornament in position.
On some models, align the cutout of the
wheel ornament with the valve stem as
shown. 2. Then firmly tap the outer edge of the wheel cap with the side or heel of your
hand to snap it into place.
CAUTION
Take due care in handling the orna-
ment to avoid unexpected personal
injury.
ProCarManuals.com
Page 212 of 283
TUNDRA (34413U)
212
ÐAfter changing wheels
11. Check the air pressure of the re-placed tire.
Adjust the air pressure to the specification
designated in Part 8. If the pressure is
lower, drive slowly to the nearest service
station and fill to the correct pressure.
Do not forget to reinstall the tire inflation
valve cap as dirt and moisture could get
into the valve core and possibly cause air
leakage. If the cap is missing, have a new
one put on as soon as possible.
12. Restow all the tools, jack and flat tire securely.
As soon after changing wheels as pos-
sible, tighten the wheel nuts to the torque
specified in Part 8 with a torque wrench
and have a technician repair the flat tire.
CAUTION
Before driving, make sure all the
tools, jack and flat tire are securely
in place in their storage location to
reduce the possibility of personal in-
jury during a collision or s udden
braking.
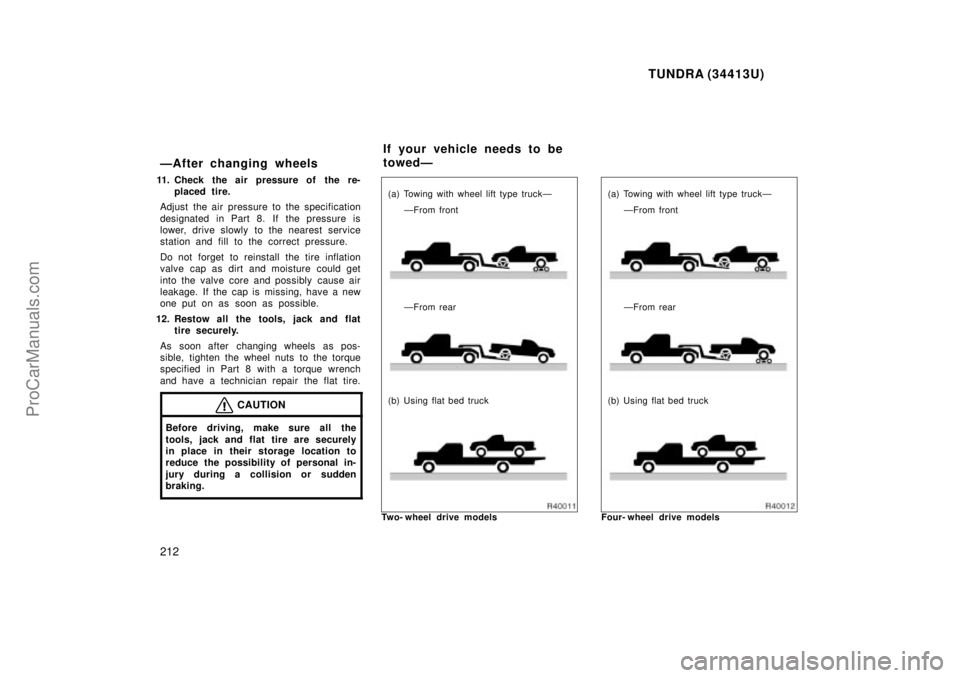
ÐFrom front
(a) Towing with wheel lift type truckÐ
ÐFrom rear
(b) Using flat bed truck
Two- wheel drive modelsÐFrom front
(a) Towing with wheel lift type truckÐ
ÐFrom rear
(b) Using flat bed truck
Four- wheel drive models
If your vehicle needs to be
towedÐ
ProCarManuals.com
Page 215 of 283
TUNDRA (34413U)
215
If towing is necessary, we recommend
you to have it done by your Toyota
dealer or a commercial tow truck ser-
vice.
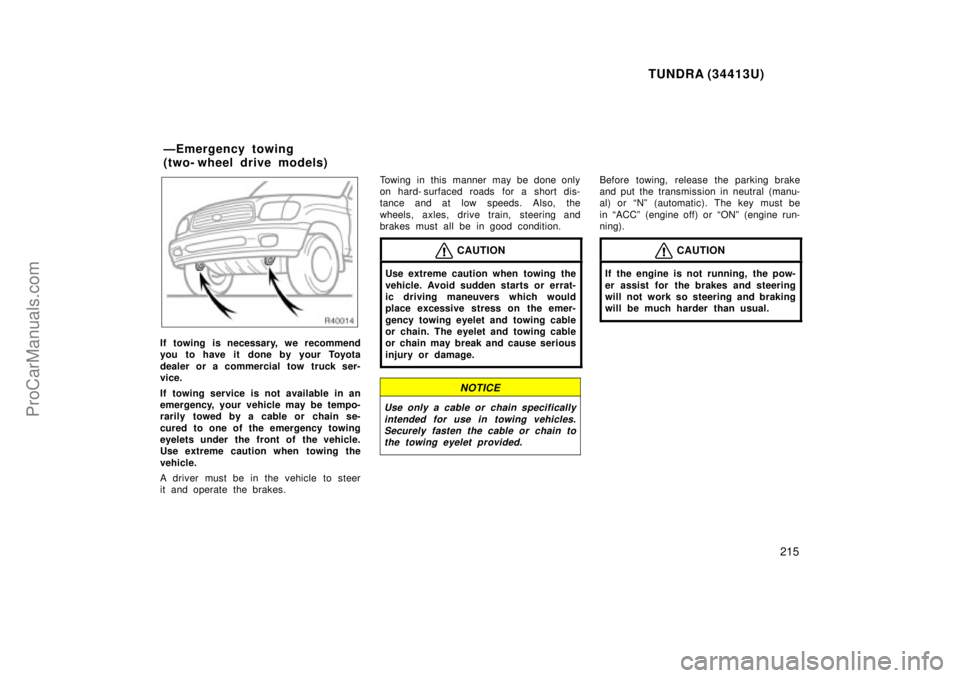
If towing service is not available in an
emergency, your vehicle may be tempo-
rarily towed by a cable or chain se-
cured to one of the emergency towing
eyelets under the front of the vehicle.
Use extreme caution when towing the
vehicle.
A driver must be in the vehicle to steer
it and operate the brakes.Towing in this manner may be done only
on hard- surfaced roads for a short dis-
tance and at low speeds. Also, the
wheels, axles, drive train, steering and
brakes must all be in good condition.
CAUTION
Use extreme caution when towing the
vehicle. Avoid sudden starts or errat-
ic driving maneuvers which would
place excessive stress on the emer-
gency towing eyelet and towing cable
or chain. The eyelet and towing cable
or chain may break and cause serious
injury or damage.
NOTICE
Use only a cable or chain specifically
intended for use in towing vehicles.Securely fasten the cable or chain tothe towing eyelet provided.
Before towing, release the parking brake
and put the transmission in neutral (manu-
al) or Nº (automatic). The key must be
in ACCº (engine off) or ONº (engine run-
ning).
CAUTION
If the engine is not running, the pow-
er assist for the brakes and steering
will not work so steering and braking
will be much harder than usual.
ÐEmergency towing
(two- wheel drive models)
ProCarManuals.com
Page 216 of 283
TUNDRA (34413U)
216
If towing is necessary, we recommend
you to have it done by your Toyota
dealer or a commercial tow truck ser-
vice.
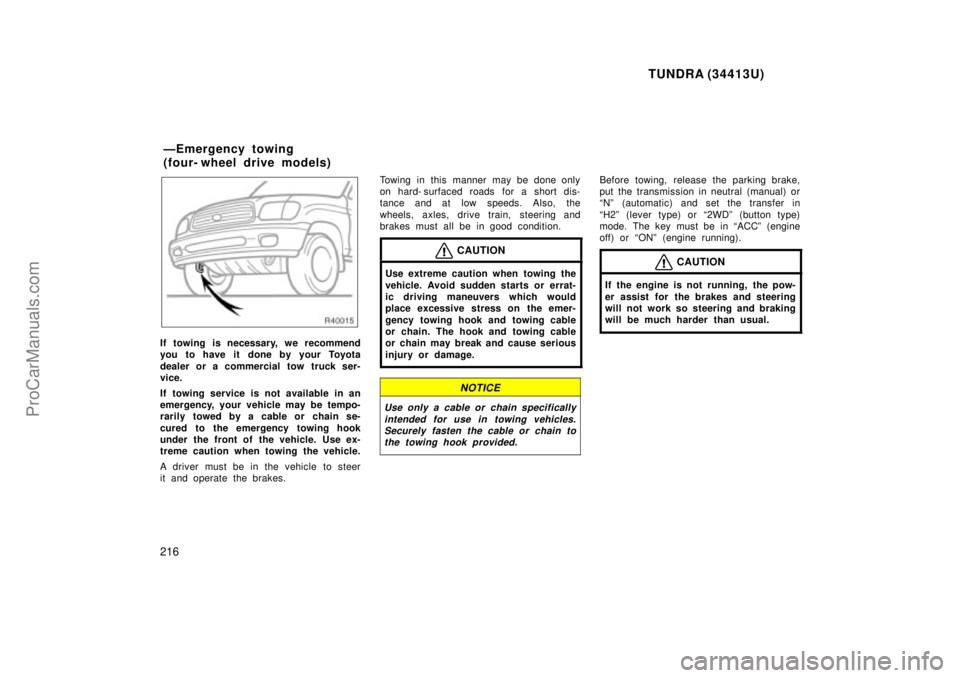
If towing service is not available in an
emergency, your vehicle may be tempo-
rarily towed by a cable or chain se-
cured to the emergency towing hook
under the front of the vehicle. Use ex-
treme caution when towing the vehicle.
A driver must be in the vehicle to steer
it and operate the brakes.Towing in this manner may be done only
on hard- surfaced roads for a short dis-
tance and at low speeds. Also, the
wheels, axles, drive train, steering and
brakes must all be in good condition.
CAUTION
Use extreme caution when towing the
vehicle. Avoid sudden starts or errat-
ic driving maneuvers which would
place excessive stress on the emer-
gency towing hook and towing cable
or chain. The hook and towing cable
or chain may break and cause serious
injury or damage.
NOTICE
Use only a cable or chain specifically
intended for use in towing vehicles.Securely fasten the cable or chain tothe towing hook provided.
Before towing, release the parking brake,
put the transmission in neutral (manual) or
Nº (automatic) and set the transfer in
H2º (lever type) or 2WDº (button type)
mode. The key must be in ACCº (engine
off) or ONº (engine running).
CAUTION
If the engine is not running, the pow-
er assist for the brakes and steering
will not work so steering and braking
will be much harder than usual.
ÐEmergency towing
(four- wheel drive models)
ProCarManuals.com
Page 227 of 283

TUNDRA (34413U)
227
Tire surface and wheel nuts
Check the tires carefully for cuts, damage
or excessive wear. See Chapter 7- 2 for
additional information. When checking the
tires, make sure no nuts are missing, and
check the nuts for looseness. Tighten
them if necessary.
Tire rotation
Rotate the tires every 12000 km (7500
miles). See Chapter 7- 2 for additional in-
formation.
Fluid leaks
Check underneath for leaking fuel, oil, wa-
ter or other fluid after the vehicle has
been parked for a while. If you smell fuel
fumes or notice any leak, have the cause
found and corrected immediately.
Doors and engine hood
Check that all doors including tailgate op-
erate smoothly and all latches lock se-
curely. Make sure the engine hood sec-
ondary latch secures the hood from
opening when the primary latch is re-
leased.INSIDE THE VEHICLE
Items listed below should be checked
regularly, e.g. while performing periodic
services, cleaning the vehicle, etc.
Lights
Make sure the headlights, stop lights, tail
lights, turn signal lights, and other lights
are all working. Check headlight aim.
Service reminder indicators and warning
buzzers
Check that all service reminder indicators
and warning buzzers function properly.
Steering wheel
Be alert for changes in steering condition,
such as hard steering or strange noise.
Seats
Check that all seat controls such as seat
adjusters, seatback recliner, etc. operate
smoothly and that all latches lock securely
in any position. Check that the head re-
straints move up and down smoothly and
that the locks hold securely in any latched
position. For folding- down seatback
(bench seat), check that the latches lock
securely.Seat belts
Check that the seat belt system such as
buckles, retractors and anchors operate
properly and smoothly. Make sure the belt
webbing is not cut, frayed, worn or dam-
aged.
Accelerator pedal
Check the pedal for smooth operation and
uneven pedal effort or catching.
Clutch pedal
Check the pedal for smooth operation.
Brake pedal
Check the pedal for smooth operation and
that the pedal has the proper clearance.
Check the brake booster function.
Brakes
At a safe place, check that the brakes do
not pull to one side when applied.
Parking brake (pedal type)
Check that the pedal has the proper travel
and that, on a safe incline, your vehicle
is held securely with only the parking
brake applied.
ProCarManuals.com
Page 228 of 283

TUNDRA (34413U)
228
Parking brake (lever type)
Check that the lever has the proper travel
and that, on a safe incline, your vehicle
is held securely with only the parking
brake applied.
Automatic transmission Parkº mecha-
nism
On a safe incline, check that your vehicle
is held securely with the selector lever in
Pº position and all brakes released.
IN THE ENGINE COMPARTMENT
Items listed below should be checked
from time to time, e.g. each time when
refueling.
Washer fluid
Make sure there is sufficient fluid in the
tank. See Chapter 7- 3 for additional in-
formation.
Engine coolant level
Make sure the coolant level is between
the Fº and Lº lines on the see- through
reservoir when the engine is cold. See
Chapter 7- 2 for additional information.Battery electrolyte level
Make sure the electrolyte level of all bat-
tery cells is between upper and lower lev-
el lines on the case. Add only distilled
water when replenishing. See Chapter 7- 3
for additional information.
Brake fluid level
Make sure the brake fluid level is correct.
See Chapter 7- 2 for additional information.
Engine oil level
Check the level on the dipstick with the
engine turned off and the vehicle parked
on a level spot. See Chapter 7- 2 for addi-
tional information.
Power steering fluid level (5VZ- FE en-
gine)
Check the level on the dipstick. The level
should be in the HOTº or COLDº range
depending on the fluid temperature. See
Chapter 7- 2 for additional information.
Power steering fluid level (2UZ- FE en-
gine)
Check the level through the reservoir. The
level should be in the HOTº or COLDº
range depending on the fluid temperature.
See Chapter 7- 2 for additional information.Exhaust system
If you notice any change in the sound of
the exhaust or smell exhaust fumes, have
the cause located and corrected immedi-
ately. (See engine exhaust cautions in
Part 2.)
ProCarManuals.com