2000 TOYOTA LAND CRUISER light
[x] Cancel search: lightPage 147 of 235
L/C 100_U169
2000 L/C 100 (OM60866U)
For detailed information on oil level check,
see ”Checking the engine oil level” in Sec-
tion 7
−2.
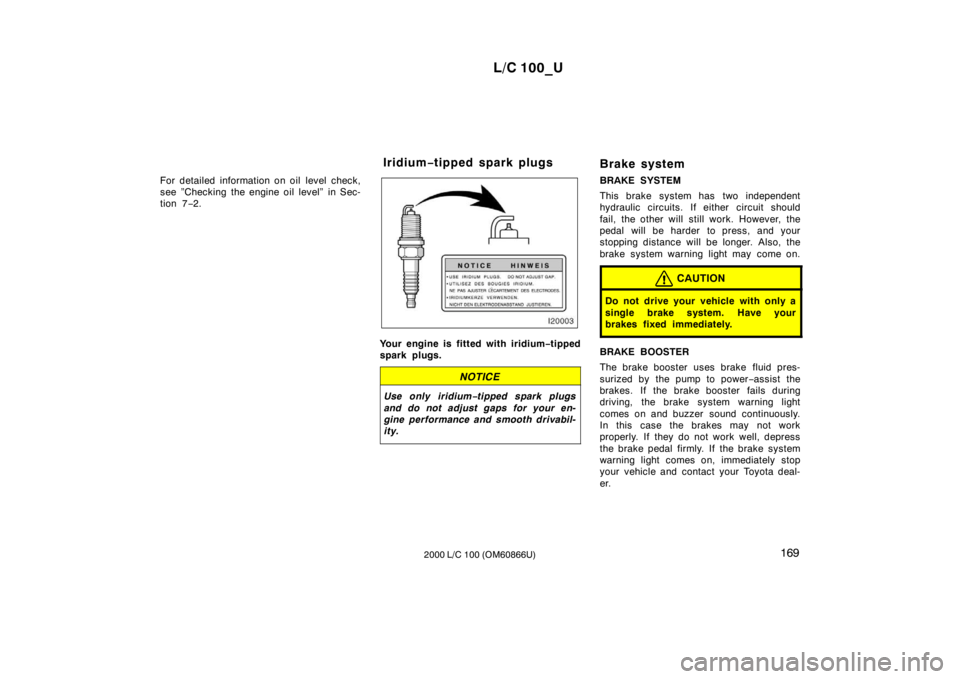
Your engine is fitted with iridium −tipped
spark plugs.
NOTICE
Use only iridium −tipped spark plugs
and do not adjust gaps for your en-
gine performance and smooth drivabil-
ity.
Brake system
BRAKE SYSTEM
This brake system has two independent
hydraulic circuits. If either circuit should
fail, the other will still work. However, the
pedal will be harder to press, and your
stopping distance will be longer. Also, the
brake system warning light may come on.
CAUTION
Do not drive your vehicle with only a
single brake system. Have your
brakes fixed immediately.
BRAKE BOOSTER
The brake booster uses brake fluid pres-
surized by the pump to power −assist the
brakes. If the brake booster fails during
driving, the brake system warning light
comes on and buzzer sound continuously.
In this case the brakes may not work
properly. If they do not work well, depress
the brake pedal firmly. If the brake system
warning light comes on, immediately stop
your vehicle and contact your Toyota deal-
er.
Iridium
−tipped spark plugs
Page 148 of 235
L/C 100_U
170 2000 L/C 100 (OM60866U)
There may be the case that the brake
system warning light stays on for a
bout
60 seconds after the engine is started. It
is normal if the light goes out after a
while.
Depressing the brake pedal repeatedly
may turn on the brake system warning
light and buzzer. It is normal if the light
goes out and the buzzer stops sounding
after a few seconds.
You may hear a small sound in the engine
compartment after the engine is started or
the brake pedal is depressed repeatedly.
This is a pump pulsating sound of the
brake system, and it is not a malfunction.
CAUTION
� Do not pump the brake pedal if the
engine stalls. Each push on the
pedal uses up your brake fluid
pressure reserve.
� Even if the power assist is com-
pletely lost, the brakes will still
work. But you will have to push the
pedal hard, much harder than nor-
mal. And your braking distance will
be longer.
ANTI −LOCK BRAKE SYSTEM
(with “ABS” warning light)
The anti −lock brake system is designed
to help prevent lock −up of the wheels
during a sudden braking or braking on
slippery road surfaces. This assists in
providing stability and steering perfor-
mance of the vehicle under these cir-
cumstances.
Effective way to press the ”ABS” brake
pedal: When the anti −lock brake system
function is in action, just hold the brake
pedal down more firmly. Especially in a
panic stop, you need to keep it de-
pressed more firmly, and do not pump
the brake. Pumping the brake pedal
makes the stopping distance longer.
The anti −lock brake system becomes op-
erative after the vehicle has accelerated
to a speed in excess of approximately 10
km/h (6 mph). It stops operating when the
vehicle decelerates to a speed below
approximately 5 km/h (3 mph).
Depressing the brake pedal on slippery
road surfaces such as on the manhole
cover, the steel plate under the construc-
tion, joints in the bridge, etc. on a rainy
day tends to activate the anti −lock brake
system. You may hear a click or motor sound in
the engine compartment for a few seconds
when the engine is started or just after
the vehicle is started. This means that the
anti
−lock brake system is in the self
check mode, and does not indicate a mal-
function.
When the anti −lock brake system is ac-
tivated, the following conditions may
occur, however, do not indicate a mal-
function of the system:
� You may hear the anti −lock brake sys-
tem operating and feel the brake pedal
pulsating and the vibrations of the body
and steering wheel. You may also hear
the motor sound in the engine compart-
ment even after the vehicle is stopped.
� At the end of the anti −lock brake sys-
tem activation, the brake pedal may
move a little forward.
Page 149 of 235
L/C 100_U171
2000 L/C 100 (OM60866U)
CAUTION
Do not overestimate the anti −lock
brake system: Although the anti −lock
brake system assists in providing ve-
hicle control, it is still important to
drive with all due care and maintain
a moderate speed and safe distance
from the vehicle in front of you, be-
cause there are limits to the vehicle
stability and effectiveness of steering
wheel operation even with the anti −
lock brake system on.
If tires grip performance exceeds its
capability, or if hydroplaning occurs
during high speed driving in the rain,
the anti −lock brake system does not
provide vehicle control.
Anti −lock brake system is not de-
signed to shorten the stopping dis-
tance: Always drive at the moderate
speed and maintain a safe distance
from the vehicle in front of you.
Compared with vehicles not fitted
with an anti −lock brake system, your
vehicle may require a longer stopping
distance in the following cases: � Driving on rough, gravel or snow −
covered roads.
� Driving with tire chains installed.
� Driving over the steps such as the
joints on the road.
� Driving on roads where the road
surface is pitted or has other differ-
ences in surface height.
Install all 4 tires of specified size at
designated pressure: The anti −lock
brake system detects vehicle speeds
using the speed sensors for respec-
tive wheels’ turning speeds. The use
of tires other than specified may fail
to detect the accurate turning speed,
resulting in a longer stopping dis-
tance.
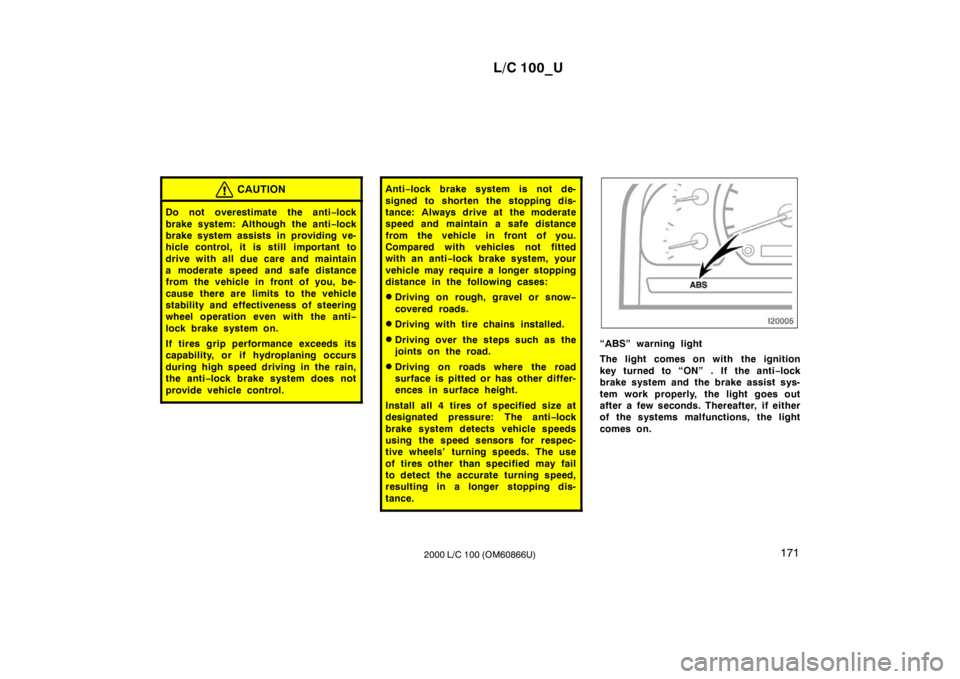
“ABS” warning light
The light comes on with the ignition
key turned to “ON” . If the anti −lock
brake system and the brake assist sys-
tem work properly, the light goes out
after a few seconds. Thereafter, if either
of the systems malfunctions, the light
comes on.
Page 150 of 235
L/C 100_U
172 2000 L/C 100 (OM60866U)
When the “ABS” warning light is on (and
the brake system warning light is off), the
anti
−lock brake system, the brake assist
system, the vehicle skid control system
and/or active traction control system do/
does not operate, but the brake system
still operates conventionally.
When the “ABS” warning light is on (and
the brake system warning light is off), the
anti −lock brake system does not operate
so that the wheels could lock up during
a sudden braking or braking on slippery
road surfaces.
If the following conditions occurs, this
indicates a malfunction somewhere in
the parts monitored by the warning
light system. Contact your Toyota deal-
er as soon as possible to service the
vehicle.
� The light does not come on with the
ignition key turned to “ON”, or remainson.
� The light comes on while driving.
If the light lit during driving goes out and
does not come on again, it is a normal
operation.
CAUTION
If the “ABS” warning light remains on
together with the brake system warn-
ing light, immediately stop your ve-
hicle at a safe place and contact your
Toyota dealer.
In this case, the vehicle may become
harder to control or skid during hard
braking or braking on slippery road
surfaces.
Either of the following conditions may
occur, but do not indicate the malfunc-
tion. � The light may stay on for about 60
seconds after the engine is started. It
is normal if it goes out after a while.
� Depressing the brake pedal repeatedly
may turn on the light. It is normal if it
goes off after a few seconds. DRUM
−IN −DISC TYPE PARKING BRAKE
SYSTEM
Your vehicle has a drum −in −disc type
parking brake system. This type of brake
system n eeds bedding −down of the brake
shoes periodically or whenever the parking
brake shoes and/or drums are replaced.
Have your Toyota dealer perform the bed-
ding −down.
BRAKE ASSIST SYSTEM
When you slam the brakes on, the
brake assist system judges as an emer-
gency stop and provides more powerful
braking for a driver who cannot hold
down the brake pedal firmly.
When you slam the brakes on, more pow-
erful braking will be applied. At this time,
you may hear a sound in the engine
compartment and feel the vibrations of the
brake pedal. This does not indicate a mal-
function.
The brake assist system becomes opera-
tive after the vehicle has accelerated to
a speed in excess of approximately 10
km/h (6 mph). It stops operating when the
vehicle decelerates to a speed below
approximately 5 km/h (3 mph).
Page 151 of 235
L/C 100_U173
2000 L/C 100 (OM60866U)
The brake assist system may not work for
about 60 seconds after the engine is
started.
For an explanation of this system’s warn-
ing light, see “Service reminder indicators
and warning buzzers” in Section 1
−5. Brake pad wear limit indicators
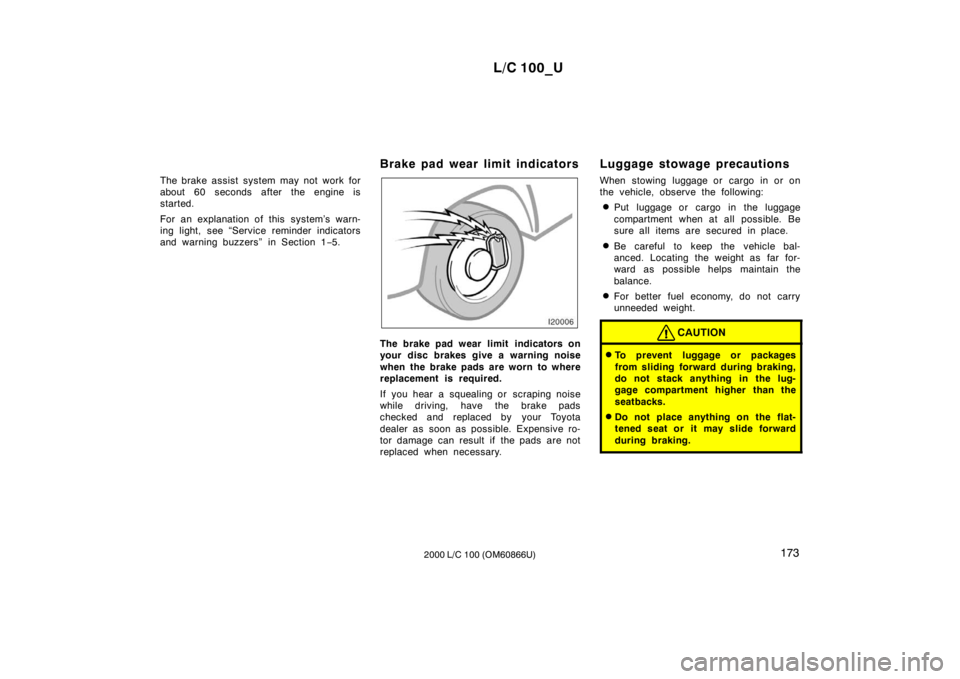
The brake pad wear limit indicators on
your disc brakes give a warning noise
when the brake pads are worn to where
replacement is required.
If you hear a squealing or scraping noise
while driving, have the brake pads
checked and replaced by your Toyota
dealer as soon as possible. Expensive ro-
tor damage can result if the pads are not
replaced when necessary. Luggage stowage pr
ecautions
When stowing luggage or cargo in or on
the vehicle, observe the following: � Put luggage or cargo in the luggage
compartment when at all possible. Be
sure all items are secured in place.
� Be careful to keep the vehicle bal-
anced. Locating the weight as far for-
ward as possible helps maintain the
balance.
� For better fuel economy, do not carry
unneeded weight.CAUTION
�To prevent luggage or packages
from sliding forward during braking,
do not stack anything in the lug-
gage compartment higher than the
seatbacks.
� Do not place anything on the flat-
tened seat or it may slide forward
during braking.
Page 158 of 235
L/C 100_U
194 2000 L/C 100 (OM60866U)
Before making these checks, make sure
you have followed the correct starting
procedure given in ”How to start the
engine” in Section 3 and that you have
sufficient fuel. Also check whether the
other keys will start the engine. If they
work, your key may be broken. Have the
key checked at your Toyota dealer. If
none of your keys work, the system is
possibly broken. Call your Toyota dealer.
(See ”Keys” in Section 1
−2.)
If the engine is not turning over or is
turning over too slowly— 1. Check that the battery terminals are tight and clean.
2. If the battery terminals are O.K., switch on the interior light.
3. If the light is out, dim or goes out when the starter is cranked, the battery
is discharged. You may try jump start-
ing. See ”(c) Jump starting” for further
instructions. If the light is O.K., but the engine still will
not start, it needs adjustment or repair.
Call a Toyota dealer or qualified repair
shop.
NOTICE
Do not pull
− or push −start the ve-
hicle. It may damage the vehicle or
cause a collision when the engine
starts. Also the three −way catalytic
converter may overheat and become a
fire hazard.
If the engine turns over at its normal
speed but will not start—
1. The engine may be flooded because of repeated cranking. See ”(b) Starting a
flooded engine” for further instructions.
2. If the engine still will not start, it needs adjustment or repair. Call a Toyota
dealer or qualified repair shop.
If your vehicle will not start—
(a) Simple checks
Page 159 of 235
L/C 100_U195
2000 L/C 100 (OM60866U)
(b) Starting a flooded engine
If the engine will not start, your engine
may be flooded because of repeated
cranking.
If this happens, turn the key to ”START”
with the accelerator pedal held down.
Keep the key and accelerator pedal so for
15 seconds and release them. Then try
starting the engine with your foot off the
accelerator pedal.
If the engine does not start after 15 se-
conds of cranking, release the key, wait
a few minutes and try again.
If the engine still will not start, it needs
adjustment or repair. Call a Toyota dealer
or qualified repair shop for assistance.
NOTICE
Do not crank for more than 30 se-
conds at a time. This may overheat
the starter and wiring systems.
(c) Jump starting
To avoid serious personal injury and
damage to your vehicle which might re-
sult from battery explosion, acid burns,
electrical burns, or damaged electronic
components, these instructions must be
followed precisely.
If you are unsure about how to follow this
procedure, we strongly recommend that
you seek the help of a competent me-
chanic or towing service.
CAUTION
�
Batteries contain sulfuric acid
which is poisonous and corrosive.
Wear protective safety glasses when
jump starting, and avoid spilling
acid on your skin, clothing, or ve-
hicle.
� If you should accidentally get acid
on yourself or in your eyes, remove
any contaminated clothing and flush
the affected area with water im-
mediately. Then get immediate medi-
cal attention. If possible, continue
to apply water with a sponge or
cloth while en route to the medical
office.
�The gas normally produced by a
battery will explode if a flame or
spark is brought near. Use only
standardized jumper cables and do
not smoke or light a match while
jump starting.
NOTICE
The battery used for boosting must
be 12 V. Do not jump start unless you
are sure that the booster battery is
correct.
Page 160 of 235
L/C 100_U
196 2000 L/C 100 (OM60866U)
JUMP STARTING PROCEDURE
1. If the booster battery is installed in another vehicle, make sure the vehicles
are not touching. Turn off all unneces-
sary lights and accessories.
2. If required, remove all the vent plugs from the booster and discharged batter-
ies. Lay a cloth over the open vents
on the batteries. (This helps reduce the
explosion hazard, personal injuries and
burns.)
3. If the engine in the vehicle with the booster battery is not running, start it
and let it run for a few minutes. During
jump starting, run the engine at about
2000 rpm with the accelerator pedal
lightly depressed.
Discharged battery
Positive
terminal
(“+” mark) Jumper
cable Booster
battery
Positive terminal
(“+” mark)
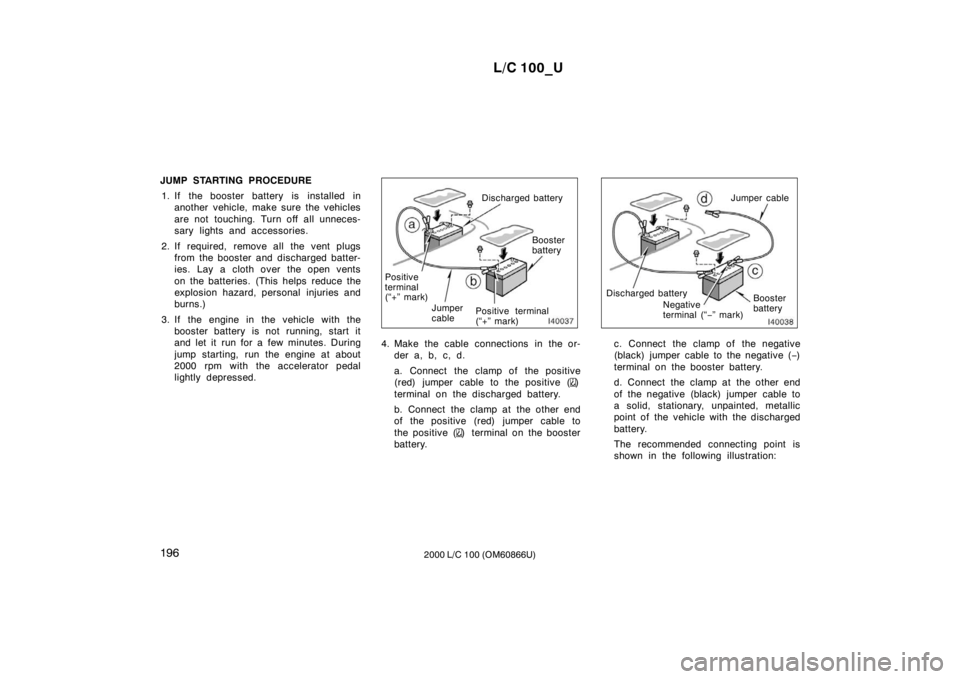
4. Make the cable connections in the or- der a, b, c, d.
a. Connect the clamp of the positive
(red) jumper cable to the positive (
)
terminal on the discharged battery.
b. Connect the clamp at the other end
of the positive (red) jumper cable to
the positive (
) terminal on the booster
battery.
Discharged battery Booster
battery
Negative
terminal (“
−” mark) Jumper cable
c. Connect the clamp of the negative
(black) jumper cable to the negative ( −)
terminal on the booster battery.
d. Connect the clamp at the other end
of the negative (black) jumper cable to
a solid, stationary, unpainted, metallic
point of the vehicle with the discharged
battery.
The recommended connecting point is
shown in the following illustration: