2000 TOYOTA LAND CRUISER spare tire
[x] Cancel search: spare tirePage 153 of 235
L/C 100_U175
2000 L/C 100 (OM60866U)
Limited
−slip differential
Some Toyotas are equipped with a lim-
ited −slip differential. If one of the rear
wheels begins to spin, the limited −slip dif-
ferential is designed to aid traction by
automatically transmitting driving force to
the other rear wheel. If you are not sure
whether your vehicle is equipped with one,
you can ask your Toyota dealer.
CAUTION
Do not start or run the engine while
your vehicle is supported by a jack.
The vehicle could be driven off the
jack and could pose a danger or re-
sult in serious injury.
NOTICE
Use only a spare tire of the same
size, construction and load capacity
as the original tires on your Toyota
because damage to the limited −slip
differential could possibly occur with
another tire type.
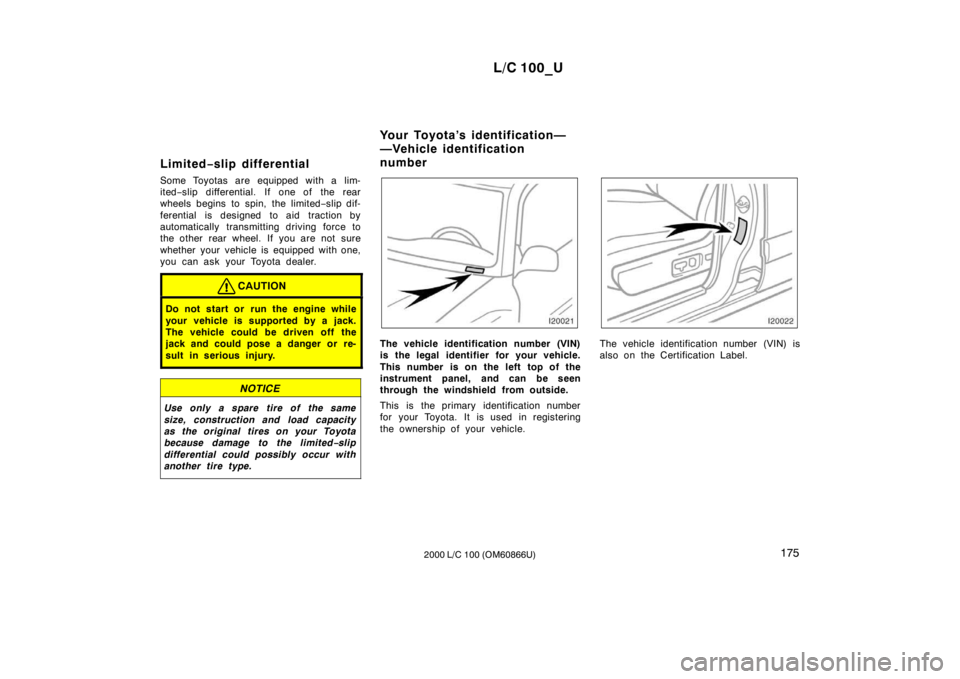
The vehicle identification number (VIN)
is the legal identifier for your vehicle.
This number is on the left top of the
instrument panel, and can be seen
through the windshield from outside.
This is the primary identification number
for your Toyota. It is used in registering
the ownership of your vehicle.The vehicle identification number (VIN) is
also on the Certification Label.
Your Toyota’s identification—
—Vehicle identification
number
Page 164 of 235

L/C 100_U
200 2000 L/C 100 (OM60866U)
NOTICE
Do not continue driving with a de-
flated tire. Driving even a short dis-
tance can damage a tire beyond re-
pair.
1. Get the required tools and spare
tire.
1 Tool bag
2 Jack
3 Spare tire
To prepare yourself for an emergency, you
should familiarize yourself with the use of
the jack, each of the tools and their stor-
age locations.
When storing the jack, put it in place and
secure to prevent it from flying forward
during a collision or sudden braking.Turn the jack joint by hand.
To remove: Turn the joint in direction 1
until the jack is free.
To store: Turn the joint in direction 2 until
the jack is firmly secured to prevent it
flying forward during a collision or sudden
braking.
— R eq u ired to o ls an d sp are
tire
Page 165 of 235
L/C 100_U201
2000 L/C 100 (OM60866U)
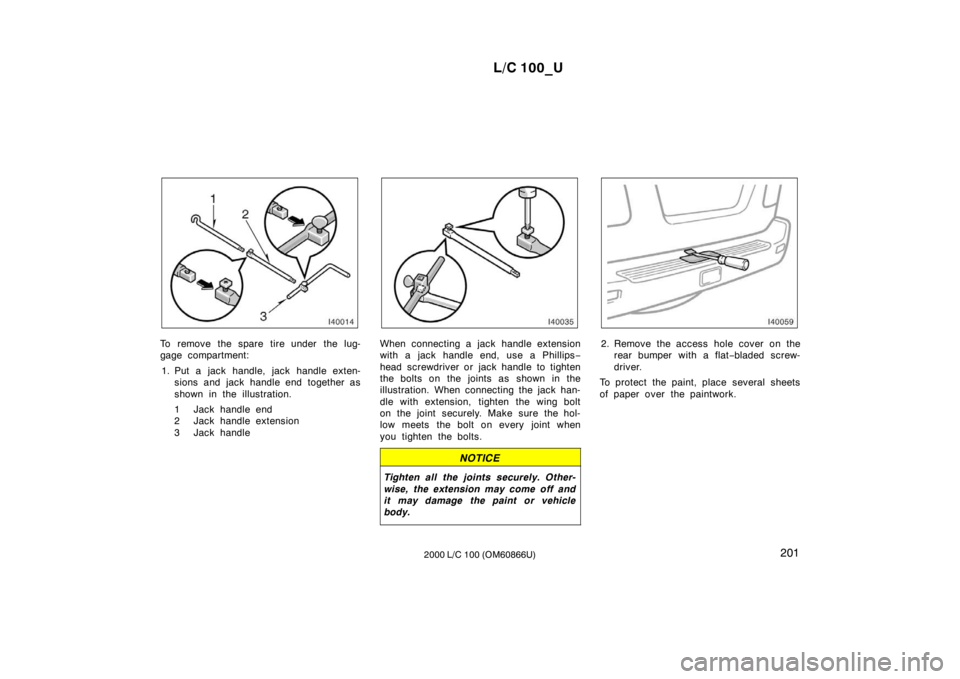
To remove the spare tire under the lug-
gage compartment:
1. Put a jack handle, jack handle exten- sions and jack handle end together as
shown in the illustration.
1 Jack handle end
2 Jack handle extension
3 Jack handleWhen connecting a jack handle extension
with a jack handle end, use a Phi llips−
head screwdriver or jack handle to tighten
the bolts on the joints as shown in the
illustration. When connecting the jack han-
dle with extension, tighten the wing bolt
on the joint securely. Make sure the hol-
low meets the bolt on every joint when
you tighten the bolts.
NOTICE
Tighten all the joints securely. Other-
wise, the extension may come off and
it may damage the paint or vehicle
body.
2. Remove the access hole cover on the rear bumper with a flat −bladed screw-
driver.
To protect the paint, place several sheets
of paper over the paintwork.
Page 166 of 235
L/C 100_U
202 2000 L/C 100 (OM60866U)
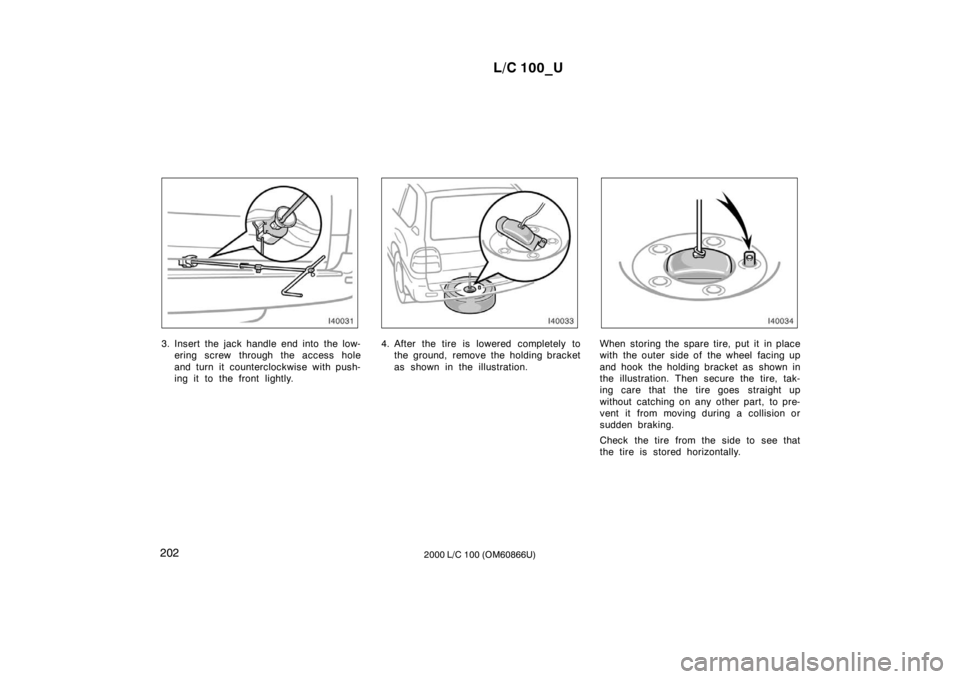
3. Insert the jack handle end into the low-
ering screw through the access hole
and turn it counterclockwise with push-
ing it to the front lightly.4. After the tire is lowered completely tothe ground, remove the holding bracket
as shown in the illustration.When storing the spare tire, put it in place
with the outer side of the wheel facing up
and hook the holding bracket as shown in
the illustration. Then secure the tire, tak-
ing care that the tire goes straight up
without catching on any other part, to pre-
vent it from moving during a collision or
sudden braking.
Check the tire from the side to see that
the tire is stored horizontally.
Page 169 of 235
L/C 100_U205
2000 L/C 100 (OM60866U)
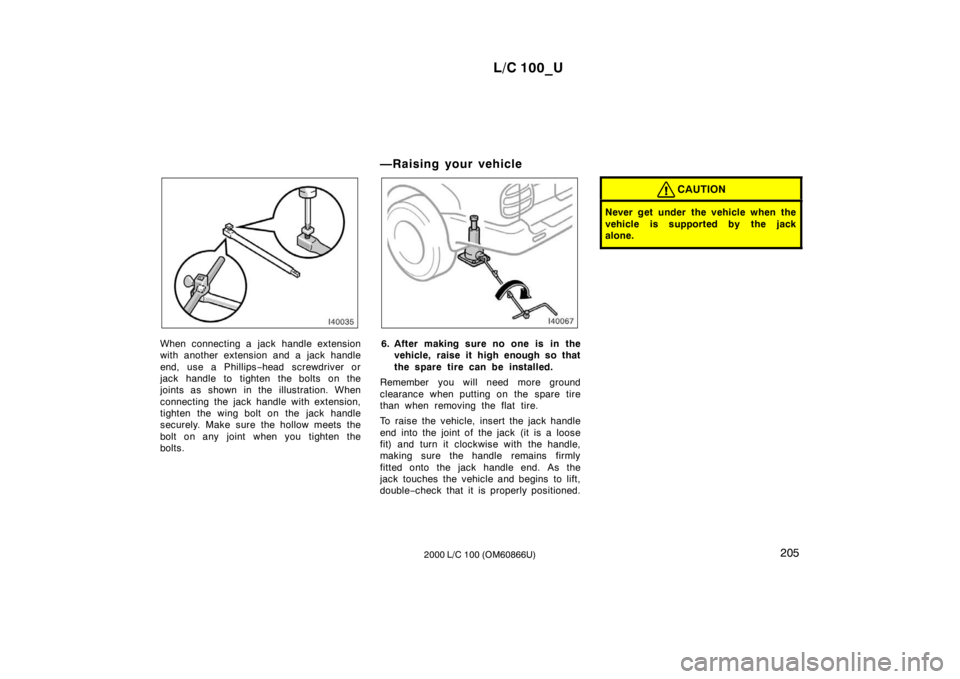
When connecting a jack handle extension
with another extension and a jack handle
end, use a Ph illips−head screwdriver or
jack handle to tighten the bolts on the
joints as shown in the illustration. When
connecting the jack handle with extension,
tighten the wing bolt on the jack handle
securely. Make sure the hollow meets the
bolt on any joint when you tighten the
bolts. —Raising your vehicle6. After making sure no one is in the
vehicle, raise it high enough so that
the spare tire can be installed.
Remember you will need more ground
clearance when putting on the spare tire
than when removing the flat tire.
To raise the vehicle, insert the jack handle
end into the joint of the jack (it is a loose
fit) and turn it clockwise with the handle,
making sure the handle remains firmly
fitted onto the jack handle end. As the
jack touches the vehicle and begins to lift,
double −check that it is properly positioned.
CAUTION
Never get under the vehicle when the
vehicle is supported by the jack
alone.
Page 170 of 235
L/C 100_U
206 2000 L/C 100 (OM60866U)
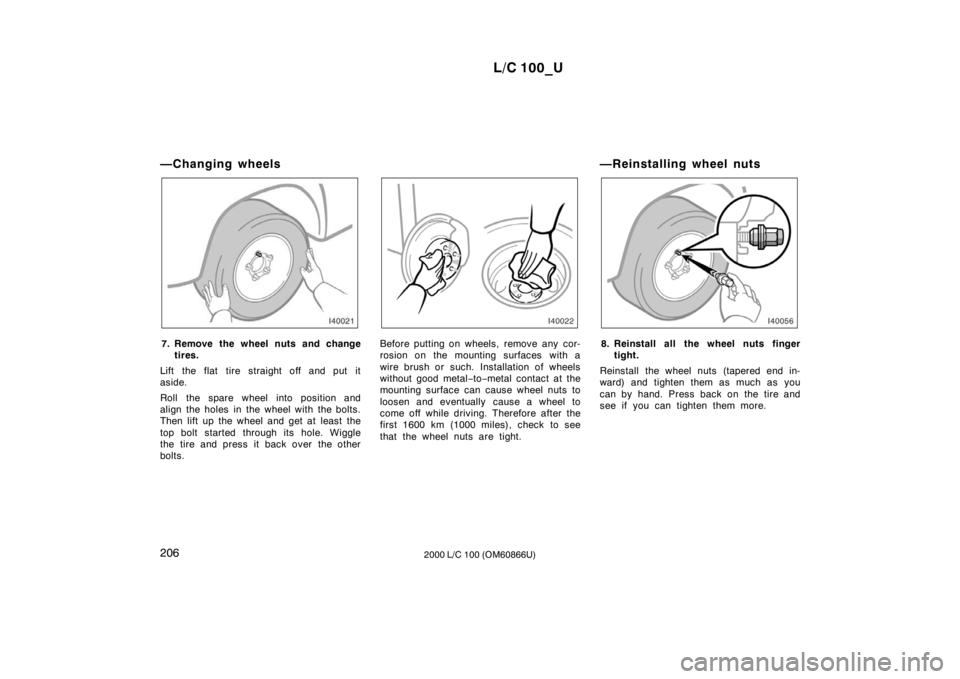
—Changing wheels
7. Remove the wheel nuts and change
tires.
Lift the flat tire straight off and put it
aside.
Roll the spare wheel into position and
align the holes in the wheel with the bolts.
Then lift up the wheel and get at least the
top bolt started through its hole. Wiggle
the tire and press it back over the other
bolts.Before putting on wheels, remove any cor-
rosion on the mounting surfaces with a
wire brush or such. Installation of wheels
without good metal −to −metal contact at the
mounting surface can cause wheel nuts to
loosen and eventually cause a wheel to
come off while driving. Therefore after the
first 1600 km (1000 miles), check to see
that the wheel nuts are tight. —Reinstalling wheel nuts8. Reinstall all the wheel nuts finger
tight.
Reinstall the wheel nuts (tapered end in-
ward) and tighten them as much as you
can by hand. Press back on the tire and
see if you can tighten them more.
Page 201 of 235

L/C 100_U237
2000 L/C 100 (OM60866U)
Checking tire pressure
Keep your tire pressures at the proper
level.
The recommended cold tire pressures, tire
size and the vehicle capacity weight are
given in Section 8.
You should check the tire pressures every
two weeks, or at least once a month. And
don’t forget the spare!
Incorrect tire pressure can reduce tire
life and make your vehicle less safe to
drive.
Low tire pressure results in excessive
wear, poor handling, reduced fuel econo-
my, and the possibility of blowouts from
overheated tires. Also, low tire pressure
can cause poor sealing of the tire bead.
If the tire pressure is excessively low,
there is the possibility of wheel deforma-
tion and/or tire separation.
High tire pressure produces a harsh ride,
handling problems, excessive wear at the
center of the tire tread, and a greater
possibility of tire damage from road haz-
ards.
If a tire frequently needs refilling, have it
checked by your Toyota dealer.
The following instructions for checking
tire pressure should be observed:
The pressure should be checked only
when the tires are cold. If your ve-
hicle has been parked for at least 3
hours and has not been driven for
more than 1.5 km or 1 mile since, you
will get an accurate cold tire pressure
reading.
Always use a tire pressure gauge.
The appearance of a tire can be mis-
leading. Besides, tire pressures that
are even just a few pounds off can
degrade handling and ride.
Do not bleed or reduce tire pressure
after driving. It is normal for the tire
pressure to be higher after driving.
Never exceed the vehicle capacity
weight. The passenger and luggage
weight should be located so that the
vehicle is balanced.
Be sure to reinstall the tire inflation
valve caps. Without the valve caps,
dirt or moisture could get into the valve
core and cause air leakage. If the caps
have been lost, have new ones put on
as soon as possible. Checking and replacing tires
Tread wear indicator
CHECKING YOUR TIRES
Check the tire tread for the tread wear
indicators. If the indicators show, re-
place the tires.
The tires on your Toyota have built −in
tread wear indicators to help you know
when the tires need replacement. When
the tread depth wears to 1.6 mm (0.06
in.) or less, the indicators will appear. If
you can see the indicators in two or more
adjacent grooves, the tire should be re-
placed. The lower the tread, the higher
the risk of skidding.
The effectiveness of snow tires is lost
if the tread wears down below 4 mm
(0.16 in.).
Page 202 of 235

L/C 100_U
238 2000 L/C 100 (OM60866U)
Check the tires regularly for damage
such as cuts, splits and cracks. If any
damage is found, consult with a techni-
cian and have the tire repaired or re-
placed.
Even if the damage does not appear seri-
ous, a qualified technician should examine
the damage. Objects which have pene-
trated the tire may have caused internal
damage.
Any tires which are over 6 years old
must be checked by a qualified techni-
cian even if damage is not obvious.
Tires deteriorate with age even if they
have never or seldom been used.
This also applies to the spare tire and
tires stored for future use.
REPLACING YOUR TIRES
When replacing a tire, use only the
same size and construction as original-
ly installed and with the same or great-
er load capacity.
Using any other size or type of tire may
seriously affect handling, ride, speedome-
ter/odometer calibration, ground clearance,
and clearance between the body and tires
or snow chains.
CAUTION
Do not mix radial, bias belted, or
bias −ply tires on your vehicle. It
can cause dangerous handling char-
acteristics, resulting in loss of con-
trol.
Do not use tires or wheels other
than the manufacturer ’s recom-
mended size.
Toyota recommends all four tires, or at
least both front or rear tires be re-
placed as a set.
See ”If you have a flat tire” in Section 4
for tire change procedure.
When a tire is replaced, the wheel
should always be balanced.
An unbalanced wheel may affect vehicle
handling and tire life. Wheels can get out
of balance with regular use and should
therefore be balanced occasionally.
When replacing a tubeless tire, the air
valve should also be replaced with a
new one. Rotating tires
To equalize tire wear and help extend
tire life, Toyota recommends that you
rotate your tires approximately every
12000 km (7500 miles). However, the
most appropriate timing for tire rotation
may vary according to your driving hab-
its and road surface conditions.
See ”If you have a flat tire” in Section 4
for tire change procedure.
When rotating tires, check for uneven
wear and damage. Abnormal wear is usu-
ally caused by incorrect tire pressure, im-
proper wheel alignment, out
−of −balance
wheels, or severe braking.